background image

60   

VQT2M98

VQT2M98

   61

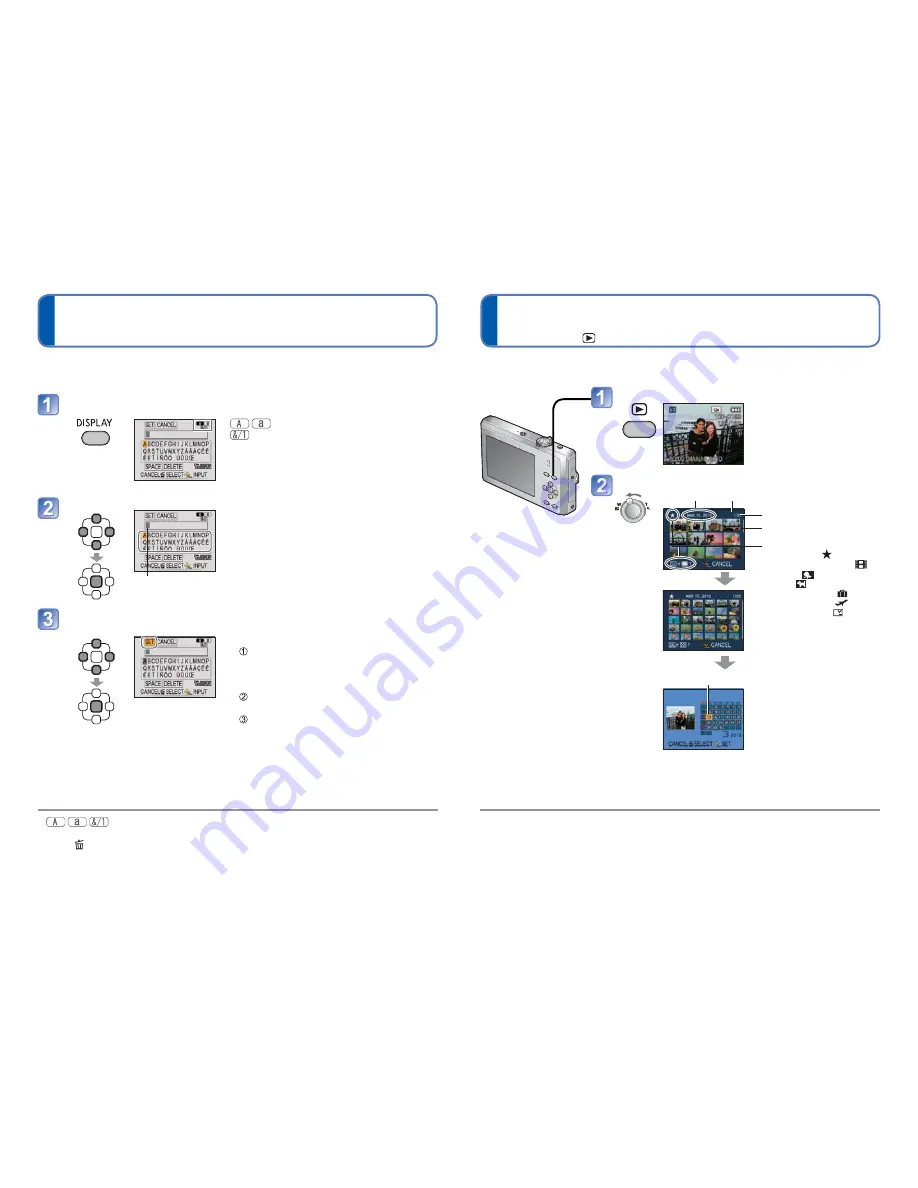
 Entering Text

 Viewing as list 

(Multi playback/Calendar playback)

Playback Mode: 

You can view 12 (or 30) pictures at once (Multi playback), or view all pictures taken on a 
certain date (Calendar playback).


To restore

Turn to T side


To change from 
12/30-screen 
display to single-
screen display

Select picture with 
 and press 
[MENU/SET]


Only months when pictures were taken are shown on the calendar screen. Pictures 
taken without clock settings are displayed with a date of the January 1st, 2010.


Cannot be displayed rotated.


Pictures displayed with [!] cannot be played back.


Pictures taken with destination settings made in [WORLD TIME] are displayed in the 
calendar screen using the appropriate date for the destination’s time zone.

Press the Playback button


• To view pictures: press

Set to multiple screen display

Scrolls 

with each 

turn to W 

side

Picture no.

Date recorded

Total no.

Scroll bar

Picture type


• [FAVORITE] 


• [MOTION PICTURE] 


• [BABY] 


• [PET] 


• [TRAVEL DATE] 


• [WORLD TIME] 


• [TEXT STAMP] 

(12 screens) 


(30 screens) 

Selected date (First picture from date)


• Select week with  and 

date with , and press 
[MENU/SET] to display 
that date’s pictures on a 
12-screen display.

(Calendar screen)

Use the cursor buttons to enter names in Scene Modes [BABY] and [PET], or to enter 
[LOCATION] names in [TRAVEL DATE]. 


: A maximum of 30 characters can be entered.


The entry position cursor can be moved left and right with the zoom lever.


Press   to return to the menu screen. 


Text is scrolled if it does not fit on the screen. 


To print the text you have specified, use [TEXT STAMP] (67) or use the 
‘PHOTOfunSTUDIO’ software on the CD-ROM (supplied).

(On the setting screen of each menu)

Select the type of character

Changes each 
time you press 
the button.


: Upper/lower case alphabet

: Symbols/numbers

Select characters and press [MENU/SET] 

(repeat)

Cursor position


• Text is inserted at the cursor position.

When you are finished entering text, select [SET] and press 
[MENU/SET]


Editing text

  Press  to move the cursor to text 

to edit.


• You can also use the zoom lever to 

reposition the cursor. 

  Press  to select [DELETE], and 

then press [MENU/SET].

  Press  to select the correct text, 

and then press [MENU/SET].

Содержание DMCFP2 - DIGITAL STILL CAMERA

Страница 1: ...WLQJ QVWUXFWLRQV LJLWDO DPHUD 0RGHO 1R 0 3 0 3 HIRUH FRQQHFWLQJ RSHUDWLQJ RU DGMXVWLQJ WKLV SURGXFW SOHDVH UHDG WKH LQVWUXFWLRQV FRPSOHWHO 3OHDVH DOVR UHIHU WR 2SHUDWLQJ QVWUXFWLRQV 3 IRUPDW UHFRUGHG RQ WKH 520 FRQWDLQLQJ WKH 2SHUDWLQJ QVWUXFWLRQV VXSSOLHG RX FDQ OHDUQ DERXW DGYDQFHG RSHUDWLRQ PHWKRGV DQG FKHFN WKH 7URXEOHVKRRWLQJ ...

Страница 2: ...WUROV DQG FRPSRQHQWV PHQX LWHPV HWF RI RXU LJLWDO DPHUD PD ORRN VRPHZKDW GLIIHUHQW IURP WKRVH VKRZQ LQ WKH LOOXVWUDWLRQV LQ WKHVH 2SHUDWLQJ QVWUXFWLRQV DUHIXOO REVHUYH FRS ULJKW ODZV 5HFRUGLQJ RI SUH UHFRUGHG WDSHV RU GLVFV RU RWKHU SXEOLVKHG RU EURDGFDVW PDWHULDO IRU SXUSRVHV RWKHU WKDQ RXU RZQ SULYDWH XVH PD LQIULQJH FRS ULJKW ODZV YHQ IRU WKH SXUSRVH RI SULYDWH XVH UHFRUGLQJ RI FHUWDLQ PDWHULDO...

Страница 3: ...RW WRXFK WKH SOXJ WHUPLQDOV DQG í ZLWK PHWDO REMHFWV R QRW GLVDVVHPEOH UHPRGHO KHDW RU WKURZ LQWR ILUH I DQ HOHFWURO WH VKRXOG FRPH LQWR FRQWDFW ZLWK RXU KDQGV RU FORWKHV ZDVK LW RII WKRURXJKO ZLWK ZDWHU I DQ HOHFWURO WH VKRXOG FRPH LQWR FRQWDFW ZLWK RXU H HV QHYHU UXE WKH H HV 5LQVH H HV WKRURXJKO ZLWK ZDWHU DQG WKHQ FRQVXOW D GRFWRU 87 21 DQJHU RI H SORVLRQ LI EDWWHU LV LQFRUUHFWO UHSODFHG 5HSOD...

Страница 4: ...UHDVH WKH VHSDUDWLRQ EHWZHHQ WKH HTXLSPHQW DQG UHFHLYHU RQQHFW WKH HTXLSPHQW LQWR DQ RXWOHW RQ D FLUFXLW GLIIHUHQW IURP WKDW WR ZKLFK WKH UHFHLYHU LV FRQQHFWHG RQVXOW WKH GHDOHU RU DQ H SHULHQFHG UDGLR 79 WHFKQLFLDQ IRU KHOS DXWLRQ 7R DVVXUH FRQWLQXHG FRPSOLDQFH IROORZ WKH DWWDFKHG LQVWDOODWLRQ LQVWUXFWLRQV DQG XVH RQO VKLHOGHG LQWHUIDFH FDEOHV ZLWK IHUULWH FRUH ZKHQ FRQQHFWLQJ WR FRPSXWHU RU SHUL...

Страница 5: ...LGHR JDPHV HWF I RX XVH WKH FDPHUD RQ WRS RI RU QHDU D 79 WKH SLFWXUHV DQG VRXQG RQ WKH FDPHUD PD EH GLVUXSWHG E HOHFWURPDJQHWLF ZDYH UDGLD LRQ R QRW XVH WKH FDPHUD QHDU FHOO SKRQHV EHFDXVH GRLQJ VR PD UHVXOW LQ QRLVH DGYHUVHO DIIHFWLQJ WKH SLFWXUHV DQG VRXQG 5HFRUGHG GDWD PD EH GDPDJHG RU SLFWXUHV PD EH GLVWRUWHG E VWURQJ PDJQHWLF ILHOGV FUHDWHG E VSHDNHUV RU ODUJH PRWRUV OHFWURPDJQHWLF ZDYH UDGL...

Страница 6: ...OW LQ PHPRU 6HWWLQJ WKH FORFN 6HWWLQJ WKH PHQX DVLFV 7DNLQJ SLFWXUHV ZLWK DXWRPDWLF VHWWLQJV 17 17 872 0RGH 6HOHFWLQJ WKH 5 PRGH 7DNLQJ PRWLRQ SLFWXUHV 027 21 3 785 0RGH 9LHZLQJ RXU SLFWXUHV 1250 3 HOHWLQJ SLFWXUHV 2WKHUV 5HDGLQJ WKH 2SHUDWLQJ QVWUXFWLRQV 3 IRUPDW 6SHFLILFDWLRQV 2SWLRQDO DFFHVVRULHV LJLWDO DPHUD FFHVVRU 2UGHU RUP LPLWHG DUUDQW 21 25 8 6 1 38 572 5 2 QIRUPDWLRQ IRU RXU 6DIHW ...

Страница 7: ...G DV EDWWHU FKDUJHU RU FKDUJHU LQ WKH WH W DWWHU DUU LQJ DVH 9 4 DQG 6WUDS 9 86 RQQHFWLRQ DEOH 9 DEOH 520 9 6RIWZDUH 8VH LW WR LQVWDOO WKH VRIWZDUH RQ RXU 3 2SHUDWLQJ QVWUXFWLRQV DUGV DUH RSWLRQDO RX FDQ UHFRUG RU SOD EDFN SLFWXUHV RQ WKH EXLOW LQ PHPRU ZKHQ RX DUH QRW XVLQJ D FDUG I DQ DFFHVVRULHV DUH ORVW FXVWRPHUV VKRXOG FRQWDFW 3DQDVRQLF V SDUWV GHSDUWPHQW DW IRU IXUWKHU LQIRUPDWLRQ DERXW REWD...

Страница 8: ...I WKH VWULS RI WDSH IURP WKH OHQV FRYHU EHIRUH XVLQJ WKH FDPHUD KHQ RSHQLQJ DQG FORVLQJ WKH OHQV FRYHU PDNH VXUH WKDW OLTXLG RU IRUHLJQ REMHFWV VXFK DV VDQG GR QRW HQWHU PRQLWRU 02 EXWWRQ XUVRU EXWWRQ 63 EXWWRQ 4 0 18 GHOHWH EXWWRQ 0LFURSKRQH 3RZHU EXWWRQ 3OD EDFN EXWWRQ 6SHDNHU EXWWRQ Ɣ H UHFRPPHQG RX XVH D EDWWHU ZLWK VXIILFLHQW EDWWHU SRZHU RU WKH DGDSWRU ZKHQ UHFRUGLQJ PRWLRQ SLFWXUHV ...

Страница 9: ...EXWWRQ Ź ODVK Ɣ Q WKLV PDQXDO WKH EXWWRQ WKDW LV XVHG LV VKDGHG RU LQGLFDWHG E ŸźŻŹ Ɣ OZD V XVH D JHQXLQH 3DQDVRQLF DGDSWRU 0 33 RSWLRQDO Ɣ I ZKLOH UHFRUGLQJ PRWLRQ SLFWXUHV XVLQJ WKH DGDSWRU WKH SRZHU VXSSO LV FXW RII GXH WR D SRZHU FXW RU LI WKH DGDSWRU LV GLVFRQQHFWHG HWF WKH PRWLRQ SLFWXUH EHLQJ UHFRUGHG ZLOO QRW EH UHFRUGHG 7KH LOOXVWUDWLRQV DQG VFUHHQV LQ WKLV PDQXDO PD GLIIHU IURP WKH DFWXD...

Страница 10: ... ZH ZRXOG UHFRPPHQG WKDW D JHQXLQH 3DQDVRQLF EDWWHU SDFN LV XVHG 8VH WKH GHGLFDWHG FKDUJHU DQG EDWWHU 7KH FDPHUD KDV D IXQFWLRQ IRU GLVWLQJXLVKLQJ EDWWHULHV ZKLFK FDQ EH XVHG VDIHO 7KH GHGLFDWHG EDWWHU 0 33 VXSSRUWV WKLV IXQFWLRQ 7KH RQO EDWWHULHV VXLWDEOH IRU XVH ZLWK WKLV XQLW DUH JHQXLQH 3DQDVRQLF SURGXFWV DQG EDWWHULHV PDQXIDFWXUHG E RWKHU FRPSDQLHV DQG FHUWLILHG E 3DQDVRQLF DWWHULHV ZKLFK GR ...

Страница 11: ...UHYLDWLRQ RI DPHUD PDJLQJ 3URGXFWV VVRFLDWLRQ 1250 3 785 0RGH 7HPSHUDWXUH XPLGLW ZKHQ PRQLWRU LV RQ 8VLQJ D 3DQDVRQLF 6 0HPRU DUG 0 8VLQJ WKH VXSSOLHG EDWWHU 6WDUWLQJ UHFRUGLQJ VHFRQGV DIWHU WKH FDPHUD LV WXUQHG RQ KHQ WKH RSWLFDO LPDJH VWDELOL HU IXQFWLRQ LV VHW WR 872 5HFRUGLQJ RQFH HYHU VHFRQGV ZLWK IXOO IODVK HYHU VHFRQG UHFRUGLQJ 5RWDWLQJ WKH RRP OHYHU IURP 7HOH WR LGH RU YLFH YHUVD LQ HYHU U...

Страница 12: ...VH JHQXLQH 3DQDVRQLF EDWWHULHV 0 33 Ɣ I RX XVH RWKHU EDWWHULHV ZH FDQQRW JXDUDQWHH WKH TXDOLW RI WKLV SURGXFW Ɣ7KH FDUG PD EH GDPDJHG LI LW LV QRW IXOO LQVHUWHG 7XUQ WKH FDPHUD RII DQG VOLGH WKH UHOHDVH OHYHU WR 23 1 EHIRUH RSHQLQJ WKH OLG RPSOHWHO LQVHUW EDWWHU DQG FDUG ERWK FOLFN LQWR SODFH R QRW WRXFK WHUPLQDO KHFN RULHQWDWLRQ ORVH OLG 6OLGH WR WKH 2 SRVLWLRQ 23 1 2 ...

Страница 13: ...DUG EDVHG FDUGV 3DQDVRQLF EUDQG UHFRPPHQGHG 7 SH RI DUG DSDFLW 1RWHV 6 PHPRU FDUGV 0 DQ EH XVHG ZLWK GHYLFHV FRPSD LEOH ZLWK WKH UHVSHF LYH IRUPDWV HIRUH XVLQJ 6 PHPRU FDUGV FKHFN WKDW RXU FRPSXWHU DQG RWKHU GHYLFHV VXSSRUW WKLV W SH RI FDUG KWWS SDQDVRQLF QHW DYF VGFDUG LQIRUPDWLRQ 6 KWPO DUGV LQ FDSDFLWLHV QRW OLVWHG DW OHIW DUH QRW VXSSRUWHG 6 PHPRU FDUGV 6 PHPRU FDUGV Ɣ I WKH ZULWH SURWHFW VZL...

Страница 14: ...VSOD HG 3UHVV WR VHOHFW WKH LWHPV HDU PRQWK GD KRXU PLQXWH GLVSOD RUGHU RU WLPH GLVSOD IRUPDW DQG SUHVV Ÿź WR VHW 7R FDQFHO ĺ 3UHVV 3UHVV 0 18 6 7 RQILUP WKH VHWWLQJ DQG SUHVV 0 18 6 7 7R UHWXUQ WR WKH SUHYLRXV VFUHHQ SUHVV 7XUQ RQ SRZHU DJDLQ DQG FKHFN WLPH GLVSOD Ŷ7R FKDQJH WLPH VHWWLQJ 6HOHFW 2 6 7 IURP 5 RU 6 783 PHQX SHUIRUP DQG R QRW WRXFK WKH OHQV ...

Страница 15: ... 3UHVV 0 18 6 7 WR GLVSOD WKH PHQX 6ZLWFKLQJ WR WKH 6 783 PHQX 3UHVV Ż 3UHVV ź WR VHOHFW WKH 6 783 PHQX LFRQ 3UHVV Ź 6HOHFW D PHQX LWHP QH W DQG VHW LW 3UHVV Ÿź WR VHOHFW 02 DQG WKHQ SUHVV Ź HSHQGLQJ RQ WKH LWHP LWV VHWWLQJ PD QRW DSSHDU RU LW PD EH GLVSOD HG LQ D GLIIHUHQW ZD 3UHVV Ÿź WR VHOHFW DQG WKHQ SUHVV 0 18 6 7 WR VHW 3UHVV 0 18 6 7 WR FORVH WKH PHQX ...

Страница 16: ... 6KXWWHU EXWWRQ 7KH SRZHU LV WXUQHG RQ 3UHVV 7DNH SLFWXUHV 3UHVV KDOIZD SUHVV OLJKWO DQG IRFXV 3UHVV IXOO SUHVV WKH EXWWRQ DOO WKH ZD WR UHFRUG I MLWWHU EHFRPHV QRWLFHDEOH XVH ERWK KDQGV NHHS RXU DUPV FORVH WR RXU ERG DQG VWDQG ZLWK RXU IHHW DW VKRXOGHU ZLGWK RFXV GLVSOD Q IRFXV OLW 1RW LQ IRFXV IODVKLQJ 7KH DUHD LV GLVSOD HG DURXQG WKH VXEMHFW V IDFH E WKH IDFH GHWHFWLRQ IXQFWLRQ Q RWKHU FDVHV LW...

Страница 17: ...H DQG QLJKW VFHQHU DUH GHWHFWHG 2QO ZKHQ LV VHOHFWHG L 6 1 5 6FHQHU LV GHWHFWHG L 1 7 6 1 5 1LJKW VFHQHU LV GHWHFWHG L 0 52 FORVH XS VKRW LV GHWHFWHG L 6816 7 VXQVHW LV GHWHFWHG 5HDGV VXEMHFW PRYHPHQW WR DYRLG EOXUULQJ ZKHQ VFHQH GRHV QRW FRUUHVSRQG WR DQ RI WKH DERYH I WKH FDPHUD DXWRPDWLFDOO LGHQWLILHV WKH VFHQH DQG GHWHUPLQHV WKDW SHRSOH DSSHDU DV VXEMHFWV LQ WKH SLFWXUH RU IDFH GHWHFWLRQ LV DF...

Страница 18: ...QHG RQ 3UHVV WKH 02 EXWWRQ 3UHVV Ÿ RU ź WR VHOHFW WKH UHFRUGLQJ PRGH 3UHVV 0 18 6 7 1250 3 785 0RGH 7DNH SLFWXUHV ZLWK RXU RZQ VHWWLQJV 0 6 1 02 7DNH SLFWXUHV LQ FRPPRQO XVHG VFHQH PRGHV 6 1 02 7DNH SLFWXUHV DFFRUGLQJ WR VFHQH 027 21 3 785 0RGH 7DNH PRWLRQ SLFWXUHV ...

Страница 19: ...LQJ WLPH DSSUR ROG GRZQ KDOIZD DGMXVW WKH IRFXV 3UHVV IXOO VWDUW UHFRUGLQJ QG UHFRUGLQJ 3UHVV IXOO Ɣ7KH IRFXV DQG RRP ZLOO UHPDLQ DV WKH ZHUH DW WKH EHJLQQLQJ RI UHFRUGLQJ Ɣ PPHGLDWHO UHOHDVH WKH VKXWWHU EXWWRQ DIWHU SUHVVLQJ LW DOO WKH ZD Ɣ KHQ WKHUH LV QR VSDFH OHIW WR VWRUH WKH PRWLRQ SLFWXUH UHFRUGLQJ DXWRPDWLFDOO HQGV Ɣ0RWLRQ SLFWXUHV FDQ EH UHFRUGHG FRQWLQXRXVO XS WR 7R UHFRUG PRUH WKDQ SUHV...

Страница 20: ...FWXUHV 3OD EDFN PRGH 3UHVV 3UHVV ŻŹ WR VHOHFW WKH SLFWXUH Ɣ7R SOD EDFN D PRWLRQ SLFWXUH VHOHFW DQ LPDJH ZLWK RU DQG WKHQ SUHVV Ÿ WR VWDUW SOD EDFN HOHWHG SLFWXUHV FDQQRW EH UHFRYHUHG 3UHVV WR GHOHWH GLVSOD HG SLFWXUH 3UHVV Ż WR VHOHFW 6 DQG WKHQ SUHVV 0 18 6 7 ...

Страница 21: ...RI VLWXDWLRQV UHIHU WR 2SHUDWLQJ QVWUXFWLRQV 3 IRUPDW UHFRUGHG RQ WKH 520 FRQWDLQLQJ WKH 2SHUDWLQJ QVWUXFWLRQV VXSSOLHG Ŷ RU LQGRZV 7XUQ WKH 3 RQ DQG LQVHUW WKH 520 FRQWDLQLQJ WKH 2SHUDWLQJ QVWUXFWLRQV VXSSOLHG OLFN WKH 2SHUDWLQJ QVWUXFWLRQV 6HOHFW WKH GHVLUHG ODQJXDJH DQG WKHQ FOLFN 2SHUDWLQJ QVWUXFWLRQV WR LQVWDOO 7R UHWXUQ WR WKH LQVWDOO PHQX 6HH QH W SDJH RXEOH FOLFN WKH µ2SHUDWLQJ QVWUXFWLRQV...

Страница 22: ...LQGRZV RX FDQ GRZQORDG DQG LQVWDOO D YHUVLRQ RI GREH 5HDGHU WKDW RX FDQ XVH ZLWK RXU 26 IURP WKH IROORZLQJ HE 6LWH KWWS JHW DGREH FRP UHDGHU RWKHUYHUVLRQV Ŷ7R XQLQVWDOO WKH 2SHUDWLQJ QVWUXFWLRQV 3 IRUPDW HOHWH WKH 3 ILOH IURP WKH µ3URJUDP LOHV 3DQDVRQLF XPL IROGHU KHQ WKH FRQWHQWV LQ WKH 3URJUDP LOHV IROGHU FDQQRW EH GLVSOD HG FOLFN WKH 6KRZ WKH FRQWHQWV RI WKLV IROGHU WR GLVSOD WKHP Ŷ RU 0DFLQWRV...

Страница 23: ...RU ILOWHU HQV 2SWLFDO RRP I PP WR PP PP ILOP FDPHUD HTXLYDOHQW PP WR PP WR LJLWDO RRP 0D WHQGHG RSWLFDO RRP 0D 0 3 0D 0 3 RFXV UDQJH 1RUPDO FP IHHW WR 0DFUR QWHOOLJHQW XWR FP IHHW LGH FP IHHW 7HOH WR 6FHQH PRGH 7KHUH PD EH GLIIHUHQFH LQ DERYH VHWWLQJV 6KXWWHU V VWHP OHFWURQLF VKXWWHU 0HFKDQLFDO VKXWWHU XUVW UHFRUGLQJ XUVW VSHHG SLFWXUHV VHFRQG 0 3 SLFWXUHV VHFRQG 0 3 1XPEHU RI UHFRUGDEOH SLFWXUHV ...

Страница 24: ...QGV VHFRQGV SRVXUH 872 3URJUDP SRVXUH FRPSHQVDWLRQ 9 6WHS 9 WR 9 0HWHULQJ PRGH 0XOWLSOH PRQLWRU 7 7 SSUR GRWV ILHOG RI YLHZ UDWLR DERXW ODVK ODVK UDQJH 62 SSUR FP IHHW WR P IHHW LGH 0LFURSKRQH 0RQDXUDO 6SHDNHU 0RQDXUDO 5HFRUGLQJ PHGLD XLOW LQ 0HPRU SSUR 0 6 0HPRU DUG 6 0HPRU DUG 6 0HPRU DUG 5HFRUGLQJ ILOH IRUPDW 6WLOO SLFWXUH 3 EDVHG RQ HVLJQ UXOH IRU DPHUD LOH V VWHP EDVHG RQ LI VWDQGDUG 32 FRUUH...

Страница 25: ... FDUG DQG EDWWHU SSUR OE FOXGLQJ FDUG DQG EDWWHU SSUR OE 2SHUDWLQJ WHPSHUDWXUH WR WR 2SHUDWLQJ KXPLGLW WR DQJXDJH VHOHFW 1 6 63 f2 DWWHU FKDUJHU 3DQDVRQLF QIRUPDWLRQ IRU RXU VDIHW QSXW 9 WR 9 2XWSXW 9 DWWHU FKDUJLQJ TXLSPHQW PRELOLW 0RYDEOH DWWHU 3DFN OLWKLXP LRQ 3DQDVRQLF 0 33 QIRUPDWLRQ IRU RXU VDIHW 9ROWDJH FDSDFLW 9 P K ...

Страница 26: ...GXFW QR 0 33 3URGXFW QDPH 6 0HPRU DUG 3URGXFW QR 53 6 8 53 6 8 3URGXFW QDPH 6 0HPRU DUG 3URGXFW QR 53 6 8 53 6 3 8 53 6 5 8 53 6 8 53 6 3 8 53 6 5 8 53 6 8 53 6 3 8 53 6 8 3URGXFW QDPH 6 0HPRU DUG 3URGXFW QR 53 6 3 8 53 6 5 8 Ɣ3URGXFW QXPEHUV DUH FRUUHFW DV RI DQXDU 7KHVH PD EH VXEMHFW WR FKDQJH Ɣ FFHVVRULHV DQG RU PRGHO QXPEHUV PD YDU EHWZHHQ FRXQWULHV RQVXOW RXU ORFDO GHDOHU ...

Страница 27: ...GHU HQFORVHG 12 2 6 30 176 9 6 UHGLW DUG 0DVWHU DUG SLUD LRQ DWH LVFRYHU XVWRPHU 6LJQDWXUH 0DNH KHFN RU 0RQH 2UGHU WR 3 1 621 6625 6 3OHDVH GR QRW VHQG FDVK 6KLSSLQJ LQIRUPDWLRQ 836 GHOLYHU UHTXLUHV FRPSOHWH VWUHHW DGGUHVV 6KLS 7R 0U 0UV 0V LUVW DVW 6WUHHW GGUHVV LW 6WDWH LS 1LJKW D 3KRQH 72 2 7 1 1 2 285 7 0 5 6625 6 28 1 2 1 2 7 2 2 1 9 6 7 285 2 3 1 621 5 25 3 1 621 6 6625 25 5 1 7 0 30 0 3 7 0...

Страница 28: ...LWK QHZ RU UHIXUELVKHG SDUWV E UHSODFH LW ZLWK D QHZ RU D UHIXUELVKHG HTXLYDOHQW YDOXH SURGXFW RU F UHIXQG RXU SXUFKDVH SULFH 7KH GHFLVLRQ WR UHSDLU UHSODFH RU UHIXQG ZLOO EH PDGH E WKH ZDUUDQWRU XULQJ WKH DERU ZDUUDQW SHULRG WKHUH ZLOO EH QR FKDUJH IRU ODERU XULQJ WKH 3DUWV ZDUUDQW SHULRG WKHUH ZLOO EH QR FKDUJH IRU SDUWV 7KLV LPLWHG DUUDQW H FOXGHV ERWK SDUWV DQG ODERU IRU QRQ UHFKDUJHDEOH EDWWH...

Страница 29: ...QGHU WKH LPLWHG DUUDQW 5 3 5 6 1 85 1 7 55 17 3 5 2 7 385 6 5 5 48 5 72 851 6 6 6 5 37 3522 2 385 6 1 7 1 7 2 385 6 02817 3 1 3 2 385 6 86720 5 5 25 7 5 3 5 2 1 81 7 5 9 7 287 68 3522 2 385 6 LPLWHG DUUDQW LPLWV QG FOXVLRQV 7KLV ZDUUDQW 21 29 56 IDLOXUHV GXH WR GHIHFWV LQ PDWHULDOV RU ZRUNPDQVKLS DQG 2 6 127 29 5 QRUPDO ZHDU DQG WHDU RU FRVPH LF GDPDJH 7KH ZDUUDQW 62 2 6 127 29 5 GDPDJHV ZKLFK RFF...

Страница 30: ... 72 7 3 5 2 2 7 0 7 55 17 6RPH VWDWHV GR QRW DOORZ WKH H FOXVLRQ RU OLPLWDWLRQ RI LQFLGHQWDO RU FRQVHTXHQ LDO GDPDJHV RU OLPLWDWLRQV RQ KRZ ORQJ DQ LPSOLHG ZDUUDQW ODVWV VR WKH H FOXVLRQV PD QRW DSSO WR RX 7KLV ZDUUDQW JLYHV RX VSHFLILF OHJDO ULJKWV DQG RX PD DOVR KDYH R KHU ULJKWV ZKLFK YDU IURP VWDWH WR VWDWH I D SUREOHP ZL K WKLV SURGXFW GHYHORSV GXULQJ RU DIWHU WKH ZDUUDQW SHULRG RX PD FRQWDFW...

Страница 31: ...QWDFW XV GLUHFWO DW 3 1 0RQGD ULGD DP SP 6DWXUGD 6XQGD DP SP 67 RU KHDULQJ RU VSHHFK LPSDLUHG 77 XVHUV 77 FFHVVRU 3XUFKDVHV 8QLWHG 6WDWHV DQG 3XHUWR 5LFR 3XUFKDVH 3DUWV FFHVVRULHV DQG QVWUXFWLRQ RRNV RQOLQH IRU DOO 3DQDVRQLF 3URGXFWV E YLVLWLQJ RXU HE 6LWH DW KWWS ZZZ SVWF SDQDVRQLF FRP 2U VHQG RXU UHTXHVW E PDLO WR QSFSDUWV XV SDQDVRQLF FRP RX PD DOVR FRQWDFW XV GLUHFWO DW 3KRQH D 2QO 0RQGD ULGD ...

Страница 32: ... 947 1 0 02 ...

Страница 33: ... 1 947 0 02 ...

Страница 34: ...Operating Instructions for advanced features Digital Camera Model No DMC FP2 DMC FP1 Before connecting operating or adjusting this product please read the instructions completely VQT2M98 ...

Страница 35: ...age malfunctions and faults 5 Standard Accessories 6 Names of parts 7 Cursor button 7 Preparations Charging battery 8 Guidelines for number of recordable pictures and recording ime 9 Inserting and removing the card optional the battery 10 Picture save des ination cards and built in memory 11 Remaining battery and memory capacity 11 Setting the clock 12 Setting the menu 14 Menu type 15 Using Quick ...

Страница 36: ...the LCD monitor clouds up wipe with a soft dry cloth Read first To prevent damage malfunctions and faults LCD monitor characteristics Extremely high precision technology is employed to produce the LCD monitor screen However there may be some dark or bright spots red blue or green on the screen This is not a malfunction The LCD monitor screen has more than 99 99 effective pixels with a mere 0 01 of...

Страница 37: ...o not indicate mechanical problems The camera rattles when shaken This is the sound of the lens moving The camera clicks when turned on or off or when switched between recording and playback This is also the sound of the lens moving You feel vibration when zooming in or out This is from the lens moving The lens makes a noise when you are recording This is the sound of iris adjustment in response t...

Страница 38: ...PA is an abbreviation of Camera Imaging Products Association NORMAL PICTURE Mode Temperature 23 C 73 4 F Humidity 50 when LCD monitor is on Using a Panasonic SD Memory Card 32 MB Using the supplied battery Starting recording 30 seconds after the camera is turned on When the optical image stabilizer function is set to AUTO Recording once every 30 seconds with full flash every second recording Rotat...

Страница 39: ...r formatting of pictures Do not turn off the power or remove the battery card or AC adaptor optional this may cause damage to or loss of data Do not subject the camera to vibrations impact or static electricity Should any of these cause camera operation to be terminated attempt to perform the operation again Picture save destination cards and built in memory Pictures will be saved to a card if one...

Страница 40: ...idnight is AM 12 00 and 0 00 noon is PM 12 00 Press MENU SET Confirm the setting and press MENU SET To return to the previous screen press Turn on power again and check time display Time and date can be displayed by pressing DISPLAY several times Failure to set the date and time will cause the date time to be improperly printed when printing pictures in digital photo center or when using TEXT STAM...

Страница 41: ...s RESET 20 Refer to the procedure example below when operating the SETUP menu REC menu and PLAYBACK menu Example Change LCD MODE in SETUP menu when in NORMAL PICTURE Mode Shutter button Open the lens cover The power is turned on Select NORMAL PICTURE Mode Press the MODE button Press to select NORMAL PICTURE and then press MENU SET To display the PLAYBACK menu press the Playback button to switch to...

Страница 42: ...umber of days elapsed in your travels 51 TRAVEL SETUP OFF SET Register departure and return dates LOCATION OFF SET Input name of destination 60 BEEP Change or mute the beep shutter sounds BEEP LEVEL Mute Low High BEEP TONE Change beep tone SHUTTER VOL Mute Low High SHUTTER TONE Change shutter tone VOLUME Adjust volume of sound from speakers 7 levels 0 LEVEL3 LEVEL6 Cannot be used to adjust TV spea...

Страница 43: ... Mode Selecting AUTO POWER LCD or POWER LCD will reduce the number of pictures available and battery life DISPLAY SIZE Change the display size of the menu STANDARD LARGE FOCUS ICON Change the focus icon Item Settings notes AUTO POWER OFF The camera turns off automatically after a specified period of inactivity OFF 2 MIN 5 MIN 10 MIN Not used in the following situations When an AC adaptor optional ...

Страница 44: ... is connected TV ASPECT Change the aspect ratio when connected to a TV etc Playback Mode only Operates when AV cable is connected VERSION DISP Check the version of the camera firmware Current version is displayed FORMAT Use when BUILT IN MEMORY ERROR or MEMORY CARD ERROR appears or when formatting the built in memory or card When a card built in memory is formatted the data cannot be restored Chec...

Страница 45: ...ings notes For details about the setting procedure in the SETUP menu 14 Please set the clock before recording 12 Sequence of Recording Open the lens cover The power is turned on Select the desired Recording Mode and record To use settings automatically selected by the camera Press the button To select the Recording Mode manually Press the MODE button Press to select the Recording Mode and then pre...

Страница 46: ...ain to return to the previous Recording Mode Recording Mode icon see below Take pictures Press halfway press lightly to focus Press fully press the button all the way to record Focus display when focus aligned flashing illuminated The type of scene detected is indicated by a blue icon for two seconds Optimum settings are made automatically from information such as face movement brightness and dist...

Страница 47: ... refers to the light that shines from behind the subject When this occurs the subject appears darker and so backlighting is automatically corrected by increasing the brightness of the entire image We recommend using a tripod and the self timer with i NIGHT SCENERY and i NIGHT PORTRAIT When jitter is small e g using tripod with i NIGHT SCENERY shutter speed can reach a maximum of 8 seconds Do not m...

Страница 48: ...DISP is set to ON Still pictures taken with the lens surface facing directly up or down and still pictures taken on other cameras may not be rotated Additionally still pictures taken while holding the camera upside down are not rotated automatically Motion pictures are not displayed vertically Zoom In Out Capture a wider area wide angle Enlarge the subject telephoto W side wide angle 1 x T side te...

Страница 49: ... FRAME Scene Modes Press the Playback button Press again to enter the Recording Mode Scroll through pictures Previous Next File number Picture number Total pictures Press the shutter button to switch to Recording Mode Hold down to quickly scroll forwards backwards Only file numbers change while held down picture is displayed when released Scroll speed increases the longer you press Speed may vary ...

Страница 50: ...o delete all data including protected pictures perform FORMAT Delete Select YES To cancel press MENU SET May take time depending on number of pictures deleted ALL DELETE EXCEPT may be selected in DELETE ALL when FAVORITE is set to ON 70 and pictures have been registered To delete multiple up to 50 or all pictures after step DISPLAY You can switch between various information shown on the LCD monito...

Страница 51: ... are as follows 1 30 1 1600th 1 8 2 1 1600th 2Max 1 4 sec when in SENSITIVITY is set max 1 sec when STABILIZER is set to OFF or when blur is insignificant Also varies according to INTELLIGENT AUTO Mode SCENE MODE scene and zoom position The effect of red eye reduction varies depending on the subject and is affected by factors such as distance to the subject whether the subject is looking at the ca...

Страница 52: ...at the flash 7 from close distances i e a few cm Do not use the flash at close distances to other subjects heat light may damage subject Flash settings may be changed when changing Recording Mode When is set in SENSITIVITY the ISO sensitivity is automatically set in a range up to 1600 Scene Mode flash settings are restored to default when Scene Mode is changed If flash is to be emitted flash type ...

Страница 53: ... MACRO Display MACRO MODE Select MACRO ZOOM The menu screen is displayed for approx 5 sec Items you select during his period are automatically selected Adjust the Digital Zoom magnification with the zoom lever The zoom position is fixed at the Wide end Focus range is 10 cm 0 33 feet Return Enlarge Digital Zoom magnification 1 x to 3 x Take a picture Zoom lever Corrects exposure when adequate expos...

Страница 54: ...t improves the skin appearance The picture quality becomes slightly lower PICTURE SIZE is fixed as follows 3 M 2 5 M 2 M AF MODE default setting is Face Detection Face Detection may not work as effectively when using SLIM HIGH or STRETCH HIGH The following functions cannot be used Extended Optical Zoom DIGITAL ZOOM BURST Scene Uses Tips Notes Using SCENE MODE enables you to take pictures with opti...

Страница 55: ...94 feet 16 4 feet When the camera is set to STABILIZER and there is very little jitter or if STABILIZER is set to OFF shutter speed may slow down up to 1 second or up to 8 seconds if flash is set to Forced flash off Interference may be noticeable with dark scenes Shutter may remain closed for 8 seconds after taking picture AF MODE default setting is Face Detection NIGHT SCENERY Takes clear picture...

Страница 56: ...for other notes and fixed functions SUNSET Takes clear pictures of scenes such as sunsets Main fixed settings SENSITIVITY ISO80 FLASH FORCED FLASH OFF AF ASSIST LAMP OFF HIGH SENS Prevents blurring of subject in dark indoor conditions Select the aspect ratio and the picture size with and press MENU SET Tips Focus Max W 10 cm 0 33 feet and above Max T 50 cm 1 64 feet and above Pictures may appear s...

Страница 57: ...s clear pictures of fireworks in the night sky Tips Stand at least 10 m 32 8 feet away Tripod recommended Shutter speed can be set to 1 4 second or 2 seconds if there is a little jitter or if Optical Image Stabilizer is OFF when not using exposure compensation Main fixed settings FLASH FORCED FLASH OFF SENSITIVITY ISO80 AF ASSIST LAMP OFF BEACH Brings out the clear blues of the sky and the sea wit...

Страница 58: ...register commonly used Scene Mode in After you register it simply switch to MY SCENE MODE and you can record in the registered Scene Mode MENU SET DISPLAY Zoom lever For information on the available recording time 92 Depending on the type of card used a card access display may appear for a while after motion picture recording This does not indicate a problem Immediately release the shutter button ...

Страница 59: ...es recorded with LUMIX digital cameras sold before this date can be played on this camera Select the desired picture quality Close menu TRAVEL DATE Record travel date and destination Record information as to what day and where pictures were taken by setting departure dates and destinations Set up Clock must be set in advance 12 Press MENU SET SETUP menu Select TRAVEL DATE The number of days elapse...

Страница 60: ...estination area Select DESTINATION Set destination area Difference with home time City area name Current time at selected destination To cancel Press If actual destination is unavailable select based on difference with home time Close menu For details about the setting procedure in the REC menu 14 Quick menu 16 is useful to easily call up frequently used menus PICTURE SIZE Set size of picture This...

Страница 61: ... sky outdoor cloudy sky outdoor shade incandescent lighting uses value set in set manually AWB operational range 10000K 9000K 8000K 7000K 6000K 5000K 4000K 3000K 2000K 1000K Cloudy sky rain Shade TV screen Incandescent lighting Sunset sunrise Candlelight Sunlight White fluorescent lighting Blue sky Picture may appear red or blue if out of range This function may also not work correctly even within...

Страница 62: ...creen When there is rapid movement When the camera is shaking When the subject is other than a human being such as pets When Digital Zoom is used BURST Enables a rapid succession of still pictures to be taken Succession of still pictures taken while shutter button is held down Mode Settings OFF Speed No of pictures DMC FP2 Approx 1 5 pictures sec Until card built in memory is full DMC FP1 Approx 1...

Страница 63: ...s where Optical Image Stabilizer may be ineffective Heavy jitter high zoom ratio including Digital Zoom range fast moving objects indoors or in dark locations due to low shutter speed This is fixed at MODE 1 during motion picture recording AF ASSIST LAMP Illuminates lamp when dark to facilitate focus alignment Mode Lamp Effective distance 1 5 m 4 92 feet Do not cover or look at lamp from close ran...

Страница 64: ...ORLD TIME TEXT STAMP 12 screens 30 screens Selected date First picture from date Select week with and date with and press MENU SET to display that date s pictures on a 12 screen display Calendar screen Use the cursor buttons to enter names in Scene Modes BABY and PET or to enter LOCATION names in TRAVEL DATE A maximum of 30 characters can be entered The entry position cursor can be moved left and ...

Страница 65: ...Single frame forward while paused Press during fast rewind or fast forward to return to the normal playback speed Volume can be adjusted with zoom lever Deleting 32 Press the Playback button Select the motion picture and start playback Motion picture recording time Motion picture icon Recorded pictures can be played back in a variety of ways NORMAL PLAY 31 SLIDE SHOW 64 CATEGORY PLAY 66 FAVORITE P...

Страница 66: ... with relaxed music and screen transition effects SLOW SWING Play with livelier music and screen transition effects URBAN OFF No effects SETUP DURATION 1 SEC 2 SEC 3 SEC 5 SEC Only available when EFFECT is OFF REPEAT OFF ON Repeat MUSIC ON The audio portion is played to match effects OFF The audio portion is not played Select START with and press MENU SET Press to return to menu screen during Slid...

Страница 67: ... NIGHT PORTRAIT NIGHT SCENERY i NIGHT SCENERY STARRY SKY SPORTS PARTY CANDLE LIGHT FIREWORKS BEACH SNOW AERIAL PHOTO BABY PET FOOD TRAVEL DATE MOTION PICTURE For details about the setting procedure in the PLAYBACK menu 14 CALENDAR Select the date from the calendar screen to view only the pictures taken on that day 61 Set up Press MENU SET PLAYBACK menu Select CALENDAR This setting can only be made...

Страница 68: ...rther reduced Set up Press MENU SET PLAYBACK menu Select RESIZE SINGLE Select SINGLE Select still picture Select size Current size Size after change Select YES After confirmation press to return to the menu screen Picture quality is reduced after resizing Cannot be set in CATEGORY PLAY or FAVORITE PLAY Playback Mode Motion pictures and text stamped still pictures cannot be used May not be compatib...

Страница 69: ...OTOfunSTUDIO Select ON Close menu Select picture and make setting repeat Displayed when set not displayed when OFF Up to 999 pictures can be selected To release Press again PRINT SET Picture picture no date printing settings can be made for when printing with DPOF print compatible shops or printers Ask at shop to check compatibility For more information visit http panasonic jp dc dpof_110 white_e ...

Страница 70: ...picture at a time from card to built in memory When selecting press to select a picture and then press MENU SET Select YES To cancel Press MENU SET After confirmation press to return to the menu screen Screen shown is example If there is not enough space on the built in memory for copying to be performed turn off the power remove the card and delete pictures from the built in memory Copying of pic...

Страница 71: ...n importing pictures from the built in memory remove any memory cards New folders are created in the following cases When pictures are added to folders containing files numbered 999 When using cards already containing the same folder number including pictures taken with other cameras etc File may not be able to be played back on camera after changing file name When using Windows XP Windows Vista W...

Страница 72: ...age to socket shape can lead to faulty operation If using AC adaptor turn off the camera before plugging in or removing Printing multiple pictures Select MULTI PRINT in step on the previous page Select item See below for details Print Previous page MULTI SELECT Scroll between pictures with select pictures with DISPLAY button to print Press DISPLAY button again to release selection Press MENU SET w...

Страница 73: ...r settings may be prioritized You can view still pictures and motion pictures on a TV by connecting the camera to your TV with the AV cable supplied Also consult TV operating manual Getting Ready Complete the TV ASPECT setting Turn off both the camera and television Connect camera to TV Turn on TV Set to auxiliary input Turn on camera Press the Playback button When using TVs with an SD card slot I...

Страница 74: ...y 50 15 Remaining recording time 49 16 Self timer mode 34 17 Elapsed recording time 49 18 Travel elapsed days 51 Name 44 Travel Location 51 Age in years months 44 Current date time 19 AF assist lamp 59 20 Audio recording for motion pictures 1 Playback Mode 63 Protected picture 72 Favorites 70 Text stamped display 67 2 Picture size 53 3 Battery capacity 11 4 Folder File number 31 75 Picture number ...

Страница 75: ...layed when formatting built in memory via computer etc Reformat directly using camera Data will be deleted MEMORY CARD ERROR FORMAT THIS CARD The card format cannot be used with this camera Save needed data on a computer or other device and then use FORMAT on he camera 21 INSERT SD CARD AGAIN TRY ANOTHER CARD Access to card has failed Insert card again Try with a different card MEMORY CARD ERROR M...

Страница 76: ...r subject movement 54 58 Recording continued Recorded pictures are blurred Optical Image Stabilizer ineffective Shutter speed is slower in dark locations and Op ical Image Stabilizer is less effective Hold camera firmly with both hands keeping arms close to body Set DIGITAL ZOOM to OFF and SENSITIVITY to 30 54 Recorded pictures appear coarse or there is interference ISO sensitivity is high or shut...

Страница 77: ... not Camera set to CATEGORY PLAY or FAVORITE PLAY Set Playback Mode to NORMAL PLAY 63 Playback continued Folder file number displayed as Picture is black Picture edited on computer or taken on different device Battery removed immediately after picture taken or picture taken with low battery Use FORMAT to delete 21 Incorrect date displayed in Calendar playback Picture edited on computer or taken on...

Страница 78: ...any trimming or edgeless printing settings on printer before prin ing Consult printer opera ing manual The pictures were recorded in aspect ratio If printing in shop check if 16 9 sizes can be printed Others Menu not displayed in desired language Change LANGUAGE setting 22 Camera rattles if shaken This sound is made by the lens movement and is not a fault Cannot set AUTO REVIEW Not available when ...

Страница 79: ...ng agent silica gel if leaving in drawer etc Store batteries in cool 15 C 25 C 59 F 77 F places with low humidity 40 60 and no major temperature changes Charge battery once per year and use completely before storing again Memory cards To prevent damage to cards and data Avoid high temperatures direct sunlight electromagnetic waves and static electricity Do not bend drop or expose to strong impacts...

Страница 80: ...0 5490 7260 9880 70590 4180 4940 24 GB 5430 7970 10550 14350 102500 6080 7170 32 GB 7500 11010 14570 19820 141620 8400 9910 48 GB 11030 15830 21420 28020 182140 12140 14570 64 GB 14970 21490 29070 38020 247160 16470 19770 DMC FP2 Picture aspect ratio PICTURE SIZE 14 M 10 M EZ 5 M EZ 3 M EZ 0 3 M EZ 12 5 M 10 5 M 4320 3240 3648 2736 2560 1920 2048 1536 640 480 4320 2880 4320 2432 Built in memory 8 ...

Страница 81: ...me and the QuickTime logo are trademarks or registered trademarks of Apple Inc used under license therefrom Other names company names and product names printed in these instructions are trademarks or registered trademarks of the companies concerned ...

Страница 82: ...ed images to be erased so do not choose to format If the card is not recognised please refer to the below support site http panasonic net avc sdcard information SDXC html PHOTOfunSTUDIO 3 QuickTime 3 n _ __ _ 7 l _ _ _ W P _ _ _ _ _f __N _ _ _ _ __ _ t i _ __ JIIr f l f Operating Instructions Operating Instructions for Advanced Features PDF format which provides details about how to operate the di...

Страница 83: ...erminal of the PC keyboard the product might not operate properly PHOTOfunSTUDIO Windows XP Vista 7 This software allows you to acquire pictures to the PC and also categorize these acquired pictures by their recording date or the model name of the camera used You can resize pictures and add effects to the pictures Various printing functions such as layout printing and writing function to CD R are ...

Страница 84: ... appearing on the screen If you do not need to install all software click on the required software in the Custom Install and install one by one To return to the install menu click on on the setup menu screen Follow the steps below after installation to read the file containing the operating instructions for PHOTOfunSTUDIO PDF format start All Programs Programs Panasonic PHOTOfunSTUDIO 5 0 Manual Y...

Страница 85: ...SP2 Microsoft Windows Vista Business or SP1 SP2 Microsoft Windows Vista Ultimate or SP1 SP2 Microsoft Windows 7 Starter Microsoft Windows 7 Home Basic Microsoft Windows 7 Home Premium Microsoft Windows 7 Professional Microsoft Windows 7 Ultimate Display High Color 16 bit or more 32 bit or more recommended Desktop resolution of 1024 x 768 pixels or more 1280x 1024 pixels or more recommended Graphic...

Страница 86: ...install this software Log on with an administrator account or standard user account before using this software You cannot use this software with a guest account If the settings for the size of characters in the screen settings dialog box in Windows is larger than the standard size some buttons may be displayed off screen and cannot be operated In this case restore the font size to standard size Wh...

Страница 87: ...e Inc used under license therefrom QuickTime Panasonic Consumer Electronics Company Division of Panasonic Corporation of North America One Panasonic Way Secaucus NJ 07094 Panasonic Canada Inc 5770 Ambler Drive Mississauga Ontario L4W 2T3 Panasonic Corporation 2010 Printed in China ...

Страница 88: ...Operating Instructions Digital photo management software PHOTOfunSTUDIO 5 0 Thank you for using PHOTOfunSTUDIO Before use please read these instructions carefully Panasonic Corporation 2010 ...

Страница 89: ...28 Deleting pictures 29 Protecting pictures 30 Refreshing the display 31 Setting as Favorites 31 Using right click menus 32 Viewing pictures Displaying the playback window 33 Displaying detailed picture information 36 Playing back slide shows 37 Searching for pictures Viewing categorized pictures 44 Face Recognition Registering the face pictures 47 Analyzing still pictures for categorization by Fa...

Страница 90: ...mail 88 Copying pictures to a memory card 91 Backing up pictures to a CD or DVD 94 Uploading motion pictures to YouTube 97 Editing motion pictures Creating still pictures from motion pictures 100 Convenient functions Displaying memory card pictures 101 Deleting pictures from memory cards 102 Registering other software 104 Changing the settings for copying pictures to a PC 106 Performing simple pla...

Страница 91: ...tures View still pictures and motion pictures Enjoy slide shows Copy from a digital camera to a PC still pictures and motion pictures with this software Process still pictures and motion pictures Print still pictures Post on the Internet Send by E mail Back up still picture and motion pictures data ...

Страница 92: ... them Here the procedure is described for copying still pictures or motion pictures that are recorded with a digital camera onto a PC 1 Connect a digital camera to a PC 6 2 Copy pictures 7 3 View copied pictures 9 Tips For details refer to the pages where each function is described ...

Страница 93: ...he supplied USB connection cable 4 Set the digital camera to PC connection The Copy to PC screen is displayed Tips If the Copy to PC screen is not displayed select the PHOTOfunSTUDIO icon in the Windows automatic playback window operation selection window If a window other than the PHOTOfunSTUDIO window is displayed such as the LUMIX Simple Viewer window click No to close the window ...

Страница 94: ...pictures 19 2 Click Next 1 If there are any pictures that you do not want to copy click and deselect them When the box in the top left of a picture is selected the picture will be copied to the PC Copy Do not copy Tips The functions of this software can be used when pictures are copied to a PC ...

Страница 95: ...mple if you select Day of acquisition a folder with today s date is created and the pictures are copied to this folder 5 Click Execute 6 When the confirmation message is displayed click Yes The digital camera pictures are copied to the PC 7 When the copying completion message is displayed click OK 8 Click Close The PHOTOfunSTUDIO main window is displayed 9 When the confirmation message is displaye...

Страница 96: ...ick 2 Searching for pictures You can also search for pictures that you want to view by using the slider to enlarge a reduced picture thumbnail 3 Double click the picture that you want to view The playback window is displayed Motion pictures start playing back automatically 4 If you want to view another picture click a thumbnail on the left side 5 Click to return to the main window Playback window ...

Страница 97: ...e operation items on the menu and right click menu depend on the operation status of PHOTOfunSTUDIO or status of the selection of the pictures The unusable items are displayed in gray Depending on the digital camera some of the models do not have functions like BABY Mode PET Mode TRAVEL DATE DATE STAMP TEXT STAMP face categorization Face Recognition RAW files etc mentioned in these instructions Pr...

Страница 98: ...ion static electricity accident malfunction or repair etc Please note in advance that Panasonic is not liable in any way for any direct or indirect damage or loss resulting from the alteration or vanishing of information including personal information Always erase personal information when it is transferred to another party or disposed of To protect personal information always erase the informatio...

Страница 99: ...d with a digital camera and has not been processed If JPEG image data for thumbnails is contained in a RAW file a thumbnail is displayed in List Mode RAW files containing no thumbnail information will be displayed as RAW and are incompatible Motion picture Motion JPEG format MOV motion picture Extensions MOV QuickTime motion picture files are the target files QuickTime VR motion pictures which are...

Страница 100: ...iness or Service Pack 1 Service Pack 2 Microsoft Windows Vista Ultimate or Service Pack 1 Service Pack 2 Microsoft Windows XP Home Edition Service Pack 2 Service Pack 3 Microsoft Windows XP Professional Service Pack 2 Service Pack 3 RAM For Windows 7 1GB or more For Windows Vista 512 MB or more For Windows XP 512 MB or more Display High Color 16 bit or more 32 bit or more recommended Desktop resol...

Страница 101: ...op operating properly If you are unsure if your PC is compatible contact the maker NET framework 2 0 SQL Server Compact 3 5 Internet Explorer 6 0 or more QuickTime Player 7 6 5 or more Sound Windows compatible sound device Drive CD ROM drive required for installing software A compatible drive and media are required for DVD writing Interface USB port Hi Speed USB USB2 0 Other requirements Mouse or ...

Страница 102: ... Only the system administrator can install or uninstall this software Log on with an administrator account or standard user account before using this software You cannot use this software with a guest account When PHOTOfunSTUDIO is running energy conserving functions such as Windows screen savers sleep or automatic display cannot be used If the settings for the size of characters in the screen set...

Страница 103: ...reen is displayed To copy pictures to the PC follow the instructions 19 Tips For details on connecting refer to the operating instructions for the digital camera When the digital camera is correctly recognized by the PC it is added to Computer My Computer as a drive If a window other than the PHOTOfunSTUDIO window is displayed such as the LUMIX Simple Viewer window click No to close the window If ...

Страница 104: ...amera is not accessing the PC such as performing a writing operation 2 Double click or on the task tray of the PC 3 Select USB Mass Storage Device and click Stop When multiple USB devices are displayed you can double click each to check which is the digital camera 4 Remove the USB connection cable from the PC 5 Turn off the digital camera ...

Страница 105: ... when launched 110 In an environment without an Internet connection PHOTOfunSTUDIO may take some time to start up When starting the software for the first time it may take some time to display the window because first it analyzes the pictures that are saved on the PC When a digital camera is connected to the PC or a memory card is set PHOTOfunSTUDIO starts automatically and the Copy to PC screen i...

Страница 106: ...ecting File Copy to PC from the menu If the Windows automatic playback window operation selection window is displayed click to close the window 3 If the selection window for the location to copy from is displayed select the drive and click Next If the connected drive or memory card is not displayed click Refresh 4 Select the pictures to copy to the PC When the box in the top left of a picture is s...

Страница 107: ...00701 Recording month Save in a folder for the month of recording Example 201006 Recording day Save in a folder for the date of recording Example 20100630 Specified folder Save in a folder that you create yourself Example Wedding 8 Enter a keyword Up to 32 characters single byte can be used The entered keywords can be used for categorized display If you do not want to set a keyword go to step 9 9 ...

Страница 108: ...andled correctly 11When the copying completion message is displayed click OK 12When the completion window is displayed after copying click Close About saving folders The following copy destinations are set by default Documents My Documents Pictures for Windows 7 or Windows Vista Desktop When Windows is installed on drive C the folder locations are as follows For Windows 7 or Windows Vista Document...

Страница 109: ...on area Displays data such as information on the picture selected in the display area and the status of the currently executed function You can change the order of the picture list in the display area and specify the data format for the pictures to display All Still pictures only Motion pictures only You can rotate the selected still picture 90 degrees You can enlarge or reduce the pictures in the...

Страница 110: ... can also switch by selecting View Display mode Thumbnail display from the menu 2 Click the folder that you want to view The pictures in the folder are displayed in a list Click or double click the folder name to expand or hide the subfolders Double click a picture to display the playback window Changing the picture order 1 Select an item by which to sort the data A Name Displays in name order Dat...

Страница 111: ...nth to expand or hide the months or days Year display Double click a month that displays a picture to switch to the month display Month display Double click a day that displays a picture to switch to the recording date display Recording date display Double click a picture to display the playback window Tips The update date and time is displayed for pictures that do not have recording date and time...

Страница 112: ...ture files of subfolders The default setting will display all the files If you do not wish to display all subfolder pictures remove the check mark from Display all picture files from the folder C Tips When a folder is added it may take some time to display the window because first the picture category information and other data are analyzed Even if you delete the registration folder the folders th...

Страница 113: ...ures Select the first picture then hold down the Shift key while you select the last picture To select all displayed pictures Click Select all A Left click the display area then hold down the Ctrl key while you press the A key To deselect pictures Click Deselect all B Click a location other than a picture in the display area Tips Pictures cannot be selected in the calendar display year or month di...

Страница 114: ...elected When you close this function and return to the main window the check marks are deselected You can add check marks to multiple pictures To add check marks to all displayed pictures Click Select all A Left click the display area then hold down the Ctrl key while you press the A key To deselect a check mark Click a picture that contains a check mark To deselect all marks Click Deselect all B ...

Страница 115: ...ging and dropping folders into a different folder To copy hold Ctrl while dragging and dropping When copying to a memory card CD or DVD use Copy to media Update the display if operation result is not reflected 1 Click Folder 2 Select the picture that you want to copy or move You can select multiple pictures 3 Drag and drop the picture to the destination folder To copy drag and drop while holding d...

Страница 116: ...tained therein Use Explorer to delete folders containing contents that cannot be deleted with this software such as non compatible files 1 Select the picture that you want to delete You can select multiple pictures 2 Select File Delete from the menu You can also delete by pressing the Delete key 3 When the confirmation message is displayed click Yes The picture is deleted You can delete pictures t...

Страница 117: ...led 3 When the confirmation message is displayed click Yes The picture is protected Tips is displayed for pictures set to Protect ON and they cannot be deleted or overwritten with edited data To delete or overwrite a picture first change the setting to Protect OFF to cancel the protection Pictures for which PROTECT is set with a supported digital camera are set to Protect ON when copied to a PC Pi...

Страница 118: ...cture as a favorite will be displayed on the picture as with pictures set as FAVORITE on compatible digital cameras A picture set as a favorite 1 Select the picture you want to set as a favorite 2 Select File Favorite ON from the menu Select OFF to remove the favorites setting 3 When the confirmation message is displayed click Yes The picture will be set as a favorite Tips Pictures for which FAVOR...

Страница 119: ...ht clicked some functions pop up Tips The menu that is displayed depends on the status of the picture or folder When changing the name the following single byte characters cannot be used _ 1 Select a picture 2 Right click on the picture The right click menu is displayed 3 Select a function ...

Страница 120: ...the performance of your PC 1 Click the folder that contains the picture that you want to view The pictures in the folder are displayed in a reduced view When using the calendar display set the recording date calendar display 2 Select the picture that you want to view and double click it The playback window is displayed 3 You can enlarge or reduce a still picture or play back a motion picture ...

Страница 121: ...ockwise Enlarges the picture Reduces the picture Displays in the original size Displays to fit the window size Displays the full screen view Closes the playback window Date of recording Displays the recording date of the picture Picture Size Displays the picture size Display area pictures Pictures that are displayed in the display area of the main window Click to switch the display Display area pi...

Страница 122: ...e playback position of the motion picture Drag to the left or right to move the playback position Date of recording Displays the recording date of the picture Play position Displays the current playback position and the length of the motion picture Display area pictures Pictures that are displayed in the display area of the main window Click to switch the display About the full screen display Doub...

Страница 123: ...cture information window is displayed 3 Check the information Item Description File information The file name file size file type file location etc Camera information Name of manufacturer of the digital camera used model name recording date shutter speed aperture value etc Categorisation information Categorization information such as category and individual names A symbol such as is used for items...

Страница 124: ... audio Changing the slide show setting 43 Adjusts the volume Exits the slide show Slider Displays the playback position of the slide show Drag to the left or right to move the playback position Play position Displays the current playback position and the length of the slide show When the mouse pointer is removed from the operation panel and no operation is made for about 3 seconds the operation pa...

Страница 125: ...en select Create new edit The slide show registration listing screen is displayed You can also display it by selecting Tools Slide show Create new edit from the menu 2 Select Create new and click Next 3 Select the pictures to play back in the slide show and drag and drop them into the registration area They are played in order from left to right To change the order Drag and drop the pictures to se...

Страница 126: ...econds Do not apply effect Ensures no effect is attached when switching the picture Music Play music Add music to the slide show for playback Default music music file for the effect Play back the music of the picture effect that is set in Effect setting Specify a music file Click Browse select the music file that you want and add it to the slide show for playback Click Playback to preview Tips Ple...

Страница 127: ... back slide shows Viewing pictures 6 Click Save The Save slide show window is displayed Click Playback to play back the created slide show 7 Enter a file name and click Save The slide show is saved 8 Click Close ...

Страница 128: ...lide shows 1 Click Slide show and then select Load The slide show registration listing screen is displayed You can also display it by selecting Tools Slide show Load from the menu 2 Select a file and click Next The saved slide show is loaded and the slide show starts ...

Страница 129: ...hen select Delete The slide show registration listing screen is displayed You can also display it by selecting Tools Slide show Delete from the menu 2 Add a check mark to the slide show file you wish to delete 3 Click Execute 4 When the confirmation message is displayed click Yes The slide show is deleted 5 Click Close ...

Страница 130: ...ect Tools Settings from the menu The settings window is displayed 2 Click Slide show Basic 3 Change the settings The setting items are the same as when creating a new slide show 38 4 Click Slide show Movie 5 Change the settings The setting items are the same as when creating a new slide show 38 6 Click Apply When OK is clicked the settings are applied and the window is closed ...

Страница 131: ...from all your pictures click All files in the folder display 2 If the narrow setting area is not displayed click 3 Click Category 4 Select the categorization item to display The corresponding pictures are displayed in the display area To cancel the narrowing by categorization item click Deselect A When the folder or recording date to be displayed is reselected the narrowing is deselected Number of...

Страница 132: ... Still pictures categorized as Face Recognition PORTRAIT etc PORTRAIT i PORTRAIT SOFT SKIN SELF PORTRAIT TRANSFORM NIGHT PORTRAIT i NIGHT PORTRAIT BABY i BABY SCENERY etc SCENERY i SCENERY SUNSET AERIAL PHOTO i SUNSET NIGHT SCENERY etc NIGHT PORTRAIT i NIGHT PORTRAIT NIGHT SCENERY i NIGHT SCENERY STARRY SKY EVENTS SPORTS PARTY CANDLE LIGHT PANNING FIREWORKS BEACH SNOW AERIAL PHOTO BABY BABY i BABY...

Страница 133: ...RTRAIT and MACRO Categorizes pictures that are recorded in Intelligent Auto Mode into scenes i PORTRAIT i SCENERY etc that are automatically identified Model Name Pictures are categorized by the name of the manufacturer and model of the camera used for recording The pictures that can be categorized are pictures in RAW format or JPEG format with Exif information that have been saved with model name...

Страница 134: ... the face person that you want to categorize the faces on the still pictures that are saved on the PC can be analyzed for this face and categorized accordingly Number of persons that can be registered Face pictures that can be registered 20 persons 5 pictures per person Linking with the Face Recognition function of a digital camera Also when Face Recognition is performed for still pictures with a ...

Страница 135: ...ter a name Up to 32 characters single byte can be used 4 Register a date of birth By registering a date of birth the age when the picture was recorded can be displayed on the property window If you do not want to register a date of birth go to step 5 1 Click Register date of birth to select the check box 2 Click in Windows XP to display the calendar and set the date of birth You can click the year...

Страница 136: ...pictures the face pictures are displayed 7 Drag and drop the face pictures to the registration area Up to five pictures can be registered for one person When a wrong face picture is incorrectly registered 1 2 1 Select the face picture to delete from the registered face pictures 2 Click Delete selected face picture 8 Click Execute Registration area ...

Страница 137: ...continue the registration or changes click Yes to return to the registration list window 11Click Close 12To categorize the pictures of the registered person click Yes Analysis starts for the still pictures and they are categorized When analysis finishes the completion notification is displayed Analysis status If you click No the Face Recognition categorization is not updated ...

Страница 138: ... Face Recog and then select Start face analysis You can also start the analysis by selecting Tools Face Recognition Start face analysis from the menu 2 When the confirmation message is displayed click Yes Analysis starts for the still pictures and they are categorized When analysis finishes the completion notification is displayed To stop the analysis process 1 Click Cancel You can cancel by click...

Страница 139: ...res can be performed to refresh the Face Recognition categorization up to date 1 Select Tools Settings from the menu The settings window is displayed 2 Click General Registration folder 3 Set whether or not to perform automatic analysis When this check box is selected the pictures are analyzed automatically to always keep the Face Recognition categorization up to date 4 Click Apply When OK is clic...

Страница 140: ...A registration list window for face recognition is displayed You can also display it by selecting Tools Face Recognition Register edit face from the menu 2 Click the person that you want to change 3 Correct the name Up to 32 characters single byte can be used 4 Correct the date of birth 5 Click Next ...

Страница 141: ...e to delete from the face pictures in the registration area 2 Click Delete selected face picture 7 Click Execute 8 Click Yes The contents are registered 9 To exit the registration or changing of the face recognition information click No To continue the registration or changes click Yes to return to the registration list window 10Click Close and if you wish to perform face analysis and categorize a...

Страница 142: ... A When the folder or recording date to be displayed is reselected the narrowing is deselected Number of pictures that contain the person Tips Right click on a name shown in the Face Recognition List and select Change Name to alter it Multiple lists can be combined by giving the same name to each of the desired lists However names already registered for Face Recognition cannot be altered When a na...

Страница 143: ...age is displayed click Yes The Face Recognition picture display is corrected 7 Click OK To delete from the categorization 1 In the Face Recognition list select a registered person 2 Right click a still picture and select Delete 3 When the confirmation message is displayed click Yes 4 Click OK Face Recognition list Tips Still pictures deleted from the category will not be returned to their original...

Страница 144: ...ch the Automatic Face Recognition does not work 1 Display a still picture that you want to categorize for Face Recognition 2 If the narrow setting area is not displayed click 3 Click Face Recog 4 Drag and drop the still picture to a categorization destination in the Face Recognition list 5 When the confirmation message is displayed click Yes It is added to the Face Recognition picture display 6 Cl...

Страница 145: ...ts to delete the name Face Recognition registrations cannot be deleted 1 Click Face Recog and select Remove from list A registration list window for face recognition is displayed You can also display it by selecting Tools Face Recognition Remove from list from the menu 2 Select the person to be deselected and add a check mark 3 Click Execute 4 When the confirmation message is displayed click Yes I...

Страница 146: ...lockwise When a still picture without Exif information is rotated When a still picture without Exif information is rotated a still picture in JPEG format that has Exif information is newly created 1 When the confirmation message is displayed click OK Tips For still pictures in RAW format and JPEG format that have Exif information rotation is performed by correcting the Exif information only With s...

Страница 147: ... picture Resize from the menu 2 Select a picture by selecting its check box and click Next 3 Set the size after the change Specify Size A Fix the aspect ratio B Set the width of the picture after the change C Set the height of the picture after the change Expansion reduction ratio D Set the zoom ratio for the picture size after the change in a range of 1 to 200 B C A D ...

Страница 148: ...the compression ratio can be set with the slider When the slider is moved to the left the picture data size becomes smaller and the picture quality deteriorates 5 Click Execute 6 When the confirmation message is displayed click Yes The picture is resized according to the settings About the confirmation message for print retouching information When overwrite original picture is set in Save Settings...

Страница 149: ...ill picture Retouch from the menu 2 Select a picture and click Execute The screen changes to display the picture retouch window A The menus of the picture retouch function are positioned here B Buttons for frequently used functions C Return to the main window D Picture window E Editing panel Picture Display the pictures that can be retouched Effect Operation panel for the retouch function A B C D ...

Страница 150: ...or of the picture 1 Click Effect 2 Select a retouch function 3 Adjust the effect Cancel the previous operation Click To restore a canceled operation click To return a picture to its initial state click 4 Select File Save or Save As from the menu and save the picture 5 Click Return to original screen The screen changes to display the main window You can double click another picture from Picture to ...

Страница 151: ... Brightness Contrast 1 3 2 1 Click 2 Select the color for retouching 3 Move the slider to adjust the effect Hue Saturation 1 2 1 Click 2 Move the slider to adjust the effect Sharpness 1 2 1 Click 2 Move the slider to adjust the effect Sepia 1 1 Click Negative 1 1 Click Grey Scale 1 1 Click ...

Страница 152: ...atic retouching varies with the picture When a picture is printed incorporating the picture quality correction function do not execute auto correction with the retouch function The picture may be corrected too much Auto Enhancement 1 1 Click Cropping 1 Select Effect Cropping Picture from the menu 2 2 Adjust the frame to specify the area to cut You can also specify the area to cut by entering the W...

Страница 153: ...rama Refer to Step 3 To change the order Drag and drop the still pictures to establish the correct order To remove pictures from the panorama stitch Select the still pictures not to be stitched and click Remove from list To start registering again from the beginning Click Deselect all in the registration area By connecting several still pictures you can create a panorama picture Tips With the Sele...

Страница 154: ...tching still pictures horizontally From 2 to 16 still pictures can be registered 360 degrees Stitching pictures horizontally 360 degrees around the picture taker s position From 6 to 32 still pictures can be registered Vertical type Stitching still pictures vertically From 2 to 8 still pictures can be registered 4 Click Execute ...

Страница 155: ...you want to attach to an e mail The left right or top bottom order of the photos for stitching can be reversed with Switching again to Horizontal type or 360 degrees is possible if the panorama type was set as Horizontal type or 360 degrees in Step 3 or if there are 6 or more still pictures 6 Click Stitch 7 Use the red trimming frame to specify the area to be cut and saved Tips Stitching may somet...

Страница 156: ... extension MOV Horizontal type or 360 degrees panorama pictures can be saved 10Click Exit Return to the main window Tips QuickTime VR motion pictures are played back with QuickTime Player by double clicking the thumbnail If QuickTime VR motion pictures are not played back by double clicking right click the icon in Explorer and associate them with QuickTime using Properties Printing panorama pictur...

Страница 157: ...on JPEG compression ratio D With JPEG format the compression ratio can be set with the slider When the slider is moved to the left the picture data size becomes smaller and the picture quality deteriorates 4 Click Execute 5 When the confirmation message is displayed click Yes The picture data format is changed 6 Click OK 7 Click Close Tips Even if you convert a still picture in JPEG format to a lo...

Страница 158: ...kipped and next number will be set Name Settings Setting a character string A The file name is a combination of the characters entered here and a serial number Up to 32 characters single byte can be used B The file name is a combination of the original file name and a serial number Setting a number C The settable range for the starting number of the serial number is 0 to 1000 D The settable range ...

Страница 159: ...e recording date of multiple pictures that were recorded while the time setting was incorrect Example Picture Recording time before the change When setting the date and time after the change July 1 2010 12 00 00 When setting the correction time Date correction 546 Time correction 12 00 00 Reference picture January 1 2009 0 00 00 July 1 2010 12 00 00 July 1 2010 12 00 00 Selected picture January 1 ...

Страница 160: ... a reference A Recording date and time of the selected picture B Recording date and time after the change 4 Set the recording date and time for after the change To set the correct recording date and time 1 Click Date and time setting for after the change 2 Click in Windows XP to display the calendar and set the recording date You can click the year display of the calendar to change the display in ...

Страница 161: ...onfirmation message is displayed click Yes The recording date and time are changed to the set date and time 8 Click OK 9 Click Close Tips Change the recording date within a range of 1971 to 2037 In the case of pictures recorded with the BABY Mode PET Mode or with the TRAVEL DATE function by the digital camera that supports these functions the age in months years or the number of travel days is not...

Страница 162: ...nd laying on the entire screen 4 Click OK It is set as the wallpaper When the picture is larger than the desktop size A confirmation window for resizing is displayed If you want to reduce the picture to the desktop size click Yes 5 Click Close Tips If the wallpaper is not displayed click the desktop and press the F5 key When a picture with an aspect ratio that is different from that of the PC disp...

Страница 163: ... in A Burn in the recording date B Burn in the number of travel days Only pictures recorded with TRAVEL DATE on a digital camera that is compatible with the TRAVEL DATE function C Burn in the age in months years Only pictures recorded with AGE on a digital camera that is compatible with BABY Mode and PET Mode D Burn in the destination selected in Travel Mode E Burn in the names registered with fac...

Страница 164: ...erformed the picture quality may deteriorate The date may not be properly burned in to pictures if the date was not set on the digital camera when the picture was taken or if it was recorded by a digital camera not manufactured by Panasonic 4 Click Save Settings A Overwrites the original picture B Save in the same folder as the original picture C Save in a different folder Click Browse and select ...

Страница 165: ...escribed Preparation Connect a printer to the PC and perform the Windows printer settings If you want to properly align the direction of text information to be printed such as the date with the picture rotate the picture the right way up 1 Click Print The Print screen is displayed You can also display it by selecting Output Print from the menu 2 Select a picture by selecting its check box and clic...

Страница 166: ...nt start The printing starts To stop printing while it is processing click Cancel 8 Click Close 9 Click Close after returning to the Print screen Tips If there are pictures imprinted with the date and title information from a digital camera that is compatible with the DATE STAMP and TEXT STAMP functions the message The same data will be printed over the existing date and the title information appe...

Страница 167: ... of a baby or pet Set title information C Prints the destination and the name age and title of the baby or pet Face Recog name settings D Print the age Set the categorisation information E Print the comments F Print the keywords G Make the background transparent Font setting H Set the font Common settings I Select the color in which to print the characters J Select the printing position A B J C E ...

Страница 168: ... left or bottom left but if this will overlap the date setting position it is printed on the right side of the picture If the title has too many letters it may overlap the date This can be prevented by changing the display position setting 3 Click OK The screen returns to the print window Setting the information to print ...

Страница 169: ... quality using the paper settings D If supported by the printer use PRINT Image Matching information or Exif Print information to retouch the picture E Print all the selected pictures F Print only the picture displayed in the print preview G Set the number of copies to print 4 Click OK The screen returns to the print window Tips If you are using a printer compatible with Epson EasyPrint module you...

Страница 170: ... 8 pictures on a page Print eight pictures on one sheet of paper 2 Select the direction of the paper 3 Select the information and other items to print Show date The recording date is printed If the number of travel days or age in months years are recorded for a picture these too are printed Show title information The title information is printed Show Face Recog name The name registered in the Face...

Страница 171: ...ll thumbnail Print about 80 thumbnails on one sheet of paper Adjust to paper Adjust to the paper size and print up to about 160 thumbnails on one sheet of paper 2 Select the direction of the paper 3 Select the information and other items to print Title The title that is entered is printed in the upper part of the paper Display of number of pages The page number is printed on the lower part of the ...

Страница 172: ...int file information Print information such as the file name and picture size Print camera information Print recording information 2 Select the direction of the paper 3 Select the information and other items to print Title The title that is entered is printed in the upper part of the paper Display of number of pages The page number is printed in the lower part of the paper 4 Click Print start ...

Страница 173: ... is printed Show Face Recog name The name registered in the Face Recognition function is printed 4 Click Print start Tips Pictures are arranged on the paper according to the picture mode setting that was specified while recording The print size of pictures is as given below Picture mode setting Print size 4 6 10 15cm L size 89 127 mm E MAIL A7 size 70 93 mm ENLARGE Size adapted to print paper Pict...

Страница 174: ...mory card and click Next 3 Select a picture by selecting its check box and click Execute 4 Select a picture 5 Set the number of copies to print A Print B The settable range for the number of copies to print is 0 to 999 If 0 is set printing is not performed C Do not print D Print the recording date E Total number of pictures set for printing Click Apply All to apply the same settings to all the sel...

Страница 175: ...d or whether to resize or convert the file format first To send the picture unchanged Check the size and then click Send Go to step 5 To convert the picture Click User settings Go to step 4 You can attach pictures to an e mail You can also convert a picture to a specified size before sending it The picture formats that can be attached to e mails are BMP JPEG TIFF and MOV Tips Large size pictures c...

Страница 176: ...F The settable range for the expansion ratio and reduction ratio is 1 to 200 File Conversion G For JPEG format specify the file size for the picture H Select the picture data format 2 Click Preview to check how the picture will look after processing 3 Click to convert other pictures Click Applies to all files to process all pictures in the same way 4 Click OK Returns to the window in step 3 5 Send...

Страница 177: ...vate it for the first time set the mail addresses etc 2 If the message Would you like to make it your default client appears select Yes If the message does not appear refer to the operating instructions of the e mail software to set the e mail software as the default client The contents of the message vary depending on the e mail software that you are using Setting example For Windows 7 or Windows...

Страница 178: ...ay back these copied pictures on a digital camera 1 Click Copy to media The Copy to media screen is displayed 2 Select the type of picture that you want to copy Still Picture Copy still pictures Motion JPEG video Copy MOV motion pictures 3 Click Next 4 Connect a device such as an SD card reader writer in which a memory card is set If the media is not displayed click Refresh ...

Страница 179: ...izing pictures 5 Select the drive memory card 6 Click Next 7 Select a picture by selecting its check box Check the total data size of the selected pictures and the free space available on the card 8 Click Execute Space required Space available ...

Страница 180: ...er saving format and file name The picture save location and file name will be as shown below P1000001 JPG P1000002 JPG P1000003 JPG The alphabetic characters of folder names differ from those in the figure depending on the model used Data in BMP format is converted to JPEG pictures with Exif information The associated files are also copied at the same time If an MOV motion picture was copied a JP...

Страница 181: ...a to a DVD RAM To write data to a CD R RW select No to enable the CD writing function 1 Click Copy to media The Copy to media screen is displayed 2 Select the type of picture that you want to copy Still Picture Copy still pictures Motion JPEG video Copy MOV motion pictures 3 Click Next Important Types of discs on which pictures can be written using this software may vary with the version of Window...

Страница 182: ...5 Select the writing drive 6 Click Next 7 Select a picture by selecting its check box Check the total data size of the selected pictures and the free space available on the disc 8 Click Next The Windows standard writing wizard starts 9 Enter the disc title For Windows 7 and Windows Vista the writing speed can also be set 10Click Next Writing to the disc starts ...

Страница 183: ... confirmation message for the completion of Copy to media is displayed click Yes Tips If there are files that are ready for writing to disc in Windows Explorer a confirmation message is displayed If copying to CD DVD is executed these files that are ready for writing are canceled To copy pictures to a DVD RAM or a disc formatted in the Windows 7 or Windows Vista Live File System first exit this so...

Страница 184: ... permission has been obtained from the related right holder Preparation Connect the PC to the Internet Register a YouTube account in advance to obtain a user name and password 1 Click Network and then select Upload to YouTube The Upload to YouTube screen is displayed You can also display it by selecting Output Network Upload to YouTube from the menu 2 Select a motion picture by selecting its check...

Страница 185: ...nter a title C Enter the contents of the motion picture D Select the category of the motion picture E Enter keywords F Set whether or not to post to the public G You can copy the same contents to other motion pictures 6 Check the file information A motion picture of up to 10 minutes in length can be uploaded 7 Click Upload A proxy settings window is displayed Set the proxy server settings to those...

Страница 186: ...es to YouTube Utilizing pictures 8 When the confirmation message for the content copyright is displayed check the contents select the check box and click OK The motion picture is uploaded 9 Click OK 10Click Cancel 11Click Close ...

Страница 187: ...t the location where you want the still picture You can also display the playback window by selecting Edit Edit movie Capture from the menu 2 Click 3 Select the save destination folder To save in a folder that is not displayed 1 Click Browse save destination folders 2 Select the folder that you want or create a new folder and then click OK 4 Enter the file name 5 Click OK A still picture with the ...

Страница 188: ...the pictures you wish to display and click Next When the connected drive or memory cards are not displayed click Refresh 3 Select the picture and click Playback The selected picture is played back The picture also plays back by clicking it Click Copy to PC to go to the selection window for pictures you want to copy Tips If you click Playback prior to selecting pictures the first picture will be pl...

Страница 189: ...ctures you wish to delete and click Next If the connected drive or memory card is not displayed click Refresh 3 Select a picture you wish to delete by selecting its check box and click Delete 4 When the confirmation message is displayed click Yes This software can be used to delete pictures stored on memory cards Pictures stored on media other than memory cards cannot be deleted with this software...

Страница 190: ...is displayed again click Yes Selected pictures will be deleted 6 Click OK 7 Click Close Tips Pictures cannot be deleted if the write protect switch on the memory card is set to the LOCK position Pictures cannot be deleted if protection settings have been applied with compatible digital cameras ...

Страница 191: ...d 2 Click General Launcher 3 Click Add No further programs may be added if 10 software programs have already been registered Deregister any programs that are no longer required 4 Select the executable file exe for the software that you want to register and click Open 5 Click Apply The software is registered When OK is clicked the settings are applied and the window is closed Tips Register software...

Страница 192: ... to be shown If Yes is clicked a maximum of 10 pictures will be opened with the registered external program If No is clicked the application does not start up If the operation is made without selecting a picture the software will simply start up Clearing registered software 1 Select Tools Settings from the menu The settings window is displayed 2 Click General Launcher 3 Select a registered softwar...

Страница 193: ...th C Save in a subfolder for the recording date Automatic start D When this check box is selected the software starts up when a digital camera or memory card is connected and displays the Copy to PC screen Reset confirmation message display E Disabled confirmation screen will be re enabled 4 Click Apply When OK is clicked the settings are applied and the window is closed You can change the setting...

Страница 194: ... playback is performed simply by placing the mouse on a motion picture thumbnail 4 Click Apply When OK is clicked the settings are applied and the window is closed Tips Audio is not played during simple playback The frame rate in simple playback is approx 2 frames a second When Preview is set simple playback is performed even for a thumbnail that collectively displays multiple pictures such as the...

Страница 195: ...uired If one of them is different from the other then pictures are acquired by adding a numerical character in the brackets at the end of the file name Manual Perform the specified process Add number to the end of the file name Save with a different name Skip Do not save Overwrite Overwrites if the file is the same same update date size If the file is not the same it does not overwrite and save bu...

Страница 196: ...ictures File unit Play back the displayed motion picture to the end and then stop Repeat Playback Play back one motion picture repeatedly Continuous playback Play back continuously the thumbnails that are displayed 4 Click Apply When OK is clicked the settings are applied and the window is closed Set the method of playback for motion pictures on the playback window ...

Страница 197: ...on updates from the menu Changing the update information setting Tips The default setting ensures update information is checked each time the program is activated For the software update procedure refer to the support page that is displayed 1 Select Tools Settings from the menu 2 Click Support Application update 3 Change the update information setting If you add a check mark the software update in...

Страница 198: ...ure 36 Exit Exits PHOTOfunSTUDIO 18 Edit Menu item Description Reference Edit still picture Counter clockwise Rotation Rotates a still picture 90 degrees counter clockwise 59 Clockwise Rotation Rotates a still picture 90 degrees clockwise 59 Resize Resizes a picture 60 Retouch Changes the brightness or color of a picture 62 Panorama stitch Stitches several still pictures to create a panorama pictu...

Страница 199: ... and face pictures 48 53 Remove from list Deletes the registered face recognition information 58 Start face analysis Starts face analysis for Face Recognition 51 Cancel face analysis Cancels face analysis for Face Recognition 51 Slide show Playback now Sets the selected pictures in a slide show for viewing 37 Create new edit Creates or edits slide shows using preferred settings 38 Load Displays th...

Страница 200: ...4 Network Upload to YouTube Uploads motion pictures to YouTube 97 Print Set DPOF Sets information such as the number of pictures to print 87 Help Menu item Description Reference Check for application updates Checks the application update information 110 About Displays the version of this software Manual Menu item Description Reference Manual Displays the operating instructions this manual ...

Страница 201: ...selected picture 29 Delete When selection is narrowed by Face Recognition information Deletes the Face Recognition category information of the selected picture 58 Protect ON Protects a picture against accidental deletion 30 OFF Cancels the protection 30 Favorite ON Sets the selected pictures as favorites 31 OFF Cancels favorites 31 Properties Displays information about the selected picture 36 When...

Страница 202: ...ht click menu list Others When Face Recognition lists are right clicked Menu item Description Reference Change Name Changes the name of the selected list 53 Delete category results Deletes the selected list 58 ...

Страница 203: ...ture with the same name associated file was also copied If you want to delete them both select both files and delete them Cannot display the picture that you want If the display is narrowed by Face Recognition or categorization item deselect the narrowing Also check whether the picture format for display is set to still pictures only or motion pictures only The error thumbnail is displayed If the ...

Страница 204: ...not be displayed even if recorded by a digital camera that had this software supplied with it Panorama pictures saved in QuickTime format cannot be played back Pictures cannot be played back if not associated with QuickTime Player Right click on the icon in Explorer and associate the picture with QuickTime Player After doing this double clicking on the thumbnail will play it back It cannot access ...

Страница 205: ...be sites When the date that the recording of motion picture started and ended is a different date which will become the recording date The date that the recording of the motion picture started will become the recording date A message regarding insufficient memory is displayed A message regarding insufficient memory may be displayed when handling large volumes of motion pictures or still pictures I...

Страница 206: ... by Seiko Epson Corporation that enables digital cameras and printers to work together If you have a compliant digital camera and printer you can reflect the conditions during recording and the photographer s intention more precisely on prints Associated file In PHOTOfunSTUDIO two files associated with each other are called associated files e g JPEG files and MOV files JPEG files and TIFF files et...

Страница 207: ...arks or trademarks of Intel Corporation in the United States and other countries QuickTime and the QuickTime logo are trademarks or registered trademarks of Apple Inc used under license therefrom YouTube is a trademark of Google Inc Microsoft product screen shot s reprinted with permission from Microsoft Corporation Other names of systems and products mentioned in these instructions are usually th...

Страница 208: ......

Страница 209: ...t at all likely and ten being extremety likely would you recommend this Panasonic product to afriend or family member Not at all likefy 1 2 3 5 6 0 0 0 0 0 0 2 Home phone Alternate phone 3 Date of birth 7 Serial number Month Year 4 Marital status 1 0 Married 2 0 Single 5 Date of purchase Month Day Year 6 Model number 9 What were the most important factors that influenced your selection of this pro...

Страница 210: ...ine club Frequent flyer 16 0 Travel in USA 17 0 Foreign travel 18 0 Cruise ship vacations 19 0 RV vacations 20 0 Casino gambling Thanks for taking the time to fill out this questionnaire Your answers will be used for market research studies and reports They will also allow you to receive important mailings and special offers from a number of fine companies whose products and services relate direct...

Страница 211: ...dependence Parkway Chesapeake VA 23320 EWS01 PANASONIC CONSUMER ELECTRONICS COMPANY PO BOX 174287 DENVER CO 80217 4287 First Class Postage Required Post Office will not deliver without proper postage I I I I I I I I I I I I I I I I I I I I I I I I I I I I I I I I I I I I I I I I I I I I I I I I I I I I I I I I I I I I I I ...

Страница 212: ... 10 days Respond promptly and receive an Early Bird discount on the Panasonic Customer Care Plan An extended service plan that assures continued top performance of your electronic product after the factory warranty has expired www panasonic com register VQC7504 ...

Отзывы: