13
RQT9199
Tips
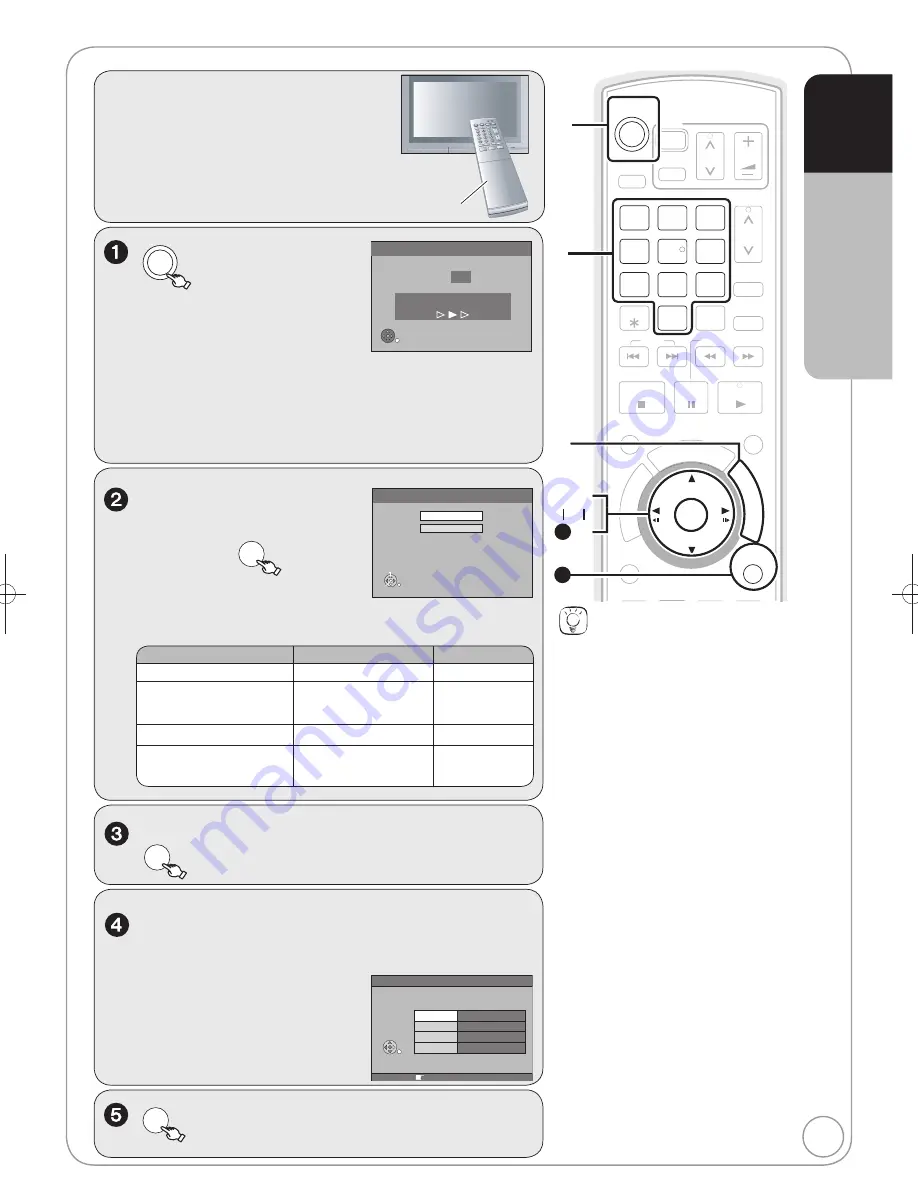
Auto-Setup
Auto-Setup
starts instead of “Download
from TV” in the following cases:
– when connecting to a television with
the VIDEO OUT, S VIDEO OUT or
COMPONENT VIDEO OUT terminal
( 75)
– when connecting to a television that
does not have the VIERA Link or Q Link
functions
This function automatically tunes all
a
v
ailable TV stations and synchronizes
the time when the TV channel that is
broadcasting time and date information is
tuned.
This takes about 8 minutes.
To cancel setup
Press [RETURN].
If the unit displays “No stations
found !”
Press [
] to select “No”, then press [OK].
Go to step
. After you have performed
steps
–
, turn off the unit and con
fi
rm
the cable or aerial input is connected
to the RF IN terminal. Restart the setup
again ( 67).
If the clock setting menu appears or
the clock is not correct, set the clock
manually ( 14).
Restarting the setup (
67)
To correct the PIN number
1. Press [
,
] to select the digit.
2. Press the numbered buttons to enter
the digit.
When this unit is not operated for
approximately 5 minutes while the screen
is being displayed, the screen saver may
be displayed.
You can turn this function off ( 70,
“Screen Saver”).
Power Save
On: Minimise standby power
consumption, without
Quick Start function and
AV2 loop-through in standby.
Off: With Quick Start
function and AV2 loop-through
in standby.
OK
RETURN
SELECT
On
Off
Power Save Function:
,
to select “On” or
“Off”, then
OK
– Set to “On” to reduce power
consumption in standby mode.
– Refer to the following chart for the Power Save function
features when the unit is turned off.
Power Save
On
Off
Power consumption
Approx. 2 W
Approx. 8 W
Watching the picture from
the digital satellite receiver
connected to the AV2 terminal
Cannot do
Can do
Startup time
Not quick
Quick
Front display
Turns off
(The clock display
disappeared.)
Stays lighted
DVD
to turn the unit on.
When connecting to a Q Link
compatible TV with a fully wired 21-pin
Scart cable or a VIERA Link (HDAVI
Control 3) compatible TV with an
HDMI cable ( 42), downloading from the television starts.
– You can download the tuning positions from the tele
v
ision
for the channels in this unit’s channel co
v
erage.
– This unit’s Auto Clock Setting function synchronizes the time
when the TV channel that is broadcasting time and date
information is tuned.
When setup has completed, the con
fi
rmation screen appears.
OK
The Owner ID settings screen appears.
, then press the numbered buttons to
enter your choice of a 4-digit PIN number.
Owner ID
RETURN : leave
PIN number
Name
House No.
Postcode
RETURN
Make a note of the PIN number
(don’t forget), as it is not possible
to return to the factory preset.
OK
to store the PIN number.
(continued on the next page)
Preparation:
Turn on the mains for the television
(and connected equipment) and
select the appropriate AV input to
suit the connections to this unit.
These are the first settings you make
upon buying the unit. You don’t need
to make these settings again.
STATUS
CREATE
CHAPTER
RETURN
PLAY/x1.3
PAUSE
STOP
SLOW/SEARCH
SKIP
CH
SELECT
INPUT
0
9
8
7
6
5
4
3
2
1
CH
AV
A
A
TV
DRIVE
SELECT
DVD
VOL
DELETE
MANUAL SKIP
AUDIO DISPLAY
VIDEO Plus+
EXIT
TIME SLIP
OK
OPTION
PROG
/CHECK
FUN
CT
IO
N M
EN
U
DIR
EC
TN
AVA
IGA
TAO
R
11
10
TV’s remote control
Download from TV
Pos
4
Download in progress. Please wait.
RETURN: to cancel
RETURN
Setting the Channels and Clock
Quick Start Guide
STEP
3
DMR-EH58EBL.indb 13
DMR-EH58EBL.indb 13
2008/05/19 17:21:06
2008/05/19 17:21:06


