background image

14

CY-VHD9401U/L

CY-VHD9401U/L

15

Before Installation

E
N

G

L

I

S
H

1

E
N

G

L

I

S
H

2

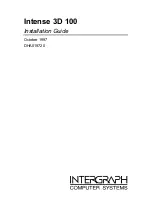
Display Unit Lateral Angle 
Adjustment

You can swivel it to the left and right, 30

e

 each way. 

Hold the display unit by the non-slip part in the 
upper half of it and adjust its lateral angle.

Open the Display Unit

1

 Push the display release button [PUSH OPEN] 

until the display is unlocked.

  (Press the button with one hand while holding 

the display with the other.)

2

 Open the display unit by both hands until a 

comfortable viewing angle is reached.

Close the Display Unit

Move the display unit by both hands until the 
display release button is locked.

Note:

 Always use both hands to open or close the 

display unit.

 Always check that the display release button is 

locked after closing the display unit.

 If the display unit cannot be locked, be sure to 

consult your dealer and remedy the situation.

[PUSH OPEN]

Safety Installation Diagram

      WARNING: 

Have a professional technician wire and install the product.
Professional skill and experience is required to wire and install the product. Improper installation could 
result in failure of safety equipment resulting in accident and injury. For safety’s sake, always ask the 
store from which you purchased the product to install and wire it for you.

Approximately 150 mm {5

15

/

16

q

}*

Approximately 
300 mm 
{11

13

/

16

q

 }

Maximum 
120˚

Approximately 300 mm 
{11

13

/

16

q

 }

 This unit opens and closes at the maximum dimensions given below. 

*  Install the product in such a way as to maintain 

the distances shown even when the display unit 
is rotated by 30˚ toward the front seat headrest 
(page 15).

Installation angle: Less than 20˚

Perform the adjustment below in order to provide the installation range shown in the fi gure on the left. 

Maximum 
120

x


30

x


30

x


Содержание CY-VHD9401N

Страница 1: ...olor con reproductor incorporado de DVD para instalaci n en el techo del auto CY VHD9401U CY VHD9401L Please read these instructions carefully before using this product and keep this manual for future...

Страница 2: ...ld cause fire electrical shock or other malfunction qNever use the car s safety equipment for installing or grounding the product Using the bolts nuts and screws of the car s safety equipment steering...

Страница 3: ...e to heed this caution may result in an accident injury and or malfunctioning qDo not poke your fingers between the ceiling and this product Failure to heed this caution may result in an injury and or...

Страница 4: ...mauvais fonctionnement o N utilisez en aucun cas les dispositifs de s curit du v hicule pour installer l appareil ou le mettre la masse L utilisation des boulons crous et vis des dispositifs de s cur...

Страница 5: ...lors de l installation de l appareil Respectez les mises en garde suivantes lors du raccordement Pour viter d endommager l appareil suivez rigoureusement les indications du sch ma de raccordement Ne...

Страница 6: ...sitio o se caiga etc mientras el veh culo est en marcha lo que podr a ocasionar accidentes y o lesiones q Siga las instrucciones para instalar y cablear el producto Si no se siguen las instrucciones p...

Страница 7: ...ales para instalar la unidad Observe las precauciones siguientes al hacer las conexiones Para prevenir da os a la unidad aseg rese de seguir el diagrama de conexiones No conecte el conector de aliment...

Страница 8: ...y unit If the display unit cannot be locked be sure to consult your dealer and remedy the situation PUSH OPEN Safety Installation Diagram WARNING Have a professional technician wire and install the pr...

Страница 9: ...ck and injury due to a short circuit accidents Contact your car dealer or manufacturer to determine the required procedure and strictly follow their instructions before attempting installation of this...

Страница 10: ...the wiring is completed If there are no plastic caps on the stereo hooking wires insulate all exposed leads with electrical tape until you are ready to use them Identify the leads in the following ord...

Страница 11: ...29 4 Get ready to attach the main unit page 26 27 E N G L I S H 8 There are five main steps to install the main unit For each step follow the detailed procedures on page 22 29 Ceiling reinforcement cr...

Страница 12: ...g reinforcement crosspieces and determine where the main unit will be installed Ceiling reinforcement crosspieces 3 Slide plate lower 1 Note Headliner construction and the position of chassis lights v...

Страница 13: ...te to prevent any mistakes in the installation position Headliner Reference holes 1 Paper template Cut out Front side Rear side 5 Pull out the wires that you pulled from the pullout opening of the bas...

Страница 14: ...nstallation you may not need to use some space washers When the space washers are to be used make absolutely sure that their height will be the same in all 6 locations Consult your dealer for details...

Страница 15: ...caution may result in an accident and or injury 5 Connect the wires and attach the main unit 1 1 2 Where the wires emerge in the front seat side at 2 positions Where the wires emerge in the rear seat...

Страница 16: ...to the sound using the accessory IR wireless headphones To the Door switch Negative Switched only Both positive and negative switched light circuits are supported by this unit s door switch If the doo...

Страница 17: ...CX DH801U option cannot be operated using this unit s CY VHD9401U CY VHD9401L remote control unit Electrical Connections continued E N G L I S H 19 E N G L I S H 20 Example of system combination CD p...

Страница 18: ...ion RCA cord option RCA cord option When a two way cord is used RCA cord option Center speaker cord option Front speaker cord L Front speaker cord R Rear speaker cord R Rear speaker cord L L white R r...

Страница 19: ...r de 30 vers la gauche ou la droite Saisissez l unit d affichage par la partie non glissante qui se trouve sur sa moiti sup rieure pour ajuster l angle lat ral Sch ma d installation s curitaire MISE E...

Страница 20: ...d s dans la m moire d un autre appareil du v hicule appareil de navigation routi re etc risquent d tre perdus si les bornes de la batterie sont d connect es Il est donc recommand de prendre en note le...

Страница 21: ...l horloge de la m moire et d autres fonctions Si le v hicule est dot d une radio ou du c blage pour radio Avec le contact coup et les phares teints identifiez le fil de batterie du v hicule en reliant...

Страница 22: ...l et remettez la garniture de toit en place pages 46 47 5 Raccordez les c bles et fixez l appareil principal pages 50 51 4 Effectuez les pr paratifs pour fixer l appareil principal pages 48 49 L insta...

Страница 23: ...plafond et d terminez l endroit o sera install l appareil principal Pi ces transversales de renforcement du plafond 3 Plaque coulissante inf rieure 1 Remarque La fabrication de la garniture de toit et...

Страница 24: ...t arri re 5 Tirez l avance les fils que vous avez fait passer par l ouverture passe fil de la plaque de base pour faciliter leur raccordement 3 Raccordez les fils de l appareil et remettez la garnitu...

Страница 25: ...m 11 4 po Couvercle avant 6 Vis a 6 9 Rondelle lastique a 6 Rondelle plate a 6 8 crous capuchon a 6 ou ou Rondelle entretoise A ou B ou C a 6 Suivant le type de v hicule o s effectue l installation ce...

Страница 26: ...et la plaque de base Il y a risque d accident et ou de blessure si vous ignorez cette mise en garde 5 Raccordez les c bles et fixez l appareil principal 1 1 2 Point de sortie des c bles du c t du si g...

Страница 27: ...ive Les syst mes commutation positive fournissent la tension aux lampes int rieures pour les allumer tandis que les syst mes commutation n gative appliquent une mise la terre pour allumer les ampoules...

Страница 28: ...commande du pr sent appareil CY VHD9401U CY VHD9401L au connecteur REMOTE IN du changeur de DVD CX DH801U en option au moyen d un cordon RCA en option Raccordez le fil de commande vid o de cet apparei...

Страница 29: ...t parleur d extr mes graves en option Haut parleur central EAB CF2 en option CY AC300 Unit d op ration en option CQ VA707WEUC Unit d affichage en option CY AC300 Appareil principal en option CY M7052...

Страница 30: ...ral de la unidad de pantalla Se puede girar hasta 30 a izquierda y derecha Sujete la unidad de pantalla por la parte antideslizante de la mitad superior y ajuste el ngulo lateral Diagrama de instalaci...

Страница 31: ...tos P ngase en contacto con su distribuidor o con el fabricante para determinar el procedimiento requerido y siga rigurosamente sus instrucciones antes de proceder a la instalaci n de este producto en...

Страница 32: ...el que hace que se ilumine la bombilla Ahora apague el motor de encendido y luego enci ndalo Si la bombilla tambi n se apaga y se enciende ese cable es el cable de alimentaci n del veh culo Si su veh...

Страница 33: ...gina 66 Abajo se muestra un ejemplo de instalaci n para su referencia Primero desprenda la cabecera A continuaci n monte firmemente las placas deslizantes superior e inferior y la placa base suminist...

Страница 34: ...fuerzo del techo y determine d nde se debe instalar la unidad principal Travesa os de refuerzo del techo 3 Placa deslizante inferior 1 Nota La estructura de la cabecera y la posici n de las luces del...

Страница 35: ...ontal Lado posterior 5 Antes de nada tire hacia afuera de los cables por el orificio de salida de la placa base con el fin de facilitar el cableado 3 Efect e el cableado de la unidad y vuelva a coloca...

Страница 36: ...6 8 Tuercas de presi n a 6 o o Arandela espaciadora A o B o C a 6 Dependiendo del tipo de veh culo en donde se efect e la instalaci n puede no ser necesario usar algunas arandelas Cuando haya que usa...

Страница 37: ...s de los sujetadores de cables Precauci n Los cables deben empalmarse de manera que nunca entren en contacto con los tornillos ni sean pillados entre las placas Precauci n Al conectar cables pelados a...

Страница 38: ...al Cable de salida remoto Al terminal de entrada remota del cambiador DVD de Panasonic CX DH801U opcional Nota para conectar las luces de b veda Tipo conmutado de puerta negativo Tipo conmutado de pue...

Страница 39: ...ta unidad CY VHD9401U CY VHD9401L al conector REMOTE IN del cambiador DVD CX DH801U opcional utilizando un cable RCA opcional Conecte el conductor de control de v deo de esta unidad CY VHD9401U CY VHD...

Страница 40: ...pesado etc Aseg rese de que el cable no est demasiado tenso al conectarlo No doble el cable en ngulos muy cerrados CY AC300 Unidad principal opcional CY M7052 opcional CQ VA707WEUC Unidad de control...

Страница 41: ...o Rico Inc PSC Ave 65 de Infanteria Km 9 5 San Gabriel Industrial Park Carolina Puerto Rico 00985 http www panasonic com Panasonic Canada Inc 5770 Ambler Drive Mississauga Ontario L4W 2T3 http www pan...

Отзывы: