74
Setup Software
(continued)
The screens of Windows 10 are used in the explanations in this manual.
If you are using an operating system other than Windows 10, some of the items displayed on the screens may differ.
Settings for connecting with the remote cameras
z
z
When connecting with the remote camera, select [MAINTENANCE] > [RP SETTING] of the unit and register the ID and password in advance.
(page 53)
z
z
When using Setup Software, select [MAINTENANCE] > [RP SETTING] > [PC_TOOL LINK] of the unit and set [ENABLE]. (page 53)
z
z
If you forget the ID or password, execute initialization on this unit with [MAINTENANCE] > [RP INITIALIZE] > [INIT ALL], then reset the ID and
password.
Note that when this operation is performed, all the setting values on this unit are returned to the factory defaults.
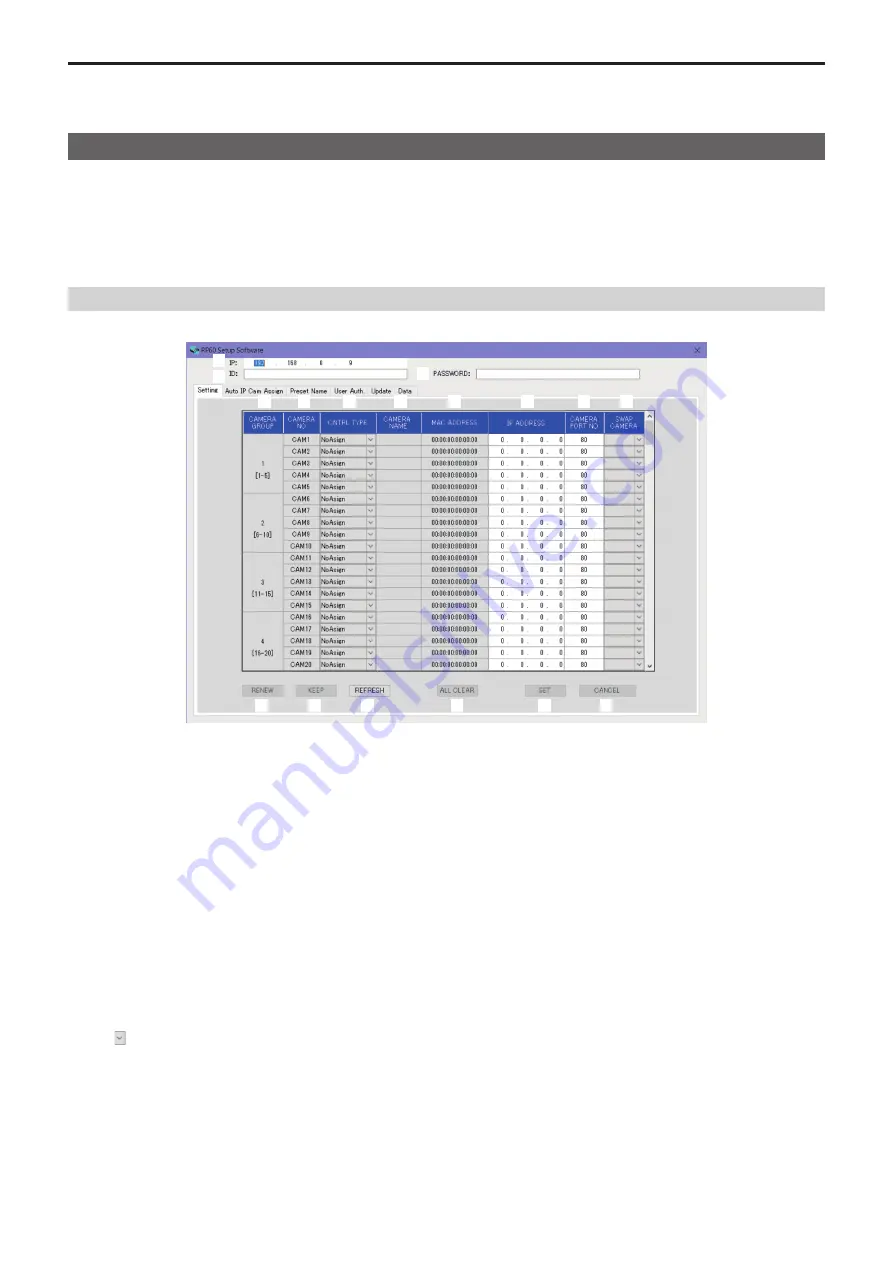
Displaying the [Setting] tab
1
2
3
12
13
17
14
15
16
4
5
9
10
11
6
7
8
1 IP
Set the IP address for the AW‑RP60 to be connected.
2 ID
Set the ID registered in the AW‑RP60 to be connected.
3 PASSWORD
Set the password registered in the AW‑RP60 to be connected. The password is displayed as “*”.
When operating the buttons for each menu item (tab), the account information (1 to 3) above is used for the authentication by AW‑RP60.
4 CAMERA GROUP
The camera group number is displayed.
5 CAMERA NO
The camera number is displayed.
6 CNTRL TYPE
Select the connection type.
Click on the right and select the connection type from amongst [Serial], [Network], and [NoAsign].
Serial
:
Serial connection
Network :
IP connection
NoAsign :
No setting
Camera numbers [CAM1] to [CAM5] can be selected for [Serial].
7 CAMERA NAME
Displays the camera name set on the remote camera.
z
z
These are displayed when they are acquired with [AUTO IP SET] on the main unit or with [AUTO IP CAM ASSIGN] on this software.


