background image

4 (F)

FRANÇAIS

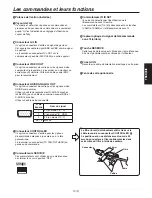
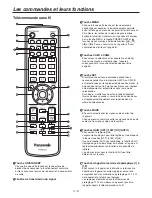
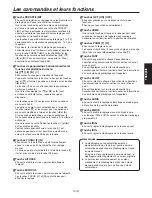
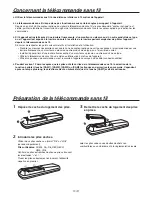
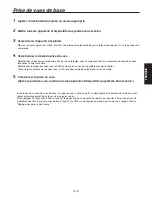
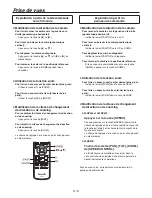
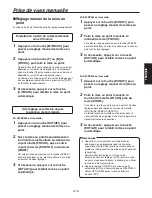
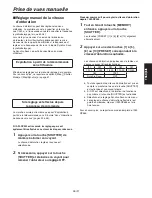
Prise de vues de base

1

  Ajuster la luminosité du sujet à un niveau approprié.

2

  Mettre tous les appareils et dispositifs du système sous tension.

3

  Sélectionner l’appareil à exploiter.


 Même si un seul appareil est utilisé, il doit tout de même est sélectionné depuis la télécommande sans fil ou le panneau de 
commande.

4

  Sélectionner le mode de prise de vues.


 Sélectionner un des quatre modes de prise de vues préréglés, chacun correspondant à un ensemble de conditions dans 
lesquelles le sujet sera filmé.  
Sélectionner le mode répondant aux conditions de prise de vues et aux préférences personnelles. 
Tant que les conditions ne changent pas, il n’est pas nécessaire de sélectionner un autre mode.

5

   Commencer la prise de vues. 

(Après la prise de vues, mettre tous les appareils et dispositifs du système hors tension.)

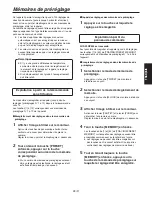
Dans le cas de la prise de vues de base, on suppose que la mise au point, le diaphragme et la balance des blancs seront 
réglés automatiquement (dans le cas des réglages usine).
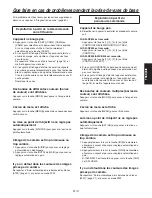
Si les réglages ont déjà été modifiés et que les réglages originaux doivent être rétablis, se reporter à “Que faire en cas de 
problèmes pendant la prise de vues de base” (page ) et “Menus de réglage du mode de prise de vues” (page 49) dans 
“Réglage des options des menus”.

Содержание AW-HE100E

Страница 1: ...eparately РУССКИЙ FRANÇAIS DEUTSCH ENGLISH ITALIANO ESPAÑOL Before operating this product please read the instructions carefully and save this manual for future use Operating Instructions HD Integrated Camera Model No AW HE100E VQTB0332 3 ...

Страница 2: ...INJURY THIS APPARATUS MUST BE SECURELY ATTACHED TO THE FLOOR WALL IN ACCORDANCE WITH THE INSTALLATION INSTRUCTIONS CAUTION In order to maintain adequate ventilation do not install or place this unit in a bookcase built in cabinet or any other confined space To prevent risk of electric shock or fire hazard due to overheating ensure that curtains and any other materials do not obstruct the ventilati...

Страница 3: ...ler IF THE FITTED MOULDED PLUG IS UNSUITABLE FOR THE SOCKET OUTLET IN YOUR HOME THEN THE FUSE SHOULD BE REMOVED AND THE PLUG CUT OFF AND DISPOSED OF SAFELY THERE IS A DANGER OF SEVERE ELECTRICAL SHOCK IF THE CUT OFF PLUG IS INSERTED INTO ANY 13 AMP SOCKET If a new plug is to be fitted please observe the wiring code as shown below If in any doubt please consult a qualified electrician WARNING This ...

Страница 4: ...lock adjustment 36 Basic menu operations 39 Setting the menu items 47 Menu item table 56 Limiters 57 Setting releasing the limiters 58 Safe modes 59 Troubleshooting 60 Maintenance 62 Replacing the consumable parts 62 Removing the unit 63 Appearance 64 Specifications 65 Caution The manual of this HD integrated camera hereafter the unit is divided into two manuals one is the Operating Instructions t...

Страница 5: ...Cable cover 1 Mounting screws with flat washers spring washers M4 8 mm 4 Cable cover screws flat head M3 6 mm 2 Screw concealment sheet 2 Rubber feet 4 Rubber foot screws black M4 6 mm 4 Filter 1 Clampers 2 Overview This unit is a multi format camera that integrates a pan tilt head and a zoom lens By integrating the camera lens and pan tilt head it has now become easier to install the unit than be...

Страница 6: ...tion with noise levels of NC30 for operations at 30 s and NC35 for operations at 60 s Storage of up to 100 positions in the preset memory The number of preset memory settings differs depending on the controller that is used with the unit High degree of compatibility with Panasonic s currently available controllers enabling a flexible system to be put together Up to five units and devices can be op...

Страница 7: ...igh temperature and humidity levels will cause its parts to deteriorate and shorten its service life Do not expose the unit directly to the heat given off in the installation location or heat from a heater or other such appliance The accessory parts provided with the unit must be used without fail to install the unit Be absolutely sure to use the mounting brackets and mounting screws provided with...

Страница 8: ...Do not approach the moving parts Under no circumstances should you bring your fingers or other parts of your body near the moving parts since doing so may result in injury The unit comes with safe modes The safe modes are functions designed to protect people and property from injury and the pan tilt head unit from damage For further details refer to Safe modes page 59 Turn off the power before con...

Страница 9: ...RP400 response to these operations may be slower compared with cases when other Panasonic camera and pan tilt head systems are used The AW CB400 cannot be connected directly to this unit The AW CB400 must be connected together with the AW RP400 and AW IF400 in combination The camera setting menus of the AW CB400 cannot be used Use the camera setting menus of the unit instead R B PED dials cannot b...

Страница 10: ...nding on the status of the unit Orange When the standby status is established Green When the power is on Red When trouble has occurred in the unit Green and blinks twice When a signal matched by the remote control ID has been received from the accessory wireless remote control while the power is on Orange and blinks twice When a signal which is not matched by the remote control ID has been receive...

Страница 11: ...Signal name 1 Pr In Y C mode C 2 Y In Y C mode VBS 3 Pb In Y C mode Y 4 to 15 GND CONTROLLER connector This is the input connector for the control signals of the camera unit or pan tilt head unit Connect it to the TO PAN TILT HEAD connector on the controller SERVICE switches These switches are used for maintenance purposes Keep them all at the OFF position IR ID SET switches These are used to sele...

Страница 12: ... are automatically adjusted and registered in the memory currently selected Alternatively if this button is pressed briefly less than two seconds only the white balance is automatically adjusted and registered in the memory currently selected 6MODE button This is used to select the video signals which are output from the unit Each time it is pressed the signals are switched between the colour bar ...

Страница 13: ...ocus M FOCUS button This is used when manually adjusting the lens focus The FOCUS buttons F and N are used when performing the actual adjustment OPT buttons ON OFF These are used for future expansion of the functions They are not used at the present time HOME button When this is pressed for two seconds the unit s direction panning or tilting returns to the reference position ZOOM buttons T W These...

Страница 14: ...away from fluorescent lights plasma monitors and other such products Operate the wireless remote control at positions within 3 meters from the unit Use a controller that has been connected to the unit using a cable wired connection For about 10 minutes even after the batteries have been removed from the wireless remote control the selection of the operation to be performed the CAM1 CAM2 CAM3 or CA...

Страница 15: ...t Select the mode that satisfies the shooting conditions and suits your preferences When continuing to shoot in the same circumstances there is no need to select another mode 5 Start shooting After shooting turn off the power of all the units and devices in the system With the basic operations it is assumed that the focus iris and white balance will be adjusted automatically as per the factory set...

Страница 16: ...hed by the remote control ID has been received and it blinks orange when a signal that is not matched by the remote control ID has been received When performing the operations using the controller 1 Set all the power switches of the units and devices connected in the system to ON This unit does not have a power switch When power is supplied to it the status display lamp will light up orange 2 Set ...

Страница 17: ... of units are going to be used repeat steps 1 and 2 as required 4 Set all the power switches of the units and devices connected in the system to OFF When performing the operations using the controller 1 Set the OPERATE switch on the controller to OFF The power of all the cameras including the unit connected to the controller is turned off The unit s status display lamp now lights up orange 2 Set a...

Страница 18: ...y the remote control ID has been received and it blinks orange when a signal that is not matched by the remote control ID has been received When performing the operations using the controller When the AW RP655 is connected Press the 1 2 3 4 or 5 button of CONTROL PREVIEW MONITOR OUT SEL When the AW RP555 is connected Press the 1 2 3 4 or 5 button of CONTROL When the AW RP400 AW CB400 is connected ...

Страница 19: ...d other adjustments are stored in the memory separately by shooting mode Be absolutely sure to select the shooting mode before making any adjustments Halogen light mode Halogen This mode is suited to shooting indoors at wedding receptions parties seminars event venues and so on Fluorescent light mode Fluorescent This mode is suited to shooting indoors under fluorescent lighting Daylight mode Dayli...

Страница 20: ...mera Setting sub menu is displayed Camera Setting Halogen Fluorescent Daylight User Return 5 Press the or button to make the shooting mode to be used blink Each time the or button is pressed the blinking item changes When Return is made to blink and the or button is pressed operation returns to the previous menu 6 Press the or button The unit is now set to the shooting mode that is blinking and a ...

Страница 21: ... made to blink and the jog dial main is turned counterclockwise operation returns to the previous menu 9 Turn the jog dial main counterclockwise The unit is now set to the shooting mode that is blinking and a sub menu is displayed Halogen Mode Set Brightness Set Colour Set G L Set Other Set Initialize Return Example Halogen mode 10 Press the MENU button or R B GAIN PED button The menu display is e...

Страница 22: ...the camera s direction Moving the camera toward the left or right panning Tilt the PAN TILT lever toward L or R Moving the camera up or down tilting Tilt the PAN TILT lever toward UP or DOWN Moving the camera diagonally Tilt the PAN TILT lever diagonally Returning the camera to the reference position If the controller has a HOME button press the HOME button Using the zoom function Zooming in the s...

Страница 23: ...lly to the gain adjustment Something is wrong with the colouring of the camera pictures Refer to Auto tracking white adjustment ATW page 31 and switch to ATW When performing the operations using the controller The unit does not move Select the unit to be operated by following the procedure below When the AW RP655 is connected Press the 1 2 3 4 or 5 button of CONTROL PREVIEW MONITOR OUT SEL When th...

Страница 24: ...r adjustment is required provided that the unit is going to be used under the same conditions Black balance adjustment This adjustment is performed to express the black accurately Its setting also has an effect on the colour tones of the entire screen It must be performed when using the unit for the first time or when the unit has not been used for a prolonged period It must be performed when the ...

Страница 25: ...e automatic adjustment When the AW RP555 is connected 1 Press the EXT AF button to switch the focus to manual adjustment 2 Adjust the focus manually by tilting the FOCUS lever Furthermore every time the SPEED button is pressed the speed of the focusing and other adjustments can be switched to fast or slow 3 If necessary press the EXT AF button to return the focus to the automatic adjustment When t...

Страница 26: ...s to the automatic adjustment When the AW RP555 is connected 1 Press the IRIS button to turn off its lamp and switch to manual adjustment 2 Turn the LEVEL dial of IRIS to adjust the iris manually 3 If necessary press the IRIS button to turn on its lamp and switch to automatic adjustment in order to return the iris to automatic adjustment When the AW RP400 AW CB400 is connected 1 Press the IRIS but...

Страница 27: ... is connected the adjustments can also be performed by following the steps below 1 Press the SHUTTER button and turn its lamp on The shutter speed set ahead of time is selected 2 If necessary press the SHUTTER button and turn its lamp off in order to return the shutter to the OFF setting Follow the steps below to set the shutter speed using the AW RP555 1 With the MEMORY button still held down pre...

Страница 28: ...the AW RP655 2 If necessary press the GAIN button and turn on the AUTO lamp in order to return the gain to the automatic adjustment AGC When the AW RP555 is connected 1 Press the GAIN button to turn off its lamp Each time this button is pressed one of the three gain increase amounts can be selected in sequence The current status is displayed as follows MANU L button MANU H button GAIN button 0 dB ...

Страница 29: ...ngle Adjust the focus and iris if they need to be adjusted 2 While holding down the PRESET button press the button corresponding to the preset memory number If a preset memory number with an already registered setting has been selected the existing setting will be erased and replaced with the new one Calling the settings of the preset memories 1 Press the button in which the preset memory setting ...

Страница 30: ...tor Operate the PAN TILT lever and ZOOM lever to determine the camera angle Adjust the focus and iris if they need to be adjusted 2 Hold down the MEMORY button The buttons among the 1 to 10 buttons of PRESET in which settings can be registered now start blinking in sequence 3 With the MEMORY button still held down press the button of the preset memory number in which the setting is to be registere...

Страница 31: ... the white balance has been adjusted when the unit is used with the same settings and under the same conditions its setting is completed simply by selecting a menu setting or pressing a button on the controller There is no need to set it again Once a new setting is entered the previous setting will be erased Use the two memories to store settings corresponding to different shooting conditions Auto...

Страница 32: ...memory the set white balance will remain in the memory even if power is turned off Therefore it is not necessary to reset the white balance if the colour temperature of those objects remains unchanged However it must be reset if the colour temperature changes such as when you move from indoors to outside or vice versa When the camera is used alone red blue gain adjustment of painting setting will ...

Страница 33: ...button The Colour Set sub menu is displayed Colour Set Chroma Level 1 White Bal AWC A Pedestal 1 Painting R Gain 1 B Gain 1 Return 6 Press the or button to make the R Gain or B Gain value blink 7 Press the or button to change the value and adjust this value in such a way that the carrier of the white parts of the video signals is minimized or that the white parts of the picture are made completely...

Страница 34: ... Automatic adjustment in White balance adjustment page 30 The auto white balance adjustment AWC and auto black balance adjustment ABC can be performed and the black balance setting entered The white balance setting is also entered at the same time so ensure that the conditions for adjusting the white balance are met before proceeding The black balance cannot be adjusted when colour bars are displa...

Страница 35: ...nual mode 2 Press the IRIS button The lens iris is stopped down 3 Select the user mode following the steps in Selecting the shooting modes scene files page 19 At this time keep the User Mode Set sub menu on the display User Mode Set Brightness Set Colour Set G L Set Detail Set Other Set Initialize Return 4 Press the or button to make Colour Set blink 5 Press the or button The Colour Set sub menu i...

Страница 36: ...The same operations as those in steps 3 to 8 of When performing the operations using the accessory wireless remote control can be performed following the operation procedure for Basic menu operations page 43 When the AW RP400 AW CB400 is connected The following operations are performed using the AW CB400 1 Press the IRIS button several times to turn off its lamp Set the iris to the manual MANU mod...

Страница 37: ...erforming the operations using the accessory wireless remote control 1 Set to the user mode by following the steps in Selecting the shooting modes scene files page 19 At this time keep the Mode Set sub menu on the display The horizontal phase adjustment is common to all shooting modes scene files but when the wireless remote control is used to perform the adjustment the shooting mode must be selec...

Страница 38: ...y if a vectorscope is used for the adjustment Colour bar of camera Split line Colour bar of special effects generator When performing the operations using the accessory wireless remote control 1 Press the MODE button The mode is switched to the colour bar display 2 Set to the user mode by following the steps in Selecting the shooting modes scene files page 19 At this time keep the Mode Set sub men...

Страница 39: ...on for two seconds The menu display is exited 8 Press the MODE button The mode is switched to the camera picture display When doing the adjustment using the controller The same operations as in steps 2 to 7 of When performing the operations using the accessory wireless remote control can be performed following the operation procedure for Basic menu operations pages 39 to 46 To switch between BAR c...

Страница 40: ...tons of CONTROL PREVIEW MONITOR OUT SEL Press one of the 1 to 5 buttons of CONTROL Press one of the 1 to 5 buttons of CONTROL SELECT Displaying the main menu Press the MENU button for two seconds 1 Press the MENU button The display on the AW RP655 s LCD panel changes to the menu mode 2 Turn the jog dial main and display CAMERA SETTING on the LCD panel 3 Press the OK button and display OPEN CAMERA ...

Страница 41: ...ub menu items have a sub menu of their own 5 Press the or button to make the item to be set or the setting blink Each time the or button is pressed the blinking item changes When Return is made to blink and the or button is pressed operation returns to the previous menu While the menus are displayed the and button have the same functions Bear in mind however that if the button is pressed when it i...

Страница 42: ...pressing this jog dial when the set value can be changed will change the set value in the positive direction Jog dial R When the LCD is in the gain adjustment mode Adjust the B GAIN setting 30 to 30 When the LCD is in the pedestal adjustment mode This operation is not available When the camera menu mode is established Change set value Changing the set values in the camera menu Turn clockwise Set v...

Страница 43: ...be set or the setting blink Each time the jog dial L is turned the blinking item changes When the Return is made to blink and the jog dial L is pressed operation returns to the previous menu 9 Turn the jog dial R to change the setting 10After the setting has been completed press the MENU button or R B GAIN PED button The menu display is exited Press other buttons when in the camera menu mode to ex...

Страница 44: ...d the mode switches between Auto Focus and Manual Focus The EXT AF button lights when the camera is in the Auto Focus mode These buttons cannot be used for controlling the AW HE100 1 Press one of the 1 to 5 buttons of CONTROL to select the unit which is to be operated 2 Press the MENU button for two seconds The main menu is displayed on the monitor 3 Press the MENU or ITEM button to make the item ...

Страница 45: ...ssed operation returns to the previous menu 6 Press the YES or NO button to change the setting Press the YES button to change the set value in the positive direction and press the NO button to change the set value in the negative direction 7 After the setting has been completed press the MENU button for two seconds The menu display is exited It may be necessary to upgrade the software version in o...

Страница 46: ... TRACING MEMORY function is not available The R B PED dial is not available The camera menu operation becomes available when the CAMERA MENU CNT item is set to ENABLE in the LCD menu of the AW CB400 OPTION SW A Opens the menu and also scrolls up the item list B Scrolls down the item list C Confirms the item selection and also changes a set value in the positive direction D Changes a set value in t...

Страница 47: ...ink and the C button is pressed operation returns to the previous menu 6 Press the C or D button of OPTION SW to change the setting Press the C button of the OPTION SW to change the set value in the positive direction and press the D button of the OPTION SW to change the set value in the negative direction 7 After the setting has been completed press the A button of OPTION SW for two seconds The m...

Страница 48: ... level of vibration accompanying the acceleration or deceleration initiated by the stop operation is less at the Soft setting than at the Just exact setting 5 Desktop stand alone installation Hanging suspended installation selection Install Position Desktop Hanging Factory setting Desktop Using this item select stand alone Desktop or suspension from an overhead surface Hanging as the manner in whi...

Страница 49: ...menu operations 4 After changing this item turn off the unit s power and turn it back on 9Initialization Initialize Using this item the settings of all the items on the Pan Tilt Head Setting menu are returned to the factory settings Refer to the section on the right Return to the previous menu main menu Return Concerning initialization When Initialize is selected the initialization confirmation sc...

Страница 50: ...G L Set Other Set Initialize Return 6 7 8 Daylight mode setting menu Daylight Mode Set Brightness Set Colour Set G L Set Other Set Initialize Return 6 7 8 User mode setting menu User Mode Set Brightness Set Colour Set G L Set Detail Set Other Set Initialize Return 6 7 8 9 6 Brightness setting menu display Brightness Set The brightness setting menu of this shooting mode is displayed here 7Colour se...

Страница 51: ...n in the halogen light mode When O K is selected while the initialization confirmation screen is displayed the screen shown below appears and initialization is performed Press the or button to make O K blink and press the or button When initialization is completed the display returns to the setting menu for the shooting mode concerned Halogen Mode initialize Example Halogen mode When O K is not se...

Страница 52: ...uddenly causing the image output to be subjected to a shock Note 4 AGC maximum gain selection AGC Max Gain 6dB 12dB 18dB Factory setting 18dB Using this item the maximum gain when Auto has been selected as the gain adjustment Gain setting is set 5 Return to the previous menu menu for selecting the shooting mode Return User mode brightness setting menu Brightness Set A Iris Level 1 Shutter Mode Syn...

Страница 53: ...e previous status is erased from the memory If AWC auto white balance adjustment or a manual white balance adjustment is performed in the status selected by AWC A or AWC B the resulting status will be stored in the memory 3200K The white balance that was adjusted under 3200K lighting conditions equivalent to a halogen light is established 5600K The white balance that was adjusted under 5600K light...

Страница 54: ...u is provided in the user mode only Detail Set Detail On Total Detail Level 2 V Detail Level 4 Noise Suppress 0 Return 1 2 3 4 5 1Detail ON OFF selection Detail On Off Using this item ON or OFF is selected for detail compensation When On is selected the amount of the detail compensation can be adjusted using the Total Detail Level and V Detail Level menu items 2 Total detail level selection Total ...

Страница 55: ...deo format Format setting either 16 9 squeeze or 4 3 sides cut off is selected as the aspect ratio When 1080i or 720p has been selected as the video format Format setting appears and the aspect ratio cannot be selected At this time the aspect ratio of the composite signals is fixed at 16 9 squeeze 5 AWC ABC operation status display ON OFF selection Status Off On Factory setting Off Using this item...

Страница 56: ...een shown below on which to confirm the setting changes appears when an operation involving a transfer to another item has been performed when the or button is pressed Other Set Focus Auto Iris Auto Format 1080i Change Setting O K CANCEL Return Example Halogen mode When O K is selected the video format is changed and the other setting menu Other Set is restored Press the or button select O K and p...

Страница 57: ... Auto Format 1080i Aspect 16 9 Status Off Component Y Pb Pr Focus ADJ With Zoom On Return Initialize Return Menu Item Factory setting Camera Setting Daylight Brightness Set A Iris Level 0 Step Off Gain Auto AGC Max Gain 18dB Return Colour Set Chroma Level 0 White Bal ATW Return G L Set H Phase 0 SC Coarse 90deg SC Fine 0 Return Other Set Focus Auto Iris Auto Format 1080i Aspect 16 9 Status Off Com...

Страница 58: ...setting the limiters directly before any such obstacle The positions of four limiters namely the upper lower left most and right most limits of the travel range can be set Once they have been set the positions will not be lost even after the power has been turned off The limiters can be set and released using either the accessory wireless remote control or the controller Whatever was set or releas...

Страница 59: ...as the position which will serve as the left most limit Next perform the steps in Basic limiter operations and press the button for two seconds while holding down the PRESET button Setting the right most limit position of the movement range Press the or button of the wireless remote control to turn the unit as far as the position which will serve as the right most limit Next perform the steps in B...

Страница 60: ... Collision triggered safe mode return the panning or tilting to a neutral position 2 Trouble triggered safe mode When trouble has occurred inside the unit the Trouble triggered safe mode is established the unit s functions are shut down and the status display lamp lights up red To release the Trouble triggered safe mode first place the unit in the standby mode turn its power off and then turn it b...

Страница 61: ...te control is operated near the wireless remote control signal light sensing area it means that the batteries have run down Replace the batteries Is there a fluorescent light or plasma monitor near the unit and if so is the wireless remote control signal light sensing area exposed to its light P 13 Cannot operate using the controller Is the unit connected to the controller properly Refer to the Op...

Страница 62: ...h to the camera picture P 22 The menu screen is displayed Exit the menu P 39 to 46 No auto focusing Is the focus set to manual Auto focusing is initiated as soon as the focus is set to auto P 22 In some situations it may be hard to focus at the auto setting In cases like this select the manual setting and focus manually P 24 Something is wrong with the colouring of the pictures Activate the ATW Au...

Страница 63: ...ch is used to clean eyeglasses and cameras Do not use benzine paint thinner or other volatile liquids When using a chemical duster carefully read the caution notes on its use Notes Replacing the consumable parts The belt is consumable It needs to be replaced at periodic intervals For details on the belt replacement consult your dealer Replacing the belt As a general rule of thumb the belt needs to...

Страница 64: ...pped During the course of the work be sure to hold the unit by its base area Removing the unit while holding it by its lens area or rotating parts may result in malfunctioning Ensure that the removal work is undertaken by a two member crew 1 Remove the cable cover Remove the screw concealment sheets remove the two screws and then remove the cable cover The cable cover is provided with tabs Pull th...

Страница 65: ...64 E ENGLISH Appearance Unit mm ...

Страница 66: ...ut connector Composite 1 0 Vp p 75 BNC 1 HD SD analogue component or SD Y C signals VGA 15P 1 Y C signals available in SD mode only switching with Y Pb Pr signals possible using menu setting SD HD selection possible when Y Pb Pr signals are output INPUT OUTPUT Input Output connector CONTROL IN RS422A RJ 45 FUNCTIONS AND PERFORMANCE Camera unit Imaging sensors 1 3 CCD imaging sensors 3 inter line t...

Страница 67: ...External synchronization BBS or VBS BNC 1 Pan tilt head unit Installation method Stand alone Desktop or suspended Hanging To ensure safety the unit must be secured using the accessory brackets Be sure to ask a qualified contractor to install the unit Controller connections Connecting cable 10BASE T STP category 5 straight cable Max 1000 m Control only Use of an external device or some other means ...

Страница 68: ...Netzsteckdose angeschlossen werden muss DEUTSCHE AUSGABE GERMAN VERSION Öffnen Sie nicht das Gerät durch Abschrauben von Gehäuseteilen Zur Vermeidung von elektrischem Schlag darf das Gehäuse nicht geöffnet werden Im Geräteinneren befinden sich keine Teile die vom Benutzer gewartet werden können Wartungs und Reparaturarbeiten grundsätzlich autorisiertem Kundendienstpersonal überlassen WARNUNG UM BR...

Страница 69: ... verhindert mögliche schädliche Auswirkungen auf Mensch und Umgebung die aus einer unsachgemäßen Handhabung von Abfall entstehen können Genauere Informationen zur nächstgelegenen Sammelstelle erhalten Sie bei Ihrer Gemeindeverwaltung In Übereinstimmung mit der Landesgesetzgebung können für die unsachgemäße Entsorgung dieser Art von Abfall Strafgebühren erhoben werden Für Geschäftskunden in der Eur...

Страница 70: ...egende Menüoperationen 39 Einstellen der Menüposten 47 Tabelle der Menüposten 56 Begrenzungen 57 Festlegen Aufheben der Begrenzungen 58 Sicherheitsmodi 59 Fehlersuche 60 Wartung 62 Auswechseln von Verbrauchsteilen 62 Entfernen des Geräts 63 Maßzeichnungen 64 Technische daten 65 Vorsicht Die Anleitung dieser integrierten HD Kamera im Folgenden Gerät genannt ist in zwei Teile unterteilt Der eine ist...

Страница 71: ...igungsschrauben mit Unterlegscheiben Federscheiben M4 8 mm 4 Kabelabdeckungsschrauben Flachkopf M3 6 mm 2 Schraubenkappe 2 Gummifüße 4 Gummifußschrauben schwarz M4 6 mm 4 Filter 1 Kabelbinder 2 Übersicht Bei diesem Gerät handelt es sich um eine Multiformatkamera mit integriertem Schwenk Neigekopf und Zoomobjektiv Durch Integrieren von Kamera Objektiv und Schwenk Neigekopf ist es jetzt einfacher al...

Страница 72: ...b mit Geräuschpegeln von NC30 für Betrieb mit 30 s und NC35 für Betrieb mit 60 s Speicherung von bis zu 100 Positionen im Vorwahlspeicher Die Anzahl der Vorwahlspeichereinstellungen hängt von dem mit dem Gerät verwendeten Steuergerät ab Hochgradige Kompatibilität mit aktuell erhältlichen Panasonic Steuergeräten ermöglicht Zusammenstellung eines flexiblen Systems Bis zu fünf Geräte und Vorrichtunge...

Страница 73: ...ung seiner Teile und einer Verkürzung seiner Lebensdauer Setzen Sie das Gerät nicht direkt der am Installationsort abgegebenen Wärme oder der Wärme eines Heizkörpers oder eines anderen derartigen Gerätes aus Die mit dem Gerät gelieferten Zubehörteile müssen unbedingt zur Installation des Gerätes verwendet werden Verwenden Sie unbedingt die mit dem Gerät gelieferten Haltebügel und Befestigungsschra...

Страница 74: ...len fern Bringen Sie auf keinen Fall Ihre Finger oder andere Körperteile in die Nähe der beweglichen Teile weil es sonst zu Verletzungen kommen kann Das Gerät ist mit Sicherheitsmodi ausgestattet Die Sicherheitsmodi haben die Aufgabe Personen und Eigentum vor Schaden und die Schwenk Neigekopfeinheit vor Beschädigung zu bewahren Weitere Einzelheiten dazu unter Sicherheitsmodi Seite 59 Schalten Sie ...

Страница 75: ...deren Kamera und Schwenk Neigekopfsystemen von Panasonic sein Das AW CB400 kann nicht direkt an dieses Gerät angeschlossen werden Das AW CB400 muss in einer Kombination zusammen mit dem AW RP400 und AW IF400 angeschlossen werden Die Kamera Einstellungsmenüs des AW CB400 können nicht benutzt werden Verwenden Sie statt dessen die Kamera Einstellungsmenüs des Gerätes Die Knöpfe R B PED können nicht b...

Страница 76: ...enn der Bereitschaftszustand aktiviert wird Grün Wenn die Stromversorgung eingeschaltet ist Rot Wenn eine Störung im Gerät aufgetreten ist Grün und zweimaliges Blinken Wenn im eingeschalteten Zustand ein Signal von der drahtlosen Fernbedienung empfangen worden ist das mit der Fernbedienungskennung übereinstimmt Orange und zweimaliges Blinken Wenn im eingeschalteten Zustand ein Signal von der draht...

Страница 77: ...lbezeichnung 1 Pr Im Y C Modus C 2 Y Im Y C Modus VBS 3 Pb Im Y C Modus Y 4 bis 15 MASSE Buchse CONTROLLER Dies ist die Eingangsbuchse für die Steuersignale der Kameraeinheit oder der Schwenk Neigekopfeinheit Sie wird mit der Buchse TO PAN TILT HEAD am Steuergerät verbunden Schalter SERVICE Diese Schalter sind Wartungszwecken vorbehalten Sie müssen alle in der Position OFF belassen werden Schalter...

Страница 78: ... gewählten Speicher registriert Wird dagegen diese Taste kurz gedrückt weniger als zwei Sekunden wird nur der Weißabgleich automatisch eingestellt und im gegenwärtig gewählten Speicher registriert 6Taste MODE Diese Taste dient der Wahl des vom Gerät ausgegebenen Videosignals Mit jedem Drücken wird zwischen Farbbalkensignal und Kamera Videosignal umgeschaltet 7Tasten GAIN OFF LOW HI AUTO Diese Tast...

Страница 79: ...ng des Objektivfokus verwendet Die Tasten FOCUS F und N werden zur Durchführung der tatsächlichen Einstellung verwendet Tasten OPT ON OFF Diese Tasten sind zukünftigen Funktionserweiterungen vorbehalten Vorläufig werden sie nicht benutzt Taste HOME Wenn diese Taste zwei Sekunden lang gedrückt wird wird die Richtung Schwenken oder Neigen des Gerätes auf die Bezugsposition zurückgestellt Tasten ZOOM...

Страница 80: ...Installieren Sie das Gerät in ausreichendem Abstand von Leuchtstofflampen Plasmamonitoren und anderen derartigen Produkten Benutzen Sie die drahtlose Fernbedienung an einer Position innerhalb von 3 m vom Gerät Verwenden Sie ein Steuergerät das über ein Kabel mit dem Gerät verbunden ist Kabelverbindung Die Einstellung der durchzuführenden Funktion der zuletzt gedrückten Taste CAM1 CAM2 CAM3 oder CA...

Страница 81: ... Wählen Sie den Modus aus der die Aufnahmebedingungen erfüllt und Ihrer Bevorzugung entspricht Wenn ständig unter den gleichen Bedingungen aufgenommen wird erübrigt sich die Wahl eines anderen Modus 5 Starten Sie die Aufnahme Schalten Sie nach Abschluss der Aufnahme alle Geräte und Vorrichtungen im System aus Bei der grundlegenden Bedienung wird angenommen dass Fokus Blende und Weißabgleich automa...

Страница 82: ...nungskennung übereinstimmt und in Orange wenn ein Signal empfangen wird das nicht mit der Fernbedienungskennung übereinstimmt Bei Verwendung des Steuergerätes 1 Stellen Sie alle Ein Aus Schalter der an das System angeschlossenen Geräte und Vorrichtungen auf ON Dieses Gerät besitzt keinen Ein Aus Schalter Wenn Strom zugeführt wird leuchtet die Statusanzeigelampe in Orange auf 2 Stellen Sie den Scha...

Страница 83: ...ie die Schritte 1 und 2 je nach Bedarf 4 Stellen Sie alle Ein Aus Schalter der an das System angeschlossenen Geräte und Vorrichtungen auf OFF Bei Verwendung des Steuergerätes 1 Stellen Sie den Schalter OPERATE am Steuergerät auf OFF Die Stromversorgung aller mit dem Steuergerät verbundenen Kameras einschließlich des vorliegenden Gerätes wird ausgeschaltet Die Statusanzeigelampe des Gerätes leuchte...

Страница 84: ...n wenn ein Signal empfangen wird das mit der Fernbedienungskennung übereinstimmt und in Orange wenn ein Signal empfangen wird das nicht mit der Fernbedienungskennung übereinstimmt Bei Verwendung des Steuergerätes Bei Anschluss des AW RP655 Drücken Sie die Taste 1 2 3 4 oder 5 von CONTROL PREVIEW MONITOR OUT SEL Bei Anschluss des AW RP555 Drücken Sie die Taste 1 2 3 4 oder 5 von CONTROL Bei Anschlu...

Страница 85: ...nderer Einstellungen werden nach Aufnahmemodus getrennt gespeichert Wählen Sie unbedingt den Aufnahmemodus bevor Sie irgendwelche Einstellungen vornehmen Halogenlampenmodus Halogen Dieser Modus eignet sich für Innenaufnahmen bei Hochzeitsempfängen Partys Seminaren Veranstaltungen usw Leuchtstofflampenmodus Fluorescent Dieser Modus eignet sich für Innenaufnahmen unter Leuchtstofflampenlicht Tagesli...

Страница 86: ...tting wird angezeigt Camera Setting Halogen Fluorescent Daylight User Return 5 Drücken Sie die Taste oder um den zu benutzenden Aufnahmemodus zum Blinken zu bringen Bei jedem Drücken der Taste oder wechselt der blinkende Posten Wenn Return zum Blinken gebracht und die Taste oder gedrückt wird wird auf das vorherige Menü zurückgeschaltet 6 Drücken Sie die Taste oder Das Gerät wird nun auf den blink...

Страница 87: ...d der JOG Knopf Main entgegen dem Uhrzeigersinn gedreht wird wird auf das vorherige Menü zurückgeschaltet 9 Drehen Sie den JOG Knopf Main entgegen dem Uhrzeigersinn Das Gerät wird nun auf den blinkenden Aufnahmemodus eingestellt und ein Untermenü wird angezeigt Halogen Mode Set Brightness Set Colour Set G L Set Other Set Initialize Return Beispiel Modus Halogen 10 Drücken Sie die Taste MENU oder R...

Страница 88: ...htung Bewegen der Kamera nach links oder rechts Schwenken Neigen Sie den Hebel PAN TILT nach L oder R Bewegen der Kamera nach oben oder unten Neigen Neigen Sie den Hebel PAN TILT nach UP oder DOWN Diagonales Bewegen der Kamera Neigen Sie den Hebel PAN TILT diagonal Zurückstellen der Kamera auf die Bezugsposition Wenn das Steuergerät eine Taste HOME besitzt drücken Sie die Taste HOME Verwendung der...

Страница 89: ... Färbung der Kamerabilder stimmt nicht Schlagen Sie unter Weißabgleich Nachregelautomatik ATW Seite 31 nach und schalten Sie auf ATW um Bei Verwendung des Steuergerätes Das Gerät bewegt sich nicht Wählen Sie das zu bedienende Gerät nach dem folgenden Verfahren aus Bei Anschluss des AW RP655 Drücken Sie die Taste 1 2 3 4 oder 5 von CONTROL PREVIEW MONITOR OUT SEL Bei Anschluss des AW RP555 Drücken ...

Страница 90: ...t wieder eingestellt zu werden sofern die Kamera unter denselben Bedingungen benutzt werden soll Schwarzabgleich Einstellung Diese Einstellung wird durchgeführt um eine genaue Reproduktion von Schwarz zu erhalten Sie hat auch einen Einfluss auf die Farbtöne des gesamten Bildschirms Sie muss durchgeführt werden wenn das Gerät zum ersten Mal benutzt wird oder längere Zeit nicht benutzt worden ist Si...

Страница 91: ... Taste EXT AF um auf manuelle Fokussierung umzuschalten 2 Stellen Sie den Fokus durch Neigen des Hebels FOCUS manuell ein Darüber hinaus kann mit jedem Drücken der Taste SPEED die Geschwindigkeit der Fokussierung und anderer Bewegungen auf hoch oder niedrig umgeschaltet werden 3 Drücken Sie erforderlichenfalls die Taste EXT AF um wieder auf automatische Fokuseinstellung zurückzuschalten Bei Anschl...

Страница 92: ...ei Anschluss des AW RP555 1 Drücken Sie die Taste IRIS so dass ihre Lampe erlischt um auf manuelle Einstellung umzuschalten 2 Drehen Sie den Knopf LEVEL von IRIS um die Blende manuell einzustellen 3 Drücken Sie erforderlichenfalls die Taste IRIS so dass ihre Lampe leuchtet um die automatische Blendeneinstellung wieder zu aktivieren Bei Anschluss des AW RP400 AW CB400 1 Drücken Sie die Taste IRIS m...

Страница 93: ...nen die Einstellungen auch gemäß den folgenden Schritten durchgeführt werden 1 Drücken Sie die Taste SHUTTER so dass ihre Lampe aufleuchtet Die im Voraus eingestellte Verschlusszeit wird gewählt 2 Drücken Sie erforderlichenfalls die Taste SHUTTER so dass ihre Lampe aufleuchtet um den Verschluss auf die Einstellung OFF zurückzustellen Führen Sie die folgenden Schritte aus um die Verschlusszeit mit ...

Страница 94: ...henfalls die Taste GAIN so dass die Lampe AUTO aufleuchtet um die Verstärkung wieder auf automatische Einstellung AGC zurückzustellen Bei Anschluss des AW RP555 1 Drücken Sie die Taste GAIN so dass ihre Lampe erlischt Bei jedem Drücken dieser Taste können die drei Verstärkungsanhebungsbeträge der Reihe nach gewählt werden Der aktuelle Status wird wie folgt angezeigt Taste MANU L Taste MANU H Taste...

Страница 95: ...tellen Sie Fokus und Blende ein falls dies erforderlich ist 2 Während Sie die Taste PRESET gedrückt halten drücken Sie die Taste die der Vorwahlspeichernummer entspricht Wenn eine Vorwahlspeichernummer mit einer bereits registrierten Einstellung gewählt wird wird die vorhandene Einstellung gelöscht und durch die neue ersetzt Abrufen der Einstellungen von den Vorwahlspeicherplätzen 1 Drücken Sie di...

Страница 96: ... Bild auf dem Monitor an Betätigen Sie den Hebel PAN TILT und den Hebel ZOOM um den Kamerawinkel festzulegen Stellen Sie Fokus und Blende ein falls dies erforderlich ist 2 Halten Sie die Taste MEMORY gedrückt Die Tasten unter den Tasten 1 bis 10 von PRESET die mit Einstellungen belegt werden können blinken nun der Reihe nach 3 Drücken Sie bei noch gedrückt gehaltener Taste MEMORY die Taste der Vor...

Страница 97: ...elben Einstellungen und unter denselben Bedingungen eingesetzt wird kann die Einstellung durch einfaches Auswählen einer Menüeinstellung oder Drücken einer Taste am Steuergerät durchgeführt werden Eine erneute Einstellung erübrigt sich Sobald eine neue Einstellung eingegeben wird wird die vorherige Einstellung gelöscht Benutzen Sie die zwei Speicherplätze um Einstellungen für unterschiedliche Aufn...

Страница 98: ...t Da die Kamera einen internen Speicher besitzt bleibt der eingestellte Weißabgleich auch nach dem Ausschalten der Kamera gespeichert Daher erübrigt sich eine Neueinstellung des Weißabgleichs wenn die Farbtemperatur dieser Objekte unverändert bleibt Der Weißabgleich muss jedoch neu eingestellt werden wenn sich die Farbtemperatur ändert z B bei einem Standortwechsel von drinnen nach draußen und umg...

Страница 99: ...enü Colour Set wird angezeigt Colour Set Chroma Level 1 White Bal AWC A Pedestal 1 Painting R Gain 1 B Gain 1 Return 6 Drücken Sie die Taste oder um den Wert von R Gain oder B Gain zum Blinken zu bringen 7 Drücken Sie die Taste oder um den Wert zu ändern und nehmen Sie die Einstellung so vor dass der Träger der Weißanteile der Videosignale minimiert wird oder dass die weißen Teile des Bilds vollko...

Страница 100: ...nd der automatische Schwarzabgleich ABC können durchgeführt werden und die Schwarzabgleich Einstellung wird eingegeben Gleichzeitig wird auch die Weißabgleich Einstellung eingegeben um zu gewährleisten dass die Bedingungen für die Weißabgleich Einstellung erfüllt sind bevor weitere Schritte unternommen werden Der Schwarzabgleich kann nicht eingestellt werden wenn die Farbbalken angezeigt werden Dr...

Страница 101: ...instellmodus 2 Drücken Sie die Taste IRIS Die Objektivblende wird verengt 3 Wählen Sie den Benutzermodus gemäß den Schritten unter Auswählen des Aufnahmemodus Szenendatei Seite 19 Halten Sie dabei das Untermenü User Mode Set auf dem Display User Mode Set Brightness Set Colour Set G L Set Detail Set Other Set Initialize Return 4 Drücken Sie die Taste oder um Colour Set zum Blinken zu bringen 5 Drüc...

Страница 102: ...en 3 Die gleichen Vorgänge wie die in den Schritten 3 bis 8 unter Bei Verwendung der mitgelieferten drahtlosen Fernbedienung können nach dem Verfahren unter Grundlegende Menüoperationen Seite 43 durchgeführt werden Bei Anschluss des AW RP400 AW CB400 Die folgenden Vorgänge werden mit dem AW CB400 durchgeführt 1 Drücken Sie die Taste IRIS mehrmals so dass ihre Lampe erlischt Aktivieren Sie den manu...

Страница 103: ...ferten drahtlosen Fernbedienung 1 Aktivieren Sie den Benutzermodus gemäß den Schritten unter Auswählen des Aufnahmemodus Szenendatei Seite 19 Halten Sie dabei das Untermenü Mode Set auf dem Display Die Horizontalphasen Einstellung ist allen Aufnahmemodi Szenendateien gemeinsam doch wenn die drahtlose Fernbedienung zur Durchführung der Einstellung verwendet wird muss der Aufnahmemodus gewählt werde...

Страница 104: ...arbphase genauer eingestellt werden Farbbalken der Kamera Trennlinie Farbbalken des Spezialeffektgenerators Bei Verwendung der mitgelieferten drahtlosen Fernbedienung 1 Drücken Sie die Taste MODE Der Modus wird auf die Farbbalkenanzeige umgeschaltet 2 Aktivieren Sie den Benutzermodus gemäß den Schritten unter Auswählen des Aufnahmemodus Szenendatei Seite 19 Halten Sie dabei das Untermenü Mode Set ...

Страница 105: ... die Taste MENU für zwei Sekunden Die Menüanzeige wird beendet 8 Drücken Sie die Taste MODE Der Modus wird auf die Kamerabildanzeige umgeschaltet Bei Durchführung der Einstellung mit dem Steuergerät Die gleichen Vorgänge wie die in den Schritten 2 bis 7 unter Bei Verwendung der mitgelieferten drahtlosen Fernbedienung können nach dem Verfahren unter Grundlegende Menüoperationen Seiten 39 bis 46 dur...

Страница 106: ...CONTROL PREVIEW MONITOR OUT SEL Drücken Sie eine der Tasten 1 bis 5 von CONTROL Drücken Sie eine der Tasten 1 bis 5 von CONTROL SELECT Anzeigen des Hauptmenüs Drücken Sie die Taste MENU für zwei Sekunden 1 Drücken Sie die Taste MENU Die Anzeige auf dem LCD Feld des AW RP655 wechselt zum Menümodus 2 Drehen Sie den JOG Knopf Main um CAMERA SETTING auf dem LCD Feld anzuzeigen 3 Drücken Sie die Taste ...

Страница 107: ...ne Untermenüs auf 5 Drücken Sie die Taste oder um den einzustellenden Posten oder die Einstellung zum Blinken zu bringen Bei jedem Drücken der Taste oder wechselt der blinkende Posten Wenn Return zum Blinken gebracht und die Taste oder gedrückt wird wird auf das vorherige Menü zurückgeschaltet Während die Menüs angezeigt werden haben die Tasten und die gleichen Funktionen Beachten Sie jedoch dass ...

Страница 108: ...n Sie bei der Bedienung Sorgfalt walten da der Einstellwert wenn dieser veränderbar ist durch Drücken des Jograds geändert wird in positiver Richtung Jograd Rechts Wenn sich das LCD im Verstärkungs Einstellmodus befindet Stellen Sie den Posten B GAIN ein 30 bis 30 Wenn sich das LCD im Schwarzwert Einstellmodus befindet Diese Funktion ist nicht verfügbar Wenn der Kameramenümodus aktiv ist Ändern de...

Страница 109: ...die Einstellung zum Blinken zu bringen Bei jedem Drücken des JOG Knopfes L wechselt der blinkende Posten Wenn Return zum Blinken gebracht und der JOG Knopf L gedrückt wird wird auf das vorherige Menü zurückgeschaltet 9 Drehen Sie den JOG Knopf R um die Einstellung zu ändern 10 Nachdem die Einstellung durchgeführt worden ist drücken Sie die Taste MENU oder R B GAIN PED Die Menüanzeige wird beendet ...

Страница 110: ...cus und Manual Focus umgeschaltet Die Taste EXT AF leuchtet auf wenn sich die Kamera im Modus Auto Focus befindet Diese Tasten können nicht zur Steuerung des AW HE100 verwendet werden 1 Drücken Sie eine der Tasten 1 bis 5 von CONTROL um das zu bedienende Gerät auszuwählen 2 Drücken Sie die Taste MENU für zwei Sekunden Das Hauptmenü wird auf dem Monitor angezeigt 3 Drücken Sie die Taste MENU oder I...

Страница 111: ... gedrückt wird wird auf das vorherige Menü zurückgeschaltet 6 Drücken Sie die Taste YES oder NO um die Einstellung zu ändern Drücken Sie die Taste YES um den Einstellwert in positiver Richtung zu ändern und die Taste NO um den Einstellwert in negativer Richtung zu ändern 7 Nachdem die Einstellung durchgeführt worden ist drücken Sie die Taste MENU für zwei Sekunden Die Menüanzeige wird beendet Even...

Страница 112: ...opf des Modells AW RP400 Die folgenden Einstellungen des LCD Menüs sind unwirksam TILT RANGE MEMORY LENGTH Die Funktion TRACING MEMORY ist nicht verfügbar Der Knopf R B PED ist nicht verfügbar Die Kameramenüfunktion ist verfügbar wenn der Posten CAMERA MENU CNT im LCD Menü des Modells AW CB400 auf ENABLE gesetzt wird OPTION SW A Dient zum Öffnen des Menüs und Aufwärtsrollen der Postenliste B Dient...

Страница 113: ...llen Drücken Sie die Taste B von OPTION SW um die Postenliste nach unten zu rollen Wenn Return zum Blinken gebracht und die Taste C gedrückt wird wird auf das vorherige Menü zurückgeschaltet 6 Drücken Sie die Taste C oder D von OPTION SW um die Einstellung zu ändern Drücken Sie die Taste C von OPTION SW um den Einstellwert in positiver Richtung zu ändern und die Taste D von OPTION SW um den Einste...

Страница 114: ...der OFF 4Wahl der Landung Landing Soft Just Werkseinstellung Soft Weiche Landung Wählen Sie mit diesem Posten Soft oder Just genau als Landeeigenschaft Der Vibrationspegel der die durch den Stoppbefehl ausgelöste Beschleunigung oder Verzögerung begleitet ist bei der Einstellung Soft geringer als bei der Einstellung Just genau 5 Wahl der Installation auf einem Tisch freistehend an der Decke aufgehä...

Страница 115: ...halten des Gerätes über die Steuervorrichtung durch die nicht mehr in der Lage war die Menüoperationen durchzuführen 4 Nachdem Sie diesen Posten geändert haben schalten Sie das Gerät aus und wieder ein 9Initialisierung Initialize Mit diesem Posten werden die Einstellungen aller Posten im Menü Pan Tilt Head Setting auf die Werkseinstellungen zurückgestellt Siehe dazu den Abschnitt auf der rechten S...

Страница 116: ...Set Other Set Initialize Return 6 7 8 Einstellungsmenü für Tageslichtmodus Daylight Mode Set Brightness Set Colour Set G L Set Other Set Initialize Return 6 7 8 Einstellungsmenü für Benutzermodus User Mode Set Brightness Set Colour Set G L Set Detail Set Other Set Initialize Return 6 7 8 9 6 Anzeige des Helligkeits Einstellungsmenüs Brightness Set Hier wird das Helligkeits Einstellungsmenü dieses ...

Страница 117: ...während der Anzeige des Initialisierungs Bestätigungsbildschirms gewählt wird erscheint der unten abgebildete Bildschirm und die Initialisierung wird durchgeführt Drücken Sie die Taste oder um O K zum Blinken zu bringen und drücken Sie dann die Taste oder Wenn die Initialisierung beendet ist schaltet das Display auf das Einstellungsmenü für den betreffenden Aufnahmemodus zurück Halogen Mode initia...

Страница 118: ...so dass das ausgegebene Bild einem Schock ausgesetzt wird Hinweis 4 Wahl der maximalen AGC Verstärkung AGC Max Gain 6dB 12dB 18dB Werkseinstellung 18dB Mit diesem Posten wird die maximale Verstärkung bei Wahl von Auto als Verstärkungseinstellung Gain festgelegt 5 Rückkehr zum vorherigen Menü Menü zur Wahl des Aufnahmemodus Return Einstellungsmenü für Benutzermodus Helligkeit Brightness Set A Iris ...

Страница 119: ...ustand aus dem Speicher gelöscht Wenn AWC automatischer Weißabgleich oder ein manueller Weißabgleich in dem mit AWC A oder AWC B gewählten Zustand durchgeführt wird wird der resultierende Zustand gespeichert 3200K Der bei einer Farbtemperatur von 3 200 K durchgeführte Weißabgleich entspricht Halogenlicht wird hergestellt 5600K Der bei einer Farbtemperatur von 5 600 K durchgeführte Weißabgleich ent...

Страница 120: ...zermodus Das Detail Einstellungsmenü ist nur im Benutzermodus verfügbar Detail Set Detail On Total Detail Level 2 V Detail Level 4 Noise Suppress 0 Return 1 2 3 4 5 1 Wahl der Detail Aktivierung Deaktivierung Detail On Off Mit diesem Posten kann Aktivierung Deaktivierung für Detailkompensation gewählt werden Wenn On gewählt wird kann der Betrag der Detailkompensation mit den Menüposten Total Detai...

Страница 121: ... entweder 16 9 squeeze oder 4 3 sides cut off als Seitenverhältnis gewählt Wenn 1080i oder 720p als Einstellung des Videoformats Format gewählt wurde erscheint und das Seitenverhältnis kann nicht gewählt werden In diesem Fall wird das Seitenverhältnis der Composite Signale auf 16 9 squeeze fixiert 5 Wahl von Ein Aus der Anzeige des AWC ABC Betriebszustands Status Off On Werkseinstellung Off Mit di...

Страница 122: ...tigung der Einstellungsänderung erscheint wenn ein Vorgang durchgeführt worden ist der den Übergang zu einem anderen Posten beinhaltet wenn die Taste oder gedrückt wird Other Set Focus Auto Iris Auto Format 1080i Change Setting O K CANCEL Return Beispiel Modus Halogen Wenn O K gewählt wird ändert sich das Videoformat und das Menü für sonstige Einstellungen Other Set wird wieder angezeigt Drücken S...

Страница 123: ...Iris Auto Format 1080i Aspect 16 9 Status Off Component Y Pb Pr Focus ADJ With Zoom On Return Initialize Return Menü Posten Werksein stellung Camera Setting Daylight Brightness Set A Iris Level 0 Step Off Gain Auto AGC Max Gain 18dB Return Colour Set Chroma Level 0 White Bal ATW Return G L Set H Phase 0 SC Coarse 90deg SC Fine 0 Return Other Set Focus Auto Iris Auto Format 1080i Aspect 16 9 Status...

Страница 124: ...n Hindernis eingestellt werden Die Positionen von vier Begrenzungen nämlich an der oberen unteren linken und rechten Grenze des Bewegungsbereichs können eingestellt werden Nachdem diese Positionen eingestellt worden sind gehen sie nicht mehr verloren auch nicht durch Ausschalten der Stromversorgung Die Begrenzungen können entweder mit der mitgelieferten drahtlosen Fernbedienung oder dem Steuergerä...

Страница 125: ...ienen soll Führen Sie als nächstes die Schritte unter Grundlegende Begrenzungsoperationen aus und drücken Sie die Taste für zwei Sekunden während Sie die Taste PRESET gedrückt halten Festlegen der rechten Grenzposition des Bewegungsbereichs Drücken Sie die Taste oder der drahtlosen Fernbedienung um das Gerät bis zu der Position zu drehen die als rechte Grenze dienen soll Führen Sie als nächstes di...

Страница 126: ... Um den Kollisions Sicherheitsmodus aufzuheben stellen Sie den Schwenk Neigekopf auf eine neutrale Position zurück 2 Durch Störung ausgelöster Sicherheitsmodus Wenn eine Störung im Gerät aufgetreten ist wird der Störungs Sicherheitsmodus aktiviert so dass die Funktionen des Gerätes ausgeschaltet werden und die Statusanzeigelampe in Rot aufleuchtet Um den Störungs Sicherheitsmodus aufzuheben verset...

Страница 127: ... selbst wenn die drahtlose Fernbedienung nahe am Lichtsensorfeld des Gerätes betätigt wird bedeutet dies dass die Batterien erschöpft sind Wechseln Sie die Batterien aus Befindet sich eine Leuchtstofflampe oder ein Plasmamonitor in der Nähe des Gerätes und wenn ja ist das Lichtsensorfeld für die drahtlose Fernbedienung diesem Licht ausgesetzt Seite 13 Steuerung mit dem Steuergerät nicht möglich Is...

Страница 128: ... das Menü Seiten 39 bis 46 Keine automatische Fokussierung Ist die manuelle Fokussierung aktiviert Die automatische Fokussierung erfolgt sobald der Autofokus aktiviert wird Seite 22 In manchen Situationen kann das Fokussieren bei Automatikeinstellung schwierig sein Wählen Sie in solchen Fällen die manuelle Einstellung und fokussieren Sie manuell Seite 24 Die Färbung der Bilder stimmt nicht Aktivie...

Страница 129: ...wendet wird Verwenden Sie keine leichtflüchtigen Lösungsmittel wie Benzin oder Lackverdünner Wenn Sie ein chemisch behandeltes Reinigungstuch verwenden lesen Sie vor Gebrauch die Vorsichtshinweise sorgfältig durch Hinweise Auswechseln von Verbrauchsteilen Der Riemen ist ein Verbrauchsteil Er muss in regelmäßigen Abständen ausgewechselt werden Einzelheiten zum Treibriemenaustausch erfahren Sie von ...

Страница 130: ...Halten Sie das Gerät während der Arbeit am Sockelteil fest Wird das Gerät während der Demontage am Objektivteil oder an Drehteilen festgehalten kann es zu einer Funktionsstörung kommen Die Demontagearbeit sollte von einem Zwei Personen Team ausgeführt werden 1 Entfernen Sie die Kabelabdeckung Entfernen Sie die Schraubenkappen drehen Sie die zwei Schrauben heraus und nehmen Sie dann die Kabelabdeck...

Страница 131: ...64 G DEUTSCH Maßzeichnungen Einheit mm ...

Страница 132: ...te 1 0 Vs s 75 BNC 1 HD SD Analog Komponenten oder SD Y C Signale VGA 15P 1 Y C Signale sind nur im SD Modus verfügbar Umschaltung auf Y Pb Pr Signale über Menüeinstellung möglich SD HD Wahl möglich wenn Y Pb Pr Signale ausgegeben werden EIN AUSGÄNG Eingäng Ausgäng CONTROL IN RS422A RJ 45 FUNKTIONEN UND LEISTUNG Kameraeinheit Bildsensoren 1 3 CCD Bildsensoren 3 Inter Line Typ Progressivsystem unte...

Страница 133: ...S BNC 1 Schwenk Neigekopfeinheit Installationsmethode Freistehend Desktop oder hängend Hanging Um die Sicherheit zu gewährleisten muss das Gerät mit den mitgelieferten Haltern befestigt werden Lassen Sie das Gerät von einem qualifizierten Installateur installieren Steuergeräteanschlüsse Verbindungskabel 10BASE T STP Kategorie 5 Straight Kabel Max 1 000 m Nur Steuerung Um die Videosignalverbindunge...

Страница 134: ...ne construction de CLASSE I doit être raccordé à une prise secteur avec une connexion à la terre sécurisée VERSION FRANÇAISE FRENCH VERSION Ne pas dévisser le couvercle Pour réduire tout risque d électrocution ne pas retirer le couvercle Il ne se trouve à l intérieur aucune pièce qui puisse être réparée par l utilisateur Confier toute réparation à un personnel qualifié AVERTISSEMENT POUR RÉDUIRE L...

Страница 135: ...produit vous contriburez à la conservation des ressources vitales et à la prévention des éventuels effets négatifs sur l environnement et la santé humaine pouvant être dus à la manipulation inappropriée des déchets Veuillez contacter les autorités locales pour connaître le point de pré collecte le plus proche Des sanctions peuvent être appliquées en cas d élimination incorrecte de ces déchets conf...

Страница 136: ...niveau du noir pedestal total 34 Réglage du genlock 36 Opérations de base des menus 39 Réglage des options des menus 47 Tableau des options des menus 56 Limiteurs 57 Pose annulation des limiteurs 58 Modes de sécurité 59 Diagnostic de panne 60 Maintenance 62 Remplacement des consommables 62 Dépose de l appareil 63 Aspect extérieur 64 Fiche technique 65 Attention Le mode d emploi de cette caméra HD ...

Страница 137: ...e montage avec rondelles plates rondelles élastiques M4 8 mm 4 Vis de cache câble tête plate M3 6 mm 2 Pastilles cache vis 2 Pieds en caoutchouc 4 Vis de pied en caoutchouc noires M4 6 mm 4 Filtre 1 Colliers 2 Vue générale Cet appareil est une caméra multi format qui intègre une tête panoramique et un objectif zoom Du fait que la caméra l objectif et la tête panoramique sont intégrés l installatio...

Страница 138: ...nt à 30 s et NC35 pour un fonctionnement à 60 s Mémorisation possible de 100 positions dans la mémoire de préréglage Le nombre de réglages dans la mémoire de préréglage diffère en fonction du panneau de commande utilisé avec l appareil Excellente compatibilité avec les panneaux de commande Panasonic disponibles actuellement permettant de réaliser un système souple Jusqu à cinq appareils et disposi...

Страница 139: ...tion des pièces de l appareil et réduira sa durée de vie utile Ne pas exposer l appareil directement à la chaleur émise dans l emplacement d installation ou à la chaleur d un radiateur ou autre dispositif Les pièces accessoires fournies avec l appareil doivent être utilisées sans faute lors de l installation de l appareil Les potences et les vis de montages fournies avec l appareil doivent impérat...

Страница 140: ... parties du corps près des pièces en mouvement car il y a risque de blessure L appareil est doté de modes de sécurité Les modes de sécurité sont des fonctions conçues pour protéger les gens et les biens de toute blessure et pour empêcher d endommager la tête panoramique Pour en savoir plus se reporter à Modes de sécurité page 59 Mettre l appareil hors tension avant de connecter ou de déconnecter d...

Страница 141: ... réponse à cette commande peut être plus lente que dans le cas d un autre système caméra et tête panoramique Panasonic L AW CB400 ne peut pas être raccordé directement à cet appareil L AW CB400 doit être combiné avec l AW RP400 et l AW IF400 Les menus de réglage de caméra de l AW CB400 ne peuvent pas être utilisés Utiliser les menus de réglage de caméra sur l appareil à la place Les cadrans R B PE...

Страница 142: ...nge L appareil est en état de veille Vert L appareil est sous tension Rouge Une erreur s est produite dans l appareil Vert clignotant deux fois Pendant qu il est sous tension l appareil reçoit depuis la télécommande sans fil fournie un signal correspondant à l identification de commande à distance Orange clignotant deux fois Pendant qu il est sous tension l appareil reçoit depuis la télécommande s...

Страница 143: ...gnal 1 Pr en mode Y C C 2 Y en mode Y C VBS 3 Pb en mode Y C Y 4 à 15 Masse Connecteur CONTROLLER Il s agit du connecteur d entrée pour les signaux de commande adressés à la caméra ou à la tête panoramique Le raccorder au connecteur TO PAN TILT HEAD du panneau de commande Commutateurs SERVICE Ces commutateurs sont utilisés pour la maintenance Les laisser tous sur la position OFF Commutateurs IR ID...

Страница 144: ... la balance des blancs sont réglées automatiquement et enregistrées dans la mémoire sélectionnée Par ailleurs si cette touche est enfoncée brièvement moins de deux secondes seule la balance des blancs est réglée automatiquement et enregistrée dans la mémoire sélectionnée 6Touche MODE Elle sert à sélectionner les signaux vidéo sortant de l appareil Chaque pression commute entre les signaux de barre...

Страница 145: ...de la touche F far et près à l aide de la touche N near Touche A FOCUS Elle sert à établir la mise au point automatique de l objectif Touche M FOCUS Elle sert à établir la mise au point manuelle de l objectif Les touches FOCUS F et N sont utilisées pour effectuer le réglage Touches OPT ON OFF Elles sont prévues pour une expansion future des fonctions Elles ne sont pas utilisées actuellement Touche...

Страница 146: ...sma ou autre produit de ce type ou à la lumière du soleil Installer l appareil loin d une lumière fluorescente d un moniteur au plasma ou autre produit de ce type Utiliser la télécommande sans fil à une distance inférieure à 3 mètres de l appareil Utiliser un panneau de commande qui est raccordé à l appareil au moyen d un câble connexion câblée Pendant environ 10 minutes après que les piles ont ét...

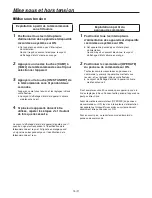
Страница 147: ...le mode répondant aux conditions de prise de vues et aux préférences personnelles Tant que les conditions ne changent pas il n est pas nécessaire de sélectionner un autre mode 5 Commencer la prise de vues Après la prise de vues mettre tous les appareils et dispositifs du système hors tension Dans le cas de la prise de vues de base on suppose que la mise au point le diaphragme et la balance des bla...

Страница 148: ...mande est reçu et il clignote en orange quand un signal ne correspondant pas à l identification de la télécommande est reçu Exploitation à partir du panneau de commande 1 Positionner tous les interrupteurs d alimentation des appareils et dispositifs raccordés au système sur ON Cet appareil ne possède pas d interrupteur d alimentation Quand il reçoit un courant électrique le voyant d affichage d ét...

Страница 149: ...1 et 2 autant de fois que nécessaire 4 Positionner tous les interrupteurs d alimentation des appareils et dispositifs raccordés au système sur OFF Exploitation à partir du panneau de commande 1 Positionner le commutateur OPERATE du panneau de commande sur OFF Toutes les caméras y compris l appareil raccordées au panneau de commande se mettent hors tension Le voyant d affichage d état de l appareil...

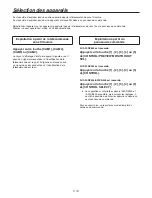
Страница 150: ...en vert quand un signal correspondant à l identification de la télécommande est reçu et il clignote en orange quand un signal ne correspondant pas à l identification de la télécommande est reçu Exploitation à partir du panneau de commande Si l AW RP655 est raccordé Appuyer sur la touche 1 2 3 4 ou 5 de CONTROL PREVIEW MONITOR OUT SEL Si l AW RP555 est raccordé Appuyer sur la touche 1 2 3 4 ou 5 de...

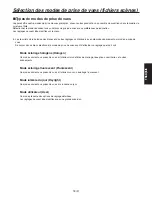
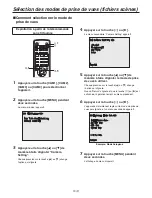
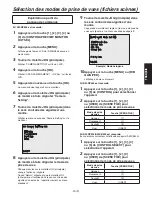
Страница 151: ...réservés en mémoire séparément par mode de prise de vues S assurer d avoir bien sélectionné le mode de prise de vues avant d effectuer un réglage quel qu il soit Mode éclairage halogène Halogen Ce mode convient aux prises de vues à l intérieur lors de fêtes de mariage réceptions séminaires et autres événements Mode éclairage fluorescent Fluorescent Ce mode convient aux prises de vues à l intérieur...

Страница 152: ...amera Setting apparaît Camera Setting Halogen Fluorescent Daylight User Return 5 Appuyer sur la touche ou de manière à faire clignoter le mode de prise de vues à utiliser Chaque pression sur la touche ou change l option qui clignote Quand Return clignote et que la touche ou est actionnée l opération revient au menu précédent 6 Appuyer sur la touche ou L appareil est maintenant réglé sur le mode de...

Страница 153: ...OG principale est tournée dans le sens contraire des aiguilles d une montre l opération revient au menu précédent 9 Tourner la molette JOG principale dans le sens contraire des aiguilles d une montre L appareil est maintenant réglé sur le mode de prise de vues qui clignote et un menu secondaire apparaît Halogen Mode Set Brightness Set Colour Set G L Set Other Set Initialize Return Exemple Mode hal...

Страница 154: ...a caméra Pour tourner la caméra vers la gauche ou la droite panoramique horizontal Incliner le levier PAN TILT vers L ou R Pour lever ou baisser la caméra panoramique vertical Incliner le levier PAN TILT vers UP ou DOWN Pour déplacer la caméra en diagonale Incliner le levier PAN TILT en diagonale Pour ramener la caméra à la position de référence Si le panneau de commande présente une touche HOME a...

Страница 155: ...dans les couleurs des images prises par la caméra Se reporter à Suivi automatique de la balance des blancs ATW page 31 et passer au mode ATW Exploitation à partir du panneau de commande L appareil ne bouge pas Sélectionner l appareil à exploiter en procédant comme suit Si l AW RP655 est raccordé Appuyer sur la touche 1 2 3 4 ou 5 de CONTROL PREVIEW MONITOR OUT SEL Si l AW RP555 est raccordé Appuye...

Страница 156: ...a balance des blancs est réalisée ce réglage n est plus à faire tant que l appareil est utilisé dans les mêmes conditions Réglage de la balance des noirs Ce réglage sert à rendre le noir avec précision Son réglage affecte les teintes de couleur de tout l écran Il doit être effectué quand l appareil est utilisé pour la première fois ou si l appareil n a pas été utilisé pendant longtemps Il doit êtr...

Страница 157: ...ise au point automatique Si l AW RP555 est raccordé 1 Appuyer sur la touche EXT AF pour passer au réglage manuel de la mise au point 2 Faire la mise au point manuelle en inclinant le levier FOCUS Par ailleurs chaque pression sur la touche SPEED permet d accélérer ou ralentir la vitesse de la mise au point et d autres réglages 3 Si nécessaire appuyer sur la touche EXT AF pour rétablir la mise au po...

Страница 158: ... et rétablir le réglage automatique du diaphragme Si l AW RP555 est raccordé 1 Appuyer sur la touche IRIS de manière à éteindre son voyant et passer au réglage manuel 2 Tourner la molette LEVEL de IRIS pour régler manuellement le diaphragme 3 Si nécessaire appuyer sur la touche IRIS de manière à allumer son voyant et rétablir le réglage automatique du diaphragme Si l AW RP400 AW CB400 est raccordé...

Страница 159: ...lement être effectués en suivant les étapes ci dessous 1 Appuyer sur la touche SHUTTER de manière à allumer son voyant La vitesse d obturation réglée à l avance est sélectionnée 2 Si nécessaire appuyer sur la touche SHUTTER et éteindre son voyant pour ramener l obturateur au réglage OFF Procéder comme suit pour régler la vitesse d obturation depuis l AW RP555 1 Tout en tenant la touche MEMORY enfo...

Страница 160: ...a touche GAIN et allumer le voyant AUTO pour rétablir le réglage de gain automatique AGC Si l AW RP555 est raccordé 1 Appuyer sur la touche GAIN de manière à éteindre son voyant Chaque pression sur la touche permet de sélectionner une des trois augmentations de gain dans l ordre L état actuel est affiché comme suit Touche MANU L Touche MANU H Touche GAIN 0 dB Éteinte Éteinte Éteinte LOW Allumée Ét...

Страница 161: ...Régler la mise au point et le diaphragme si nécessaire 2 Tout en tenant la touche PRESET enfoncée appuyer sur la touche correspondant au numéro de la mémoire de préréglage Si un numéro de mémoire de préréglage contenant déjà un réglage est sélectionné le réglage existant est effacé et remplacé par le nouveau Rappel des réglages des mémoires de préréglage 1 Appuyer sur la touche sur laquelle le rég...

Страница 162: ...ires de préréglage 1 Afficher l image à filmer sur le moniteur Actionner le levier PAN TILT et le levier ZOOM pour déterminer l angle de la caméra Régler la mise au point et le diaphragme si nécessaire 2 Tenir la touche MEMORY enfoncée Les touches entre 1 et 10 de PRESET sur lesquelles des réglages peuvent être enregistrés commencent à clignoter dans l ordre 3 Avec la touche MEMORY toujours enfonc...

Страница 163: ... si l appareil est utilisé avec les mêmes réglages et dans les mêmes conditions ce réglage est effectué simplement en sélectionnant un réglage du menu ou en appuyant sur une touche du panneau de commande Il n y a pas besoin de refaire ce réglage Si un nouveau réglage est entré le réglage précédent est effacé Utiliser les deux mémoires pour préserver des réglages correspondant à des conditions de m...

Страница 164: ...e intégrée la balance des blancs réglée reste en mémoire même si la caméra est mise hors tension En conséquence il n est pas nécessaire de refaire le réglage de la balance des blancs si la température de couleur de ces objets ne change pas Cependant il doit être refait si la température de couleur change comme quand on passe de l intérieur à l extérieur ou vice versa Si la caméra est utilisée seul...

Страница 165: ...a touche ou Le menu secondaire Colour Set apparaît Colour Set Chroma Level 1 White Bal AWC A Pedestal 1 Painting R Gain 1 B Gain 1 Return 6 Appuyer sur la touche ou de manière à faire clignoter la valeur R Gain ou B Gain 7 Appuyer sur la touche ou pour changer la valeur et régler cette valeur de manière que la porteuse des parties blanches des signaux vidéo soit minimisée ou que les parties blanch...

Страница 166: ... des blancs AWC et le réglage automatique de la balance des blancs ABC peuvent être effectués et le réglage de balance des noirs peut être entré Le réglage de balance des blancs est entré en même temps pour assurer que les conditions de réglage de la balance des blancs sont réunies avant de l opération La balance des noirs ne peut pas être réglée quand des barres de couleur sont affichées Appuyer ...

Страница 167: ...diaphragme de l objectif se ferme 3 Sélectionner le mode utilisateur en procédant comme pour Sélection des modes de prise de vues fichiers scène page 19 A cette étape garder le menu secondaire User Mode Set affiché User Mode Set Brightness Set Colour Set G L Set Detail Set Other Set Initialize Return 4 Appuyer sur la touche ou de manière à faire clignoter Colour Set 5 Appuyer sur la touche ou Le m...

Страница 168: ...agme de l objectif 3 Les mêmes opérations que celles des étapes 3 à 8 de Exploitation à partir de la télécommande sans fil fournie peuvent être effectuées en suivant la procédure pour Opérations de base des menus page 43 Si l AW RP400 AW CB400 est raccordé Les opérations suivantes sont effectuées depuis l AW CB400 1 Appuyer plusieurs fois sur la touche IRIS de manière à éteindre son voyant Passer ...

Страница 169: ... le mode utilisateur en procédant comme pour Sélection des modes de prise de vues fichiers scène page 19 A cette étape garder le menu secondaire Mode Set affiché Le réglage de phase horizontale est commun à tous les modes de prise de vues fichiers scène mais si la télécommande sans fil est utilisée pour effectuer le réglage le mode de prise de vues doit être sélectionné Pour cette raison il convie...

Страница 170: ...es colorées provenant de la caméra vidéo Ligne de séparation Barres colorées provenant du générateur d effets spéciaux Exploitation à partir de la télécommande sans fil fournie 1 Appuyer sur la touche MODE Le mode est commuté sur l affichage des barres de couleur 2 Sélectionner le mode utilisateur en procédant comme pour Sélection des modes de prise de vues fichiers scène page 19 A cette étape gar...

Страница 171: ...yer sur la touche MENU pendant deux secondes L affichage du menu disparaît 8 Appuyer sur la touche MODE Le mode est commuté sur l affichage de l image de caméra Si le réglage est effectué depuis le panneau de commande Les mêmes opérations que les étapes 2 à 7 de Exploitation à partir de la télécommande sans fil fournie peuvent être effectuées en suivant la procédure pour Opérations de base des men...

Страница 172: ...puyer sur une des touches 1 à 5 de CONTROL Appuyer sur une des touches 1 à 5 de CONTROL SELECT Affichage du menu principal Appuyer sur la touche MENU pendant deux secondes 1 Appuyer sur la touche MENU L affichage sur l écran LCD de l AW RP655 passe en mode menu 2 Tourner sur la molette JOG principale et afficher CAMERA SETTING sur l écran LCD 3 Appuyer sur la touche OK et afficher OPEN CAMERA MENU...

Страница 173: ...ptions des menus secondaires ont leur propre menu secondaire 5 Appuyer sur la touche ou de manière à faire clignoter l option à régler Chaque pression sur la touche ou change l option qui clignote Quand Return clignote et que la touche ou est actionnée l opération revient au menu précédent Pendant que les menus sont affichés les touches et ont les mêmes fonctions Noter cependant que si la touche e...

Страница 174: ...ette molette est enfoncée pendant que la valeur de réglage peut être changée cette valeur de réglage sera modifiée dans le sens positif Molette Droite Quand l écran LCD est en mode de réglage de gain Ajuster le réglage B GAIN 30 à 30 Quand l écran LCD est en mode de réglage de Pedestal Cette opération est inaccessible Quand le mode de menu de caméra est établi Modification de la valeur de réglage ...

Страница 175: ...anière à faire clignote l option à régler ou le réglage Chaque rotation de la molette JOG L change l option qui clignote Quand Return clignote et que la molette JOG L est enfoncée l opération revient au menu précédent 9 Tourner la molette JOG R pour changer le réglage 10Une fois que le réglage est effectué appuyer sur la touche MENU ou R B GAIN PED L affichage du menu disparaît Appuyer sur d autre...

Страница 176: ...manuelle La touche EXT AF s allume quand la caméra est en mode de mise au point automatique Ces touches ne peuvent pas servir à piloter l AW HE100 1 Appuyer sur une des touches 1 à 5 de CONTROL pour sélectionner l appareil devant être exploité 2 Appuyer sur la touche MENU pendant deux secondes Le menu principal apparaît sur le moniteur 3 Appuyer sur la touche MENU ou ITEM de manière à faire cligno...

Страница 177: ...nfoncée l opération revient au menu précédent 6 Appuyer sur la touche YES ou NO pour changer le réglage Appuyer sur la touche YES pour modifier la valeur de réglage dans le sens positif et appuyer sur la touche NO pour modifier la valeur de réglage dans le sens négatif 7 Une fois que le réglage est effectué appuyer sur la touche MENU pendant deux secondes L affichage du menu disparaît Il peut être...

Страница 178: ...ble La molette R B PED n est pas utilisable Le menu de caméra devient accessible quand l option CAMERA MENU CNT est réglée sur ENABLE sur le menu LCD de l AW CB400 OPTION SW A Ouvre le menu et fait défiler la liste des options vers le haut B Fait défiler la liste des options vers le bas C Confirme la sélection de l option et modifie une valeur de réglage dans le sens positif D Modifie une valeur d...

Страница 179: ...t enfoncée l opération revient au menu précédent 6 Appuyer sur la touche C ou D de OPTION SW pour changer le réglage Appuyer sur la touche C de OPTION SW pour modifier la valeur de réglage dans le sens positif et appuyer sur la touche D de OPTION SW pour modifier la valeur de réglage dans le sens négatif 7 Une fois que le réglage est effectué appuyer sur la touche A de OPTION SW pendant deux secon...

Страница 180: ...e usine Soft Atterrissage souple Utiliser cette option pour sélectionner Soft souple ou Just exact comme caractéristique d atterrissage Le niveau de vibration accompagnant l accélération ou la décélération est réduit au réglage Soft souple par rapport au réglage Just exact 5 Sélection de l installation sur plan de travail autonome Installation suspendue Install Position Desktop Hanging Réglage usi...

Страница 181: ...de mise sous tension de l appareil depuis le dispositif de commande qui n était plus capable d exploiter les menus 4 Après avoir changé cette option mettre l appareil hors tension et à nouveau sous tension 9Initialisation Initialize Utiliser cette option pour ramener toutes les options du menu Pan Tilt Head Setting aux réglages usine Se reporter à la section de droite Retour au menu précédent menu...

Страница 182: ...Set Other Set Initialize Return 6 7 8 Menu de réglage du mode lumière du jour Daylight Mode Set Brightness Set Colour Set G L Set Other Set Initialize Return 6 7 8 Menu de réglage du mode utilisateur User Mode Set Brightness Set Colour Set G L Set Detail Set Other Set Initialize Return 6 7 8 9 6 Affichage du menu de réglage de luminosité Brightness Set Le menu de réglage de luminosité pour ce mode...

Страница 183: ...mode éclairage halogène Quand O K est sélectionné pendant que l écran de confirmation d initialisation est affiché l écran ci dessous apparaît et l initialisation est exécutée Appuyer sur la touche ou de manière à faire clignoter O K et appuyer sur la touche ou Quand l initialisation est terminée l affichage revient au menu de réglage pour le mode de prise de vues correspondant Halogen Mode initia...

Страница 184: ...ut provoquer un sursaut de l image produite Remarque 4 Sélection de gain maximum AGC AGC Max Gain 6dB 12dB 18dB Réglage usine 18dB Cette option permet de régler le gain maximum quand Auto est sélectionné comme réglage de gain Gain 5 Retour au menu précédent menu de sélection du mode de prise de vues Return Menu de réglage de luminosité en mode utilisateur Brightness Set A Iris Level 1 Shutter Mode...

Страница 185: ...egardé dans la mémoire l état précédent est effacé de la mémoire Si un réglage de balance des blancs automatique AWC ou manuel est effectué dans l état sélectionné par AWC A ou AWC B l état résultant est sauvegardé dans la mémoire 3200K La balance des blancs qui a été réglée dans des conditions d éclairage 3200K équivalant à un éclairage halogène est établie 5600K La balance des blancs qui réglée ...

Страница 186: ...Detail Set Detail On Total Detail Level 2 V Detail Level 4 Noise Suppress 0 Return 1 2 3 4 5 1 Sélection de détail activé désactivé Detail On Off Cette option permet d activer ou désactiver la compensation de détail Quand On est sélectionné la quantité de compensation de détail peut être réglée par les options de menu Total Detail Level et V Detail Level 2 Sélection du niveau de détail total Total...

Страница 187: ...format vidéo Format le format d image sélectionné est 16 9 compression ou 4 3 côtés coupés Si 1080i ou 720p est sélectionné au réglage de format vidéo Format apparaît et le rapport d image ne peut pas être sélectionné A ce stade le rapport d image des signaux composites est fixé à 16 9 compression 5 Affichage activé désactivé de l état de l opération AWC ABC Status Off On Réglage usine Off Cette o...

Страница 188: ...e a été changé L écran ci dessous permettant de confirmer le changement de réglage apparaît quand une opération impliquant un transfert à une autre option est exécutée quand la touche ou est actionnée Other Set Focus Auto Iris Auto Format 1080i Change Setting O K CANCEL Return Exemple Mode halogène Si O K est sélectionné le format vidéo est changé et le menu des autres réglages Other Set est rétab...

Страница 189: ...uto Iris Auto Format 1080i Aspect 16 9 Status Off Component Y Pb Pr Focus ADJ With Zoom On Return Initialize Return Menu Option Réglage usine Camera Setting Daylight Brightness Set A Iris Level 0 Step Off Gain Auto AGC Max Gain 18dB Return Colour Set Chroma Level 0 White Bal ATW Return G L Set H Phase 0 SC Coarse 90deg SC Fine 0 Return Other Set Focus Auto Iris Auto Format 1080i Aspect 16 9 Status...

Страница 190: ...els obstacles pour éviter tout contact Les positions de quatre limiteurs définissant les limites en haut en bas à gauche et à droite de la plage de déplacement peuvent être fixées Une fois que les positions sont fixées elles ne peuvent pas être perdues même si l appareil est mis hors tension Les limiteurs peuvent être posés et annulés à partir de la télécommande sans fil fournie ou du panneau de c...

Страница 191: ...ande sans fil de manière à tourner l appareil jusqu à la position qui sera définie comme la limite gauche Ensuite procéder comme pour Réglages de base des limiteurs et appuyer sur la touche pendant deux secondes tout en tenant la touche PRESET enfoncée Pose de la limite droite de la plage de déplacement Appuyer sur la touche ou de la télécommande sans fil de manière à tourner l appareil jusqu à la...

Страница 192: ...éclenché par une collision ramener le panoramique horizontal ou vertical sur une position neutre 2 Mode de sécurité déclenché par une défaillance En cas de défaillance à l intérieur de l appareil le Mode de sécurité déclenché par une défaillance se déclenche les fonctions de l appareil se bloquent et le voyant d affichage d état s allume en rouge Pour annuler le Mode de sécurité déclenché par une ...

Страница 193: ...as même quand la télécommande sans fil fournie est utilisée près du capteur optique du signal de télécommande sans fil cela signifie que les piles sont épuisées Remplacer les piles Y a t il un éclairage fluorescent ou un moniteur au plasma près de l appareil et dans ce cas le capteur optique du signal de télécommande sans fil est il exposé à sa lumière Page 13 Impossible à piloter à partir du pann...

Страница 194: ...r du menu Pages 39 à 46 Pas de mise au point automatique La mise au point est elle réglée sur manuel La mise au point automatique est lancée dès qu elle est réglée sur automatique Page 22 Dans certaines situations la mise au point peut se faire difficilement quand elle est réglée sur automatique Dans de tels cas sélectionner le réglage manuel et faire la mise au point manuellement Page 24 Les coul...

Страница 195: ...tes et les caméras Ne pas utiliser de benzène de diluant pour peintures ou autre liquide volatile Lors de l utilisation d un chiffon à épousseter chimique lire attentivement ses précautions d utilisation Remarques Remplacement des consommables La courroie est un consommable Elle doit être remplacée périodiquement Pour les détails sur le remplacement de la courroie consulter son revendeur Remplacem...

Страница 196: ...s de tomber Pendant le travail d installation prendre soin de tenir l appareil par son socle Le fait de déposer l appareil en le tenant par l objectif ou par des pièces rotatives peut provoquer une défaillance S assurer que le travail de dépose est effectué par une équipe de deux personnes 1 Déposer le cache câble Déposer les pastilles cache vis déposer les deux vis puis déposer le cache câble Le ...

Страница 197: ...64 F FRANÇAIS Aspect extérieur Unité mm ...

Страница 198: ...cteur de sortie Composite 1 0 Vc c 75 BNC 1 Signaux HD SD analogiques composantes ou SD Y C VGA 15 broches 1 Signaux Y C disponibles en mode SD uniquement commutation avec des signaux Y Pb Pr possible sur le menu Sélection SD HD possible quand les signaux Y Pb Pr sont sortis Entrée sortie Connecteur d entrée sortie CONTROL IN RS422A RJ 45 FONCTIONS ET PERFORMANCE Caméra Capteurs d image Capteurs d...

Страница 199: ...oramique Méthode d installation Autonome Desktop ou suspendue Hanging Pour assurer la sécurité l appareil doit être fixé à l aide des potences de fixation fournies S adresser à une entreprise qualifiée pour l installation de l appareil Connexions du panneau de commande Câble de raccordement Câble droit 10BASE T STP catégorie 5 Maxi 1000m Commande uniquement Utiliser un dispositif externe ou tout a...

Страница 200: ...nte utilizzabili Si avvisa che gli apparecchi di CLASSE I devono essere collegati a una presa di rete dotata di collegamento protettivo di terra VERSIONE ITALIANA ITALIAN VERSION NON TOGLIERE IL COPERCHIO SVITANDOLO Per ridurre i pericoli di scosse elettriche non togliere il coperchio All interno non ci sono parti riparabili dall utente Per le riparazioni rivolgersi a personale tecnico qualificato...

Страница 201: ... contribuirà a far risparmiare preziose risorse ed evitare potenziali effetti negativi sulla salute umana e sull ambiente che potrebbero derivare altrimenti da uno smaltimento inappropriato Per ulteriori dettagli contattare la propria autorità locale o il punto di raccolta designato più vicino In caso di smaltimento errato di questo materiale di scarto potrebbero venire applicate delle penali in b...

Страница 202: ...zione del genlock 36 Operazioni basilari dei menu 39 Impostazione delle voci di menu 47 Tabella delle voci di menu 56 Limitatori 57 Impostazione sblocco dei limitatori 58 Modalità di sicurezza 59 Risoluzione dei problemi 60 Manutenzione 62 Sostituzione delle parti consumabili 62 Rimozione dell unità 63 Aspetto 64 Dati tecnici 65 Attenzione Il manuale di questa videocamera HD integrata di seguito l...

Страница 203: ...montaggio con rondelle piane rondelle elastiche M4 8 mm 4 Viti per copricavo testa piana M3 6 mm 2 Tappini coprivite 2 Piedini di gomma 4 Viti per piedini di gomma nere M4 6 mm 4 Filtro 1 Morsetti 2 Descrizione generale Questa unità è una videocamera multiformato che integra una testa di panoramica orizzontale verticale e un obiettivo zoom Integrando la videocamera l obiettivo e la testa di panora...

Страница 204: ...velli di rumorosità NC30 per operazioni a 30 s e NC35 per operazioni a 60 s Memorizza fino a 100 posizioni nella memoria personalizzata Il numero di posizioni nella memoria personalizzata dipende dal controller utilizzato con l unità Alta compatibilità con i controller Panasonic attualmente disponibili per la creazione di un sistema flessibile È possibile comandare fino a cinque unità e dispositiv...

Страница 205: ...re i componenti e ridurne la durata utile Non esporre l unità a fonti calore nel punto di installazione e al calore proveniente da apparecchi riscaldanti o altri apparecchi Gli accessori in dotazione con l unità devono essere utilizzati correttamente per l installazione Utilizzare tutte le staffe di montaggio e le viti di montaggio in dotazione con l unità per installarla Non montare l unità adott...

Страница 206: ...collegato durante l operazione Non avvicinarsi alle parti in movimento Non avvicinare le dita o altre parti del corpo alle parti in movimento In caso contrario potrebbero verificarsi infortuni L unità è dotata di modalità di sicurezza Le modalità di sicurezza sono funzioni che hanno lo scopo di proteggere le persone e gli oggetti da incidenti e la testa di panoramica orizzontale verticale dai dann...

Страница 207: ...asi in cui si utilizzano altre videocamere e sistemi di testa di panoramica orizzontale verticale Panasonic L AW CB400 non può essere collegata direttamente a questa unità L AW CB400 deve essere collegata con l AW RP400 e l AW IF400 in combinazione Non è possibile utilizzare i menu di impostazione dell AW CB400 In sostituzione utilizzare i menu di impostazione della videocamera Non è possibile uti...

Страница 208: ...onda dello stato dell unità Arancio Se viene attivata la modalità standby Verde Se l unità è accesa Rosso Se si sono verificati errori sull unità Verde e doppio lampeggio Se viene ricevuto un segnale di comando a distanza corrispondente all ID del telecomando wireless in dotazione mentre l unità è accesa Arancio e doppio lampeggio Se viene ricevuto un segnale di comando a distanza non corrisponden...

Страница 209: ...n modalità Y C C 2 Y In modalità Y C VBS 3 Pb In modalità Y C Y da 4 a 15 GND Connettore CONTROLLER Connettore di ingresso per i segnali di controllo della videocamera o della testa di panoramica orizzontale verticale Collegarlo al connettore TO PAN TILT HEAD del controller Interruttori SERVICE Interruttori utilizzati per la manutenzione Tenerli tutti in posizione OFF Interruttori IR ID SET Permet...

Страница 210: ...ati nella memoria correntemente selezionata In alternativa premendo brevemente questo tasto meno di due secondi solo il bilanciamento del bianco viene regolato automaticamente e registrato nella memoria correntemente selezionata 6Tasto MODE Viene utilizzato per selezionare i segnali video trasmessi dall unità A ogni pressione del tasto vengono commutati i segnali delle barre dei colori e i segnali...

Страница 211: ...a a fuoco Tasto M FOCUS Viene utilizzato per la regolazione manuale della messa a fuoco I tasti FOCUS F e N vengono utilizzati per la regolazione effettiva Tasti OPT ON OFF Vengono utilizzati per future espansioni delle funzioni e attualmente non possono essere utilizzati Tasto HOME Se premuto per due secondi la direzione dell unità panoramica orizzontale o verticale torna alla posizione di riferi...

Страница 212: ...otti simili o al sole Installare l unità lontano da luci fluorescenti monitor al plasma e prodotti simili Utilizzare il telecomando wireless da un punto distante al massimo 3 metri dall unità Utilizzare un controller collegato all unità tramite un cavo collegamento cablato Anche dopo aver rimosso le batterie dal telecomando wireless la selezione dell operazione da eseguire tasto CAM1 CAM2 CAM3 o C...

Страница 213: ...re la modalità più idonea alle condizioni di ripresa e alle proprie preferenze Se le condizioni di ripresa rimangono invariate non è necessario selezionare altre modalità 5 Iniziare le riprese Dopo le riprese spegnere tutte le unità e i dispositivi del sistema Per le operazioni di base si ipotizza che la messa a fuoco il diaframma e il bilanciamento del bianco vengano regolati automaticamente seco...

Страница 214: ...gnale corrispondente all ID del telecomando e lampeggia di colore arancio se il segnale ricevuto non corrisponde all ID del telecomando Se le operazioni vengono eseguite con il controller 1 Impostare tutti gli interruttori di accensione delle unità e dei dispositivi collegati al sistema su ON Questa unità non dispone di interruttore di accensione Se l unità è alimentata la spia del display di stat...

Страница 215: ...ggi 1 e 2 secondo necessità 4 Impostare tutti gli interruttori di accensione delle unità e dei dispositivi collegati al sistema su OFF Se le operazioni vengono eseguite con il controller 1 Spostare l interruttore OPERATE del controller su OFF Tutte le videocamere compresa l unità collegate al controller vengono spente La spia del display di stato dell unità si accende di colore arancio 2 Impostare...

Страница 216: ...ore verde se viene ricevuto un segnale corrispondente all ID del telecomando e lampeggia di colore arancio se il segnale ricevuto non corrisponde all ID del telecomando Se le operazioni vengono eseguite con il controller Se è collegato l AW RP655 Premere il tasto 1 2 3 4 o 5 di CONTROL PREVIEW MONITOR OUT SEL Se è collegato l AW RP555 Premere il tasto 1 2 3 4 o 5 di CONTROL Se è collegato l AW RP4...

Страница 217: ...olazioni vengono salvati in memoria separatamente dalla modalità di ripresa È sempre necessario selezionare la modalità di ripresa prima di effettuare qualsiasi regolazione Modalità luce alogena Halogen Questa modalità è adatta per riprese in interni per esempio a matrimoni feste seminari sedi di eventi e così via Modalità luce fluorescente Fluorescent Questa modalità è adatta per riprese in inter...

Страница 218: ...zzato il sottomenu Camera Setting Camera Setting Halogen Fluorescent Daylight User Return 5 Premere il tasto o per far lampeggiare la modalità di ripresa da utilizzare A ogni pressione del tasto o cambia la voce lampeggiante Quando lampeggia Return e premendo il tasto o l operazione torna al menu precedente 6 Premere il tasto o L unità viene quindi impostata sulla modalità di ripresa lampeggiante ...

Страница 219: ...iante Quando lampeggia Return e la manopola jog dial principale viene ruotata in senso antiorario l operazione torna al menu precedente 9 Ruotare la manopola jog dial principale in senso antiorario L unità viene quindi impostata sulla modalità di ripresa lampeggiante e viene visualizzato un sottomenu Halogen Mode Set Brightness Set Colour Set G L Set Other Set Initialize Return Esempio Modalità al...

Страница 220: ... della direzione della videocamera Movimento della videocamera a destra o sinistra panoramica orizzontale Spostare la leva PAN TILT verso L o R Movimento della videocamera verso l alto o il basso panoramica verticale Spostare la leva PAN TILT verso UP o DOWN Movimento della videocamera in diagonale Spostare la leva PAN TILT diagonalmente Ritorno della videocamera nella posizione di riferimento Se ...

Страница 221: ...olazione automatica del guadagno Problemi con i colori delle immagini della videocamera Vedere Regolazione automatica costante del bianco ATW pag 31 e passare ad ATW Se le operazioni vengono eseguite con il controller L unità non si muove Selezionare l unità da comandare procedendo come segue Se è collegato l AW RP655 Premere il tasto 1 2 3 4 o 5 di CONTROL PREVIEW MONITOR OUT SEL Se è collegato l...

Страница 222: ... non sarà più necessario effettuare la regolazione purché l unità venga utilizzata alle stesse condizioni Regolazione del bilanciamento del nero Questa regolazione viene eseguita per riprodurre il nero in modo preciso L impostazione ha effetti sulle tonalità di colore dell intero schermo La regolazione deve essere effettuata se l unità viene utilizzata per la prima volta o se è rimasta inutilizzat...

Страница 223: ... collegato l AW RP555 1 Premere il tasto EXT AF per passare alla regolazione manuale della messa a fuoco 2 Regolare manualmente la messa a fuoco agendo sulla leva FOCUS Inoltre a ogni pressione del tasto SPEED la velocità della messa a fuoco e delle altre regolazioni viene aumentata o diminuita 3 Se necessario premere il tasto EXT AF per tornare alla regolazione automatica della messa a fuoco Se è...

Страница 224: ...one automatica del diaframma Se è collegato l AW RP555 1 Premere il tasto IRIS per spegnerne la spia e passare alla regolazione manuale 2 Ruotare la ghiera LEVEL di IRIS per regolare manualmente il diaframma 3 Se necessario premere il tasto IRIS per accenderne la spia e passare alla regolazione automatica in modo da riportare il diaframma alla regolazione automatica Se è collegato l AW RP400 AW CB...

Страница 225: ...possibile eseguire le regolazioni anche con la seguente procedura 1 Premere il tasto SHUTTER per accenderne la spia Viene selezionata la velocità otturatore impostata precedentemente 2 Se necessario premere il tasto SHUTTER e spegnerne la spia per tornare all otturatore in posizione OFF Per impostare la velocità otturatore con l AW RP555 procedere come segue 1 Tenendo premuto il tasto MEMORY preme...

Страница 226: ... premere il tasto GAIN e accendere la spia AUTO per tornare alla regolazione automatica del guadagno AGC Se è collegato l AW RP555 1 Premere il tasto GAIN per spegnerne la spia A ogni pressione del tasto è possibile selezionare in sequenza uno dei tre incrementi di guadagno Lo stato corrente viene visualizzato come segue Tasto MANU L Tasto MANU H Tasto GAIN 0 dB Spento Spento Spento LOW Acceso Spe...

Страница 227: ...ngolazione della videocamera Regolare la messa a fuoco e il diaframma secondo necessità 2 Tenendo premuto il tasto PRESET premere il tasto corrispondente al numero di memoria personalizzata Se si seleziona un numero di memoria personalizzata su cui è già stata registrata un impostazione l impostazione esistente viene cancellata e sostituita con quella nuova Richiamo delle impostazioni delle memori...

Страница 228: ... immagine da riprendere sul monitor Agire sulla leva PAN TILT e sulla leva ZOOM per determinare l angolazione della videocamera Regolare la messa a fuoco e il diaframma secondo necessità 2 Tenere premuto il tasto MEMORY I tasti da 1 a 10 di PRESET in cui è possibile registrare le impostazioni iniziano a lampeggiare in sequenza 3 Tenendo premuto il tasto MEMORY premere il tasto del numero di memori...

Страница 229: ...o il bilanciamento del bianco e se l unità viene utilizzata con le stesse impostazioni e alle stesse condizioni l impostazione viene completata selezionando semplicemente un impostazione di menu o premendo un tasto del controller Non è necessario impostarlo nuovamente Dopo aver inserito una nuova impostazione l impostazione precedente viene cancellata Utilizzare le due memorie per salvare le impos...

Страница 230: ...videocamera dispone di memoria integrata il bilanciamento del bianco impostato rimane in memoria anche dopo aver spento l unità Pertanto non è necessario reimpostare il bilanciamento del bianco se la temperatura del colore dei soggetti rimane invariata Al contrario deve essere reimpostato se la temperatura del colore varia per esempio passando da interni ad esterni o viceversa Se la videocamera è ...

Страница 231: ... Premere il tasto o Viene visualizzato il sottomenu Colour Set Colour Set Chroma Level 1 White Bal AWC A Pedestal 1 Painting R Gain 1 B Gain 1 Return 6 Premere il tasto o per far lampeggiare il valore di R Gain o B Gain 7 Premere il tasto o per modificare il valore e regolarlo in modo che la portante delle parti bianche dei segnali video sia ridotta al minimo o che le parti bianche dell immagine s...

Страница 232: ...utomatica del bilanciamento del bianco AWC e la regolazione automatica del bilanciamento del nero ABC ed è possibile inserire l impostazione del bilanciamento del nero Contemporaneamente viene inserita anche l impostazione del bilanciamento del bianco Pertanto verificare che le condizioni per la regolazione del bilanciamento del bianco siano soddisfacenti prima di procedere Il bilanciamento del ne...

Страница 233: ...stare il diaframma in modalità manuale 2 Premere il tasto IRIS Il diaframma si arresta 3 Selezionare la modalità utente come descritto in Selezione delle modalità di ripresa file di scena pag 19 Viene visualizzato il sottomenu User Mode Set sul display User Mode Set Brightness Set Colour Set G L Set Detail Set Other Set Initialize Return 4 Premere il tasto o per far lampeggiare Colour Set 5 Premer...

Страница 234: ...tivo 3 Le operazioni descritte ai passaggi da 3 a 8 di Se le operazioni vengono eseguite con il telecomando wireless in dotazione possono essere eseguite seguendo la procedura Operazioni basilari dei menu pag 43 Se è collegato l AW RP400 AW CB400 Le seguenti operazioni vengono eseguite con l AW CB400 1 Premere più volte il tasto IRIS per spegnerne la spia Impostare il diaframma in modalità manuale...

Страница 235: ...e Se le operazioni vengono eseguite con il telecomando wireless in dotazione 1 Impostare la modalità utente come descritto in Selezione delle modalità di ripresa file di scena pag 19 Viene visualizzato il sottomenu Mode Set sul display La regolazione della fase orizzontale è comune per tutte le modalità di ripresa file di scena Tuttavia se la regolazione viene effettuata con il telecomando wireles...

Страница 236: ...golazione si utilizza un vettorscopio Barre di colore della videocamera Linea di scissione Barre di colore del generatore di effetti speciali Se le operazioni vengono eseguite con il telecomando wireless in dotazione 1 Premere il tasto MODE La modalità passa alla visualizzazione delle barre dei colori 2 Impostare la modalità utente come descritto in Selezione delle modalità di ripresa file di scen...

Страница 237: ...per due secondi Si esce dal display del menu 8 Premere il tasto MODE La modalità passa alla visualizzazione dell immagine della videocamera Se le regolazioni vengono eseguite con il controller Le operazioni descritte ai passaggi da 2 a 7 di Se le operazioni vengono eseguite con il telecomando wireless in dotazione possono essere eseguite seguendo la procedura Operazioni basilari dei menu pagg 39 4...

Страница 238: ... tasti da 1 a 5 di CONTROL PREVIEW MONITOR OUT SEL Premere uno dei tasti da 1 a 5 di CONTROL Premere uno dei tasti da 1 a 5 di CONTROL SELECT Visualizzazione del menu principale Premere il tasto MENU per due secondi 1 Premere il tasto MENU Il display del pannello LCD dell AW RP655 passa alla modalità menu 2 Ruotare la manopola jog dial principale per visualizzare CAMERA SETTING sul pannello LCD 3 ...

Страница 239: ... Alcuni sottomenu hanno a loro volta un sottomenu 5 Premere il tasto o per far lampeggiare la voce da impostare o l impostazione A ogni pressione del tasto o cambia la voce lampeggiante Quando lampeggia Return e premendo il tasto o l operazione torna al menu precedente Mentre sono visualizzati i menu i tasti e hanno la stessa funzione Tuttavia tenere presente che se il tasto viene premuto quando è...

Страница 240: ...nferma la selezione delle voci 1 1 La regolazione deve essere eseguita con cautela poiché se la manopola jog dial viene premuta quando è possibile regolare un valore impostato il valore verrà regolato in senso positivo Manopola jog dial Destra Se il pannello LCD è in modalità di regolazione del guadagno Regolare l impostazione B GAIN da 30 a 30 Se il pannello LCD è in modalità di regolazione del l...

Страница 241: ...a manopola jog dial L per far lampeggiare la voce da impostare o l impostazione A ogni rotazione della manopola jog dial L cambia la voce lampeggiante Quando lampeggia Return e la manopola jog dial L viene premuta l operazione torna al menu precedente 9 Ruotare la manopola jog dial R per modificare l impostazione 10Dopo aver terminato l impostazione premere il tasto MENU o il tasto R B GAIN PED Si...

Страница 242: ... Messa a fuoco automatica e Messa a fuoco manuale Se la videocamera è in modalità Messa a fuoco automatica il tasto EXT AF si accende Questi tasti non possono essere utilizzati per comandare l AW HE100 1 Premere uno dei tasti da 1 a 5 di CONTROL per selezionare l unità da comandare 2 Premere il tasto MENU per due secondi Viene visualizzato il menu principale sul monitor 3 Premere il tasto MENU o I...

Страница 243: ... il tasto YES l operazione torna al menu precedente 6 Premere il tasto YES o NO per modificare l impostazione Premere il tasto YES per regolare il valore impostato in senso positivo Premere il tasto NO per regolare il valore impostato in senso negativo 7 Dopo aver terminato l impostazione premere il tasto MENU per due secondi Si esce dal display del menu Per comandare l AW HE100 dall AW RP555 potr...

Страница 244: ...unzione TRACING MEMORY non è disponibile La ghiera R B PED non è disponibile Le operazioni del menu della videocamera diventano disponibili se la voce CAMERA MENU CNT è impostata su ENABLE nel menu LCD dell AW CB400 OPTION SW A Apre il menu e scorre in alto nell elenco delle voci B Scorre in basso nell elenco delle voci C Conferma la selezione delle voci e regola un valore impostato in senso posit...

Страница 245: ...endo il tasto C l operazione torna al menu precedente 6 Premere il tasto C o D di OPTION SW per modificare l impostazione Premere il tasto C di OPTION SW per regolare il valore impostato in senso positivo Premere il tasto D di OPTION SW per regolare il valore impostato in senso negativo 7 Dopo aver terminato l impostazione premere il tasto A di OPTION SW per due secondi Si esce dal display del men...

Страница 246: ...t Just Impostazione di fabbrica Soft arresto manovra morbido Utilizzando questa voce selezionare Soft o Just esatto per l arresto manovra Le vibrazioni che accompagnano l accelerazione o la decelerazione della manovra di arresto sono inferiori con l impostazione Soft rispetto all impostazione Just esatto 5 Selezione installazione Desktop indipendente Hanging sospesa Install Position Desktop Hangin...

Страница 247: ...al dispositivo di controllo con cui non era stato possibile eseguire le operazioni dei menu 4 Dopo aver modificato questa voce spegnere l unità e riaccenderla 9Inizializzazione Initialize Utilizzando questa voce le impostazioni di tutte le voci del menu Pan Tilt Head Setting vengono riportate alle impostazioni di fabbrica Vedere la sezione a destra Ritorno al menu precedente menu principale Return...

Страница 248: ...Menu di impostazione della modalità luce diurna Daylight Mode Set Brightness Set Colour Set G L Set Other Set Initialize Return 6 7 8 Menu di impostazione della modalità utente User Mode Set Brightness Set Colour Set G L Set Detail Set Other Set Initialize Return 6 7 8 9 6 Display del menu di impostazione della luminosità Brightness Set Viene visualizzato il menu di impostazione della luminosità p...

Страница 249: ...one nella modalità luce alogena Selezionando O K mentre è visualizzata la schermata di conferma dell inizializzazione viene visualizzata la seguente schermata e viene avviata l inizializzazione Premere il tasto o per far lampeggiare O K quindi premere il tasto o Terminata l inizializzazione il display torna al menu di impostazione della modalità di ripresa pertinente Halogen Mode initialize Esempi...

Страница 250: ... improvvisamente causando uno shock sull immagine in uscita Nota 4 Selezione del guadagno massimo AGC AGC Max Gain 6dB 12dB 18dB Impostazione di fabbrica 18dB Utilizzando questa voce viene impostato il guadagno massimo se per la regolazione del guadagno Gain è stato selezionato Auto 5 Ritorno al menu precedente menu di selezione della modalità di ripresa Return Menu di impostazione della luminosit...

Страница 251: ...e eseguita la funzione AWC regolazione automatica del bilanciamento del bianco o viene eseguita una regolazione manuale del bilanciamento del bianco in AWC A o AWC B il valore risultante verrà salvato in memoria 3200K Viene impostato il bilanciamento del bianco regolato alle condizioni di illuminazione a 3200K equivalente a una luce alogena 5600K Viene impostato il bilanciamento del bianco regolat...

Страница 252: ...ile solo per la modalità utente Detail Set Detail On Total Detail Level 2 V Detail Level 4 Noise Suppress 0 Return 1 2 3 4 5 1 Selezione ATTIVAZIONE DISATTIVAZIONE del dettaglio Detail On Off Utilizzando questa voce è possibile selezionare ON o OFF per la compensazione del dettaglio Selezionando On è possibile regolare il valore di compensazione del dettaglio utilizzando le voci di menu Total Deta...

Страница 253: ...tato selezionato 576i o 576psF viene selezionato l aspect ratio 16 9 con schiacciamento o 4 3 con tagli laterali Se per l impostazione del formato video Format è stato selezionato 1080i o 720p viene visualizzato e non è possibile selezionare l aspect ratio In tal caso l aspect ratio dei segnali compositi è fisso a 16 9 con schiacciamento 5 Selezione ATTIVAZIONE DISATTIVAZIONE del display dello sta...

Страница 254: ...mente anche cambiando l impostazione Se si esegue un operazione che prevede un trasferimento a un altra voce premendo il tasto o viene visualizzata la schermata di conferma del cambiamento di impostazione illustrata di seguito Other Set Focus Auto Iris Auto Format 1080i Change Setting O K CANCEL Return Esempio Modalità alogena Selezionando O K il formato video viene cambiato e viene ripristinato i...

Страница 255: ...o Iris Auto Format 1080i Aspect 16 9 Status Off Component Y Pb Pr Focus ADJ With Zoom On Return Initialize Return Menu Voce Impostazione di fabbrica Camera Setting Daylight Brightness Set A Iris Level 0 Step Off Gain Auto AGC Max Gain 18dB Return Colour Set Chroma Level 0 White Bal ATW Return G L Set H Phase 0 SC Coarse 90deg SC Fine 0 Return Other Set Focus Auto Iris Auto Format 1080i Aspect 16 9...

Страница 256: ... impostando i limitatori immediatamente prima degli ostacoli È possibile impostare le posizioni dei quattro limitatori ovvero il limite superiore inferiore sinistro e destro della corsa Terminata l impostazione le posizioni resteranno memorizzate anche dopo aver spento l unità I limitatori possono essere impostati e sbloccati utilizzando il telecomando wireless in dotazione o il controller L ultim...

Страница 257: ... telecomando wireless per ruotare l unità fino al punto da considerare limite sinistro Quindi eseguire la procedura descritta in Operazioni basilari dei limitatori e premere il tasto per due secondi tenendo premuto il tasto PRESET Impostazione della posizione del limite di corsa destro Premere il tasto o sul telecomando wireless per ruotare l unità fino al punto da considerare limite destro Quindi...

Страница 258: ... Per sbloccare la Modalità di sicurezza attivata da collisione riportare la panoramica orizzontale o la panoramica verticale in posizione neutrale 2 Modalità di sicurezza attivata da errore Se all interno dell unità si è verificato un errore si attiva la Modalità di sicurezza attivata da errore Le funzioni dell unità vengono annullate e la spia del display di stato si accende di colore rosso Per s...

Страница 259: ...ità non lampeggia neanche quando il telecomando wireless viene utilizzato vicino all area di rilevamento del segnale del telecomando wireless le batterie sono esaurite Sostituire le batterie L unità è si trova vicino a una luce fluorescente o a un monitor al plasma Se sì l area di rilevamento del segnale del telecomando wireless è esposta alla luce Pag 13 Impossibile comandare l unità con il contr...

Страница 260: ...di menu Uscire dal menu Pagg 39 46 Non viene eseguita la messa a fuoco automatica La messa a fuoco è impostata su manuale La messa a fuoco automatica inizia appena la messa a fuoco viene impostata su automatica Pag 22 In alcune situazioni potrebbe risultare difficile mettere a fuoco con l impostazione automatica In questi casi selezionare l impostazione manuale e mettere a fuoco manualmente Pag 24...

Страница 261: ... anche per occhiali e fotocamere Non utilizzare benzina solventi e altri liquidi volatili Se si utilizza un prodotto chimico per la pulizia leggere attentamente le avvertenze per l uso Note Sostituzione delle parti consumabili La cinghia è soggetta a usura e deve essere sostituita a intervalli periodici Per i dettagli sulla sostituzione della cinghia rivolgersi al rivenditore Sostituzione della ci...

Страница 262: ...e l unità non possa cadere Durante le operazioni reggere l unità dall area di base Se l unità viene rimossa reggendola dall area dell obiettivo o dalle parti rotanti potrebbero verificarsi malfunzionamenti La rimozione deve essere sempre eseguita da due persone 1 Rimuovere il copricavo Rimuovere i tappini coprivite quindi rimuovere le due viti e il copricavo Il copricavo è munito di linguette Abba...

Страница 263: ...64 I ITALIANO Aspetto Unità mm ...

Страница 264: ...nali componente analogico HD SD o SD Y C VGA 15P 1 Segnali Y C disponibili solo in modalità SD tramite l impostazione a menu è possibile commutare i segnali Y Pb Pr È possibile selezionare SD HD se vengono trasmessi segnali Y Pb Pr Ingresso uscita Connettore di ingresso uscita CONTROL IN RS422A RJ 45 FUNZIONI E PRESTAZIONI Unità videocamera Sensori di immagine 3 sensori di immagine CCD da 1 3 tipo...

Страница 265: ...di panoramica orizzontale verticale Metodo di installazione Indipendente Desktop o sospesa Hanging Per garantire la sicurezza l unità deve essere fissata con le staffe in dotazione Per installare l unità rivolgersi a un tecnico qualificato Collegamenti controller Cavo di collegamento Cavo dritto 10BASE T STP categoria 5 Max 1 000 m Solo controllo Per prolungare i collegamenti del segnale video è n...

Страница 266: ...cilmente En la toma de corriente con conexión a tierra de protección deberá ponerse un aviso indicando que en ella se pueden conectar aparatos CLASS I VERSIÓN ESPAÑOLA SPANISH VERSION NO QUITE LA CUBIERTA DESATORNILLÁNDOLA No quite la tapa para evitar el riesgo de sacudidas eléctricas Las piezas del interior no requieren mantenimiento por parte del usuario Solicite las reparaciones al personal de ...

Страница 267: ...valiosos recursos y a evitar cualquier posible efecto negativo en la salud de las personas y en el medio ambiente que pudiera producirse debido al tratamiento inadecuado de desechos Póngase en contacto con su autoridad local para que le informen detalladamente sobre el punto de recogida designado más cercano De acuerdo con la legislación nacional podrían aplicarse multas por la eliminación incorre...

Страница 268: ...l 34 Ajuste del intersincronizador 36 Operaciones básicas con menús 39 Ajuste de los elementos del menú 47 Tabla de elementos de menús 56 Limitadores 57 Ajuste cancelación de los limitadores 58 Modos de seguridad 59 Solución de problemas 60 Mantenimiento 62 Cambio de piezas consumibles 62 Desmontaje de la unidad 63 Apariencia 64 Especificaciones 65 Aviso El manual de esta cámara integrada de HD de...

Страница 269: ... montaje con arandelas planas y arandelas de resorte M4 8 mm 4 Tornillos para la cubierta de cables cabeza plana M3 6 mm 2 Hoja para tapar tornillos 2 Patas de goma 4 Tornillos para patas de goma negros M4 6 mm 4 Filtro 1 Bandas de fijación 2 Perspectiva general Esta unidad es una cámara multiformato que incorpora un cabezal de panorámica e inclinación y un objetivo zoom Al integrar la cámara el o...

Страница 270: ...lencioso con niveles de ruido de NC30 para operaciones realizadas a 30 s y NC35 para operaciones realizadas a 60 s Memorización de hasta 100 posiciones en la memoria de preajustes El número de ajustes de la memoria de preajustes cambia dependiendo del controlador que se utilice con la unidad Alto grado de compatibilidad con los controladores actuales de Panasonic lo que permite crear un sistema fl...

Страница 271: ...duzca su duración No exponga directamente la unidad al calor producido en el lugar de instalación ni al calor producido por una calefacción u otro aparato similar Las piezas accesorias suministradas con la unidad deberán utilizarse sin falta cuando se instale la unidad Asegúrese absolutamente de utilizar los soportes de montaje y los tornillos de montaje suministrados con la unidad cuando tenga qu...

Страница 272: ...e desconecta durante el funcionamiento No se acerque a las piezas móviles Bajo ninguna circunstancia deberá acercar sus dedos u otras partes de su cuerpo a las piezas móviles porque si lo hace podrá sufrir lesiones La unidad dispone de modos de seguridad Los modos de seguridad son funciones diseñadas para proteger a las personas y a las propiedades y para evitar que se dañe el cabezal de panorámic...

Страница 273: ...e sea más lenta si se compara con la de los casos en los que se emplean otras cámaras y sistemas de cabezal de panorámica inclinación de Panasonic El AW CB400 no se puede conectar directamente a esta unidad El AW CB400 debe conectarse junto con el AW RP400 y el AW IF400 en combinación Los menús de ajuste de la cámara del AW CB400 no se pueden utilizar Use en su lugar los menús de ajuste de la cáma...

Страница 274: ...blece el modo de espera Verde Cuando está conectada la alimentación Rojo Cuando se ha producido algún problema en la unidad Verde y parpadea dos veces Cuando mientras está conectada la alimentación se ha recibido procedente del mando a distancia inalámbrico accesorio una señal que concuerda con la identificación del mando a distancia Anaranjado y parpadea dos veces Cuando mientras está conectada l...

Страница 275: ... Nombre de señal 1 Pr En el modo Y C C 2 Y En el modo Y C VBS 3 Pb En el modo Y C Y 4 a 15 TIERRA Conector CONTROLLER Éste es el conector de entrada para las señales de control de la unidad de la cámara o de la unidad del cabezal de panorámica e inclinación Conéctelo al conector TO PAN TILT HEAD del controlador Conmutadores SERVICE Estos conmutadores se utilizan con fines de mantenimiento Manténga...

Страница 276: ...ria actualmente seleccionada De forma alternativa si se pulsa brevemente este botón menos de dos segundos sólo el balance del blanco se ajustará y registrará automáticamente en la memoria actualmente seleccionada 6Botón MODE Este botón se utiliza para seleccionar las señales de vídeo que van a salir por la unidad Cada vez que se pulsa este botón las señales cambian entre señales de franja cromátic...

Страница 277: ...uando se ajusta automáticamente el enfoque del objetivo Botón M FOCUS Este botón se utiliza cuando se ajusta manualmente en enfoque del objetivo Los botones FOCUS F y N se utilizan cuando se realiza el ajuste real Botones OPT ON OFF Estos botones se utilizan para la expansión futura de las funciones No se utilizan en la actualidad Botón HOME Cuando se pulse este botón durante dos segundos la direc...

Страница 278: ...ilares o a la luz del sol Instale la unidad lejos de luces fluorescentes monitores con pantalla de plasma u otros aparatos similares Utilice el mando a distancia inalámbrico en posiciones situadas a menos de 3 metros de la unidad Utilice un controlador que haya sido conectado a la unidad utilizando un cable conexión con cable La selección de la operación que va a ser realizada el botón CAM1 CAM2 C...

Страница 279: ...ccione el modo que cumpla las condiciones de la filmación y sea satisfaga sus preferencias Cuando continúe filmando bajo las mismas circunstancias no será necesario tener que seleccionar otro modo 5 Inicie la filmación Después de filmar desconecte la alimentación de todas las unidades y dispositivos del sistema Con las operaciones básicas se supone que el enfoque el iris y el balance del blanco se...

Страница 280: ...a con la identificación del mando a distancia y parpadea en color anaranjado cuando se recibe una señal que no concuerda con la identificación del mando a distancia Cuando se realizan las operaciones utilizando el controlador 1 Ponga todos los interruptores de la alimentación de las unidades y dispositivos conectados al sistema en la posición ON Esta unidad no tiene interruptor de la alimentación ...

Страница 281: ...y 2 según sea necesario 4 Ponga todos los interruptores de la alimentación de las unidades y dispositivos conectados al sistema en la posición OFF Cuando se realizan las operaciones utilizando el controlador 1 Ponga el interruptor OPERATE del controlador en OFF La alimentación de todas las cámaras incluyendo la unidad conectadas al controlador se desconectará La luz indicadora de estado de la unid...

Страница 282: ...ndo se recibe una señal que concuerda con la identificación del mando a distancia y parpadea en color anaranjado cuando se recibe una señal que no concuerda con la identificación del mando a distancia Cuando se realizan las operaciones utilizando el controlador Cuando está conectado el AW RP655 Pulse el botón 1 2 3 4 o 5 de CONTROL PREVIEW MONITOR OUT SEL Cuando está conectado el AW RP555 Pulse el...

Страница 283: ...la memoria por separado para cada uno de los modos de filmación Asegúrese absolutamente de seleccionar el modo de filmación antes de hacer cualquier ajuste Modo de luz halógena Halógena Este modo resulta adecuado para filmar en interiores en banquetes de bodas fiestas seminarios lugares de actuaciones etc Modo de luz fluorescente Fluorescente Este modo resulta adecuado para filmar en interiores ba...

Страница 284: ...era Setting se visualiza Camera Setting Halogen Fluorescent Daylight User Return 5 Pulse el botón o para que parpadee el modo de filmación que vaya a utilizar Cada vez que se pulsa el botón o cambia el elemento que parpadea Cuando se hace parpadear Return y se pulsa el botón o la operación vuelve al menú anterior 6 Pulse el botón o La unidad se pone ahora en el modo de filmación que está parpadean...

Страница 285: ...ira el dial principal hacia la izquierda la operación vuelve al menú anterior 9 Gire el dial principal hacia la izquierda La unidad está ahora en el modo de filmación que está parpadeando y se visualiza un menú secundario Halogen Mode Set Brightness Set Colour Set G L Set Other Set Initialize Return Ejemplo Modo halógeno 10 Pulse el botón MENU o el botón R B GAIN PED Se sale de la visualización de...

Страница 286: ...mara Movimiento de la cámara hacia la derecha o hacia la izquierda panorámica Incline la palanca PAN TILT hacia la L o la R Movimiento de la cámara hacia arriba o hacia abajo inclinación Incline la palanca PAN TILT hacia UP o hacia DOWN Movimiento de la cámara en diagonal Incline la palanca PAN TILT diagonalmente Retorno de la cámara a la posición de referencia Si el controlador tiene un botón HOM...

Страница 287: ... ganancia Algo no va bien con el color de las imágenes de la cámara Consulte Ajuste del balance del blanco con seguimiento automático ATW página 31 y cambie a ATW Cuando se realizan las operaciones utilizando el controlador La unidad no se mueve Seleccione la unidad que va a utilizar siguiendo el procedimiento indicado más abajo Cuando está conectado el AW RP655 Pulse el botón 1 2 3 4 o 5 de CONTR...

Страница 288: ... necesario realizar más ajustes siempre que la unidad vaya a utilizarse bajo las mismas condiciones Ajuste del balance del negro Este ajuste se realiza para expresar con mayor precisión el color negro Su ajuste también influye en los tonos de los colores de toda la pantalla Este ajuste debe realizarse cuando se utilice la unidad por primera vez o cuando la unidad no se haya utilizado durante mucho...

Страница 289: ...juste automático Cuando está conectado el AW RP555 1 Pulse el botón EXT AF para cambiar el enfoque a ajuste manual 2 Ajuste manualmente el enfoque inclinando la palanca FOCUS Además cada vez que se pulse el botón SPEED la velocidad del enfoque y de otros ajustes podrá cambiarse a rápida o lenta 3 Si es necesario pulse el botón EXT AF para volver a poner el enfoque en ajuste automático Cuando está ...

Страница 290: ...z para volver a poner el iris en el ajuste automático Cuando está conectado el AW RP555 1 Pulse el botón IRIS para apagar su luz y cambiar al ajuste manual 2 Gire el dial LEVEL del IRIS para ajustar el iris manualmente 3 Si es necesario pulse el botón IRIS para encender su luz y cambie al ajuste automático con el fin de volver a poner el iris en ajuste automático Cuando está conectado el AW RP400 ...

Страница 291: ... los ajustes también se pueden hacer siguiendo los pasos indicados más abajo 1 Pulse el botón SHUTTER y encienda su luz La velocidad del obturador establecida de antemano se selecciona 2 Si fuese necesario pulse el botón SHUTTER y apague su luz para volver a poner el obturador en el ajuste OFF Siga los pasos de abajo para establecer la velocidad del obturador utilizando el AW RP555 1 Con el botón ...

Страница 292: ...ario pulse el botón GAIN y encienda la luz AUTO para volver a poner la ganancia en el modo de ajuste automático AGC Cuando está conectado el AW RP555 1 Pulse el botón GAIN para apagar su luz Cada vez que se pulsa este botón se puede seleccionar en orden una de las tres cantidades de aumento de ganancia El estado actual se visualiza de la forma siguiente Botón MANU L Botón MANU H Botón GAIN 0 dB Ap...

Страница 293: ...lo de la cámara Ajuste el enfoque y el iris si éstos necesitan ser ajustados 2 Mientras mantiene pulsado el botón PRESET pulse el botón correspondiente al número de la memoria de preajuste Si se ha seleccionado un número de memoria de preajuste con un ajuste ya registrado el ajuste existente será borrado y reemplazado por el ajuste nuevo Recuperación de ajustes de la memoria de preajustes 1 Pulse ...

Страница 294: ...imagen que va a filmar Utilice la palanca PAN TILT y la palanca ZOOM para determinar el ángulo de la cámara Ajuste el enfoque y el iris si necesitan ser ajustados 2 Mantenga pulsado el botón MEMORY Los botones entre el 1 y el 10 de PRESET en los que se pueden registrar los ajustes empiezan a parpadear ahora en orden 3 Con el botón MEMORY todavía pulsado pulse el botón del número de la memoria de p...

Страница 295: ...balance del blanco cuando la unidad se utilice con los mismos ajustes y bajo las mismas condiciones su ajuste se completará seleccionando simplemente un ajuste de menú o pulsando un botón del controlador No será necesario tener que volver a ajustar el balance del blanco otra vez Una vez introducido un ajuste nuevo el ajuste anterior se borrará Utilice las dos memorias para guardar los ajustes corr...

Страница 296: ...memoria aunque se desconecte la alimentación Por lo tanto no será necesario restablecer el balance del blanco si la temperatura del color de esos objetos permanece sin cambiar Sin embargo el balance del blanco tendrá que restablecerse si cambia la temperatura del color como es el caso en el que usted pasa de interiores a exteriores o viceversa Cuando la cámara se utilice sola el ajuste de ganancia...

Страница 297: ... el botón o El menú secundario Colour Set se visualiza Colour Set Chroma Level 1 White Bal AWC A Pedestal 1 Painting R Gain 1 B Gain 1 Return 6 Pulse el botón o para que parpadee el valor R Gain o B Gain 7 Pulse el botón o para cambiar el valor y ajuste este valor de forma que la portadora de las partes blancas de las señales de vídeo se minimice o que las partes blancas de la imagen queden comple...

Страница 298: ... balance del blanco página 30 El ajuste automático del balance del blanco AWC y el ajuste automático del balance del negro ABC se realizan y se introduce el ajuste del balance del negro El balance del blanco también se introduce al mismo tiempo para asegurar que las condiciones para el ajuste del balance del blanco se cumplan antes de proseguir El balance del negro no se puede ajustar cuando se vi...

Страница 299: ... manual 2 Pulse el botón IRIS El iris del objetivo se diafragma 3 Seleccione el modo del usuario siguiendo los pasos de Selección de los modos de filmación archivos de escenas página 19 Ahora mantenga el menú secundario User Mode Set en la visualización User Mode Set Brightness Set Colour Set G L Set Detail Set Other Set Initialize Return 4 Pulse el botón o para que parpadee Colour Set 5 Pulse el ...

Страница 300: ...peraciones básicas con menús página 43 se pueden realizar las mismas operaciones que las de los pasos 3 a 8 de Cuando se realizan las operaciones utilizando el mando de control inalámbrico accesorio Cuando está conectado el AW RP400 AW CB400 Las operaciones siguientes se realizan utilizando el AW CB400 1 Pulse varias veces el botón IRIS para apagar su luz Ponga el iris en el modo manual MANU 2 Gir...

Страница 301: ...e vídeo Alinee la fase horizontal Cuando haga las operaciones utilizando el mando a distancia inalámbrico accesorio 1 Establezca el modo del usuario siguiendo los pasos de Selección de los modos de filmación archivos de escenas página 19 Ahora mantenga el menú secundario Mode Set en la visualización El ajuste de fase horizontal es común a todos los modos de filmación archivos de escenas pero cuand...

Страница 302: ...recisión si se utiliza un vectorscopio para hacer el ajuste Franja cromática de la cámara Línea de división Franja cromática del generador de efectos especiales Cuando haga las operaciones utilizando el mando a distancia inalámbrico accesorio 1 Pulse el botón MODE El modo cambia a la visualización de franja cromática 2 Establezca el modo del usuario siguiendo los pasos de Selección de los modos de...

Страница 303: ...e la visualización del menú 8 Pulse el botón MODE El modo cambia a la visualización de imágenes de la cámara Utilice el controlador cuando haga este ajuste Siguiendo el procedimiento de operación de Operaciones básicas con menús páginas 39 a 46 se pueden realizar las mismas operaciones que las de los pasos 2 a 7 de Cuando haga las operaciones utilizando el mando a distancia inalámbrico accesorio P...

Страница 304: ... CB400 Selección de la cámara que va a ser utilizada Pulse el botón CAM1 CAM2 CAM3 o CAM4 Pulse uno de los botones 1 a 5 de CONTROL PREVIEW MONITOR OUT SEL Pulse uno de los botones 1 a 5 de CONTROL Pulse uno de los botones 1 a 5 de CONTROL SELECT Visualización del menú principal Pulse el botón MENU durante dos segundos 1 Pulse el botón MENU La visualización del panel LCD del AW RP655 cambia al mod...

Страница 305: ...ntos de menú secundario tienen su propio menú secundario 5 Pulse el botón o para que parpadee el elemento que va a establecer o el ajuste establecido Cada vez que pulsa el botón o el elemento que parpadea cambia Cuando se hace parpadear Return y se pulsa el botón o la operación vuelve al menú anterior Mientras se visualizan los menús los botones y tienen las mismas funciones Tenga en cuenta sin em...

Страница 306: ...iba Pulsación Confirma la selección del elemento 1 1 La operación deberá realizarse cuidadosamente ya que al pulsar este dial de avance cuando el valor ajustado va a cambiarse el valor ajustado cambiará en sentido positivo Dial de avance Derecho Cuando la LCD está en el modo de ajuste de ganancia Ajuste la configuración B GAIN 30 a 30 Cuando la LCD está en el modo de ajuste de pedestal Esta operac...

Страница 307: ...8 Gire el dial L para que parpadee el elemento que va a establecer o el ajuste establecido Cada vez que se gira el dial L cambia el elemento que parpadea Cuando se hace parpadear Return y el dial L se pulsa hacia la izquierda la operación vuelve al menú anterior 9 Gire el dial R para cambiar el ajuste 10Pulse el botón MENU o el botón R B GAIN PED después de terminar el ajuste Se sale de la visuali...

Страница 308: ...e automático y enfoque manual El botón EXT AF se enciende cuando la cámara está en el modo de enfoque automático Estos botones no se pueden utilizar para controlar la AW HE100 1 Pulse uno de los botones 1 a 5 de CONTROL para seleccionar la unidad que va a ser utilizada 2 Pulse el botón MENU durante dos segundos El menú principal se visualiza en el monitor 3 Pulse el botón MENU o el botón ITEM para...

Страница 309: ...Return y se pulsa el botón YES la operación vuelve al menú anterior 6 Pulse el botón YES o NO para cambiar el ajuste Pulse el botón YES para cambiar el valor ajustado en sentido positivo y pulse el botón NO para cambiar el valor ajustado en sentido negativo 7 Pulse el botón MENU durante dos segundos después de terminar el ajuste Se sale de la visualización del menú Para poder operar la AW HE100 de...

Страница 310: ...00 Los ajustes siguientes del menú LCD no funcionan TILT RANGE MEMORY LENGTH La función TRACING MEMORY no está disponible El dial R B PED no está disponible La operación con menú de cámara se encuentra disponible cuando el elemento CAMERA MENU CNT se pone en ENABLE en el menú LCD del AW CB400 OPTION SW A Abre el menú y también desplaza hacia arriba la lista de elementos B Desplaza hacia abajo la l...

Страница 311: ...elementos hacia arriba Pulse el botón B de OPTION SW para desplazar la lista de elementos hacia abajo Cuando se hace parpadear Return y se pulsa el botón C la operación vuelve al menú anterior 6 Pulse el botón C o D de OPTION SW para cambiar el ajuste Pulse el botón C de OPTION SW para cambiar el valor ajustado en sentido positivo y pulse el botón D de OPTION SW para cambiar el valor ajustado en s...

Страница 312: ...ng Soft Just Ajuste de fábrica Soft Bajada suave Utilizando este elemento seleccione Soft o Just exacto como ajuste de bajada El nivel de vibración que acompaña a la aceleración o desaceleración iniciada por la operación de parada es menor con el ajuste Soft que con el ajuste Just exacto 5 Selección de instalación de escritorio independiente instalación colgada suspendida Install Position Desktop ...

Страница 313: ...3 Realice la operación de conexión de la alimentación de la unidad desde el dispositivo de control que no pudo hacerlo mediante las operaciones con menús 4 Después de cambiar este elemento desconecte la alimentación de la unidad y vuelva a conectarla 9Inicialización Initialize Utilizando este elemento los ajustes de todos los elementos del menú Pan Tilt Head Setting vuelve a ser los ajustes que fu...

Страница 314: ... Set Initialize Return 6 7 8 Menú de ajuste del modo de iluminación diurna Daylight Mode Set Brightness Set Colour Set G L Set Other Set Initialize Return 6 7 8 Menú de ajuste del modo del usuario User Mode Set Brightness Set Colour Set G L Set Detail Set Other Set Initialize Return 6 7 8 9 6 Visualización del menú de ajuste de brillo Brightness Set Aquí se visualiza el menú de ajuste de brillo de...

Страница 315: ...odo de iluminación halógena Cuando se selecciona O K mientras se visualiza la pantalla de confirmación de inicialización aparece la pantalla mostrada abajo y se realiza la inicialización Pulse el botón o para que parpadee O K y luego pulse el botón o Cuando termina la inicialización la visualización vuelve al menú de ajuste para el modo de filmación correspondiente Halogen Mode initialize Ejemplo ...

Страница 316: ...ión de ganancia máxima de AGC AGC Max Gain 6dB 12dB 18dB Ajuste de fábrica 18dB Utilizando este elemento se establece la ganancia máxima cuando se ha seleccionado Auto como ajuste de ganancia Gain 5 Retorno al menú anterior menú para seleccionar el modo de filmación Return Menú de ajuste del brillo para el modo del usuario Brightness Set A Iris Level 1 Shutter Mode Synchro Step Synchro 50 08Hz Gai...

Страница 317: ...e borra de la misma Si el AWC ajuste automático del balance del blanco o el ajuste manual del balance del blanco se realiza en el estado seleccionado por AWC A o AWC B el estado resultante se guardará en la memoria 3200K Se establece el balance del blanco que fue ajustado bajo las condiciones de iluminación de 3200K equivalente a una luz halógena 5600K Se establece el balance del blanco que fue aj...

Страница 318: ...l menú de ajuste de detalles sólo se provee en el modo del usuario Detail Set Detail On Total Detail Level 2 V Detail Level 4 Noise Suppress 0 Return 1 2 3 4 5 1 Selección de encendido apagado de detalles Detail On Off Utilizando este elemento se puede seleccionar el encendido o el apagado de la compensación de detalles Cuando se selecciona On la cantidad de compensación de los detalles se puede a...

Страница 319: ...rmat de vídeo se seleccionará 16 9 apretado o 4 3 lados cortados como relación de aspecto Cuando se haya seleccionado 1080i o 720p como ajuste de formato Format de vídeo aparecerá y la relación de aspecto no podrá ser seleccionada Ahora la relación de aspecto de las señales compuestas se fija en 16 9 apretado 5 Selección de encendido apagado del estado de operación del AWC ABC Status Off On Ajuste...

Страница 320: ...inmediatamente a pesar de cambiar el ajuste La pantalla mostrada abajo en la que se confirman los cambios de ajuste aparece cuando se ha realizado una operación de transferencia a otro elemento cuando se pulsa el botón o Other Set Focus Auto Iris Auto Format 1080i Change Setting O K CANCEL Return Ejemplo Modo halógeno Cuando se selecciona O K el formato de vídeo cambia y se restaura el menú de otr...

Страница 321: ...o Iris Auto Format 1080i Aspect 16 9 Status Off Component Y Pb Pr Focus ADJ With Zoom On Return Initialize Return Menú Elemento Ajuste de fábrica Camera Setting Daylight Brightness Set A Iris Level 0 Step Off Gain Auto AGC Max Gain 18dB Return Colour Set Chroma Level 0 White Bal ATW Return G L Set H Phase 0 SC Coarse 90deg SC Fine 0 Return Other Set Focus Auto Iris Auto Format 1080i Aspect 16 9 St...

Страница 322: ...leciendo los limitadores directamente enfrente de tales obstáculos Se pueden establecer las posiciones de cuatro limitadores el superior el inferior el del extremo derecho y el del extremo izquierdo Una vez establecidas las posiciones no se perderán aunque se desconecte la alimentación Los limitadores se pueden establecer y cancelar mediante el mando a distancia inalámbrico accesorio o el controla...

Страница 323: ...sos de Operaciones básicas para los limitadores y pulse el botón durante dos segundos mientras mantiene pulsado el botón PRESET Ajuste de la posición del extremo derecho del margen de movimiento Pulse el botón o del mando a distancia inalámbrico para girar la unidad hasta la posición que servirá como límite del extremo derecho A continuación siga los pasos de Operaciones básicas para los limitador...

Страница 324: ...e seguridad activado por colisión ponga el control de panorámica o inclinación en la posición neutral 2 Modo de seguridad activado por problemas Cuando se produce un problema en el interior de la unidad se establece el Modo de seguridad activado por problemas las funciones de la unidad se desactivan y la luz indicadora de estado se enciende en color rojo Para cancelar el Modo de seguridad activado...

Страница 325: ... indicadora de estado no parpadea a pesar de emplear el mando a distancia inalámbrico cerca del área sensora de señales del mando a distancia esto significa que las pilas están agotadas Sustituya las pilas Hay una lámpara fluorescente o un monitor de plasma cerca de la unidad Y si es así está el área sensora de señales del mando a distancia expuesta a esas luces Página 13 No se puede controlar la ...

Страница 326: ... pantalla de menú Salga del menú Páginas 39 a 46 No se realiza el enfoque automático Está el enfoque ajustado en manual El enfoque automático empieza tan pronto como éste se ajusta Página 22 En algunas situaciones puede resultar difícil enfocar con el enfoque automático En casos como éste seleccione el ajuste manual y enfoque manualmente Página 24 Algo no está bien con los colores de las imágenes ...

Страница 327: ...o de los empleados para limpiar gafas y cámaras No utilice bencina diluyente de pintura u otros líquidos volátiles Cuando utilice un paño químico lea con mucha atención las notas de aviso relacionadas con el uso del mismo Notas Cambio de piezas consumibles La correa es consumible Necesita ser sustituida a intervalos periódicos Para conocer detalles del cambio de la correa consulte a su concesionar...

Страница 328: ... el trabajo de desmontaje asegúrese de sujetar la unidad por la zona de su base El desmontaje de la unidad sujetándola por la parte del objetivo o por sus piezas giratorias puede ser la causa de que la unidad funcione mal posteriormente Asegúrese de que el trabajo de desmontaje lo lleven a cabo dos personas 1 Quite la cubierta de cables Quite las hojas para ocultar tornillos quite los dos tornillo...

Страница 329: ...64 S ESPAÑOL Apariencia Unidad mm ...

Страница 330: ... p 75 BNC 1 Señales de vídeo componente analógico HD SD o señales SD Y C VGA 15P 1 Señales Y C disponibles solamente en el modo SD utilizando ajustes de menú se puede hacer el cambio con señales Y Pb Pr Cuando salen señales Y Pb Pr se puede seleccionar SD HD ENTRADA SALIDA Conector de entrada salida CONTROL IN RS422A RJ 45 FUNCIONES Y RENDIMIENTO Unidad de cámara Sensores de imagen Sensores de ima...

Страница 331: ...e instalación Independiente Desktop o suspendido Hanging Para garantizar la seguridad la unidad deberá asegurarse utilizando las ménsulas de montaje Asegúrese de pedir a un contratista cualificado que le instale la unidad Conexiones del controlador Cable de conexión Cable recto 10BASE T STP categoría 5 máximo de 1 000 m Control solamente Para extender las conexiones de la señal de vídeo deberá pro...

Страница 332: ...У 1 следует подключать к СЕТЕВОЙ розетке с защитным заземлением РУССКАЯ ВЕРСИЯ RUSSIAN VERSION НЕ ОТВИНЧИВАЙТЕ КРЫШКИ ПАНЕЛЕЙ Для снижения риска удара электрическим током не снимайте панели Внутри устройства нет деталей подлежащих обслуживанию пользователем Обратитесь за сервисным обслуживанием к квалифицированному персоналу ВНИМАНИЕ ДЛЯ СНИЖЕНИЯ РИСКА ВОЗНИКНОВЕНИЯ ПОЖАРА ИЛИ УДАРА ЭЛЕКТРИЧЕСКИМ ...

Страница 333: ...бщий баланс 34 Регулировка синхронизатора видеосигналов 36 Базовые операции меню 39 Установка пунктов меню 47 Таблица пунктов меню 56 Ограничители 57 Установка снятие ограничителей 58 Режимы безопасности 59 Поиск и устранение неисправностей 60 Техническое обслуживание 62 Замена изнашиваемых деталей 62 Снятие устройства 63 Внешний вид 64 Технические характеристики 65 Осторожно Руководство по этой и...

Страница 334: ... пульте используются две сухие батарейки размера R6 или LR6 приобретаются отдельно Кабели электропитания 2 м 1 Кронштейн установочной поверхности для пола или потолка 1 Крышка кабелей 1 Крепежные винты с плоскими шайбами или пружинными шайбами M4 8 мм 4 Винты крышки кабелей с плоской головкой M3 6 мм 2 Маскировочная пластина для винтов 2 Резиновые ножки 4 Винты резиновых ножек черные M4 6 мм 4 Фил...

Страница 335: ...онно поворотное устройство и объектив с увеличением Благодаря объединению камеры объектива и наклонно поворотного устройства установка устройства теперь стала легче чем раньше Устройством можно также управлять удаленно с помощью пульта дистанционного управления входящего в комплект принадлежностей ...

Страница 336: ...те на 60 град с Запоминание до 100 положений в предустановленных шаблонах памяти Количество установок предустановленных шаблонов памяти различается в зависимости от контроллера используемого с устройством Высокая степень совместимости с доступными в настоящее время контроллерами Panasonic позволяющая создавать гибкую систему До пяти устройств и приборов могут эксплуатироваться с помощью контроллер...

Страница 337: ...нию его деталей и к сокращению срока его службы Не подвергайте устройство непосредственному воздействию тепла выделяемого в месте установки или тепла от обогревателя либо другого подобного прибора Вспомогательные детали поставляемые вместе с устройством должны обязательно использоваться для его установки Для установки устройства обязательно используйте монтажные кронштейны и крепежные винты прилаг...

Страница 338: ...жать пальцы или другие части Вашего тела к движущимся частям поскольку такие действия могут привести к травме Устройство поставляется с режимами безопасности Режимы безопасности представляют собой функции предназначенные для защиты людей и имущества от повреждения а наклонно поворотного устройства от поломки Для получения дополнительной информации обращайтесь к разделу Режимы безопасности стр 59 П...

Страница 339: ...нению со случаями когда используются другие камеры Panasonic и системы наклонно поворотных устройств AW CB400 не может быть подключен непосредственно к данному устройству AW CB400 должен подключаться в комбинации вместе с AW RP400 и AW IF400 Меню установок камеры AW CB400 использоваться не может Вместо него используйте меню установок камеры устройства Диски R B PED использоваться не могут Функция ...

Страница 340: ...стояния устройства Оранжевый При установленном режиме ожидания Зеленый При включенном питании Красный При появлении в устройстве проблемы Зеленый с двукратным миганием При приеме сигнала совпадающего с идентификатором дистанционного управления от вспомогательного пульта дистанционного управления при включенном питании Оранжевый с двукратным миганием При приеме сигнала не совпадающего с идентификат...

Страница 341: ... Название сигнала 1 Pr В режиме Y C C 2 Y В режиме Y C VBS 3 Pb В режиме Y C Y с 4 по 15 GND Разъем CONTROLLER Это входной разъем для управляющих сигналов блока камеры или наклонно поворотного устройства Подсоединяйте его к разъему TO PAN TILT HEAD на контроллере Переключатели SERVICE Эти переключатели используются для целей технического обслуживания Держите их все в положении OFF Переключатели IR...

Страница 342: ...отрегулированы и сохранены в выбранной в настоящий момент памяти В качестве альтернативы при кратковременном нажатии этой кнопки менее двух секунд только баланс белого автоматически регулируется и сохраняется в выбранной в настоящий момент памяти 6Кнопка MODE Используется для выбора видеосигналов выводимых с устройства Каждый раз при ее нажатии происходит переключение сигналов между сигналами цвет...

Страница 343: ... фокуса объектива Кнопка M FOCUS Используется при ручной регулировке фокуса объектива Кнопки FOCUS F и N используются для выполнения фактической регулировки Кнопки OPT ON OFF Используются для расширения функций в будущем Они не используются в настоящее время Кнопка HOME При нажатии в течение двух секунд направление устройства поворот или наклон вернется в исходное положение Кнопки ZOOM T W Использ...

Страница 344: ...их подобных изделий Установите устройство вдали от источников флуоресцентного света плазменных мониторов и других подобных изделий Выполняйте операции пультом дистанционного управления на расстоянии в пределах 3 метров от устройства Используйте контроллер подключенный к устройству с помощью кабеля проводное подключение Даже после того как батарейки извлечены из пульта дистанционного управления в т...

Страница 345: ... которых будет производиться съемка объекта Выберите режим удовлетворяющий условиям съемки и Вашим предпочтениям Продолжая съемку в таких же условиях нет необходимости выбирать другой режим 5 Начните съемку После съемки выключите питание всех устройств и приборов в системе При выполнении базовых операций предполагается что фокус диафрагма и баланс белого регулируются автоматически в соответствии с...

Страница 346: ...ающего с идентификатором дистанционного управления и мигнет оранжевым цветом при приеме сигнала не совпадающего с идентификатором дистанционного управления При выполнении операций с помощью контроллера 1 Установите выключатели электропитания устройств и приборов подключенных в системе в положение ON Данное устройство не имеет выключателя электропитания Когда на него подается электропитание индикат...

Страница 347: ...тройств повторите при необходимости действия пунктов 1 и 2 4 Установите выключатели электропитания устройств и приборов подключенных в системе в положение OFF При выполнении операций с помощью контроллера 1 Установите переключатель OPERATE на контроллере в положение OFF Электропитание всех камер включая данное устройство подключенных к контроллеру отключится Индикаторная лампа состояния теперь заг...

Страница 348: ...ом при приеме сигнала совпадающего с идентификатором дистанционного управления и мигнет оранжевым цветом при приеме сигнала не совпадающего с идентификатором дистанционного управления При выполнении операций с помощью контроллера При подключении AW RP655 Нажмите кнопку 1 2 3 4 или 5 переключателя CONTROL PREVIEW MONITOR OUT SEL При подключении AW RP555 Нажмите кнопку 1 2 3 4 или 5 переключателя CO...

Страница 349: ...к хранятся в памяти отдельно по режимам съемки Обязательно выберите режим съемки перед выполнением каких либо регулировок Режим галогенного освещения Halogen Данный режим подходит для съемки внутри помещения на свадебных приемах вечеринках семинарах с мест событий и т п Режим флуоресцентного освещения Fluorescent Данный режим подходит для съемки внутри помещения в условиях флуоресцентного освещени...

Страница 350: ...подменю Camera Setting Camera Setting Halogen Fluorescent Daylight User Return 5 Нажмите кнопку или чтобы начал мигать режим съемки который предполагается использовать Каждый раз при нажатии кнопки или мигающий пункт будет меняться Если начнет мигать индикация Return и при этом нажать кнопку или операция вернется к предыдущему меню 6 Нажмите кнопку или Теперь устройство установлено в режим съемки ...

Страница 351: ... меняться Если начнет мигать индикация Return и при этом повернуть поворотный переключатель главный против часовой стрелки операция вернется к предыдущему меню 9 Поверните поворотный переключатель главный против часовой стрелки Теперь устройство установлено в режим съемки который мигал и отображается подменю Halogen Mode Set Brightness Set Colour Set G L Set Other Set Initialize Return Пример Режи...

Страница 352: ...нение направления камеры Движение камеры в левую или в правую сторону поворот Наклоните рычаг PAN TILT в направлении L или R Движение камеры вверх или вниз наклон Наклоните рычаг PAN TILT в направлении UP или DOWN Движение камеры по диагонали Наклоните рычаг PAN TILT по диагонали Возвращение камеры в исходное положение Если контроллер имеет кнопку HOME нажмите кнопку HOME Использование функции тра...

Страница 353: ...я переключения на автоматическую регулировку усиления Наблюдается искажение цвета в изображениях камеры Обратитесь к разделу Автоматическое слежение за балансом белого ATW стр 31 и переключитесь на ATW При выполнении операций с помощью контроллера Устройство не перемещается Выберите управляемое устройство с помощью процедуры приведенной ниже При подключении AW RP655 Нажмите кнопку 1 2 3 4 или 5 пе...

Страница 354: ...не требуется при условии что устройство будет использоваться в тех же условиях Регулировка баланса черного Эта регулировка выполняется для точного изображения черного цвета Эта установка также влияет на цветовые тона всего экрана Ее следует выполнять если устройство используется в первый раз или если устройство не использовалось в течение длительного периода времени Эту регулировку следует выполня...

Страница 355: ...е фокуса При подключении AW RP555 1 Нажмите кнопку EXT AF для переключения на ручную регулировку фокуса 2 Отрегулируйте фокус вручную наклоняя рычаг FOCUS Кроме того каждый раз при нажатии кнопки SPEED скорость фокусировки и других регулировок можно переключить на быструю или медленную 3 При необходимости нажмите кнопку EXT AF для возврата к автоматической регулировке фокуса При подключении AW RP4...

Страница 356: ...и подключении AW RP555 1 Нажмите кнопку IRIS для отключения ее лампочки и переключения на ручную регулировку 2 Поверните диск LEVEL кнопки IRIS для ручной регулировки диафрагмы 3 При необходимости нажмите кнопку IRIS для включения ее лампочки и переключения на автоматическую регулировку для того чтобы вернуться к автоматической регулировке диафрагмы При подключении AW RP400 AW CB400 1 Нажмите кноп...

Страница 357: ...сли подключен AW RP555 регулировки могут быть также выполнены путем выполнения действий приведенных ниже пунктов 1 Нажмите кнопку SHUTTER и включите ее лампочку Выбирается скорость затвора установленная до отключения функции 2 При необходимости нажмите кнопку SHUTTER и отключите ее лампочку для возврата установки затвора OFF Для установки скорости затвора с помощью AW RP555 выполните действия прив...

Страница 358: ...луатации AW RP655 2 При необходимости нажмите кнопку GAIN и включите лампочку AUTO для возврата к автоматической регулировке усиления AGC При подключении AW RP555 1 Нажмите кнопку GAIN для отключения ее лампочки Каждый раз при нажатии этой кнопки можно последовательно выбрать одно из трех значений увеличения усиления Текущее состояние отображается как показано ниже Кнопка MANU L Кнопка MANU H Кноп...

Страница 359: ...гулируйте фокус и диафрагму если они нуждаются в регулировке 2 Удерживая нажатой кнопку PRESET нажмите кнопку соответствующую номеру предустановленного шаблона памяти Если будет выбран номер предустановленного шаблона памяти с уже сохраненной установкой существующая установка будет стерта и заменена новой Вызов установок предустановленных шаблонов памяти 1 Нажмите кнопку в которой была сохранена у...

Страница 360: ...на мониторе изображение для съемки Перемещайте рычаг PAN TILT и рычаг ZOOM для задания угла камеры Отрегулируйте фокус и диафрагму если они нуждаются в регулировке 2 Держите нажатой кнопку MEMORY Те кнопки из числа от 1 до 10 переключателя PRESET в которых можно сохранить установки начнут последовательно мигать 3 Удерживая кнопку MEMORY нажатой нажмите кнопку номера предустановленного шаблона памя...

Страница 361: ...рован если устройство используется с такими же установками и в таких же условиях его установка завершается простым выбором установки меню или нажатием кнопки на контроллере Нет необходимости устанавливать его снова Как только вводится новая установка предыдущая установка будет стерта Используйте два запоминающих устройства для хранения установок соответствующих различным условиям съемки Автоматиче...

Страница 362: ...питания Поэтому нет необходимости повторно устанавливать баланс белого если цветовая температура снимаемых объектов осталась неизменной Однако его следует повторно установить если цветовая температура изменилась например если Вы переместились из помещения наружу и т п Если камера используется одна регулировка усиления красного синего установки закраски будет автоматически сброшена в значение 0 пос...

Страница 363: ...е кнопку или Отобразится подменю Colour Set Colour Set Chroma Level 1 White Bal AWC A Pedestal 1 Painting R Gain 1 B Gain 1 Return 6 Нажмите кнопку или чтобы начало мигать значение R Gain или B Gain 7 Нажмите кнопку или для изменения значения и отрегулируйте это значение таким образом чтобы несущая белой составляющей видеосигналов была минимизирована или чтобы белые участки изображения стали полно...

Страница 364: ...овка баланса белого стр 30 Автоматическая регулировка баланса белого AWC и автоматическая регулировка баланса черного ABC могут быть выполнены и установка баланса черного будет введена Установка баланса белого также вводится в это же время для гарантии соответствия условий регулировки баланса белого перед продолжением эксплуатации Баланс черного не может быть отрегулирован когда отображаются цветн...

Страница 365: ...гму в ручной режим 2 Нажмите кнопку IRIS Объектив будет затемнен диафрагмой 3 Выберите пользовательский режим выполнив действия пунктов раздела Выбор режимов съемки сюжетные файлы стр 19 В это время на дисплее должно отображаться подменю User Mode Set User Mode Set Brightness Set Colour Set G L Set Detail Set Other Set Initialize Return 4 Нажмите кнопку или чтобы начала мигать индикация Colour Set...

Страница 366: ...афрагмой 3 Операции аналогичные приведенным в пунктах с 3 по 8 При выполнении операций с помощью вспомогательного пульта дистанционного управления могут быть выполнены с помощью процедуры приведенной в разделе Базовые операции меню стр 43 При подключении AW RP400 AW CB400 Следующие операции выполняются с помощью AW CB400 1 Нажмите кнопку IRIS несколько раз для отключения ее лампочки Установите диа...

Страница 367: ...оде Синхронизация фазы по строкам При выполнении операций с помощью вспомогательного пульта дистанционного управления 1 Установите пользовательский режим выполнив действия пунктов раздела Выбор режимов съемки сюжетные файлы стр 19 В это время на дисплее должно отображаться подменю Mode Set Регулировка фазы по строкам является общей для всех режимов съемки сюжетных файлов но если для выполнения рег...

Страница 368: ... использоваться вектороскоп Цветовая полоса камеры Пунктирная линия Цветовая полоса генератора спецэффектов При выполнении операций с помощью вспомогательного пульта дистанционного управления 1 Нажмите кнопку MODE Режим переключится на отображение цветных полос 2 Установите пользовательский режим выполнив действия пунктов раздела Выбор режимов съемки сюжетные файлы стр 19 В это время на дисплее до...

Страница 369: ...ух секунд Отображение меню завершится 8 Нажмите кнопку MODE Режим переключится на отображение изображения камеры При выполнении регулировки с помощью контроллера Операции аналогичные приведенным в пунктах со 2 по 7 При выполнении операций с помощью вспомогательного пульта дистанционного управления могут быть выполнены с помощью процедуры приведенной в разделе Базовые операции меню стр 39 46 Для пе...

Страница 370: ...кнопок от 1 до 5 переключателя CONTROL Нажмите одну из кнопок от 1 до 5 переключателя CONTROL SELECT Вызов главного меню Нажмите кнопку MENU в течение двух секунд 1 Нажмите кнопку MENU Дисплей на панели ЖКД AW RP655 перейдет в режим меню 2 Поверните поворотный переключатель главный и отобразите индикацию CAMERA SETTING на панели ЖКД 3 Нажмите кнопку OK и отобразите индикацию OPEN CAMERA MENU OK Ke...

Страница 371: ...нкта Некоторые пункты подменю имеют собственные подменю 5 Нажмите кнопку или чтобы начал мигать устанавливаемый пункт или установка Каждый раз при нажатии кнопки или мигающий пункт будет меняться Если при мигающей индикация Return нажать кнопку или операция вернется к предыдущему меню При отображении меню кнопки и имеют одинаковые функции Не забывайте однако о том что если нажать кнопку когда можн...

Страница 372: ... Операцию нужно выполнять осторожно так как если установленное значение можно изменить нажатие кругового переключателя приведет к изменению установленного значения в сторону увеличения Круговой переключатель правый Когда на ЖКИ отображается режим регулировки усиления Настройте параметр B GAIN на нужное значение от 30 до 30 Когда на ЖКИ отображается режим настройки основания Эта операция недоступна...

Страница 373: ... L чтобы начал мигать выбираемый пункт Каждый раз при повороте поворотного переключателя L мигающий пункт будет меняться Если при мигающей индикации Return нажать поворотный переключатель L операция вернется к предыдущему меню 9 Поверните поворотный переключатель R для изменения установки 10После завершения установки нажмите кнопку MENU или кнопку R B GAIN PED Отображение меню завершится Чтобы вый...

Страница 374: ...з при нажатии кнопки EXT AF будет выполняться переключение между режимами Автофокус и Ручной фокус Кнопка EXT AF загорается когда камера находится в режиме Автофокуса Эти кнопки не могут использоваться для управления камерой AW HE100 1 Нажмите одну из кнопок от 1 до 5 переключателя CONTROL для выбора устройства для управления 2 Нажмите кнопку MENU в течение двух секунд На мониторе отобразится глав...

Страница 375: ...ется к предыдущему меню 6 Нажимайте кнопку YES или NO для изменения установки Нажимайте кнопку YES для изменения установленного значения в сторону увеличения и кнопку NO для изменения установленного значения в сторону уменьшения 7 После завершения установки нажмите кнопку MENU в течение двух секунд Отображение меню завершится Для управления камерой AW HE100 с контроллера AW RP555 возможно потребуе...

Страница 376: ...оступен Управление меню камеры становится доступным в случае установки опции CAMERA MENU CNT в значение ENABLE в меню LCD камеры AW CB400 OPTION SW A Используется для открытия меню а также прокрутки вверх списка пунктов B Используется для прокрутки вниз списка пунктов C Используется для подтверждения выбора пункта а также изменения установленного значения в сторону увеличения D Используется для из...

Страница 377: ...рнется к предыдущему меню 6 Нажмите кнопку C или D переключателя OPTION SW для изменения установки Нажмите кнопку C переключателя OPTION SW для изменения установленного значения в сторону увеличения и кнопку D переключателя OPTION SW для изменения установленного значения в сторону уменьшения 7 После завершения установки нажмите кнопку A переключателя OPTION SW в течение двух секунд Отображение мен...

Страница 378: ...я или Just точная в качестве характеристик условий установки Уровень вибраций сопровождающий ускорение или торможение вызванное операцией установки при установке Soft меньше чем при установке Just точная 5 Выбор способа установки устройства Desktop отдельно стоящее Hanging подвешенное Install Position Desktop Hanging Заводская установка Desktop С помощью этого пункта выберите способ установки устр...

Страница 379: ...кабель электропитания устройства и вставьте его обратно 3 Выполните операцию включения питания устройства с управляющего устройства которое было не способно больше выполнять операции меню 4 После изменения данного пункта выключите питание устройства и включите его снова 9Инициализация Initialize С помощью этого пункта установки всех пунктов меню Pan Tilt Head Setting возвращаются к заводским устан...

Страница 380: ... Set G L Set Other Set Initialize Return 6 7 8 Меню установок режима дневного света Daylight Mode Set Brightness Set Colour Set G L Set Other Set Initialize Return 6 7 8 Меню установок пользовательского режима User Mode Set Brightness Set Colour Set G L Set Detail Set Other Set Initialize Return 6 7 8 9 6 Вызов меню установки яркости Brightness Set Здесь можно вызвать меню установки яркости данног...

Страница 381: ...инициализации в режиме галогенного освещения При выборе O K во время отображения экрана подтверждения инициализации появится экран показанный ниже и инициализация будет выполнена Нажмите кнопку или чтобы начала мигать индикация O K и нажмите кнопку или После завершения инициализации дисплей вернется к меню установок соответствующего режима съемки Halogen Mode initialize Пример Режим галогенного ос...

Страница 382: ...его выходной сигнал изображения подвергается ударному воздействию Примечание 4 Выбор максимального усиления AGC AGC Max Gain 6dB 12dB 18dB Заводская установка 18dB С помощью этого пункта устанавливается максимальное усиление при выбранной установке регулировки усиления Gain Auto 5 Возврат к предыдущему меню меню выбора режима съемки Return Меню установки яркости в пользовательском режиме Brightnes...

Страница 383: ...параметры удаляются из памяти Если AWC автоматическая регулировка баланса белого или ручная регулировка баланса белого будут выполнены в режиме выбранном с помощью опций AWC A или AWC B результаты регулировки будут сохранены в памяти 3200K Устанавливается баланс белого отрегулированный в условиях освещения свыше 3200K эквивалент галогенного освещения 5600K Устанавливается баланс белого отрегулиров...

Страница 384: ...ю детальных установок предусмотрено только в пользовательском режиме Detail Set Detail On Total Detail Level 2 V Detail Level 4 Noise Suppress 0 Return 1 2 3 4 5 1Выбор детализации ON OFF Detail On Off С помощью этого пункта для коррекции детализации выбирается ON ВКЛ или OFF ВЫКЛ При выборе опции On степень коррекции детализации можно отрегулировать с помощью пунктов Total Detail Level и V Detail...

Страница 385: ...ие или 4 3 обрезание краев Когда в качестве установки видеоформата Format выбрана опция 1080i или 720p появляется индикация и формат кадра не выбирается В это время фиксируется формат кадра композитных видеосигналов 16 9 сжатие 5 Выбор ON OFF индикации состояния операции AWC ABC Status Off On Заводская установка Off С помощью этого пункта индикация состояния операции AWC автоматическая регулировка...

Страница 386: ...становки этого пункта формат видео не переключается немедленно При выполнении операции связанной с переходом к другому пункту появляется приведенный ниже экран подтверждения изменения установки при нажатии кнопки или Other Set Focus Auto Iris Auto Format 1080i Change Setting O K CANCEL Return Пример Режим галогенного освещения При выборе O K видеоформат изменяется и восстанавливается меню других у...

Страница 387: ...ris Auto Format 1080i Aspect 16 9 Status Off Component Y Pb Pr Focus ADJ With Zoom On Return Initialize Return Меню Пункт Заводская установка Camera Setting Daylight Brightness Set A Iris Level 0 Step Off Gain Auto AGC Max Gain 18dB Return Colour Set Chroma Level 0 White Bal ATW Return G L Set H Phase 0 SC Coarse 90deg SC Fine 0 Return Other Set Focus Auto Iris Auto Format 1080i Aspect 16 9 Status...

Страница 388: ...тановив ограничители перемещения до препятствия Можно установить положение четырех ограничителей верхнего нижнего крайнего левого и крайнего правого пределов диапазона перемещений После установки положение ограничителей не будет утеряно даже после отключения электропитания Ограничители могут быть установлены и сняты с помощью вспомогательного пульта дистанционного управления или контроллера То что...

Страница 389: ...ствия пунктов указанных в разделе Базовые операции с ограничителями и нажмите кнопку в течение двух секунд удерживая нажатой кнопку PRESET Установка положения крайнего правого предела диапазона перемещений Нажмите кнопку или пульта дистанционного управления для поворота устройства до положения которое будет служить крайним правым пределом Затем выполните действия пунктов указанных в разделе Базовы...

Страница 390: ...го в случае столкновения верните поворот или наклон в нейтральное положение 2 Безопасный режим срабатывающий в случае неисправности Когда внутри устройства возникает неисправность устанавливается Безопасный режим срабатывающий в случае неисправности функционирование устройства прекращается и индикаторная лампа состояния загорается красным цветом Для снятия Безопасного режима срабатывающего в случа...

Страница 391: ...рная лампа состояния не мигает даже если операции пультом дистанционного управления выполняются вблизи светочувствительной области сигнала пульта дистанционного управления это означает что батарейки разрядились Замените батарейки Имеется ли возле устройства источник флуоресцентного освещения или плазменный монитор и если да не попадает ли это освещение на светочувствительную область сигнала пульта...

Страница 392: ... Выйдите из меню стр 39 46 Не выполняется автоматическая фокусировка Установлен ли ручной фокус Автоматическая фокусировка инициируется сразу после установки автоматического фокуса стр 22 В некоторых ситуациях может быть трудно выполнить фокусировку при автоматической установке В подобных случаях выбирайте ручную установку и выполняйте фокусировку вручную стр 24 Наблюдается искажение цвета изображ...

Страница 393: ...яров и камер Не используйте бензин разбавитель для краски или другие летучие жидкости При использовании химического пылеуловителя тщательно прочтите предостережения по его использованию Примечания Замена изнашиваемых деталей Ремень является изнашиваемой деталью Его следует периодически заменять по истечении определенных интервалов времени Для получения дополнительной информации по замене ремня свя...

Страница 394: ...адет Во время выполнения работы обязательно держите устройство за его основание Если при съеме держать устройство за объектив или за вращающиеся части это может привести к неисправности Выполнение съемных работ должно осуществляться бригадой из двух человек 1 Снимите крышку кабелей Снимите маскировочные пластины для винтов отвинтите два винта а затем снимите крышку кабелей На крышке кабелей предус...

Страница 395: ...64 R РУССКИЙ Внешний вид Единица измерения мм ...

Страница 396: ...вается сигнал BBS или VBS Выход Выходные разъема Композитный 1 0 Vp p 75 Ом BNC 1 HD SD аналоговые компонентные или SD Y C сигналы VGA 15P 1 Сигналы Y C доступны только в режиме SD переключение с сигналами Y Pb Pr возможно с помощью установки меню Выбор SD HD возможен при выводе сигналов Y Pb Pr Вход выход Входные выходные разъема CONTROL IN RS422A RJ 45 ФУНКЦИИ И ПРОИЗВОДИТЕЛЬНОСТЬ Блок камеры Да...

Страница 397: ...nging Для обеспечения безопасности устройство должно быть закреплено с помощью вспомогательных кронштейнов Обязательно обратитесь к квалифицированному специалисту для установки устройства Соединения контроллера Соединительный кабель Линейный кабель 10BASE T категории STP 5 Макс 1000 м Только управление Для увеличения длины распространения видеосигнала необходимо отдельно предусмотреть использовани...

Страница 398: ...Memo ...

Страница 399: ......

Страница 400: ...e Impreso en Japón Напечатано в Японии Panasonic Corporation Web Site http panasonic net Importer s name address to follow EU rules Panasonic Testing Centre Panasonic Marketing Europe GmbH Winsbergring 15 22525 Hamburg F R Germany Panasonic Corporation 2008 E F0508S4029 D ...

Отзывы: