35
TROUBLESHOOTING
OPERATOR TOP FIVE TROUBLESHOOTING LIST
2. MACHINE RUN TIME HAS DECREASED
If the machine run time has decreased, there are three potential issues that must be checked: The charger may not be plugged in or
working, the wet, lead acid batteries may need watering or the batteries need to be replaced.
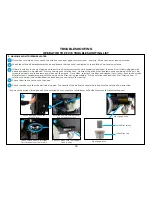
First, check the charger by plugging it in.
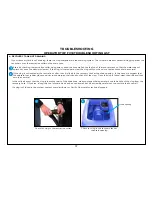
Off-board charger LEDs
(charger appearance may vary)
On-board charger LEDs
If an on-board charger, check the three LEDs. If none are on, then you likely have a faulty charger and it will need to be replaced.
However, if the lights are on and the red or yellow light is on, then the batteries aren’t fully charged and the charge cycle needs to be
completed. If the green light is on, then the charger is working and the next step is to consider the batteries.
If an off-board charger, check the charge status LED. If it is not lit or blinking, then you likely have a faulty charger and it will need to be
replaced. However, if the light is on and is blinking then the batteries aren’t fully charged and the charge cycle needs to be completed.
Also, check for the fault LED to be lit and if so, review the manual that comes with your off-board charger for fault details.
If the batteries are wet, lead acid batteries, check the water levels in the battery cells. If they require watering, refer to the Battery
Watering segment of this manual.
If the batteries don’t require watering and are over 18 months old, you’ve likely started to reach a point in the battery’s life where their
capacity is starting to decline. If you are able to meet your run time requirements, then you still have some useful life left. However, if
the capacity has reduced the run time to below your requirements, then it is time to replace the batteries. See Changing Batteries
segment of this manual for further instructions on how to replace your batteries.
If none of these factors are present and you are still not getting expected run times, contact your distributor or Pacific Floorcare for
technical support.
1
2
1
2
Содержание S Series
Страница 45: ...45 FRAME ASSEMBLY WITH URETHANE WHEELS...
Страница 46: ...46 FRAME ASSEMBLY WITH FOAM FILLED WHEELS...
Страница 48: ...48 ON BOARD CHEMICAL INJECTION ASSEMBLY OPTIONAL...
Страница 49: ...49 BATTERY ASSEMBLY...
Страница 50: ...50 RECOVERY TANK ASSEMBLY...
Страница 51: ...51 SQUEEGEE ASSEMBLY S 24...
Страница 52: ...SQUEEGEE ASSEMBLY S 28 52...
Страница 53: ...SQUEEGEE ASSEMBLY S 32 53...
Страница 54: ...54 SQUEEGEE LINKAGE ASSEMBLY...
Страница 55: ...55 HEAD LIFT ASSEMBLY...
Страница 56: ...56 HEAD ASSEMBLY DRAWING 1 OF 2 S 24...
Страница 57: ...57 HEAD ASSEMBLY DRAWING 2 OF 2 S 24...
Страница 58: ...58 HEAD ASSEMBLY S 28 DISK...
Страница 59: ...59 HEAD ASSEMBLY S 32...
Страница 60: ...60 HEAD ASSEMBLY LOWER S 28 ORBITAL...
Страница 61: ...61 HEAD ASSEMBLY UPPER S 28 ORBITAL...
Страница 62: ...62 CONTROLS ASSEMBLY S 24...
Страница 63: ...63 CONTROLS ASSEMBLY S 28 S 32 DISK...
Страница 64: ...64 CONTROLS ASSEMBLY S 28 ORBITAL...
Страница 65: ...65 CONTROLS ASSEMBLY BATTERYSHIELDTM CHEMICAL INJECTION SYSTEM OPTIONAL...
Страница 66: ...66 ELECTRONICS ASSEMBLY S 24...
Страница 67: ...67 ELECTRONICS ASSEMBLY S 28 S 32 DISK...
Страница 68: ...68 ELECTRONICS ASSEMBLY S 28 ORBITAL...
Страница 69: ...69 ELECTRONICS ASSEMBLY BATTERYSHIELDTM...
Страница 70: ...70 CHARGER ASSEMBLY ON BOARD...
Страница 71: ...WIRING DIAGRAM S 24...
Страница 72: ...WIRING DIAGRAM S 28 S 32 DISK...
Страница 73: ...WIRING DIAGRAM S 28 ORBITAL...
Страница 74: ...WIRING DIAGRAM BATTERYSHIELD OPTIONAL 74...
Страница 75: ...WIRING DIAGRAM ON BOARD CHEMICAL INJECTION SYSTEM OPTIONAL 75...


