


26
MAINTENANCE
END OF SHIFT
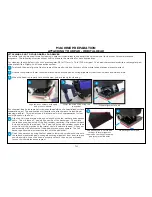
SQUEEGEE ASSEMBLY
The squeegee system is crucial to high-performance cleaning. It is the last thing that touches the floor so proper maintenance is important
for making it perform at its peak.
To flip or replace squeegee blades,
release over-center latch
Remove the blade and either flip to
fresh edge or replace
Slide the squeegee retainer off the
hook on the other side
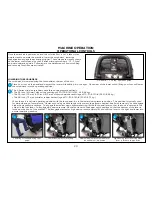
Remove the squeegee assembly from the machine by loosening the easy-grip knobs and detaching the recovery hose at the back of the
machine. Take the squeegee to a drain or utility sink and thoroughly rinse the underside of the squeegee frame and squeegee blades.
Make sure that all particles and debris have been removed. Inspect the neck of the squeegee assembly for debris. If found, clear the
debris and rinse it out.
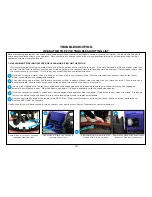
Inspect the front and rear squeegee blades. If the blade edges are not clearly defined or worn halfway through the thickness of the
blade, then it is time for replacement or to be flipped to another edge. The S-Series mid-size scrubber’s squeegee blades have four
usable edges.
Blade exchange is completely tool-free for fast, easy maintenance. To remove the rear blade, release the over-center latch and slide the
squeegee retainer off the hook on the other side.
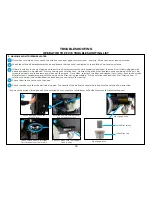
To re-attach the blade, align the blade holes with the squeegee frame guides from one end to the other. Slide the retainer over the hook and
press the retainer latch into position on the far end following the guides. Engage the latch to finish the operation.
The front-blade exchange is completed in a similar fashion to the rear blade by removing the front blade retainer, attaching a new blade using
the guides and re-engaging the squeegee retainer.
When squeegee assembly and blade maintenance is complete, re-attach the squeegee assembly by aligning the assembly, tightening the
easy grip knobs and re-attaching the hose.
1
2
3
4
The blade can be removed for replacement or flipped length wise or top to bottom to utilize another blade edge.
2
3
Loosen the two easy-grip knobs and
detach recovery hose to lift away
the squeegee assembly
4
1
Содержание S Series
Страница 45: ...45 FRAME ASSEMBLY WITH URETHANE WHEELS...
Страница 46: ...46 FRAME ASSEMBLY WITH FOAM FILLED WHEELS...
Страница 48: ...48 ON BOARD CHEMICAL INJECTION ASSEMBLY OPTIONAL...
Страница 49: ...49 BATTERY ASSEMBLY...
Страница 50: ...50 RECOVERY TANK ASSEMBLY...
Страница 51: ...51 SQUEEGEE ASSEMBLY S 24...
Страница 52: ...SQUEEGEE ASSEMBLY S 28 52...
Страница 53: ...SQUEEGEE ASSEMBLY S 32 53...
Страница 54: ...54 SQUEEGEE LINKAGE ASSEMBLY...
Страница 55: ...55 HEAD LIFT ASSEMBLY...
Страница 56: ...56 HEAD ASSEMBLY DRAWING 1 OF 2 S 24...
Страница 57: ...57 HEAD ASSEMBLY DRAWING 2 OF 2 S 24...
Страница 58: ...58 HEAD ASSEMBLY S 28 DISK...
Страница 59: ...59 HEAD ASSEMBLY S 32...
Страница 60: ...60 HEAD ASSEMBLY LOWER S 28 ORBITAL...
Страница 61: ...61 HEAD ASSEMBLY UPPER S 28 ORBITAL...
Страница 62: ...62 CONTROLS ASSEMBLY S 24...
Страница 63: ...63 CONTROLS ASSEMBLY S 28 S 32 DISK...
Страница 64: ...64 CONTROLS ASSEMBLY S 28 ORBITAL...
Страница 65: ...65 CONTROLS ASSEMBLY BATTERYSHIELDTM CHEMICAL INJECTION SYSTEM OPTIONAL...
Страница 66: ...66 ELECTRONICS ASSEMBLY S 24...
Страница 67: ...67 ELECTRONICS ASSEMBLY S 28 S 32 DISK...
Страница 68: ...68 ELECTRONICS ASSEMBLY S 28 ORBITAL...
Страница 69: ...69 ELECTRONICS ASSEMBLY BATTERYSHIELDTM...
Страница 70: ...70 CHARGER ASSEMBLY ON BOARD...
Страница 71: ...WIRING DIAGRAM S 24...
Страница 72: ...WIRING DIAGRAM S 28 S 32 DISK...
Страница 73: ...WIRING DIAGRAM S 28 ORBITAL...
Страница 74: ...WIRING DIAGRAM BATTERYSHIELD OPTIONAL 74...
Страница 75: ...WIRING DIAGRAM ON BOARD CHEMICAL INJECTION SYSTEM OPTIONAL 75...


