13
12
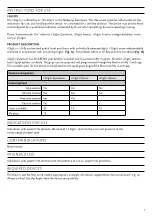
– Create slack in the digit wires, so that the bellows assembly flexes without causing tension in the digit wires.
(Fig. 36)
NOTE:
if there is not enough slack, flexing the bellows may lead to failure of the digit wire connection.
Removing the Digit Wires
To remove a digit wire, pull the connector piece to remove the digit wires of a specific digit.
Connecting the Electrodes to the Wristband
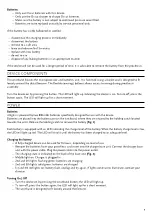
– When digit wires are connected, slide electrode cables through the aperture at the distal end of the bellows
(Fig. 37)
.
– Connect the electrodes cables as shown in the mapping
(Fig. 34)
.
– Mate the connectors by aligning the mating axes of both connectors and then pushing them together. An
audible
“click”
will confirm a fully mated connection.
– Route the signal cables inserted in signal 1 position to avoid excessive bending of the connector
(Fig. 38)
.
– Check cables are tension-free when bellows is fully flexed
(Fig. 36)
.
– Check that digits and electrodes are all functioning correctly before completing the next stage.
Removing the Electrode Cables
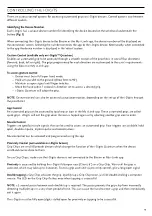
Use the extraction tool supplied to remove electrode cables when necessary.
Insert the end portion of the tool under the connector flanges
(Fig. 39)
and pull off vertically, in the direction of the
connector mating axis.
FSR PCB
– If using an FSR wristband, insert the FSR cables through the aperture at the socket end of the bellows
(Fig. 40)
.
– Insert the pairs of wires into the FSR receivers using the same method as inserting the digit wires. Ensure
click is heard indicating secure connection.
– Remove the FSR wires the same way as removing the digit wires.
Completing the Wristband Assembly
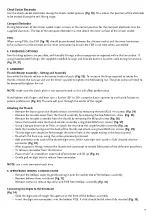
– Carefully reposition the wired PCB into the upper and lower collar. Screw into position to secure
(Fig. 33, 41).
NOTE:
take care not to damage the PCB.
– Slide the bellows cover back into position over the bellows.
– Bond the bellows cover to the bellows at either end using a few spots of superglue.
– Reattach the bellows by pushing the connector from the bellows into the connector from the wristband
(Fig. 42)
.
– Insert the two M2.5 screws
(Fig. 43)
.
– Attach the wristband to the socket using the M4 socket button head screw.
7. DIGIT COVERS
Attaching the Digit Covers
A digit cover must be used for each digit. Digit covers can be easily slided onto a digit.
The same applies for the thumb and thumb cover.
Make sure covers are fully to the tip of each digit.
CLEANING
The i-Digits wristband, digits, cover and electrode surface can only be cleaned with a soft damp cloth and mild
soap.
Clean the electrode surface regularly.
Do not use any strong chemicals.
Содержание i-Digits Quantum
Страница 1: ...i DIGITS Technical Manual...
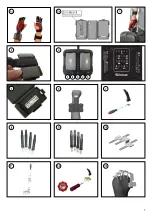
Страница 3: ...3 1a 1b 2 3 4 5 6 7 8 9 10 11 12 13 1 2 3 4 5...
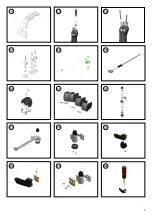
Страница 4: ...4 16 17 18 19 20 21 22 23 24 25 26 27 28 15 14...
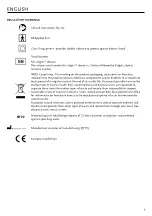
Страница 5: ...5 31 32 33 34 35 36 37 38 39 40 41 42 43 30 29...
Страница 155: ...155 BF II i digits i digits 2 6 IP22 12 5 mm...
Страница 157: ...157 i Digits i Digits i Digits 2 i Digits i Digits ssur ssur ssur ssur...
Страница 158: ...158 i Digits EMG ssur ssur ssur ssur 15 LED LED i Digits 800 mAh 3 LED LED LED 16 4...
Страница 162: ...162 A M2x5 mm 24 M2x4 mm 25 M3 26 M2x5 mm 27 1 Nm 28 M2x5 mm 29 30 31 6 32 PCB 33 34 PCB 35 36 37 34 1 38 36...
Страница 163: ...163 39 FSR PCB FSR FSR 40 FSR FSR PCB 33 41 PCB 42 M2 5 43 M4 7 i Digits i Digits i Digits i Digits ssur 12...
Страница 164: ...164 Health Check Biosim Biosim...
Страница 168: ...168 EMC ssur ssur CISPR 11 ssur RF CISPR 11 ssur IEC 61000 3 2 IEC 61000 3 3...
Страница 258: ...258 BF II i Digits i Digits 2 6 WEEE IP22 12 5...
Страница 260: ...260 i Digits i Digits i Digits 2 i Digits i Digits ssur ssur ssur ssur i Digits...
Страница 261: ...261 ssur ssur ssur ssur 15 i Digits 800 3...
Страница 264: ...264 1 12 2 13 M2 5 M2 5 14 M2 16 T6 15 M2 5 T6 16 3 17 18 FSR FSR 19 FSR 4 20 21 5 22 8 M4...
Страница 265: ...265 120 150 8 23 M2 5 24 M2 4 25 M3 26 M2 5 27 1 28 M2 5 29 30 31 6 32 33 34 35 36 37 34 1 38 36...
Страница 266: ...266 39 FSR FSR FSR 40 FSR FSR 33 41 42 M2 5 43 M4 7 i Digits i Digits i Digits i Digits ssur 12...
Страница 267: ...267 Health Check Biosim Biosim...
Страница 271: ...271 ssur Myoelectric ssur Myoelectric CISPR 11 ssur Myoelectric CISPR 11 B ssur Myoelectric IEC 61000 3 2 IEC 61000 3 3...
Страница 275: ...275 BF II i Digits i Digits 2 6 WEEE IP22 12 5 mm CE...
Страница 277: ...277 i Digits i Digits i Digits 2 i Digits i Digits ssur ssur ssur ssur EMG i Digits ssur...
Страница 278: ...278 ssur ssur ssur 15 LED LED i Digits 2 800 mAh 3 LED LED LED 16 4 2 5 2 5 1 4 LED LED...
Страница 282: ...282 34 PCB 35 36 37 34 1 38 36 39 FSR PCB FSR FSR 40 FSR FSR PCB 33 41 PCB 42 2 M2 5 43 M4 7 i Digits...
Страница 283: ...283 i Digits 1 1 i Digits 12 i Digits ssur 1 Biosim Health Check Biosim...
Страница 290: ...290 BF II i digits i digits 2 6 WEEE IP22 12 5 mm...
Страница 292: ...292 2 i Digits i Digits ssur ssur ssur ssur i Digits ssur ssur ssur ssur...
Страница 297: ...297 PCB 33 41 PCB 42 M2 5 43 M4 7 i Digits i Digits i Digits 12 i Digits ssur...
Страница 298: ...298 Biosim Biosim i Digits 7 4 V 5 A 7 4 V 800 mAh 20 kg 5 kg 0 8 5...
Страница 305: ...305 BF Class II i digits i digits 2 6 WEEE IP22 12 5mm...
Страница 307: ...307 i Digits i Digits i Digits 2 i Digits i Digits ssur ssur ssur ssur EMG i Digits ssur...
Страница 308: ...308 Vaseline ssur ssur ssur 15 LED LED i Digits 800mAh 2 3 LED LED LED 16 4 2 5 2 5 1 4 LED...
Страница 312: ...312 M2x5mm 2 24 M2x4mm 2 25 M3 26 M2x5mm 3 27 1Nm 28 M2x5mm 2 29 30 31 6 32 PCB 33 34 PCB 35 36 37 34 1 38 36...
Страница 313: ...313 39 FSR PCB FSR FSR 40 FSR FSR PCB 33 41 PCB 42 M2 5 2 43 M4 7 i Digits i Digits i Digits 12 i Digits ssur...
Страница 314: ...314 Biosim Health Check Biosim i Digits 7 4V 5A 7 4V 800mAh 20kg 5kg 0 8 5...
Страница 321: ...321 BF 2 i digits 6 i digits WEEE 12 5 IP22...
Страница 323: ...323 2 i Digits i Digits ssur ssur ssur ssur i Digits ssur ssur ssur ssur...
Страница 324: ...324 15 LED LED 800 i Digits 3 LED LED 16 4 LED LED I DIGITS i Digits 5 i Digits i Digits My i Limb i Digits about...
Страница 326: ...326 10 4 11 M2x6 T6 12 Nm 1 2 2 13 M2x5 M2x5 14 15 T6 M2x16 T6 M2x5 16 3 3 17 18 FSR 19 FSR 4 4 21 20 5 5 8 22 M4...
Страница 327: ...327 8 150 120 23 24 M2x5 25 M2x4 26 M3 27 M2x5 28 1 29 M2x5 30 31 6 6 32 33 34 35 36 37 34 38 1 36 39 40...
Страница 328: ...328 41 33 42 43 M2 5 M4 7 7 i Digits i Digits i Digits 12 ssur i Digits...
Страница 329: ...329 Biosim Biosim myograph i Digits 7 4 5 800 7 4 20 5 0 8 5 XP VEP36US12 0 9 50 60 240 100 3 12...


