12
12
SAW ASSEMBLY AND INSTALLATION
UNPACKING YOUR HEAVY DUTY SERIES SAW
Your Heavy Duty series saw system has been completely assembled, tested, and then partially
disassembled. The shipment of your saw contains the following items:
•
The Heavy Duty Series Saw, (4) frame legs, arbor wrenches, allen hex wrench kit, hardware to
attach legs.
Your machine will be banded down to a shipping skid with the legs removed and packaged under
the table top. To uncrate simply remove the corners and the framing from the skid and cut the
bands that hold the saw to the skid. The unit can them be picked up with a forklift under the steel
frame and then the legs can be installed using the 3/8 bolts, lock washers, and heavy hex nuts.
Make sure to use the leg with the warning stickers on the left front.
Install bolts finger tight and
place machine where it is to be set up then tighten legs this will allow machine to level itself
to the floor. Note: if you are mounting our roller tables to the machine leave legs loose so
assist in aligning the brackets properly then when all extension tables are installed tighten all
bolts down.
IMPORTANT
All cable lengths have been adjusted during manufacture to allow for proper movement of the arm and
rollerhead. However, you should check the cables to ensure full range of movement. If adjustment is
necessary, loosen the cable clamp (at right rear of arm) and adjust the cables so rollerhead is free to
travel the total length of the arm. Check to ensure there is enough slack in the cables between the rear
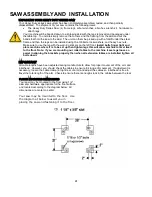
FLOOR MOUNTING DIMENSIONS
Your saw may be mounted to the floor using
1/2”
diameter hardware appropriate for the floor surface
and located according to the diagram below. All
dimensions are center
-
to
-
center.
Your saw may be mounted to the floor. Use
the diagram at below to assist you in
placing the saw and fastening it to the floor.
Содержание 3531-01
Страница 11: ...11 11...


