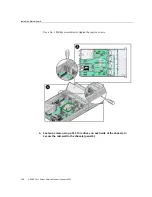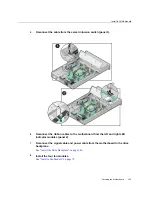
Verify the Drive Backplane
a.
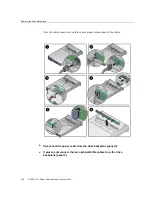
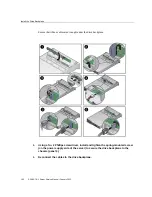
Reconnect the auxiliary signal cable to the drive backplane (panel 3).
b.
Reconnect the power cable to the drive backplane (panel 5).
c.
If present, reconnect the two optional NVMe cables to the storage drive
backplane (panel 5).
d.
Reconnect the two SAS cables to the drive backplane from the motherboard
(panel 6).
4.
Return the Server to Operation
.
5.
“Verify the Drive Backplane” on page 151
.
Related Information
■
“Internal Component Locations” on page 14
■
“Remove the Drive Backplane” on page 147
Verify the Drive Backplane
1.
Use the Oracle ILOM
show faulty
command to verify that the fault has been
cleared.
“Identify Faulted Components” on page 23
for more information on using the
show faulty
command.
2.
Perform one of the following tasks based on your verification results:
■
If the previous steps did not clear the fault, see
for information about the tools and methods you can use
to diagnose component faults.
■
If the previous steps indicate that no faults have been detected, then the
component has been replaced successfully. No further action is required.
Related Information
■
“Remove the Drive Backplane” on page 147
■
“Install the Drive Backplane” on page 149
Servicing the Drive Backplane
151
Содержание SPARC T8-1
Страница 1: ...SPARC T8 1 Server Service Manual Part No E80510 04 January 2022 ...
Страница 2: ......
Страница 10: ...10 SPARC T8 1 Server Service Manual January 2022 ...
Страница 20: ...20 SPARC T8 1 Server Service Manual January 2022 ...
Страница 58: ...58 SPARC T8 1 Server Service Manual January 2022 ...
Страница 106: ...106 SPARC T8 1 Server Service Manual January 2022 ...
Страница 112: ...112 SPARC T8 1 Server Service Manual January 2022 ...
Страница 128: ...128 SPARC T8 1 Server Service Manual January 2022 ...
Страница 146: ...146 SPARC T8 1 Server Service Manual January 2022 ...
Страница 152: ...152 SPARC T8 1 Server Service Manual January 2022 ...


