34
9. ASSEMBLY GUIDELINES
ATTENTION!!!
Please open the louvers to vertical in winter and snowing
weather to protect your pergola!
Ø
8&12mm
Tools Required for Installation
X2
X2
AO
IO
JO
4
XO-1
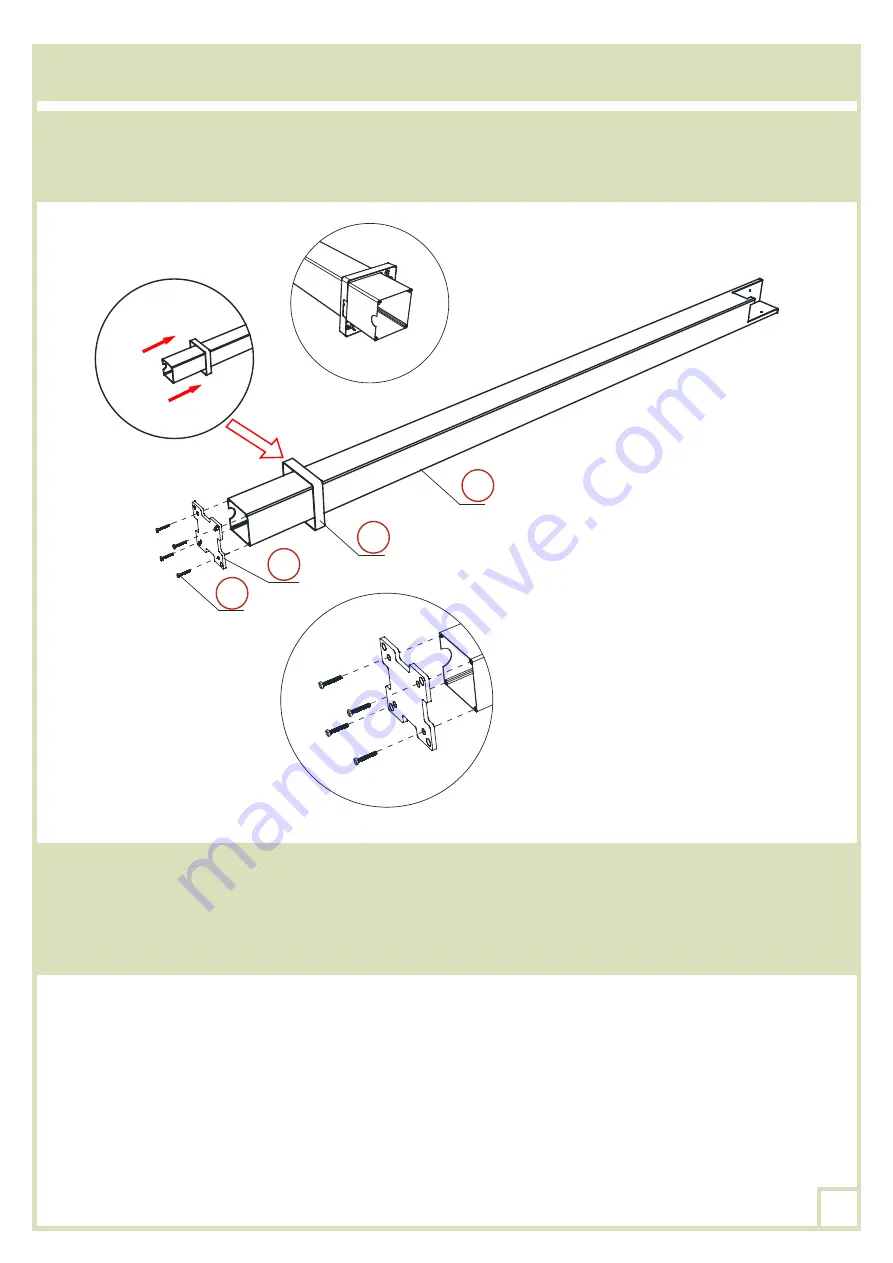
Insert and slide the posts skirts
IO
onto the posts
AO
. The opening of this part should stay on the
same side as the crescent opening located on the bottom of the post.
Fasten the post base plate
JO
with the bolt
XO-1
by using an electric screwdriver.
To prevent any damage to your pergola, we recommand to place the parts either on a table,
trestels or a smooth and clean surface.
Содержание 15-729087
Страница 8: ...8 8 PLAN DE MONTAGE dimensions en mm 134 104 4 160 134 104 4 160 22 134 2773 134 3002 5 2982 2791...
Страница 13: ...13 M8X150 Impact bit Percer les trous marqu s au mur l aide d un perforateur et d un foret M8x150...
Страница 15: ...15 BO 2 DO 2 DO 2 Embo ter l extension de poutre DO 2 sur la poutre murale BO 2...
Страница 33: ...33 8 FOOTING MEASUREMENT dimensions in mm 134 104 4 160 134 104 4 160 22 134 2773 134 3002 5 2982 2791...
Страница 38: ...38 M8X150 Impact bit Using an electric drill with a M8x150 drill bit make holes in the marked area...
Страница 40: ...40 BO 2 DO 2 DO 2 Clip on the beam extension DO 2 onto the wall beam BO 2...
Страница 58: ...58 8 PLAN DEL MONTAJE dimensiones en mm 134 104 4 160 134 104 4 160 22 134 2773 134 3002 5 2982 2791...
Страница 63: ...63 M8X150 Impact bit Taladra los agujeros marcados en la pared con un taladro y una broca M8x150...
Страница 65: ...65 BO 2 DO 2 DO 2 Empuja la prolongaci n de la viga DO 2 sobre la viga de pared BO 2...
Страница 83: ...83 8 PIANO DI MONTAGGIO dimensioni in mm 134 104 4 160 134 104 4 160 22 134 2773 134 3002 5 2982 2791...
Страница 88: ...88 M8X150 Impact bit Forate il muro nei punti segnati a matita con un trapano e una punta M8x150...
Страница 90: ...90 BO 2 DO 2 DO 2 Incastrate l estensione della trave DO 2 alla trave murale BO 2...


