background image

41

MVX10

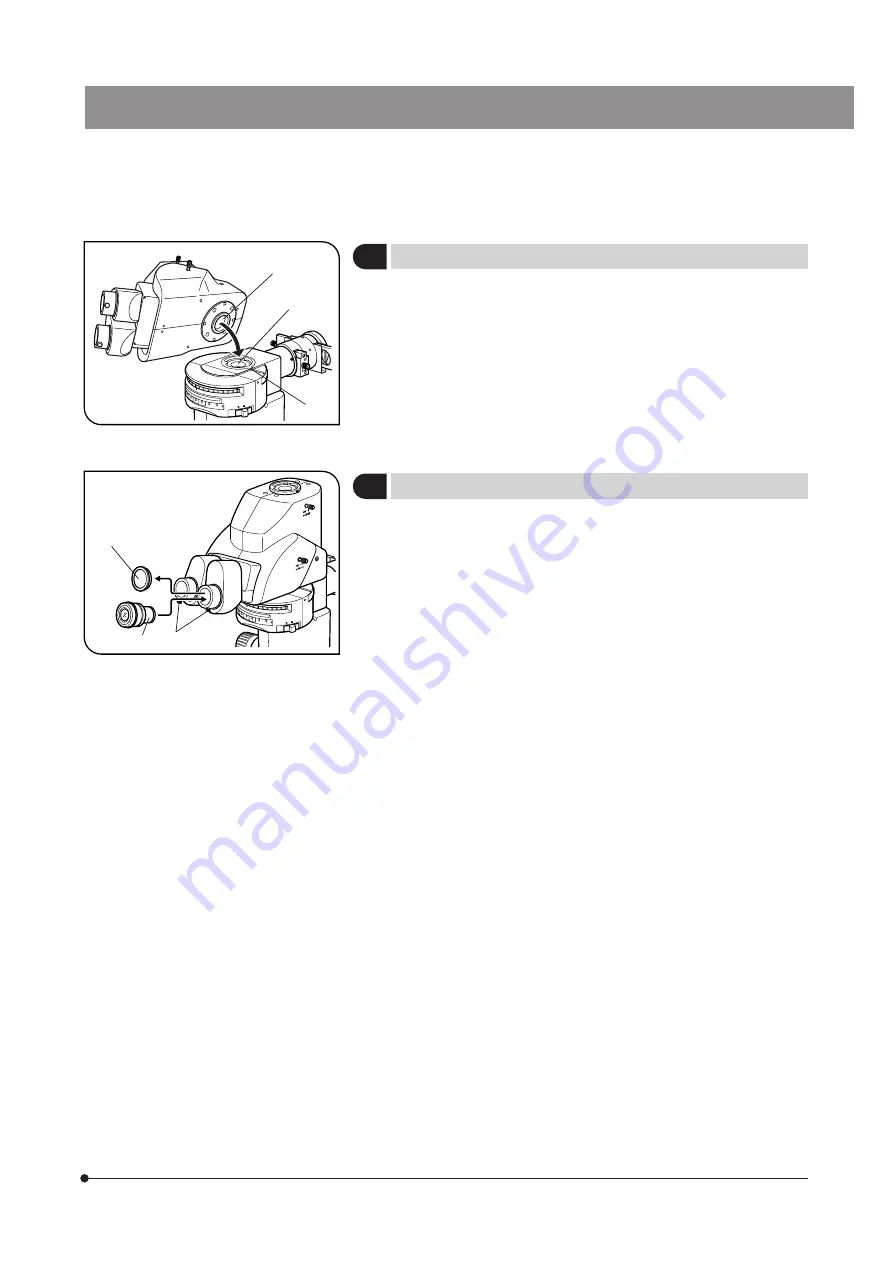
1. Using the Allen screwdriver, loosen the clamping screw @ of the coaxial

fluorescence illuminator.

2. Fit the round dovetail ² on the bottom of the trinocular head into the

mount dovetail ³ of the illuminator and tighten the clamping screw.

1. Remove the eyepiece dust caps @ and loosen the eyepiece clamping

knobs ² completely.

2. Gently insert the eyepiece (WHN10X-H) ³ into the left and right eye-

piece sleeves all the way until they stop.

3. Tighten both eyepiece clamping knobs ².

Fig. 40

@

²

³

Fig. 41

@

²

³

8

Mounting the Tilting Trinocular Head

(Fig. 40)

9

Mounting the Eyepieces

(Fig. 41)

Содержание MVX10

Страница 1: ...e yourself fully with the use of this attachment we recommend you study this manual thoroughly before operating the microscope Retain this instruction manual in an easily accessible place near the wor...

Страница 2: ......

Страница 3: ...8 9 10 17 1 Adjusting the Focus 2 Adjusting the Rotation Tension of the Coarse Focus Adjustment Knob 3 Engaging and Disengaging the Zooming Knob Click Stop Position 4 Adjusting the Aperture Iris Diap...

Страница 4: ...24 25 10 2 Magnification Changer MVX CA2X 26 10 3 BX Stage Adapter Type 1 SZX STAD1 27 29 10 4 Stage Adapter Type 1 SZH STAD1 29 10 5 BX Stage Adapter Type 2 SZX STAD2 30 31 10 6 Vertical Movement Sta...

Страница 5: ...Before plugging the power cord into the wall outlet ensure that the main switch of the power supply unit is set to OFF 7 Always ensure that the grounding terminal of the power supply unit is properly...

Страница 6: ...e careful in handling the limiting or stopper mechanisms because an excessive force may destroy them 2 Do not use the microscope where it is subjected to direct sunlight high temperature and humidity...

Страница 7: ...ied service life has been exceeded the glass tube may be distorted accumulatively and may eventually burst though this happens very rarely The used mercury burner should be disposed of as an industria...

Страница 8: ...ailure to follow the instructions in the warning could result in bodily harm to the user and or damage to equipment including objects in the vicinity of the equipment Indicates that failure to follow...

Страница 9: ...FPHQ XL U MGFPHQ XL U MYFPHQ XL U MRFPHQ XL U MGFP XL U MGFPA XL Objective Lens MVPLAPO 1X MVPLAPO 0 63X MVPLAPO 2XC Camera Adapter MVX TV 1XC MVX TV 0 63XC MVX TV1XB High Intensity Lamp Housing U LH1...

Страница 10: ...re iris diaphragm knob P 11 Zoom ratio indicator P 11 Zoom Body MVX ZB10 UV shield plate MVX objective Camera Adapter MVX TV 1XC Light path selector lever P 17 Mono stereo selector lever P 17 Lamp Hou...

Страница 11: ...unit frame which does not incorporate a filter P 39 Use the blank indicator sheets provided with the illuminator to write the original mirror unit name Tube Lens Unit MVX TLU Camera adapter mount dove...

Страница 12: ...path Mirror unit turret P 12 Set the shutter knob to to open the shut ter and bring the specimen into focus Shutter knob P 14 Coarse fine focus adjustment knobs P 10 Engage the ND filter in the light...

Страница 13: ...9 MVX10 Make a photocopy of this spread and post it near the microscope for quick reference...

Страница 14: ...for this will damage the internal mechanism This adjustment is intended to facilitate the rotation of the knob while preventing the microscope body from lowering spontaneously For best ease of use it...

Страница 15: ...narrowly degrades resolution When performing fluorescent light observation it is recommended to open the aperture iris diaphragm fully for bright observation 1 Adjust the aperture iris diaphragm knob...

Страница 16: ...P U MYFPHQ XL DM505HQ BP490 500HQ BA515 560HQ EYFP U MRFPHQ XL DM565HQ BP535 555HQ BA570 625HQ RFP U MGFP XL DM505 BP460 490 BA510IF EGFP U MGFPA XL BA510 550 Spectral Characteristics of the Filters 1...

Страница 17: ...13 MVX10 5 IB excitation filter wide band U MGFP XL 6 IB excitation filter wide band U MGFPA XL Transmittance Wavelength nm Transmittance Wavelength nm...

Страница 18: ...0 minutes after it is turned off because it cannot be turned on unless the mercury vapor in the burner has cooled down and liquefied If the lamp housing is opened while the burner is on the power supp...

Страница 19: ...ND12 32ND25 32ND50 or frost filter 32FR80 in the filter pockets and select the desired filter pocket with the filter slider knob When the mercury burner has been turned on for an extended period the m...

Страница 20: ...d fine focus adjustment knobs 5 Rotate the zooming knob to the lowest zoom ratio then focus the specimen by rotating the left and right diopter adjustment rings instead of the coarse and fine focus ad...

Страница 21: ...l division Mono stereo selector lever Indication Observation Pushed in Stereo Pulled out Standard The brightness of the peripheral section of the field becomes insufficient when the aperture iris diap...

Страница 22: ...bservation areas when the WHN10X H eyepieces with a field diameter of 22 are used When the 0 63X camera adapter is used The field may be cut off when the 1 inch CCD is used When the 1X camera adapter...

Страница 23: ...er When Using the MVX TV1XC Fig 18 3 Using the Allen screwdriver loosen the parfocality adjustment clamping screw and camera adapter clamping screw 4 While observing the monitored image hold the upper...

Страница 24: ...izer are required The MVPLAPO 2XC objectives cannot be used Note 1 When the MVPLAPO2XC objective is used and the zoom ratio is 2 5X or less insufficiency of brightness in the peripheral section become...

Страница 25: ...e dust Dust on eyepiece Remove dust 4 Excessive image contrast Aperture is stopped down excessively Open the aperture to proper diameter 5 Resolution problems Image is not sharp Insufficient contrast...

Страница 26: ...S Tilting angle 0 to 23 Light path selection 2 steps Bi 100 or TV Photo 100 Interpupillary distance adjustment 51 to 76 mm Eyepiece clamping knob provided Eyepiece WHN10X H 6 Coaxial fluorescence illu...

Страница 27: ...power x Zoom ratio x Eyepiece magnification Actual field area Eyepieces Eyepiece FN Objective power x Zoom ratio Objective WHN10X H Field number 22 Total magnification Actual field mm MVPLAPO 0 63X 4X...

Страница 28: ...ews 1 Remove the trinocular head and coaxial fluorescence illuminator from the zoom microscope body 2 Remove the zoom microscope body and focusing assembly from the pillar and place them upside down o...

Страница 29: ...using assembly Fig 22 5 Install the focusing assembly on the pillar and install the observation tube and coaxial fluorescence illuminator which have been removed above in the original positions 6 Atta...

Страница 30: ...se applied on it Be careful not to stain the lenses with the grease during assembly Using the Allen wrench remove the four AB3 x 8 screws from the mount dovetail on the MVX TTRS Using the two AB4 x 6...

Страница 31: ...X STL 10 3 BX Stage Adapter Type 1 SZX STAD1 1 Applicable Bases Restrictions MVPLAPO 0 63X MVPLAPO 1X MVPLAPO 2XC None Transmitted illumination base SZX ILLK SZX ILLB2 SZX ILLD2 The same restrictions...

Страница 32: ...ole Base Mounting the Polarizer SZX PO When simplified transmitted polarized light observation is required install the polarizer on the SZX STAD1 BX stage adapter type 1 To install the polarizer place...

Страница 33: ...r rotation ring so that the field of view is darkest cross Nikol adjustment 3 Place a specimen on the rotary stage and rotate it to perform the polarized light observation 10 4 Stage Adapter Type 1 SZ...

Страница 34: ...rvation place the mirror knob on the front and use a frosted filter 2 Simplified Transmitted Light Observation Fig 25 Frosted filter Mirror Zoom microscope body Objective Stage External light source B...

Страница 35: ...Clamping knob Stage Gliding Stage SZH SG Cup Stage SZH SC Vertical Movement Stage SZ2 FO Focus adjustment knob SZX STL SZX illumination base When using a filter or polarized simplified light module in...

Страница 36: ...gain Removing the Stage Plate Fig 26 Loosen the clamping knob and push up the stage plate from its bottom side 4 Operation Adjusting the Rotation Tension of the Focus Adjustment Knob Fig 27 This adjus...

Страница 37: ...ble Objectives Restrictions Large base SZX STL MVPLAPO 0 63X MVPLAPO 1X MVPLAPO 2XC None Transmitted illumination base SZX ILLK SZX ILLB2 SZX ILLD2 The same restrictions apply regardless of whether th...

Страница 38: ...be sure to avoid bringing the gliding surfaces in con tact with the desk surface Note 3 Clean the gliding surfaces periodically 2 Assembly Mount Same dimensions as the stage plate Mount Hold the glid...

Страница 39: ...eriodically Place a specimen on the stage plate hold the edge of the cut stage and tilt it slowly Fig 29 If the specimen slips off fix it using the provided specimen holder To fix a container such as...

Страница 40: ...PA XL UV shield plate Revolving Nosepiece MVX 2RE Objective Lens MVPLAPO 0 63X MVPLAPO 1X MVPLAPO 2XC Stage Glass base accessories Camera Adapter MVX TV1XC MVX TV0 63XC MVX TV1XB Tube Lens Unit MVX TL...

Страница 41: ...a thin object into the notch 2 Using the provided Allen screwdriver loosen the dovetail mount clamping screw inside the cap on the focusing assembly by rotating it by 2 or 3 turns counterclockwise 3...

Страница 42: ...so that the abbreviation of the mirror unit name is upside down and then tighten the clamping screw firmly If the clamping screw is loose it may interfere with the inner surface of the turret cover m...

Страница 43: ...filter mounting orientation Dimensional Conditions of the Optical Parts Barrier filter 32 mm max thickness 4 mm Excitation filter 25 mm max thickness 6 mm Dichroic mirror See figure on the right 0 1...

Страница 44: ...lay down so it is not necessary to use the push ring 3 Apply the filter push ring against the filter so that it will not lay down 4 Drop the light leak prevention cap into the filter slider Even when...

Страница 45: ...dovetail of the illuminator and tighten the clamping screw 1 Remove the eyepiece dust caps and loosen the eyepiece clamping knobs completely 2 Gently insert the eyepiece WHN10X H into the left and ri...

Страница 46: ...side then the negative pole to the mount on the lower side Be sure to use the USH 103OL OLYMPUS or the HBO103W 2 OSRAM mercury burner Be careful and avoid leaving fingerprints or contaminants on the...

Страница 47: ...e around the lamp housing particularly above it Also do not mount the lamp housing obliquely Place the stage plate white black on back side or a stage glass into the mounting hole on the base To remov...

Страница 48: ...the aperture iris diaphragm knob toward the left to open the diaphragm 7 Set the shutter knob to to open the shutter 8 Rotate the collector lens focusing knob to project the arc image on the white she...

Страница 49: ...adjust the centering of the mirror reflected image 1 Set the shutter knob to to close the light path with the shutter 2 Rotate the mirror unit turret to engage a mirror unit in the light path 3 Set th...

Страница 50: ...Table 1 Certified Cord A power supply cord should be certified by one of the agencies listed in Table 1 or comprised of cordage marked with an agency marking per Table 1 or marked per Table 2 The fit...

Страница 51: ...talter sterreichischer Verband f r Elektrotechnik VE Danmarks Elektriske Materialkontroll DEMKO National Standards Authority of Ireland NSAI Norges Elektriske Materiellkontroll NEMKO Asociacion Electr...

Страница 52: ...MEMO...

Страница 53: ...MEMO...

Страница 54: ...MEMO...

Страница 55: ......

Страница 56: ...Olympus Tower 446 Bongeunsa ro Gangnam gu Seoul Korea 135 509 48 Woerd Avenue Waltham MA 02453 U S A Distributed by Shinjuku Monolith 2 3 1 Nishi Shinjuku Shinjuku ku Tokyo 163 0914 Japan Manufacture...

Отзывы: