


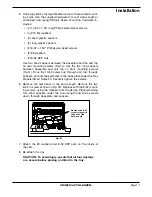


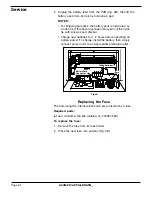
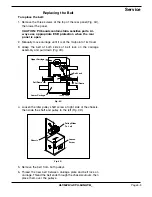
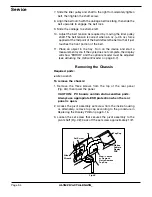

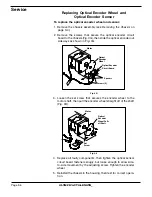
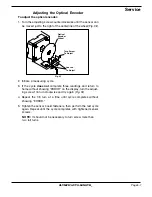
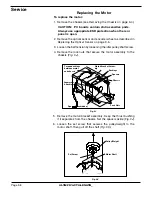


Page 2-2
OLYMPIC AUTO-LENGTH
™
Operation
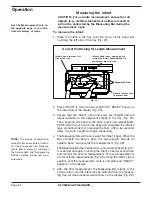
Measuring the Infant
CAUTION: For accurate measurement, ensure that all
objects (e.g., clothing, blankets) are either removed or
will not be contacted by the Measuring Bar during the
measurement cycle.
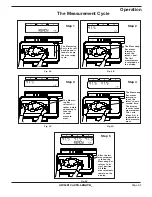
To measure the infant:
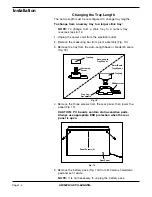
1. Place the infant in the tray with the crown of his head just
touching the left side of the tray (
Fig. 2F
).
Pronate infant's foot
to present heel.
Fig. 2F
Infant's head, neck, and body are
straight and are aligned parallel to
alignment stripes in tray.
Infant's head touches left
side of the tray.
Correct Positioning for Length Measurement
Alignment Stripes
See
The Measurement Cycle,
on
the opposite page, for an illus-
trated summary of steps.
2. Press ON/OFF to turn the Auto-Length ON. “READY” shows on
the lower half of the display (
Fig. 2A
).
3. Ensure that the infant’s neck and body are straight and are
aligned parallel to the alignment stripes in the tray (
Fig. 2F
).
Then, keeping one hand on the baby, press and release MEA-
SURE. Return your hand to the baby and straighten the infant’s
legs, pronating one foot to expose the heel. After a two-second
delay, the Auto-Length will begin measuring.
4. The Measuring Bar will move toward the infant’s heel. When the
Bar contacts the baby’s heel, the Auto-Length sounds an
audible ‘beep’ and records the measurement (
Fig. 2B
).
The Measuring Bar then retracts two-and-a-half inches (
Fig. 2C
).,
moves forward again, touching the infant’s heel a second time,
and records the second measurement. This cycle repeated for
a total of three measurements (
Fig. 2D
). Keep the infant’s leg in
position until the measurement cycle is complete and “READY”
appears on the display.
5. After the final measurement, the Measuring Bar returns to the
start position, and the infant may be removed from the measur-
ing tray. All three measurements show on the display (
Fig. 2E
).
NOTE:
The device automatically
turns off after one minute of inactiv-
ity. You can recover the measure-
ments from memory by turning on
the Auto-Length, and then pressing
RECALL before taking new mea-
surements.
Содержание AUTO-LENGTH 20
Страница 2: ...OLYMPICAUTO LENGTH ...
Страница 39: ...Page 3 19 OLYMPIC AUTO LENGTH Service Auto Length 120 Vac 60 Hz WiringDiagram Drawing No 700215 Rev B ...
Страница 40: ...Page 3 20 OLYMPIC AUTO LENGTH Service Schematic Drawing No 700216 Sheet 1 of 2 ...
Страница 41: ...Page 3 21 OLYMPIC AUTO LENGTH Service Schematic Drawing No 700216 Sheet 2 of 2 ...


