background image

CHAPTER 3

28

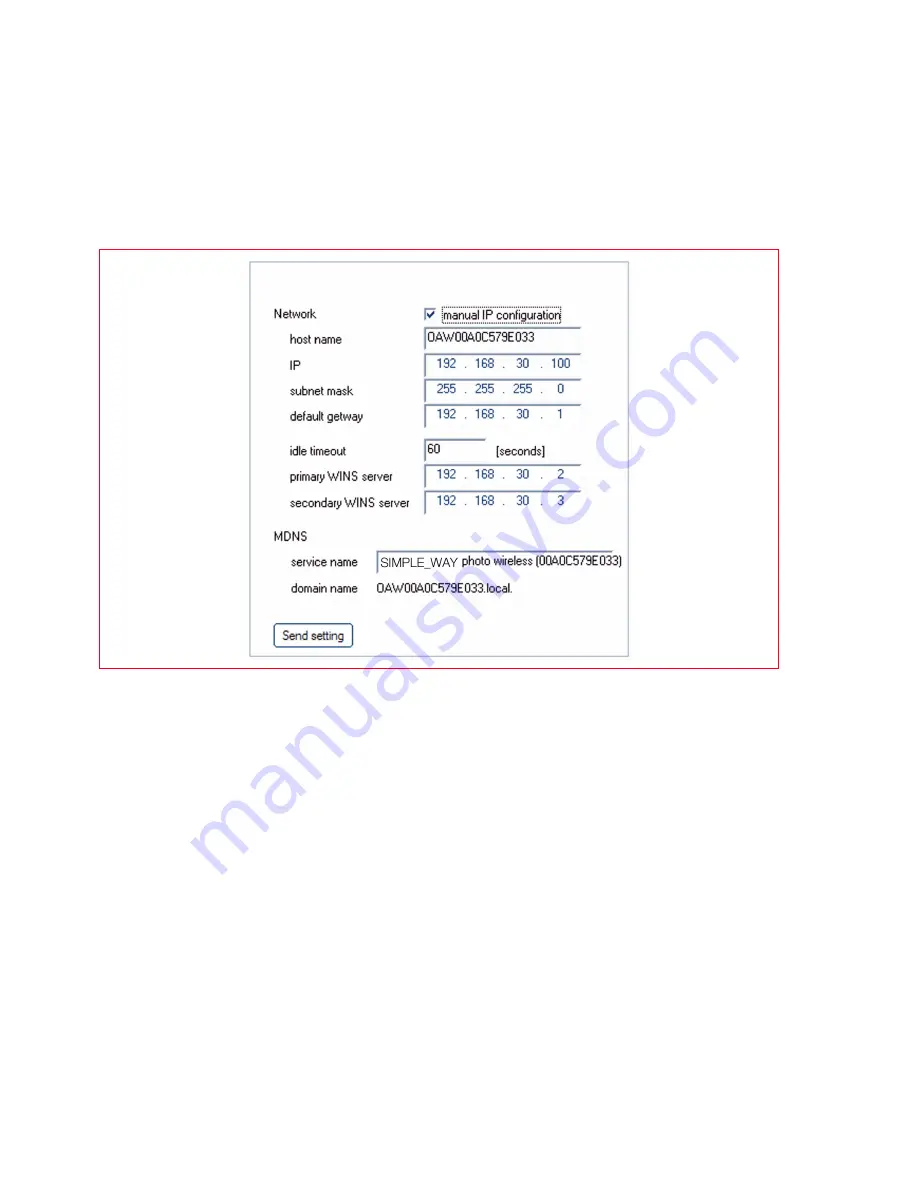
Declaring Network Addresses

After declaring network type, you must enter the parameters for printer recognition that must comply 
with the TCP/IP network protocol specifications; therefore, network address (IP), subnet mask and 
gateway.

note: 

You are advised to save or print this Configuration page as the data is important for any 

subsequent settings. However, you can always display this page opening the 

Toolbox

 program, 

selecting the “Wireless“ network settings or from the menu 

Start > Programs > SIMPLE_WAY Wi-

Fi > Configuration

.

Described below are the network address definition fields:

Manual IP configuration: 

This is necessary when a DHCP server that assigns a network address 

automatically is not available. In this case, manual configuration is necessary and consists in entering 
the network addresses available (IP, subnet mask, gateway).

Host name: 

The name of the printer on the network.

IP, subnet mask, default gateway: 

The univocal names of the network parameters, those required 

by TCP/IP (Transmission Control Protocol/Internet Protocol standard, a communications protocol that 
defines the method of data transmission to network peripherals). Virtually, all modern operating 
systems offer TCP/IP assistance, and most large networks use the TCP/IP protocol for network traffic. 
Indicate the IP address, subnet mask and the pre-defined Gateway, maintaining the same class of 
addresses as the Wireless router or access Point.

Idle timeout [seconds]: 

Indicates the length of time the peripheral waits to receive data on the 

network (this depends on the characteristics of the network, and in particular its speed).

Primary and secondary WINS Server:

 Indicate the characteristics of any WINS type servers present 

on the network for managing peripherals.

MDNS:

 Multicast Domain Name Server. Used with local and AD HOC networks that do not use central 

DNS servers. To execute service names using this method, an alternative DNS called mDNS is used. 
Using mDNS, the computer identifies and uses any printer connected to the LAN. It can also work with 
any other peripheral enabled for Ethernet displayed on the network. In this case, declare the service 
name and domain name. 

note: 

The MDNS method is particularly useful for connection in a Macintosh environment. Refer to the 

OS X 10.2 (or higher) system for further information.

Содержание SIMPLE_WAY

Страница 1: ......

Страница 2: ...ency in response to environmental issues and for the purpose of advancing the development and utilization of more efficient office equipment Code 528013en Date of publication March 2007 Trademarks Mic...

Страница 3: ...ng Bluetooth 10 USB Installation and Bluetooth Printing from Computer in Windows Environment 10 Installing Bluetooth from Computer in Macintosh Environment 11 Installing Bluetooth for Printing from Co...

Страница 4: ...WEP keys 30 Entering WPA Coding Data 30 BLUETOOTH SYSTEM SETTINGS BLUETOOTH MODEL 31 4 INK CARTRIDGES 33 CHECKING INK LEVELS 34 Information Required to Purchase New Ink Cartridges 34 REPLACING INK CA...

Страница 5: ...tween mobile phones and home printers The guidelines are promoted for use internationally to ensure a broad spectrum of products and services for mobile phone consumers www mobileprinting org SIMPLE_...

Страница 6: ...CHAPTER CONTENTS vi...

Страница 7: ...G YOUR PRINTER COMPONENTS PRINTER FRONT PANEL PLACING YOUR DOCUMENT ON THE SCANNER GLASS LOADING PAPER PRINTER POWER SUPPLY PRINTER FRONT PANEL STATES CONNECTING A DIGITAL CAMERA TO YOUR PRINTER INSTA...

Страница 8: ...of the multi functional printer in Wi Fi mode are always carried out using the USB cable the cable can be removed subsequently for wireless mode operation note To install the wi fi model follow the in...

Страница 9: ...and top quality printing you must use only original Olivetti ink cartridges Olivetti declines any responsibility for damage to your printer caused by the tampering with or refilling ink jet cartridge...

Страница 10: ...exposure bed on which to place original 9 Power connector Connect the power cable of the external universal power supply unit furnished with the product to the printer Then connect the other end of t...

Страница 11: ...ection button Select print or copy quality The printer automatically regulates its own print resolution high or normal according to the quality selected Photo mode is recommended if the original to be...

Страница 12: ...cover 10 Scan button Enabled when the printer is connected to a computer Press this button to scan the document or photo placed on the exposure bed See Scanning from the Front Panel A Toolbox window i...

Страница 13: ...rts into their upright position then press the paper width guide and slide it to its outermost position note When raising the paper supports make sure they are in their correct upright position 2 Load...

Страница 14: ...paper support with the print side facing up Pressing the paper guide slide it up against the left edge of the paper note Load letterhead paper with the top of the letterhead entering the printer firs...

Страница 15: ...nal computer connected to the printer For appropriate corrective measures in the case of errors see Meaning of Front Panel LEDs On completion of the self test phase if no errors are detected the On Of...

Страница 16: ...to operate in the Bluetooth environment If a password is requested during the connection phase enter 0000 or other user defined password using the Toolbox application Start Programs Olivetti Olivetti...

Страница 17: ...h connection to the printer is made via a COM port available on the system note In the case of a previous USB installation this must be removed from the system before proceeding note Before continuing...

Страница 18: ...gs Installation To correctly install the printer in Wi Fi mode Carry out USB installation Activate the Wi Fi component of the printer To enable wireless communication from the computer use the printer...

Страница 19: ...e provided with the computer Use of ad hoc mode is generally restricted to simple wireless networks of reduced size as performance tends to downgrade considerably after connection of several network p...

Страница 20: ...CHAPTER 1 14...

Страница 21: ...TER COPYING A DOCUMENT CREATING AND PRINTING THE PHOTO INDEX PRINTING PHOTOS FROM YOUR PICTBRIDGE DIGITAL CAMERA PRINTING PHOTOS FROM YOUR DPOF DIGITAL CAMERA PRINTING PHOTOS FROM YOUR NON PICTBRIDGE...

Страница 22: ...mbnail format and a space is provided under each for you to define the number of copies 1 to 4 At the bottom of the page you can choose printing with or without borders and the full formats 2x1 4x1 Th...

Страница 23: ...information see Loading Paper and Printer Front Panel 2 Make sure your digital camera is turned on and connected to the printer For more information see Connecting a Digital Camera to Your Printer 3 P...

Страница 24: ...CHAPTER 2 18...

Страница 25: ...SCANNING FROM THE TOOLBOX PRINTING FROM YOUR APPLICATION USING PRINT PROPERTIES SCANNING AN ORIGINAL FROM YOUR APPLICATION SCANNING AN ORIGINAL FROM THE PRINTER FRONT PANEL HOW TO SET PARAMETERS TO IM...

Страница 26: ...tained on this CD ROM note Guided printer installation uses a network protocol to send and receive information During this exchange of information when a firewall has been activated certain communicat...

Страница 27: ...nitor closes automatically at the end of a print or copy job but you can close it to its icon on the Windows task bar at any time If you decide to close the Status Monitor during a print or copy job i...

Страница 28: ...make multiple copies of the same image or of several images on a single page make poster format copies defining the number of pages onto which to adapt the copied image reproduce the copied image the...

Страница 29: ...se and its size Define the size in either inches or millimetres of any customised paper you want to use Print borderless photos when coated paper glossy paper or postcard format is selected Select man...

Страница 30: ...to application Scan to e mail and Scan to fax Select where you want to send the scanned image by clicking on the corresponding tool icon See Printing Copying and Scanning From the Toolbox Ink Levels...

Страница 31: ...Standard Define whether the document to scanned consists of black text or line art only a combination of black text or line art colour graphics or photos or just photos and therefore scan at 150 dpi 3...

Страница 32: ...to print before clicking on the Print button SETTING PARAMETERS FOR WI FI CONNECTION WIFI MODEL To connect the printer to the computer via a pre existing wireless network the network characteristics m...

Страница 33: ...peripherals pass through an access point Each wireless network peripheral must have a wireless network adapter to connect to the access point Channel Indicates the path on which the digital informati...

Страница 34: ...a communications protocol that defines the method of data transmission to network peripherals Virtually all modern operating systems offer TCP IP assistance and most large networks use the TCP IP pro...

Страница 35: ...led PSK Pre Shared Key which uses manually entered passwords or keys for protection PSK is designed for simple installation by the user at home or in the small office note Toolbox software with Wi Fi...

Страница 36: ...WPA implements EAP Extensible Authentication Protocol If WPA is used on the network PSK Pre Shared Key authentication is used In Web Server mode proceed as follows 1 Click on the Networking tab 2 In t...

Страница 37: ...he Toolbox program from the system finder in the list of available programs 4 Click on the Settings button to access Bluetooth parameter configuration Activate Bluetooth mode and press Send Settings t...

Страница 38: ...CHAPTER 3 32...

Страница 39: ...INK CARTRIDGES 33 4INK CARTRIDGES CHECKING INK LEVELS REPLACING INK CARTRIDGES ALIGNING INK CARTRIDGES EXCHANGING BLACK AND PHOTO INK CARTRIDGES USING THE GARAGE...

Страница 40: ...ation bar and select the Toolbox or click on Start Programs or All programs Olivetti Olivetti Toolbox The Toolbox window is displayed note In the Macintosh environment run the Toolbox program from the...

Страница 41: ...hs use the photographic and colour ink cartridges Printing time will be longer but the final quality obtained is the best that can be obtained from the printer 1 Switch on the printer pressing the On...

Страница 42: ...cartridge from the sides 6 Holding the cartridge with the nozzles facing down and with the contacts facing towards the rear part of the printer insert the colour ink cartridge into the right side car...

Страница 43: ...installed ink cartridge It is printed Automatically once the scanner unit is closed after installing new ink cartridges Directly from the Toolbox installed on your personal computer when you select th...

Страница 44: ...te When using the black cartridge store the photo ink cartridge in the garage and vice versa To exchange the photo and black ink cartridges to best suit your printing requirements 1 Open the lid of th...

Страница 45: ...MAINTENANCE AND TROUBLESHOOTING 39 5MAINTENANCE AND TROUBLESHOOTING CLEANING YOUR PRINTER CLEANING THE INK CARTRIDGE NOZZLES TROUBLESHOOTING CLEARING PAPER JAMS...

Страница 46: ...ot print in parts or at all Vertical lines in printout are jagged To clean the ink cartridge nozzles 1 Make sure A4 size paper is loaded onto the printer See Loading Paper 2 Click your mouse right but...

Страница 47: ...with the CD ROM software may be running on the personal computer 1 Make sure the personal computer is running Windows 98 SE ME 2000 or XP or MAC OS X 10 2 or later The auto run feature is disabled Yo...

Страница 48: ...When connecting your printer to the computer with the USB cable the New Hardware Wizard is not displayed on the computer monitor The computer is running an incompatible operating system 1 Make sure th...

Страница 49: ...the USB Universal Serial Bus Controller option If USB host controller and USB root hub are present USB is enabled If they are not present read your computer manual for information on how to enable a...

Страница 50: ...when you click on the Print icon on the task bar of the application you are using Your printer is not set as the default printer In the Windows environment 1 Click Start Settings Printers and Fax 2 R...

Страница 51: ...nd then turn it back on again by pressing the On Off button Horizontal streaks are printed The ink cartridges are dirty Clean the ink cartridges See Cleaning the Ink Cartridge Nozzles A completely bla...

Страница 52: ...e error condition note If the paper jam occurred when copying or printing without a computer the print job continues from the next page If the jam occurred when using a computer a pop up screen is dis...

Страница 53: ...TECHNICAL CHARACTERISTICS 47 6TECHNICAL CHARACTERISTICS GENERAL SPECIFICATIONS PRINTER SPECIFICATIONS COPIER SPECIFICATIONS SCANNER SPECIFICATIONS WI FI SYSTEM SPECIFICATIONS PAPER SPECIFICATIONS...

Страница 54: ...to personal computer PictBridge compliant USB 1 1 on front panel for connecting digital camera Temperature ranges Operating 15 C to 35 C Storage 5 C to 45 C Transportation 15 C to 55 C Humidity range...

Страница 55: ...can be used instead of the black ink cartridge Print resolution Up to 4800 dpi optimised Advanced print functions Applied from Toolbox program or from photographic printing control panel Optimisation...

Страница 56: ...25 to 400 clone poster mode Maximum number of copies Up to 99 when copying from Toolbox application installed on the personal computer Up to 9 when copying in stand alone Scanner Specifications Type F...

Страница 57: ...ctly with a PC equipped with wireless functions for an ad hoc mode connection The peer to peer connection method is used for small medium web connections as the increasing the number of network connec...

Страница 58: ...g m2 50 sheets A4 Transparencies 170 g m2 20 sheets A4 Photo paper 160 to 280 g m2 20 sheets A4 Glossy paper 160 to 180 g m2 20 sheets A4 T shirt transfers 150 to 180 g m2 5 sheets A4 ink jet labels...

Страница 59: ...envelope 4 46 x 6 37 in 114 x 162 mm US Folio 8 5 x 13 in 215 9 x 330 2 mm B6 4 92 x 6 93 in 125 x 176 mm US Statement 5 5 x 8 5 in 139 7 x 215 9 mm B5 envelope 6 93 x 9 84 in 176 x 250 mm B5 7 2 x 10...

Страница 60: ...CHAPTER 6 54...

Страница 61: ...configuration manual 28 K Keys WEP 30 WPA 30 L LED meanings 45 Link Toolbox Help 23 Settings 23 Solutions and Assistance 23 M MDNS 28 mDNS 28 N Network address definition fields 28 Nozzles cleaning 40...

Страница 62: ...to fax 22 scan to file 22 Troubleshooting 41 copying scanning 45 during printer setup 41 powering on printer 44 printing problems 44 U USB error status LED 45 installation 10 interface 4 W Warranty 3...

Страница 63: ...Code 528013en...

Отзывы: