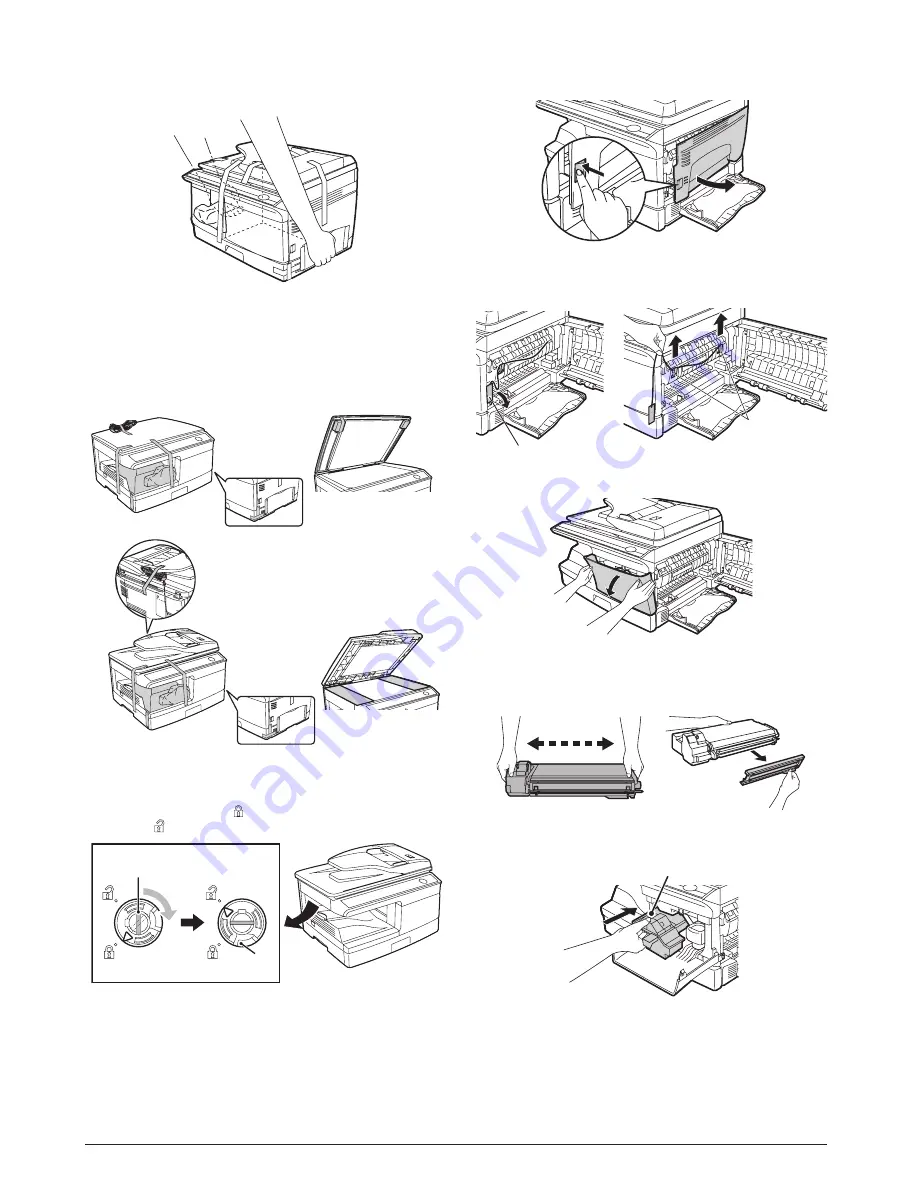
4. Unpacking
Be sure to hold the handles on both sides of the unit to unpack the
unit and carry it to the installation location.
5. Removing protective packing
materials
1) Remove all pieces of tape shown in the illustration below.
Then open the SPF and remove protective materials. After
that, take out the bag containing the TD cartridge.
2) Release the scan head locking switch.
The scan head locking switch is under the document glass.
If the switch is locked (
), the unit will not operate. Unlock the
switch (
) as shown below.
To lock the scan head locking switch, hold up the catch in illus-
tration (A) and turn the center knob counter-clockwise 90
degrees until you hear a click.
6. Installing the TD cartridge
1) Open the multi-bypass tray, and then open the side cover.
2) Remove the CAUTION tape from the front cover and remove
the two protective pins from the fusing unit by pulling the
strings upward one at a time.
3) Push gently on both sides of the front cover to open the cover.
4) Remove the TD cartridge from the bag. Remove the protective
paper. Hold the cartridge on both sides and shake it horizon-
tally four or five times. Hold the tab of the protective cover and
pull the tab to your side to remove the cover.
5) Gently insert the TD cartridge until it locks in place while push-
ing the lock release button.
6) Close the front cover and then the side cover by pressing the
round projections near the side cover open button.
Caution: When closing the covers, be sure to close the front cover
securely and then close the side cover. If the covers are
closed in the wrong order, the covers may be damaged.
d-Copia 201D
d-Copia 201D
d-Copia 200D
d-Copia 200D
(A)
Lock
Unlock
Grasp here and turn in
the direction of the arrow.
CAUTION tape
Protective pins
4 or 5 times
Lock release button
5-2 Service Manual Y109500-5
Содержание d-Copia 200D
Страница 1: ...d Copia 200D d Copia 201D Digital Copier SERVICE MANUAL Code Y109500 5...
Страница 6: ...This page is intentionally left blank...
Страница 8: ...This page is intentionally left blank 1 2 Service Manual Y109500 5...
Страница 12: ...This page is intentionally left blank 2 4 Service Manual Y109500 5...
Страница 22: ...This page is intentionally left blank 4 8 Service Manual Y109500 5...
Страница 28: ...This page is intentionally left blank 5 6 Service Manual Y109500 5...
Страница 86: ...This page is intentionally left blank 10 20 Service Manual Y109500 5...
Страница 94: ...This page is intentionally left blank 12 6 Service Manual Y109500 5...
Страница 96: ...UPDATING STATUS DATE UPDATED PAGES PAGES CODE 05 2008 1ST EDITION 96 Y109500 5...


