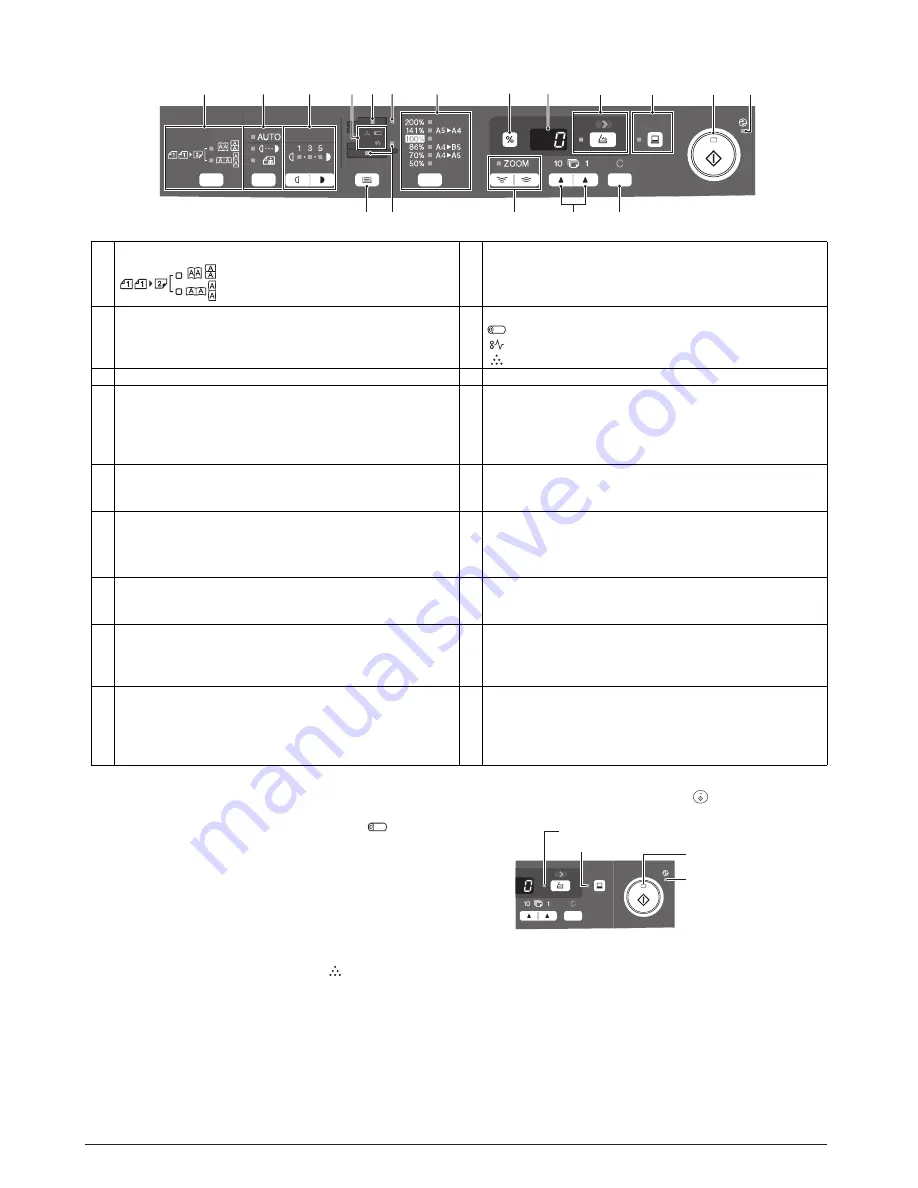
3. Operation panel
*1: Drum cartridge replacement
The useful life of the drum cartridge is approximately 18,000
copies*. When the internal counter reaches approximately
17,000 copies, the drum replacement required (
) indicator
will light up indicating that replacement of the drum cartridge
will be needed soon. For more information on purchasing the
drum cartridge, please refer to the Operation Manual. When
the indicator begins to blink, the unit will stop operating until
the cartridge is replaced. Replace the drum cartridge at this
time.
*: Based on copying onto letter size paper at 5% toned area.
*2: TD cartridge replacement
The TD cartridge replacement required (
) indicator will light
up when toner is needed. For more information on purchasing
the TD cartridge. If copying is continued while the indicator is
lit, copies will gradually become lighter until the unit stops and
the indicator begins blinking.
*3: Indicators on the operation panel
The ONLINE indicator and the start (
) indicator indicate the
state of the printer or scanner.
Start indicator
1
Original to copy key and indicators
2
Exposure mode selector key and indicators
Use to sequentially select the exposure modes: AUTO,
MANUAL or PHOTO.
Selected mode is shown by a lit indicator.
Two-sided copies from one-sided originals.
Turn on Long Edge or Turn on Short Edge
can be selected.
3
Light and dark keys and indicators
Use to adjust the MANUAL or PHOTO exposure level. Selected
exposure level is shown by a lit indicator. Use to start and
terminate user program setting.
4
Alarm indicators
Drum replacement required indicator *1
Misfeed indicator
TD cartridge replacement required indicator *2
5
SPF indicator (
d-Copia 201D
only)
6
SPF misfeed indicator (
d-Copia 201D
only)
7
Copy ratio selector key and indicators
Use to sequentially select preset reduction/enlargement copy
ratios.
Selected copy ratio is shown by a lit indicator.
8
Copy ratio display (%) key
• Use to verify a zoom setting without changing the zoom ratio.
• Use to check the number of originals that must be returned to
the document feeder tray if an original misfeed occurs while
using the SPF.
9
Display
Displays the specified copy quantity, zoom copy ratio, user
program code, and error code.
10
SCAN key and indicator *3, *4
11
ONLINE key and indicator
Lights up when the unit is used as a printer and scanner. *3
12
Start key and indicator
• Copying is possible when the indicator is on.
• Press to start copying
• Use to set a user program.
13
Power save indicator
Lights up when the unit is in a power save mode.
14
Tray select key
Use to select a paper feed station (paper tray or multi-bypass
tray).
15
Paper feed location indicators
Light up to show the selected paper feed station.
16
ZOOM keys and indicator
Use to select any reduction or enlargement copy ratio from 25%
to 400% in 1% increments. (When the SPF is being used, the
zoom copy ratio range is 50% to 200%.)
17
Copy quantity keys
• Use to select the desired copy quantity (1 to 99).
• Use to make user program entries.
18
Clear key
• Press to clear the display, or press during a copy run to
terminate copying.
• Press and hold down during standby to display the total
number of copies made to date.
1
2
3
4
5 6
7
8
9
10
11
12
13
14 15
16
17
18
On:
Indicates the unit is ready for copying or scanning is
being performed.
Blinking: The indicator blinks in the following situations:
• When a print job is interrupted.
• When reserving a copy job.
• When toner is being replenished during a copy or
print job.
Off:
The indicator is off in the following situations:
• During copying or scanning.
• The unit is in the auto power shut-off mode.
• When a misfeed or error has occurred.
Power save indicator
Start indicator
ONLINE indicator
SCAN indicator
4-2 Service Manual Y109500-5
Содержание d-Copia 200D
Страница 1: ...d Copia 200D d Copia 201D Digital Copier SERVICE MANUAL Code Y109500 5...
Страница 6: ...This page is intentionally left blank...
Страница 8: ...This page is intentionally left blank 1 2 Service Manual Y109500 5...
Страница 12: ...This page is intentionally left blank 2 4 Service Manual Y109500 5...
Страница 22: ...This page is intentionally left blank 4 8 Service Manual Y109500 5...
Страница 28: ...This page is intentionally left blank 5 6 Service Manual Y109500 5...
Страница 86: ...This page is intentionally left blank 10 20 Service Manual Y109500 5...
Страница 94: ...This page is intentionally left blank 12 6 Service Manual Y109500 5...
Страница 96: ...UPDATING STATUS DATE UPDATED PAGES PAGES CODE 05 2008 1ST EDITION 96 Y109500 5...


