background image

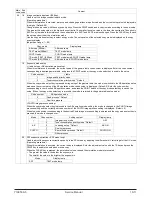
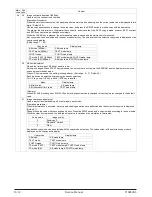
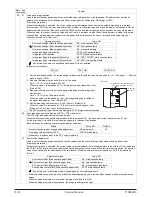
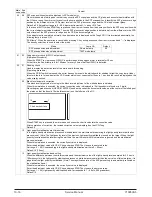
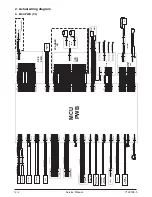
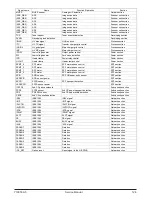
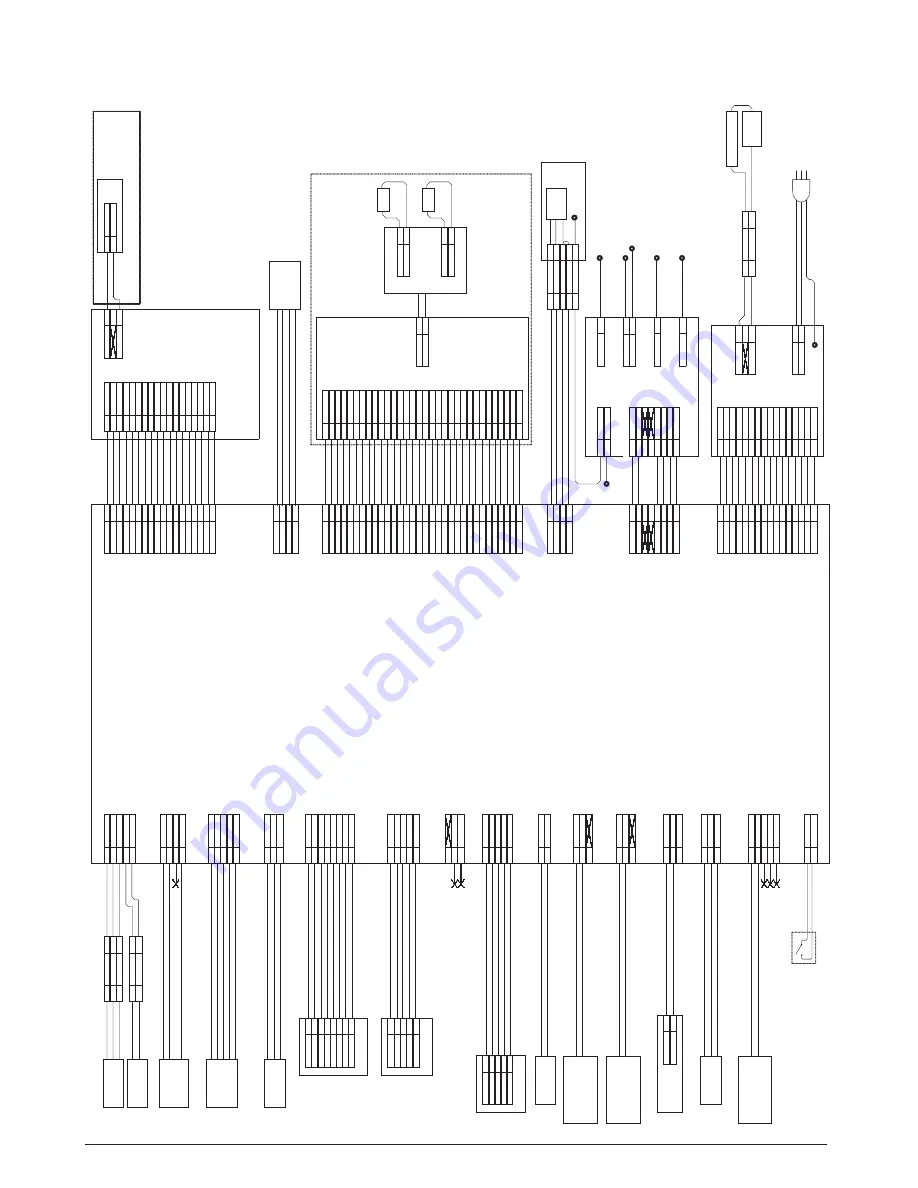
2. Actual wiring diagram

A. MCU PWB (1/3)

DHAI-0519QSPZ

DHAI-0287QSZZ

CN22

CN2

DHAI-0513QSPZ

CN304

CN303

DHAI-0270QSZZ

11

11

1

1

22

22

2

2

33

33

3

44

11

55

22

B5B-PH-K-S

66

77

88

CN11

99

10

10

11

11

12

12

13

13

B4B-PH-K-S

14

14

15

15

16

16

17

17

18

18

IMSA-9619S-18A

CN13

B05B-XASK-1

DHAI-0286QSZZ

CN19

CN4

1

2

B3B-PH-K-S

3

4

B4B-PH-K-R

DHAI-0530QSPZ

CN42

-HSYNC

8

D-GND

7

+5V

6

CN3

DHAI-0268QSZ3

5

1

1

-LDEN

4

2

2

-VIDEO

3

3

3

-S/H

2

4

4

D-GND

1

5

5

B08B-CZHK-B

6

6

7

7

8

8

9

9

10

10

DHAI-0529QSPZ

CN41

11

11

5

12

12

4

13

13

3

14

14

2

15

15

1

16

16

1

B05B-CZHK-B

17

17

2

18

18

19

19

CN25

20

20

21

21

22

22

23

23

B3B-PH-K-M

24

24

25

25

DHAI-0514QSPZ

CN6

26

26

1

27

27

2

28

28

3

29

29

4

30

30

5

31

31

B5B-PASK-1

32

32

FF4-32-S15D5

CN23

B2P-VH

CN5

DHAI-0526QSPZ

1

11

CN12

2

22

3

66

4

55

B4B-PH-K-R

88

B3B-PH-K-E

DHAI-0515QSPZ

11

CN10

2

DHAI-0273QSZZ

CN1

DHAI-0525QSPZ

1

B3B-PH-K-S

11

4

22

33

44

DHAI-0292QSZZ

DHAI-0269QSZZ

CN7

55

1

CED1

66

D-GND

77

8

8

DHAI-0267QSPZ

B3B-PH-K-K

B24B-PNDZS-1

1

DHAI-0289QSZZ

CN16

CN1

B3B-PH-K-R

91

10

2

11

3

12

4

1

DHAI-0510QSP1

DHAI-0511QSP1

CN26

13

5

2

1

1

14

6

22

15

7

16

8

17

9

18

10

B5B-PH-K-R

19

11

20

12

21

13

1

DHAI-0272QSZZ

CN15

22

14

2

23

15

24

16

B2P-VH-R

B24B-PNDZS-1

L

N

1

2

TMA_O

TMB_O

/RRS

1

D-GND

MMLD

/MMCLK

LEDPPD2

PD1

MMLD

/MMCLK

PPD2

LEDPPD2

D-GND

RTH_IN

KIN2

3

/DMT_1

5V

DRST

D-GND

5V

/DMT_0

OP-DATA

5VEN

SELIN1

OP-CLK

SELIN2

OP-LATCH

D-GND

(AFE_SCK)

(AFE_SEN)

(ADCLK)

D-GND

24V

/MPFS

24V

CCD-RS

(BSAMP)

CCD-CP

(AFE_SDI)

CCD_PHI2

D-GND

CCD_PHI1

24V1(DSWS)

5

MFD

DGND

3

PPD1

D-GND

CED1

D-GND

LEDPPD1

1

2

D-GND

3

(AFE_DB4)

(AFE_DB3)

EN5V

(AFE_DB0)

(AFE_DB2)

(AFE_DB1)

(AFE_DB7)

(AFE_DB5)

(AFE_DB6)

mt_at_home

OP-STB

D-GND

(VSAMP)

CCD-TG

P-GND

P-GND

OP-LATCH

PSL

ONL

PSW

FANLK

/VFMCNT

PGND

24V

/DMT_3

24VDupMT

/DMT_2

PMRDY

/PMD

D-GND

KEYIN1#

SELIN3

STROBE

VFMOUT

PPD2

D-GND

D-GND

RTH_IN

DRST

D-GND

D-GND

KIN1

SELIN3

OUTB+

OUTA-

OUTB-

OUTA+

D-GND

DRST

SELIN1

OP-CLK

D-GND

D-GND

PMCLK_A

3

DRST

D-GND

D-GND

LEDPOD

POD

5

SELIN2

KEYIN2#

PSW

D-GND

PSL

ONL

OP-DATA

EN5V

3

4

1

2

3

4

5

1

2

D-GND

5

3

4

VCL

VCL

12V

12V

8

1

2

D-GND

D-GND

P-GND

24V

1

2

3

4

1

2

1

2

5

3

4

6

7

2

1

1

3

2

2

3

4

5

2

P-GND

P-GND

VCL

VCL

12V

12V

EN5V

D-GND

(VSAMP)

CCD-TG

D-GND

CCD-RS

(BSAMP)

CCD-CP

(AFE_SDI)

CCD_PHI2

D-GND

CCD_PHI1

(AFE_SEN)

(AFE_DB5)

VCL

P-GND

(AFE_DB6)

D-GND

(ADCLK)

D-GND

(AFE_SCK)

(AFE_DB7)

MHPS

(AFE_DB0)

(AFE_DB4)

(AFE_DB3)

(AFE_DB2)

(AFE_DB1)

D-GND

D-GND

24V

DVSEL

TCS

BIAS

24V

TCS

DVSEL

BIAS

F-GND

MC

/GRIDL

INT5V

INT24V

INT5V

INT24V

BC

/BIAS

/TC

/GRIDL

/MC

D-GND

P-GND

D-GND

3.3VIN

EN5V

3.3VIN

5V

/POFF

12VIN

24V

FW

24V

/PR

HLOUT

P-GND

P-GND

D-GND

P-GND

D-GND

3.3VIN

EN5V

3.3VIN

5V

/POFF

12VIN

24V

FW

P-GND

24V

/PR

HLOUT

P-GND

2

1

2

D-GND

2

3

4

5

1

1

SHOLD

/SYNC

INT5V

D-GND

/LDEN

/VIDEO

/PMD

PMRDY

PMCLK_A

2

3

INT24V

/MMD

PGND

24V

GRID

MCFB

TC

/MC

/BIAS

/TC

HLN

HLL

HLL

3

HLN

/CPFS1

1

INT24V

PGND

/MMD

1

24V

P-GND

PPD2

Thermistor

Fan

MT

POD

POLYGON

MT

LD

TONER

MT

RESIST

ROLLER

SOLENOID

CASSETTE

PAPER

SOLENOID

CED1

PPD1

DSW

DRST

OPE

PWB

SCANNER

MT

CCD

PWB

INVERTER

PWB

CL

CL

TCS

DV

un

HVT

PWB

POWER

SUPPLY

PWB

AC-CORD

120V/60Hz

MCU

PWB

MAIN

MT

DUPLEX

MT

AL

MODEL

ONLY

THERMOSTAT

HL

SCANNER

UN

MPFS

SOLENOID

12-2       Service Manual                                                             Y109500-5

Содержание d-Copia 200D

Страница 1: ...d Copia 200D d Copia 201D Digital Copier SERVICE MANUAL Code Y109500 5...

Страница 2: ...PUBLICATION ISSUED BY Olivetti S p A 77 Via Jervis 10015 Ivrea TO Italy Copyright 2008 Olivetti All rights reserved...

Страница 3: ...y inserting wedges or other items into the switch slot LASER WAVE LENGTH 770 795nm Pulse times 12 88 s 12 88ns 7mm Out put power MAX 0 2mW CAUTION INVISIBLE LASER RADIATION WHEN OPEN AND INTERLOCKS DE...

Страница 4: ...cable only to the 220V model 230V model and 240V model VAROITUS LAITTEEN K YTT MINEN MUULLA KUIN T SS K YTT OHJEESSA MAINITULLA TAVALLA SAATTAA ALTISTAA K YTT J N TURVALLISUUSLUOKAN 1 YLITT V LLE N KY...

Страница 5: ...ical section 8 3 A List 8 3 B Disassembly procedure 8 3 C Assembly procedure 8 4 4 Fusing section 8 5 A List 8 5 B Disassembly procedure 8 5 C Assembly procedure 8 7 5 Tray paper feed transport sectio...

Страница 6: ...This page is intentionally left blank...

Страница 7: ...with USB PCL printer PCL printer function with USB E SORT Electronic sort function Duplex Auto duplex copy print function Shifter Job separator function USB Interface port USB RJ45 Interface port Netw...

Страница 8: ...This page is intentionally left blank 1 2 Service Manual Y109500 5...

Страница 9: ...2 x 5 1 2 Landscape Paper weight 15 21 lbs Paper feed capacity 250 sheets Kinds Standard paper specified paper recycled paper Remark User adjustment of paper guide available Multi bypass paper feed s...

Страница 10: ...on item Details d Copia 200D d Copia 201D Copy magnification Fixed magnification ratios 3 Reduction 2 Enlargement AB system 50 70 86 100 141 200 Inch system 50 64 78 100 129 200 Zooming magnification...

Страница 11: ...x 14 0 V Original position Left Center SPF position Right Center Scan speed OC SPF Max 2 88ms line Protocol TWAIN WIA Only XP Vista STI Interface USB2 0 Full speed support Scanner utility Button Mana...

Страница 12: ...This page is intentionally left blank 2 4 Service Manual Y109500 5...

Страница 13: ...cceptable operating condition 3 Transport condition 4 Supply storage condition No Name Content Life Product name Package 1 Develop cartridge Black x 1 Toner developer cartridge x 1 Toner Net weight 12...

Страница 14: ...n 1 Option 2 Same pack 3 Production month Production day Destination code Dealer distributor OEM etc Production place SOCC Fixed to B End digit of year Version No Production month Production day Desti...

Страница 15: ...r output tray extension 11 Power switch 12 Handle 13 Power cord 1 Front cover 2 Side cover 3 Fusing unit release lever 4 Transfer charger 5 Charger cleaner LAN connector d Copia201Donly Interface USB...

Страница 16: ...indicators Use to sequentially select preset reduction enlargement copy ratios Selected copy ratio is shown by a lit indicator 8 Copy ratio display key Use to verify a zoom setting without changing t...

Страница 17: ...ing performed On line Blinking Printing or data is being received from a computer Off Copying is being performed Off line On Indicates the unit is in a power save mode Blinking Indicates that the unit...

Страница 18: ...toner 4 Cooling fan motor VFM Cools the optical fusing section 5 Resist roller solenoid RRS Resist roller rotation control solenoid 6 Paper feed solenoid CPFS1 Cassette Paper feed solenoid 1 7 Multi p...

Страница 19: ...tte installation detection H at cassette insertion 5 PPD1 sensor PPD1 Transmission sensor Paper transport detection 1 L at paper pass 6 Door switch DSW Micro switch Door open close detection safety sw...

Страница 20: ...ration PWB Operation input display 4 High voltage PWB High voltage control 5 CCD sensor PWB For image scanning 6 LSU motor PWB For polygon motor drive 7 TCS PWB For toner sensor control 8 LSU PWB For...

Страница 21: ...ner on the paper Silicon rubber roller 8 Drum Forms images 9 Transfer unit Transfers images onto the drum 10 Pickup roller Picks up the manual feed paper In multi feed only 11 Manual paper feed tray T...

Страница 22: ...This page is intentionally left blank 4 8 Service Manual Y109500 5...

Страница 23: ...e outlet is properly grounded Be sure to allow the required space around the machine for servic ing and proper ventilation 2 Cautions on handling Be careful in handling the copier as follows to mainta...

Страница 24: ...over and remove the two protective pins from the fusing unit by pulling the strings upward one at a time 3 Push gently on both sides of the front cover to open the cover 4 Remove the TD cartridge from...

Страница 25: ...nter function of the machine The printer driver includes the Print Status Window This is a utility that monitors the machine and informs you of the printing status the name of the document currently b...

Страница 26: ...he machine and your computer 2 Although it is possible to install Button Manager and Desktop Document Manager on Windows 98 Me 2000 XP Vista neither Button Manager nor the scanner function of Desktop...

Страница 27: ...the handle of the paper tray and pull the paper tray out until it stops 4 Push the center of the pressure plate down until it locks in place and lock the plate using the pressure plate lock which has...

Страница 28: ...This page is intentionally left blank 5 6 Service Manual Y109500 5...

Страница 29: ...rum Transfer unit Resist roller Exposure Main high voltage unit Saw tooth Charge Drum Cleaning Cleaning blade Waste toner box Paper release Fusing Separation Heat roller Heater lamp Transfer Transfer...

Страница 30: ...drum surface is removed and col lected by the cleaning blade Step 6 Optical discharge Residual charge on the drum surface is removed by semiconductor laser beam 3 Actual print process Step 1 DC charg...

Страница 31: ...ible image on the drum surface is transferred onto the print paper by applying a positive charge from the transfer corona to the backside of the print paper Step 5 Separation Since the print paper is...

Страница 32: ...the drum because of the strong electrostatic force of the drum To avoid this the process is controlled by adjusting the drum potential and the grid potential of the Scorotron charger Basic function V...

Страница 33: ...beams are radiated through the polygon mirror and various lenses to the OPC drum Printing 7 Electrostatic latent images are formed on the OPC drum according to the laser beams and the latent images ar...

Страница 34: ...solution is 600dpi When copying only the green component is used to print with the printer The color component for printing can be switched to red or blue by the service simulation Spectrum characteri...

Страница 35: ...point Makes the laser scanning speeds at both ends of the drum same as each other B Laser beam path C Composition Effective scanning width 216mm max Resolution 600dpi Beam diameter 75um in the main s...

Страница 36: ...ng resistor in the fusing section to improve transfer efficiency Since the upper heat roller is conductive when using copy paper that contains moisture and the distance between the transfer unit and t...

Страница 37: ...sleeve stopping rotation of the pick up roller 5 At this time the paper is fed passed the paper entry detection switch PPD1 and detected by it After about 0 15 sec from detection of paper by PPD1 the...

Страница 38: ...r to start paper feeding 3 When pawl C of the manual paper feed clutch sleeve is engaged with the manual feed latch the manual feed stopper falls and the manual take up roller rises At that time the m...

Страница 39: ...automatically copies up to 50 sheets of documents of a same size Only one set of copies B Document transport path and basic composition a PPD1 jam PPD1 does not turn off within 4 sec after turning on...

Страница 40: ...attached to the paper exit guide document scanning sec tion by the scanner CCD and detecting the varied quantity SPID ON PSW ON MRMT rotation MM rotation CPFS ON SPFM rotation Document set Document se...

Страница 41: ...ng 1 Remove the charger cleaner from the manual paper feed unit Before disassembly be sure to disconnect the power cord for safety 1 Do not disconnect or connect the connector and the harness while th...

Страница 42: ...the following items The rest of the charger wire must be within 1 5mm Refer to Fig 1 The spring hook section charger wire winding section must be in the range of the projection section Be careful not...

Страница 43: ...the rear cabinet cover 2 Remove two screws and remove the earth wire 3 Disconnect the connector 4 Remove the SPF unit 5 Remove five screws Remove the operation unit and discon nect the connector 6 Rem...

Страница 44: ...age unit 3 Move the core which was passed through the CCD MCU har ness near the CCD PWB connector as shown in the figure below and fix it with a filament tape 19mm wide 40mm long For the attachment re...

Страница 45: ...r mistor 4 Remove the screw and remove the U turn guide Pressure roller section disassembly 5 Remove the three screws remove the fusing cover lower on the right side and open the heat roller section 6...

Страница 46: ...move the spring and remove the lower separation pawls 4 pcs 11 Remove the pressure release levers on the right and the left sides 12 Remove the pressure roller the pressure bearing and the spring Note...

Страница 47: ...t of the current model C Assembly procedure For assembly reverse the disassembly procedure 5 Tray paper feed transport section A List B Disassembly procedure 1 Remove two screws and remove the hinge g...

Страница 48: ...PWB 6 Remove the PWB insulation mylar and remove the paper transport detection sensor PPD2 7 Remove two screws and remove the toner motor 8 Remove two springs and open the intermediate frame unit 1 1...

Страница 49: ...paper exit roller 10 Pull out the paper exit roller knob and remove the belt 11 Release the belt pulley lock and remove the belt pulley bear ing 12 Remove the paper exit roller 13 Remove the harness...

Страница 50: ...and remove the paper guide unit 17 Remove four screws and remove the LSU unit Note for assembling the LSU When installing the LSU turn the LSU clockwise and fix with screws in order to provide an att...

Страница 51: ...the E ring and remove the PS semi circular earth plate and the PS roller unit 22 Remove the E ring and remove the spring clutch from the PS roller unit 23 Remove three screws and remove the TC front...

Страница 52: ...procedure For assembly reverse the disassembly procedure 6 Manual paper feed section A List B Disassembly procedure Multi unit 1 Remove the screw and remove the multi upper cover 1 2 4 5 1 2 3 4 Back...

Страница 53: ...e the multi paper feed upper frame 4 Remove two screws and remove the multi feed bracket unit from the multi paper feed upper frame 5 Remove three E rings and remove the manual paper feed roller B9 1...

Страница 54: ...er so that the resin section is not covered with the seal M1 N 7 Rear frame section A List B Disassembly procedure 1 Remove four screws and remove the rear cabinet and the rear cabinet cover 2 1 1 2 3...

Страница 55: ...fan motor 6 Disconnect the connector 7 Remove the two screws and remove the NIC PWB 8 Disconnect the connector 9 Remove the three screws and remove the NIC PWB unit 10 Disconnect the connectors 11 Rem...

Страница 56: ...onnect the connector 3 Remove the SPF unit A SPF motor 1 Remove the screw 2 Disengage the pawl 3 positions 3 Remove the rear cabinet 1 Remove the screw and remove the harness 2 Remove three screws 3 D...

Страница 57: ...ck up roller unit 1 Remove the shaft 2 Remove the paper feed roller 3 Remove the bearing and the spring 1 Remove the pick up roller 2 Remove the gear C Paper exit roller 1 Remove four gears 2 Remove t...

Страница 58: ...onnectors When assembling attach the blue harness to the marking B side of the sensor and attach the orange harness to the oppo site side sensor E Transport roller 1 Remove the actuator 2 Remove the t...

Страница 59: ...mode To select the adjustment mode use the copy mode select key In the case of the automatic adjustment when the START switch is pressed the mirror base unit moves to the white plate for shading to sc...

Страница 60: ...ing mode To select the adjustment mode with SIM 50 10 use the copy mode select key The relationship between the adjustment modes and the lighting lamps are as shown in the table below Machine with th...

Страница 61: ...14 paper 2 Execute SIM 50 01 to select the image rear edge void amount adjustment mode The set adjustment value is displayed on the copy quantity dis play 3 Make a copy and measure the void amount of...

Страница 62: ...tage section and the devel oping bias voltage are in the specified range C Necessary tool for copy density adjustment One of the following test charts UKOG 0162FCZZ UKOG 0089CSZZ KODAK GRAY SCALE B4 1...

Страница 63: ...ed for 30 sec in the grid voltage HIGH output mode 4 Adjust the control volume VRG1 so that the output voltage is 580 12V B DV bias check Procedures 1 Set the digital multi meter range to DC500V 2 Set...

Страница 64: ...urface printing mode rear end void in duplex copying In a duplex copying operation the paper is delivered starting from the rear end of the first printing surface It is therefore necessary to make a v...

Страница 65: ...ass cover edge and the OC side document glass If the adjustment is completed normally the adjusted value is displayed on the 7seg LCD If it is terminated abnormally the following lamp is turned ON JAM...

Страница 66: ...ace the gray gradation chart UKOG 0162FCZZ used as the correction document so that the density 10 black side comes on the left side and that the chart is upside down at the center of the plate left ce...

Страница 67: ...d Is it the Perform the operation according to the simulation number performed Press the clear key All displays on the operation panel go off and the machine enters the ready state for entering the ma...

Страница 68: ...ort control ON OFF 38 Cancel of stop at drum life over 26 Various setup 39 Memory capacity check 40 Polygon motor OFF time setup Time required for turning OFF after completion of printing 42 Transfer...

Страница 69: ...eed corresponding to the currently set magnification ratio 08 SPF paper feed solenoid operation check SPF model only The SPF paper feed solenoid SPUS is turned ON for 500msec and OFF for 500msec This...

Страница 70: ...ng is terminated This is similar to SIM 07 01 without the aging function 08 01 Developing bias Operation Procedure When the START key is pressed the developing bias is outputted for 30 sec 02 Main cha...

Страница 71: ...T switch is pressed the drum count value is reset to 0 08 Copy counter clear When the PRINT switch is pressed the copy count value is reset to 0 09 Printer counter clear When the PRINT switch is press...

Страница 72: ...number corresponding to the CE mark support setup and press the PRINT switch to enable the setup 38 Cancel of stop at drum life over When this simulation is executed the current setup of the code num...

Страница 73: ...of the code number is displayed Enter the code number and press the PRINT switch to enable the setup 30 01 Paper sensor status display Indicates the paper sensor status using the lamps on the operati...

Страница 74: ...et range 0 99 Default 30 30 pixels 43 01 Fusing temperature setting Normal copy Used to set the fusing temperature of 3rd or later sheet For 1st and 2dns sheets SIM 43 14 is used When this simulation...

Страница 75: ...to the sub code input standby mode 14 Fusing start temperature setting The fusing temperature when starting printing first second sheet is set When this simulation is executed the currently set code n...

Страница 76: ...he simulation mode Use the copy mode select key to select a copy mode The setup value of the selected copy mode is displayed on the copy quantity display adjustment range 1 99 02 Copy density adjustme...

Страница 77: ...ode is returned to the gamma table setup mode PHOTO image process setting When the copy mode select key is pressed in the AE operation mode setting the mode is changed to the PHOTO image process setti...

Страница 78: ...id 10UP key is invalid Remark When SIM 26 06 is changed or SIM 46 19 automatic exposure mode is changed this setting is also changed to the default value 31 Image sharpness adjustment Used to adjust t...

Страница 79: ...the density select key When there is no document in the SPF copy is inhibited 49 01 Flash ROM program writing mode Operating procedure When this simulation is executed d is displayed on the display an...

Страница 80: ...pposite to the scan start position Each mode can be selected by pressing the density select key When there is no document in the SPF copy is inhibited 10 Center offset adjustment Used to adjust the co...

Страница 81: ...in two digits Center value 50 However setup 50 setup 0 When the correction value is set to 0 the correction value is written as 50 Press the copy mode select key to select your desired copy mode and...

Страница 82: ...is executed the current correction value is displayed in 12bit hexadecimal number in 3 digits Place the gray gradation chart UKOG 0162FCZZ used as the correction document face down at the center of t...

Страница 83: ...lighting abnormality H2 00 Thermistor open H3 00 Heat roller high temperature detection H4 00 Heat roller low temperature detection L1 00 Feeding is not completed within the specified time after star...

Страница 84: ...harness and the connector between the thermistor and the PWB Use SIM 14 to clear the self diagnostic display Main code Sub code Details of trouble H3 00 Content Heat roller high temperature detection...

Страница 85: ...home position sensor Main code Sub code Details of trouble L4 01 Content Main motor lock detection Detail When the main motor encoder pulse is not detected for 100 msec Cause Main motor unit abnormal...

Страница 86: ...This page is intentionally left blank 10 20 Service Manual Y109500 5...

Страница 87: ...HOTO indicator will stop blinking and light up steadily The light and dark indicator marked 3 will light up The toner save mode is now active Note To return to the standard mode repeat the procedure b...

Страница 88: ...tep 2 6 Press the light key to return to the normal copy mode 25 Copy effective paper width setting function Bypass tray 1 Large A4 width LETTER 2 Small B5R width INVOICE 26 Copy effective paper width...

Страница 89: ...ror Motor Polygon Motor AC Code LSU KRONOS ASIC 296pin CPU H8S 2321 19 6608MHz EEPROM SDRAM 16Mbyte Reset IC SRAM Driver Flash ROM AFE HT82V24 CDS AGC MPX AD 16bits CCD Driver CCFL x 2 Lamp Inverter f...

Страница 90: ...BSAMP CCD CP AFE_SDI CCD_PHI2 D GND CCD_PHI1 24V1 DSWS 5 MFD DGND 3 PPD1 D GND CED1 D GND LEDPPD1 1 2 D GND 3 AFE_DB4 AFE_DB3 EN5V AFE_DB0 AFE_DB2 AFE_DB1 AFE_DB7 AFE_DB5 AFE_DB6 mt_at_home OP STB D...

Страница 91: ...ID SPMT SPF UNIT SPPD CN1 DHAI 0518QSPZ CN39 24FMN BTK A VCC3 5V 5V D GND P2 P1 P0 RESET P6 P5 P4 P3 PFRR PBSY PACK P7 23 24 D GND DIR3 IT3 SELIN3 AFFFD3 STB FLT SLCT 19 20 21 22 15 16 17 18 11 12 13...

Страница 92: ...section CED1 Machine cassette detection Paper transport section LEDPPD1 PPD sensor power Paper transport section PPD1 PPD sensor Paper transport detection Paper transport section MPFS Multi bypass so...

Страница 93: ...phase control SPF section SPID SPID sensor SPF UN paper entry sensor SPF section LEDSPID SPID sensor power SPF section SPPD SPPD sensor SPF transport detection SPF section LEDSPPD SPPD sensor power S...

Страница 94: ...This page is intentionally left blank 12 6 Service Manual Y109500 5...

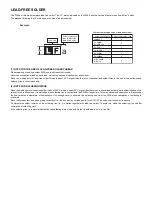
Страница 95: ...ional one it is apt to keep the soldering iron in contact with the PWB for longer time This may cause land separation or may exceed the heat resistive temperature of components Use enough care to sepa...

Страница 96: ...UPDATING STATUS DATE UPDATED PAGES PAGES CODE 05 2008 1ST EDITION 96 Y109500 5...

Отзывы: