


Menu Functions • 43
NOTE
The printer automatically adjusts color balance and
density at appropriate intervals, optimizing the printed
output for bright white paper viewed in natural daylight
conditions. The items on this menu provide a means of
changing the default settings for special or particularly
difficult print jobs. Settings revert to their default values
when the next print job is complete.
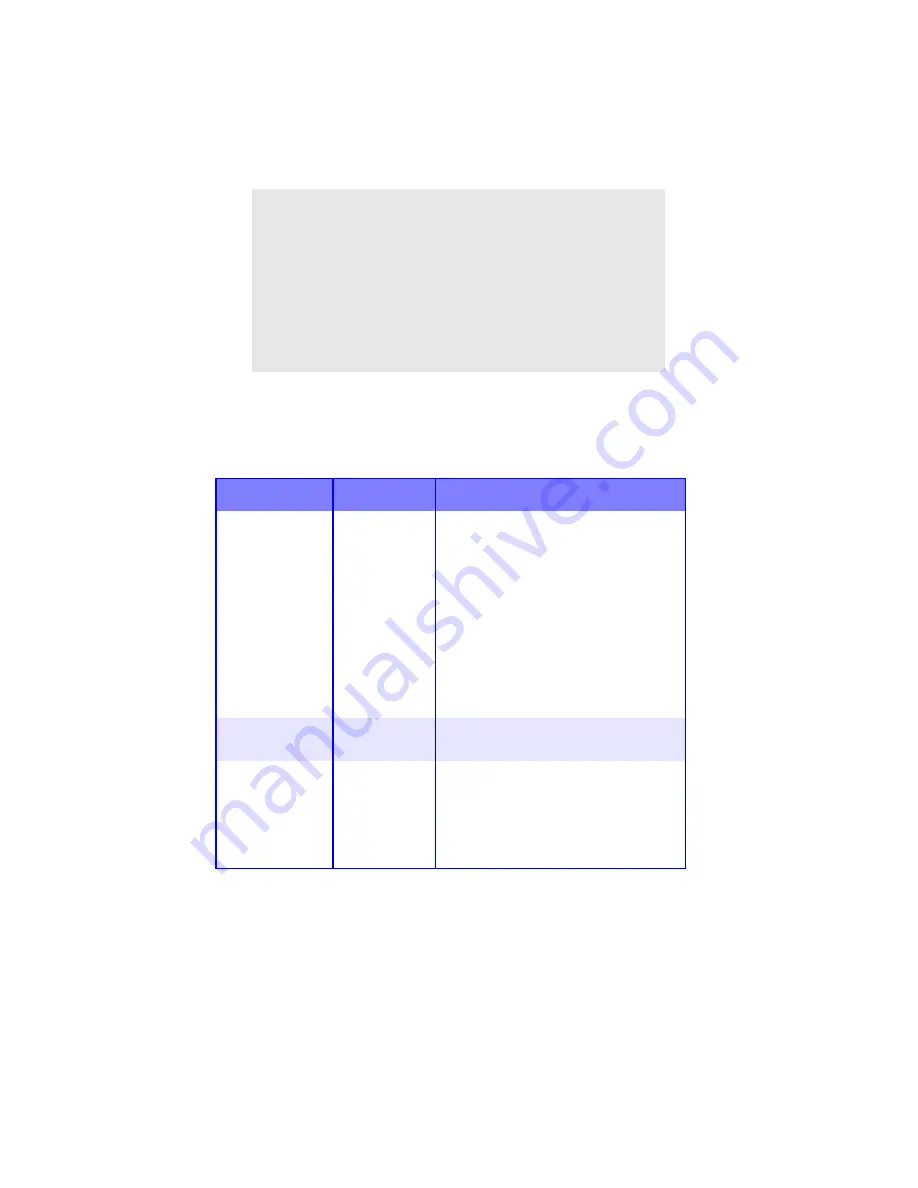
Color Menu
Note:
Factory default settings are shown in
bold
.
Item
Settings
Explanation
DENSITY
CONTROL
AUTO
MANUAL
AUTO = image density is automatically
adjusted:
• at power on
• when a new image drum or toner
cartridge is installed
• at intervals of 100, 300 and 500 drum
counts
Auto adjustment takes up to 55
seconds.
Switch to manual only if you wish to
initiate Density Control manually using
the printer menu.
AUTO DENSITY
EXECUTE
Selecting this will perform the auto
density set up.
COLOR TUNING PRINT
PATTERN
Prints the pattern for the user to
manually adjust TRC. Ordinarily this
function is not needed because TRC is
automatically adjusted. See “Setting
Color Tuning from The Front Panel” on
page 66.
Содержание C5400 Series
Страница 1: ......
Страница 77: ...Replacing Consumables 75 6 Remove the adhesive tape from the underside of the cartridge...
Страница 87: ...Replacing Consumables 85 11 If present remove the silica gel pack 12 Place the image drum in the printer...
Страница 88: ...Replacing Consumables 86 13 Remove the orange drum seal 14 Install the toner cartridge in the image drum...
Страница 95: ...Replacing Consumables 93 11 Close and latch the top cover...
Страница 100: ...Replacing Consumables 98 8 Close and latch the top cover...
Страница 104: ...Clearing Paper Jams 102 5 Close the rear exit 6 Close the top cover...
Страница 112: ...Clearing Paper Jams 110 3 Close the front cover...
Страница 114: ...Clearing Paper Jams 112 2 Remove any jammed sheets...
Страница 116: ...Clearing Paper Jams 114 3 Pull the duplexer lid to unlock it 4 Open the lid and remove the jammed sheet...
Страница 119: ...Clearing Paper Jams 117 2 Open the front cover 3 Remove any jammed sheets 4 Close the front cover...
Страница 121: ...Clearing Paper Jams 119 2 Remove any jammed sheets 3 Close the front cover...
Страница 202: ...Windows PCL Emulation Driver 200 3 On the Setup tab under 2 Sided Printing select Long Edge or Short Edge 4 Click Print...


