background image

Using the Operator Panel 

2-88

ADVANCED OPERATION GUIDE

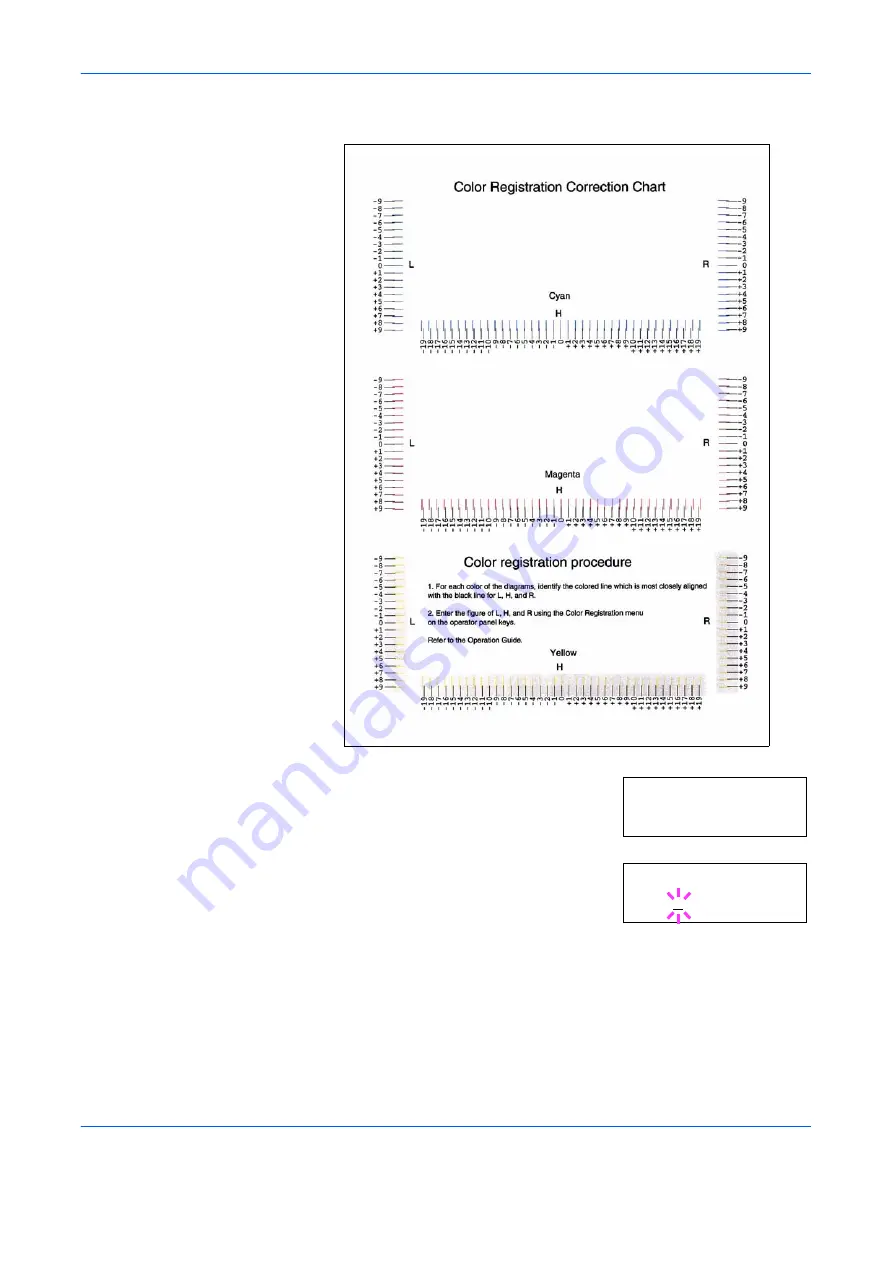
Sample Color Registration Correction Chart

9

Press 

U

 or 

V

 repeatedly until 

>>Adjust 

Cyan

 appears. 

10

Press

 [OK] ([ENTER])

0

 or 

00

 will be 

displayed for each value and the cursor will 
flash under the left (

L

) value.

11

Look at the left chart (L) in the cyan portion of the color registration 
correction chart. Find the two lines that most seem to overlap as a single 
straight line and note the number value listed there. In the example below 
the value would be -2. (Be careful of plus [+] and minus [-] numbers.)

>>Adjust Cyan

 L=   H=    R=

>>Adjust Cyan

 L= 0 H= 00 R= 0

Содержание PP18C

Страница 1: ...1 1 1 Oc PP18C Advanced Operation Guide Education Services Oc Operation Guide English version...

Страница 2: ......

Страница 3: ...ult Settings 2 37 Pagination 2 44 Setting Print Quality 2 49 Operating the Storage Device 2 51 Paper Handling 2 60 Selecting Monochrome or Color Printing 2 74 Reading Life Counters 2 75 Other Modes 2...

Страница 4: ...Contents ii ADVANCED OPERATION GUIDE...

Страница 5: ...how choose handle and load paper 2 Using the Operator Panel Explains how to use the operator panel to configure the printer 3 Options Shows the available options 4 Computer Interface Describes the pos...

Страница 6: ...ure mode or key Press Copy Notes Used to provide additional or useful information about a function or feature Can also contain references to other publications NOTE For information about storing the p...

Страница 7: ...ADVANCED OPERATION GUIDE 1 1 1 Handling Paper This chapter contains explanations on the following topics General Guidelines 1 2 Selecting the Right Paper 1 4 Paper Type 1 12 Loading Paper 1 13...

Страница 8: ...ficant difference between grades is the ease with which they pass through the machine This is affected by the smoothness size and moisture content of the paper and the way in which the paper is cut Th...

Страница 9: ...mum performance Moisture content 4 to 6 Direction of grain Long grain Pulp content 80 or more Item Specification 148mm 5 13 16 inches 210mm 8 1 4 inches 216mm 8 1 2 inches 356mm 14 inches Minimum Pape...

Страница 10: ...ive off harmful fumes Bond paper should contain at least 80 pulp Not more than 20 of the total paper content should consist of cotton or other fibers Paper Sizes Cassettes and the MP Tray are availabl...

Страница 11: ...iple sheet feeding or print quality problems such as blurring because of poor toner fusing The recommended basis weight is between 60 and 105 g m 16 and 28 lb ream for the cassette and between 60 and...

Страница 12: ...appearance When the relative humidity is low and the paper loses moisture the edges shrink and tighten and print contrast may suffer Wavy or tight edges can cause jams and alignment anomalies The mois...

Страница 13: ...the paper Whiter paper provides a sharper brighter appearance Quality control Uneven sheet size corners that are not square ragged edges welded uncut sheets and crushed edges and corners can cause the...

Страница 14: ...owards the printer To avoid problems stack transparencies face up on the face up tray option When unloading transparencies e g for clearing jams hold them carefully by the edges to avoid leaving finge...

Страница 15: ...tack of postcards and align the edges before loading them in the MP tray Make sure the postcards you are going to set are not curled Feeding curled postcards may cause paper jams Some postcards have r...

Страница 16: ...r If jams occur try setting a lesser number of envelopes on the MP tray To avoid jams caused by curled envelopes stack no more than 10 printed envelopes on the output tray Thick Paper Fan the stack of...

Страница 17: ...the printing process and must not be affected by silicone oil Do not use paper with any kind of surface treatment such as the type of paper commonly used for calendars Recycled paper Select recycled p...

Страница 18: ...Paper Type Paper source MP tray Paper Cassette Paper Weight Duplex path MP tray available only in Cassette mode Plain Yes Yes Normal 2 Yes Transparency Yes No Extra Heavy No Preprinted Yes Yes Normal...

Страница 19: ...paper in the cassette and the MP tray Loading Paper into the Cassette 1 Fan the media paper transparencies then tap it on a level surface to avoid media jams or skewed printing 2 Pull the paper casse...

Страница 20: ...tte 4 Turn the paper size dial so that the size of the paper you are going to use appears in the paper size window NOTE When the paper size dial is set to OTHER the paper size must be set into the pri...

Страница 21: ...r and slide the paper stopper to the desired paper size When using non standard size paper move the paper guides and paper stopper all the way out insert the paper then adjust the paper guides and pap...

Страница 22: ...Slide the paper into the paper cassette NOTE Do not load more paper than will fit under the load limits on the paper guides The paper cassette will hold approximately 500 sheets of 80g m 21 lb paper w...

Страница 23: ...9 Insert the paper cassette into the slot in the printer Push it straight in as far as it will go There is a paper gauge on the right side of the front of the paper cassette to indicate the remaining...

Страница 24: ...IDE Loading Paper into the MP Multi Purpose Tray 1 Fan the media paper transparencies then tap it on a level surface to avoid media jams or skewed printing 2 Pull the MP tray towards you until it stop...

Страница 25: ...e when you load Legal size paper U S A only 5 Adjust the position of the paper guides on the MP tray Standard paper sizes are marked on the MP tray For standard paper sizes slide the guides to the pos...

Страница 26: ...nside of the MP tray If the paper is considerably curled in one direction for example if the paper is already printed on one side try to roll the paper in the opposite direction to counteract the curl...

Страница 27: ...tor Panel 2 3 Canceling a Printing Job 2 10 Using the Menu Selection System 2 11 Status Pages 2 15 e MPS 2 18 Changing the Interface Parameters 2 29 Making Default Settings 2 37 Pagination 2 44 Settin...

Страница 28: ...ication software NOTE Changes to printer settings made using a software application override changes made using the operator panel You can also rely on other printer utilities such as KM NET for Clien...

Страница 29: ...ht keys and three indicators LED Messages that appear on the display and functions of indicators and keys are explained in this chapter Message Display The message display on the operator panel shows...

Страница 30: ...ually on the operator panel For details see Color Calibration on page 2 90 Ready The printer is ready to print Processing The printer is receiving data to print This is also shown when the printer is...

Страница 31: ...er size of the current cassette The default paper cassette is determined by the operator panel keys For details see Paper Handling on page 2 60 While the printer is printing the paper size used to for...

Страница 32: ...pe 10 4 1 8 x 9 1 2 inches HA Hagaki 100 148mm OH Oufuku Hagaki 200 148mm O2 Oficio II 8 1 2 13 inches 16K 16 kai 197 273mm ST Statement 5 1 2 8 1 2 inches FO Folio 210 330mm Y2 Yokei 2 114 162mm Y4 Y...

Страница 33: ...ob by switching the printer off line Print and feed out one page when the printer displays Waiting Indicator Description Flashing Indicates an error that you can resolve For details see the Troublesho...

Страница 34: ...option serial interface Option option network interface 2 Press OK ENTER Cancelling data appears on the message display and printing stops after the current page is printed MENU Key MENU lets you ente...

Страница 35: ...s Set the paper source when Use alternative is shown in the message display NOTE If you hold down OK ENTER and press MENU when Ready is shown on this printer the AdministrationID menu will be displaye...

Страница 36: ...el appears on the message display followed by the interface in use The interface is indicated by one of the following messages Parallel FS C5030N only USB Network Serial option serial interface Option...

Страница 37: ...display NOTE Settings that are received from application software and the printer driver will take priority over settings made in the operator panel Entering the Mode Selection Menu Press MENU when R...

Страница 38: ...menu and press OK ENTER to set or change the configuration Press U or V to display the desired item and OK ENTER to finalize the value or selections set Cancelling Menu Selection If you press MENU wh...

Страница 39: ...selection system Printing a Menu Map The printer prints a full list of the menu selection system Menu Map Note that menus shown in the list may vary depending on which optional units installed in the...

Страница 40: ...Using the Operator Panel 2 14 ADVANCED OPERATION GUIDE Menu Map Sample MENU MAP...

Страница 41: ...o the printer Printing a Status Page You can check the printer s current status including available memory space and option settings by printing a status page 1 Press MENU 2 Press U or V repeatedly un...

Страница 42: ...s and values on the status page may vary depending on the printer s firmware version 1 Firmware Version This item shows the version and release date of the printer firmware 2 Hardware Information This...

Страница 43: ...s all available emulations of the printer The PCL 6 emulation is set as default when the printer is shipped from the factory The emulations are PCL 6 KPDL3 8 Error Log This item shows the last three i...

Страница 44: ...nter driver through the application software Quick Copy Proof and Hold Private Print Stored Job Primary function To later print additional copies To proof the first copy before printing multiple copie...

Страница 45: ...tion only Using Quick Copy This mode enables you to print the requested number of copies of a job simultaneously storing the job on the hard disk RAM disk When additional copies are required you can r...

Страница 46: ...to let the title of the job to be deleted displayed 2 When the title of the job to be deleted is displayed e g Report press OK ENTER The cursor below the copy count starts to blink 3 Press V repeated...

Страница 47: ...the printer driver if printing with PIN security is required Then the access code must be entered on the operator panel to print a stored job Print data will be stored in the hard disk after printing...

Страница 48: ...ing procedure Jobs saved using Private Print will be automatically deleted if you turn the power off after printing but jobs saved using Stored Job will not be deleted automatically 1 Follow steps 1 t...

Страница 49: ...el 1 Press MENU 2 Press U or V repeatedly until e MPS appears 3 Press Z 4 Press U or V repeatedly until List of Code JOB appears 5 Press OK ENTER A question mark appears 6 Press OK ENTER again The pri...

Страница 50: ...estion mark appears 6 Press OK ENTER The document in the mailbox is printed and automatically deleted from the mailbox Printing a List of VMB A Virtual Mailbox list includes the jobs currently stored...

Страница 51: ...ce assigned to temporary code jobs Maximum space assigned to permanent code jobs Maximum space assigned to virtual mailboxes NOTE The total amount of storage areas specified must not exceed the total...

Страница 52: ...m 0 to 9999 megabytes The actual maximum size depends on the size of free hard disk space The default size is 1 6 of the total hard disk space rounded off in units of 50MB For example if the total har...

Страница 53: ...PS Configuration 5 Press Z 6 Press U or V and select Perm Code JOB Size 7 Press OK ENTER the message display shows a blinking cursor _ 8 Press U or V to increase or decrease respectively the value at...

Страница 54: ...elect VMB Size 7 To change the maximum size press OK ENTER The message display shows a blinking cursor _ 8 Press U or V to increase or decrease respectively the value at the blinking cursor Use Z and...

Страница 55: ...nterface supports a bi directional high speed mode according to IEEE standards Normally this interface is used under the default setting Auto For details see Parallel Interface FS C5030N only on page...

Страница 56: ...al serial interface board kit IB 11 installed You can confirm or change the serial interface parameters including baud rate data bits stop bits parity and protocol These parameters must match those of...

Страница 57: ...g question mark appears 7 Press U or V to scroll through values When 115200 is displayed press OK ENTER Press MENU to exit the menu selection NOTE Some computers may not be able to handle a baud rate...

Страница 58: ...Enter IP address subnet mask address and default gateway address Determine whether to print a network status page when the printer is turned on 1 Press MENU 2 Press U or V repeatedly until Interface a...

Страница 59: ...o the network using TCP IP protocol you must set the IP address on the printer The IP address must be unique to the printer and should be obtained from your network administrator 1 Activate TCP IP pro...

Страница 60: ...6 Press U or V to move to Subnet Mask Perform the same procedure to complete entering the subnet mask address 7 Then press U or V to move to Gateway Perform the same procedure to complete entering th...

Страница 61: ...optional network interface card For details see the manual for the network interface 1 Press MENU 2 Press OK ENTER repeatedly until Interface appears 3 If the interface is other than network press OK...

Страница 62: ...Using the Operator Panel 2 36 ADVANCED OPERATION GUIDE 9 Press MENU The display returns to Ready The printer prints a network status page as an example shown in the following illustration...

Страница 63: ...select KPDL AUTO in the following procedure 1 Press MENU 2 Press U or V repeatedly until Emulation appears on the message display One of the emulation modes appears indicating the emulation currently...

Страница 64: ...efault font can be one of the internal fonts or a font that is downloaded to the printer memory or stored on memory card or hard disk In this menu you can also set the type and pitch for Courier and L...

Страница 65: ...When the desired font is displayed press OK ENTER 8 Press MENU The display returns to Ready Selecting Regular or Dark Courier Letter Gothic Courier or Letter Gothic font thickness can be selected as...

Страница 66: ...tedly until Font appears 3 Press Z Press U or V until Font Select appears 4 Make sure that Internal is displayed and press Z 5 Press U or V repeatedly until Size appears 6 Press OK ENTER A blinking cu...

Страница 67: ...ing cursor _ appears 7 Press U or V to increase or decrease the value at the blinking cursor The character pitch can be set between 0 44 and 99 99 characters per inch in 0 01 character per inch increm...

Страница 68: ...of the internal fonts or the optional fonts including downloaded fonts 1 Press MENU 2 Press U or V repeatedly until Font appears 3 Press Z 4 Press U or V repeatedly until List of Internal Fonts or Li...

Страница 69: ...2 43 Samples of Fonts List Internal Scalable and Bitmapped Fonts List Font Name Scalable Bitmap Password Selection FSET Font ID PRESCRIBE Internal Scalable and Bitmapped Fonts List Font Name Scalable...

Страница 70: ...Press U or V repeatedly until Page Set appears 3 Press Z 4 Press U or V repeatedly until Copies appears 5 Press OK ENTER A blinking cursor _ appears 6 Press U or V to increase or decrease respectivel...

Страница 71: ...e Page Protect Menu does not normally appear however Page Protect will be forcibly set to On if a print overrun error occurs because the print job is too complex When this has happened be sure to rese...

Страница 72: ...efault CR and LF A linefeed and carriage return are performed Ignore LF The linefeed is ignored 1 Press MENU 2 Press U or V repeatedly until Page Set appears 3 Press Z 4 Press U or V repeatedly until...

Страница 73: ...until CR Action appears 5 Press OK ENTER A blinking question mark appears 6 Press U or V repeatedly until the desired carriage return action appears 7 When the desired action is displayed press OK ENT...

Страница 74: ...NCED OPERATION GUIDE 4 Press U or V repeatedly until Wide A4 appears 5 Press OK ENTER A blinking question mark appears 6 Select On or Off using U or V 7 Press OK ENTER 8 Press MENU The display returns...

Страница 75: ...halftone for text solid objects etc Either of these tone modes consistently affects all objects on a page The Fine tone mode provides a print quality better than Normal but the printing speed is slowe...

Страница 76: ...the paper used printing in gloss mode may cause wrinkle in paper To reduce wrinkle try using thicker paper 1 Press MENU 2 Press U or V repeatedly until Print Quality appears 3 Press Z 4 Press U or V...

Страница 77: ...ration of the memory card Using the Memory Card The printer is equipped with a slot for a memory card By inserting a memory card into the printer the following operations become available Reading Font...

Страница 78: ...the data in the memory card 1 Press MENU 2 Press U or V repeatedly until Memory Card appears 3 Press Z 4 Press U or V repeatedly until Read Data appears Report in this example 5 Press OK ENTER A blin...

Страница 79: ...d See Formatting a Memory Card on page 2 55 1 Press MENU 2 Press U or V repeatedly until Memory Card appears 3 Press Z 4 Press U or V repeatedly until Write Data appears 5 Press OK ENTER A question ma...

Страница 80: ...taining only to the data just written To see all data contained in the memory card at once print a list of data names as explained See Printing a List of Data Names Partitions on page 2 56 Deleting Da...

Страница 81: ...be used in the printer Formatting allows data to be written to the memory card NOTE Formatting will destroy any existing data on a storage device including a used memory card Formatting of the memory...

Страница 82: ...to Ready Printing a List of Data Names Partitions The printer prints a list of all data names referred to as partitions stored in a memory card for reference Printing a list is also available for a f...

Страница 83: ...s on the hard disk Reading data List of Partitions Item Description Device Name Number MEMORY CARD A is indicated for the memory card Capacity The total capacity of the memory card in kilobytes Used S...

Страница 84: ...tive only when the printer is powered up To use the RAM disk activate and enter the desired size of the RAM disk in the manner described below The maximum RAM disk size can be calculated as follows Ma...

Страница 85: ...blinking question mark appears Press U or V to select On Press OK ENTER 4 Press Z Press U or V repeatedly until RAM Disk Size appears The data size also appears 5 Press OK ENTER A blinking cursor _ a...

Страница 86: ...automatically feeds paper placed on the MP tray overriding another paper source that is selected on the printer driver After all sheets in the MP tray have been used up approximately 100 sheets paper...

Страница 87: ...TE Feeding the paper having a paper size which does not match the current paper size from the MP tray can cause paper jam 1 Press MENU 2 Press U or V repeatedly until Paper Handling appears 3 Press Z...

Страница 88: ...ting is plain paper For more information about paper types that can be fed from the MP tray see Paper Availability on page 1 2 1 Press MENU 2 Press U or V repeatedly until Paper Handling appears 3 Pre...

Страница 89: ...you use a non standard size paper load the paper and turn the paper size dial to OTHER see Loading Paper on page 1 13 1 Press MENU 2 Press U or V repeatedly until Paper Handling appears 3 Press Z 4 Pr...

Страница 90: ...g the Unit of Measurement 1 Press Z 2 Press U or V repeatedly until Unit appears The unit of measurement can be selected between millimeters and inches The current unit of measurement is displayed the...

Страница 91: ...TER 8 Press MENU The display returns to Ready 9 To print using the custom size set above define the same custom size on the printer driver For details see KX Printer Drivers Operation Guide Setting th...

Страница 92: ...xit the menu selection press MENU Selecting the Paper Feed Source You can select the paper source from which the printer feeds paper as the default If an optional paper feeder s is installed it is als...

Страница 93: ...duplexer is done by selecting either short edge or long edge binding mode NOTE To use this function the optional duplexer must be installed on the printer Duplex printing can be also performed from t...

Страница 94: ...d when the optional duplexer is installed 1 Press MENU 2 Press U or V repeatedly until Paper Handling appears 3 Press Z 4 Press U or V repeatedly until Duplex Mode appears 5 To activate duplex printin...

Страница 95: ...paper size in the current cassette differs from the paper size formatting the job By default this feature is off 1 Press MENU 2 Press U or V repeatedly until Paper Handling appears 3 Press Z 4 Press...

Страница 96: ...aper type to be customized as follows For how to reset the customized settings see Resetting the Custom Paper Type on page 2 72 1 Press MENU 2 Press U or V repeatedly until Paper Handling appears 3 Pr...

Страница 97: ...per Availability on page 1 2 Light Normal 1 Normal 2 Normal 3 Heavy 1 Heavy 2 Heavy 3 Extra Heavy 5 When the desired paper thickness is displayed press OK ENTER 6 Press MENU The display returns to Rea...

Страница 98: ...he Custom Paper Type 1 Press MENU 2 Press U or V repeatedly until Paper Handling appears 3 Press Z 4 Press U or V repeatedly until Reset Type Adjust appears 5 To reset all custom paper types press OK...

Страница 99: ...U or V repeatedly until Stack Select appears 5 To change the output stack press OK ENTER A blinking question mark appears 6 Press U or V select output stack Top tray FaceDn or Rear tray FaceUp 7 When...

Страница 100: ...y default the printer is set to print in color mode 1 Press MENU 2 Press U or V repeatedly until Color Mode appears 3 To change color mode press OK ENTER A blinking question mark appears 4 Press U or...

Страница 101: ...xit the menu selection press MENU Resetting the Toner Counter The toner containers must be replaced when the printer displays the Low toner or Replace toner message which will be given depending on th...

Страница 102: ...until the message display shows the toner container of the color you replaced C yan M agenta Y ellow or blac K For example to reset the Cyan toner counter display New Toner C Installed 6 Press OK ENTE...

Страница 103: ...essage Language You can select the language of the message display by following the procedure given below You can optionally download messages in other languages Contact your service technician for in...

Страница 104: ...l Form Feed Time Out appears 5 To change the timeout time press OK ENTER A blinking cursor _ appears 6 Press U or V to increase or decrease the value at the blinking cursor and set the desired time Th...

Страница 105: ...ime You can adjust the length of time the printer waits before entering Auto Sleep in the absence of data The printer reverts to normal operation mode when the printer receives a print job the operato...

Страница 106: ...received by the printer as hexadecimal code for debugging programs and files 1 Press MENU 2 Press U or V repeatedly until Others appears 3 Press Z 4 Press U or V repeatedly until Print HEX DUMP appear...

Страница 107: ...ont etc set by commands to their default values Downloaded fonts and macros are deleted from the printer s memory 1 Press MENU 2 Press U or V repeatedly until Others appears 3 Press Z 4 Press U or V r...

Страница 108: ...ars 3 Press Z 4 Press U or V repeatedly until Resource Prot appears 5 Press OK ENTER A blinking question mark appears 6 Press U or V to select Permanent or Perm Temp Permanent Temporary for resource p...

Страница 109: ...s U or V to display the desired alarm The display changes as shown below Error Ready Job End Key Confirm 7 Press OK ENTER A blinking question mark appears 8 Select On or Off using U or V 9 Press OK EN...

Страница 110: ...and one person causes one of the above errors after the set period of time elapses the data sent from the next person is printed The default setting is Off Auto Error Clear disabled The auto clear err...

Страница 111: ...ase or decrease the value at the blinking cursor and set the desired time The time must be set between 000 and 495 seconds in 5 second increments If set to 000 printing will be continued immediately w...

Страница 112: ...default setting is Off 1 Press MENU 2 Press U or V repeatedly until Others appears 3 Press Z 4 Press U or V repeatedly until Finishing Error appears 5 Press Z and display Duplex 6 Press OK ENTER A bl...

Страница 113: ...atedly until Others appears 3 Press Z 4 Press U or V repeatedly until Color Registration appears 5 Press Z 6 Press U or V repeatedly until Print Regist Chart appears 7 Press OK ENTER A question mark a...

Страница 114: ...yed for each value and the cursor will flash under the left L value 11 Look at the left chart L in the cyan portion of the color registration correction chart Find the two lines that most seem to over...

Страница 115: ...t press OK ENTER 15 Press V Adjust Magenta will be displayed and once you complete the settings for that color Adjust Yellow will be displayed Perform the same operation as you did for the cyan chart...

Страница 116: ...rs 7 Press OK ENTER A question mark appears 8 Press OK ENTER The display indicates Processing and printing starts Color Calibration This printer contains a calibration function that automatically make...

Страница 117: ...tion appears 7 To let the printer perform color calibration press OK ENTER A question mark appears to let you confirm the execution of calibration 8 Press OK ENTER The message display shows Please wai...

Страница 118: ...Using the Operator Panel 2 92 ADVANCED OPERATION GUIDE...

Страница 119: ...apter contains explanations on the following topics General Information 3 2 Expansion Memory Modules 3 3 General Description of Options 3 6 IB 21E IB 23 Network Interface Cards 3 10 For availability o...

Страница 120: ...uded with the option Some options are explained in the following sections Duplex Unit DU 301 Paper Feeder PF 60 FS C5015N 1 FS C5025N FS C5030N 3 Memory Card CF Expansion Memory DIMM 64 128 256 512MB...

Страница 121: ...e 128MB memory module and install two 512MB memory modules NOTE The expansion memory should only be installed by your service technician We shall not be liable for any damages caused by improper insta...

Страница 122: ...off the printer and unplug the printer power cord 2 Unscrew two screws at the back of the main controller board 3 Pull out the main controller board gently 4 Push out the clamps on both ends of the me...

Страница 123: ...e memory modules 7 After you finish installing the memory modules reinstall the main controller board and fasten it with screws Removing a Memory Module To remove a memory module remove the main contr...

Страница 124: ...om the control panel or automatically when you power on or reset the printer To manually read data in the memory card see Using the Memory Card on page 2 51 NOTE Before inserting a memory card in the...

Страница 125: ...feeder DU 301 Duplex Unit The duplex unit is attached to the bottom of the printer and allows you to print onto both sides of the paper Printing on both sides can be performed using ISO A4 ISO A5 JIS...

Страница 126: ...e up output tray perform the following procedures 1 Install the paper stopper according to the size of paper to be used 2 Install the face up output tray on the rear of the printer or the duplexer Leg...

Страница 127: ...slot If a hard disk is installed in the printer received data can be rasterized and stored on this hard disk This enables high speed printing of multiple copies using an electric sort function Also y...

Страница 128: ...SPX NetBEUI and Appletalk protocols so that the printer can be used on network environments including Windows Macintosh UNIX NetWare etc The network interface card must be installed in the option inte...

Страница 129: ...s chapter contains explanations on the following topics General Information 4 2 Parallel Interface FS C5030N only 4 3 USB Interface 4 5 Serial Interface FS C5030N only 4 6 RS 232C Protocol FS C5030N o...

Страница 130: ...the printer s parallel FS C5030N only USB and serial option FS C5030N only interfaces It also lists pin assignments signal functions timings connector specifications and voltage levels This chapter e...

Страница 131: ...ace Explanation of each signal is also given in the table The description in indicates signal names in Auto mode and Nibble high mode IEEE 1284 compliant In Auto and Nibble modes these signals are bid...

Страница 132: ...18 5 V DC This pin is used for the printer s 5 V DC power supply 5 0 5 V 400 mA maximum with fuse 19 Ground return 20 Ground return 21 Ground return 22 Ground return 23 Ground return 24 Ground return...

Страница 133: ...peed USB Connectors Printer B type receptacle female with upstream port Cable B type plug male Cable Use a shielded cable that complies with USB 2 0 Hi Speed USB and not longer than 5 meters 16 feet T...

Страница 134: ...ption 1 FG Frame Ground This pin is connected directly to the printer frame 2 Out TXD Transmit Data This pin is used to output asynchronous data sent from the printer to the computer This signal is of...

Страница 135: ...y H5 Protocol logic H6 Buffer nearly full threshold H7 Buffer nearly empty threshold H8 Received data buffer size The parameters can be changed from the printer operator panel To change the value for...

Страница 136: ...ithout notice The difference between the nearly full and nearly empty thresholds allows the computer to send a fairly large amount of data in a continuous stream H8 Received data buffer size The input...

Страница 137: ...lating XON XOFF when an error has occurred on the serial interface The following table summarizes the error status corresponding to different D0 values Timing of XON transfer to host while Ready or Wa...

Страница 138: ...er s current parameter settings reset them to the values shown above i e baud rate 9600 bps etc You can perform parameter settings from the operation panel See Changing Serial Interface Parameters FS...

Страница 139: ...ble click on System 3 System Properties window opens Click on the Device Manager tab then double click on Ports COM LPT 4 Double click on Communications Port 5 The Communications Port Properties dialo...

Страница 140: ...Computer Interface 4 12 ADVANCED OPERATION GUIDE...

Страница 141: ...nit for expressing resolution EcoPrint This is a printing mode that reduces toner consumption Pages printed in the EcoPrint mode are lighter than pages printed in the normal mode Emulation This refers...

Страница 142: ...uts made in one minute Printer driver The printer driver makes it possible for you to print data created using application software The printer driver for the printer is contained on the CD ROM suppli...

Страница 143: ...7 E e MPS changing configuration 2 25 general information 2 18 how to change hard disk spaces 2 25 printing a list of code jobs 2 23 Emulation appearing on the status page 2 17 KPDL printing errors 2...

Страница 144: ...ndicators included 2 5 status information 2 3 MP tray defined Glossary 2 first mode cassette mode 2 60 setting the paper size 2 61 setting the paper type 2 62 N Network interface a sample of the netwo...

Страница 145: ...0 Tone mode 2 49 R RAM disk setup 2 51 Recycled paper 1 11 Reset resetting the printer 2 81 Resource protection description 2 82 S Serial interface changing parameters 2 30 computer interface 4 10 pro...

Страница 146: ...ADVANCED OPERATION GUIDE Index 4...

Страница 147: ...A1...

Страница 148: ......

Страница 149: ...is a trademark of Kyocera Corporation 2006...

Страница 150: ...Rev 1 0 2006 6...

Отзывы: