


5
Troubleshooting
5-4
CS172
5.2
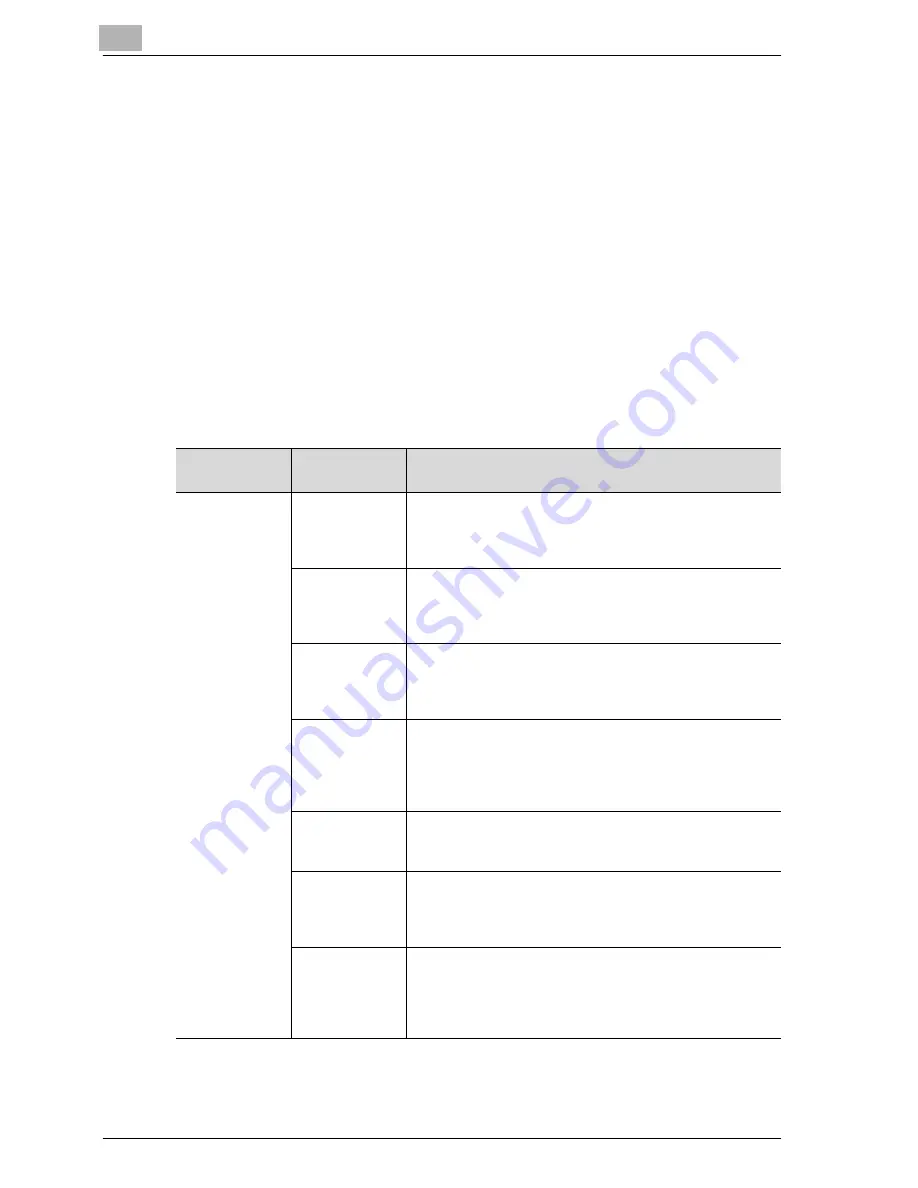
Cannot receive messages
When a document cannot be received, try to correct the problem by referring
to the table below. If the document still cannot be received properly even
after attempting to correct the problem, please contact your service
representative.
!
Detail
Refer to "Error message displayed" on page 5-6 for information
regarding error messages.
Refer to the User manual [Copy Operations] provided with the FK-502 for
problems such as jamming of originals, paper jams, poor image quality
or running out of toner.
Description of
Problem
Check Points
Corrective Actions
Cannot receive
Is paper in the
machine?
If the add paper icon is lit, the machine is out of paper and
received documents are stored in memory. Add paper. Re-
fer to the User manual [Copy Operations] for the procedure
for adding paper.
Is paper
jammed in the
machine?
In case of paper jam, received documents are stored in
memory. Removed the jammed paper. Refer to the User
manual [Copy Operations] for the procedure for correcting
paper jams.
Is the machine
out of toner?
No mail can be received if the toner has exhausted. Re-
place the toner bottle immediately. Refer to the User man-
ual [Copy Operations] for the procedure for replacing the
toner bottle.
Is the FK-502
set to manual
reception?
If [Receive Mode] of [Telephone Line Setting] in the Utility
Mode is set to [Manual RX], it is necessary to perform the
reception procedure manually. Perform the manual recep-
tion procedure by referring to "Manual reception (tele-
phone only mode)" on page 4-5.
Is the telephone
line connected
properly?
Is the telephone line disconnected? Check the telephone
line connection and connect it if it is disconnected.
Is the FK-502
set to closed
area communi-
cation?
If the closed area communication function (to prevent re-
ception of unwanted documents) is set, documents will
only be received from specific destination facsimiles.
Has a wrong
SUB been sent
in F code from
the sender
side?
When a wrong sub-address is received with the Confiden-
tial User Box or Relay User Box set, there may occurs a
communication error, thus resulting in the reception una-
vailable. Check the sender side to see if the sub-address
is set.
Содержание CS172 FK-502
Страница 1: ...Oc CS172 FK 502 User Manual Facsimile Operations...
Страница 14: ...Contents 12 CS172...
Страница 15: ...1 Introduction...
Страница 16: ......
Страница 40: ...1 Introduction 1 26 CS172...
Страница 41: ...2 Before use...
Страница 42: ......
Страница 68: ...2 Before use 2 28 CS172...
Страница 69: ...3 Transmission...
Страница 70: ......
Страница 127: ...4 Reception...
Страница 128: ......
Страница 146: ...4 Reception 4 20 CS172...
Страница 147: ...5 Troubleshooting...
Страница 148: ......
Страница 154: ...5 Troubleshooting 5 8 CS172...
Страница 155: ...6 Specifications...
Страница 156: ......
Страница 158: ...6 Specifications 6 4 CS172...
Страница 159: ...7 Transmission applications...
Страница 160: ......
Страница 211: ...8 Useful functions for reception...
Страница 212: ......
Страница 220: ...8 Useful functions for reception 8 10 CS172...
Страница 221: ...9 Polling...
Страница 222: ......
Страница 237: ...10 Registering Settings...
Страница 238: ......
Страница 240: ...10 Registering Settings 10 4 CS172 3 Press Fax Fax Registration screen appears...
Страница 286: ...10 Registering Settings 10 50 CS172 3 Press User Box 4 Press Public Personal User Box 5 Press New...
Страница 290: ...10 Registering Settings 10 54 CS172 3 Press User Box 4 Press Bulletin Board User Box 5 Press New...
Страница 294: ...10 Registering Settings 10 58 CS172 3 Press User Box 4 Press Relay User Box 5 Press New...
Страница 298: ...10 Registering Settings 10 62 CS172...
Страница 299: ...11 Utility mode...
Страница 300: ......
Страница 303: ...Utility mode 11 CS172 11 5 Exiting from administrator setting 1 Press Exit on the sub area...
Страница 316: ...11 Utility mode 11 18 CS172 6 Press Close The value of the parameter is changed 7 Press Exit on the sub area...
Страница 319: ...Utility mode 11 CS172 11 21 6 Press Close The value of the parameter is changed 7 Press Exit on the sub area...
Страница 324: ...11 Utility mode 11 26 CS172 6 Press Close The value of the parameter is changed 7 Press Exit on the sub area...
Страница 371: ...Utility mode 11 CS172 11 73 6 Press Close The value of the parameter is changed 7 Press Exit on the sub area...
Страница 384: ...11 Utility mode 11 86 CS172...
Страница 385: ...12 Explanation of reports and lists...
Страница 386: ......
Страница 393: ...Explanation of reports and lists 12 CS172 12 9 Detail Some items may not be indicated depending on the optional settings...
Страница 438: ...12 Explanation of reports and lists 12 54 CS172 The actual reports may be different from the reports in this manual...
Страница 442: ...12 Explanation of reports and lists 12 58 CS172...
Страница 443: ...13 Web Connection...
Страница 444: ......
Страница 450: ...13 Web Connection 13 8 CS172 The user is logged off and the Login page appears...
Страница 452: ...13 Web Connection 13 10 CS172 2 Click Login The User mode page appears...
Страница 454: ...13 Web Connection 13 12 CS172 2 Click Login The User mode page appears...
Страница 458: ...13 Web Connection 13 16 CS172 4 Enter the settings and click Apply 5 Click OK Registration is performed...
Страница 462: ...13 Web Connection 13 20 CS172 3 To delete click the OK 4 Click OK An address is deleted...
Страница 465: ...Web Connection 13 CS172 13 23 7 Click OK Registration is performed...
Страница 467: ...Web Connection 13 CS172 13 25 3 Select the transmission mode and then click Next...
Страница 468: ...13 Web Connection 13 26 CS172 4 Enter the Settings and click Apply...
Страница 492: ...13 Web Connection 13 50 CS172 3 Enter the password and then click OK 4 Confirm the contents in the box...
Страница 494: ...13 Web Connection 13 52 CS172...
Страница 495: ...14 Appendix...
Страница 496: ......
Страница 499: ...Appendix 14 CS172 14 5 The following procedure describes how to type using E Mail address input screen...


