background image

Manage media profiles in Onyx

Introduction

You can use Onyx as the RIP software to manage media profiles. You can:
• Install a downloaded media profile
• Copy and edit an existing media profile
• Create a new media profile

NOTE

In order to get the best results it is strongly advised to use the Océ Colorado 1640 media profiles.

Install a downloaded media profile

You have to download a Océ Colorado 1640 media profile before, saved in a media library file
(*.OML) for Onyx. For more information, see 

Download an Océ Colorado 1640 media profile on

page 25

.

Step

Action


1

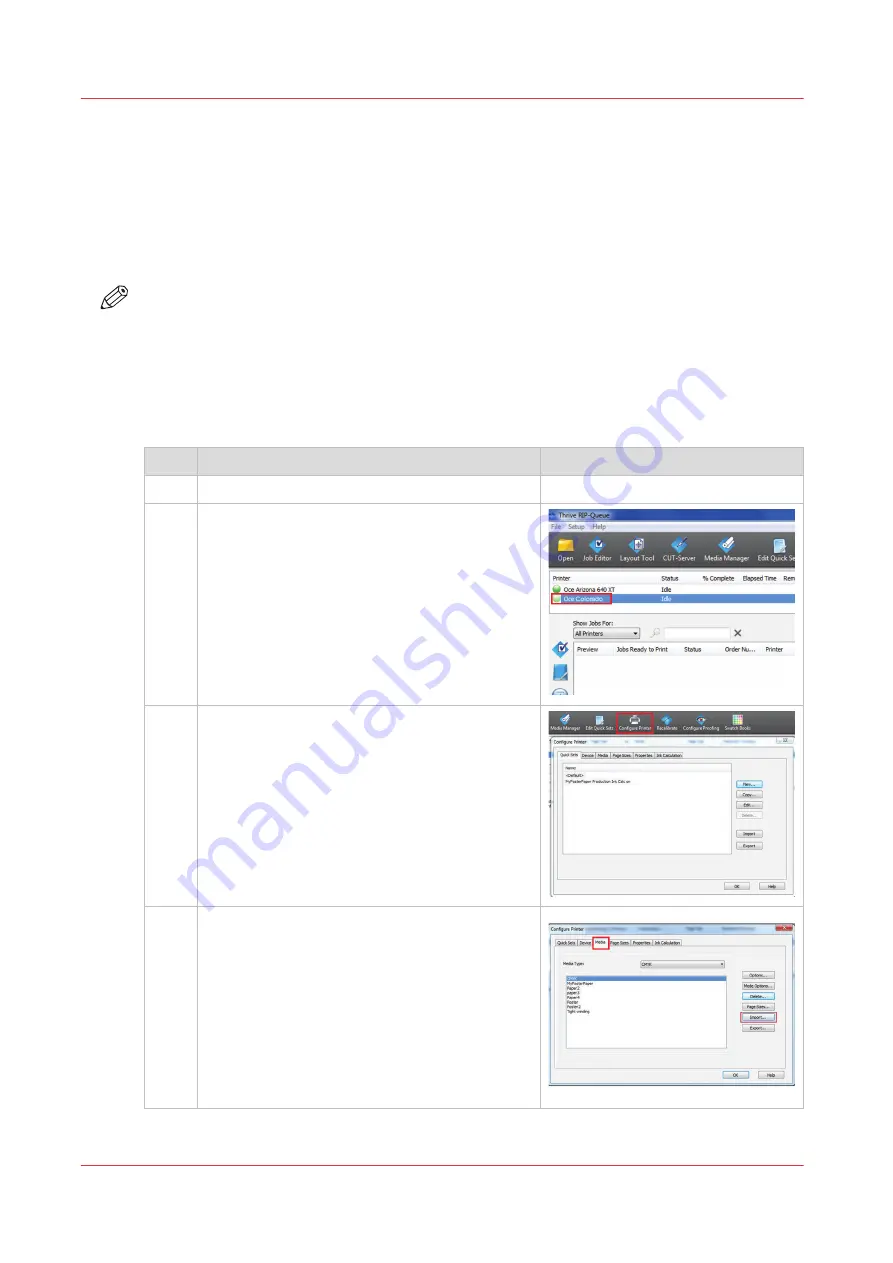
Open the Onyx RIP queue.


2

Select the Océ Colorado 1640 printer name.

3

Click on [Configure printer].
The [Configure printer] menu opens.

4

Select the [Media] tab and click on [Import].
A window opens.

4

Manage media profiles in Onyx

26

Chapter 3 - Handle the media

Содержание Colorado 1640

Страница 1: ...Operation guide Océ Colorado 1640 ...

Страница 2: ...IES AS TO MARKETABILITY MERCHANTABILITY FITNESS FOR A PARTICULAR PURPOSE OF USE OR NON INFRINGEMENT OCÉ SHALL NOT BE LIABLE FOR ANY DIRECT INCIDENTAL OR CONSEQUENTIAL DAMAGES OF ANY NATURE OR LOSSES OR EXPENSES RESULTING FROM THE USE OF THE CONTENTS OF THIS PUBLICATION Océ reserves the right to revise this publication and to make changes from time to time in the content hereof without obligation t...

Страница 3: ...Colorado 1640 media profile 25 Manage media profiles in Onyx 26 Manage media profiles in Caldera 33 Choose a media category 42 Change the media settings 44 Select a print mode 47 Prepare media for printing 48 Load a media roll position 1 48 Load a media roll position 2 54 Calibrate the media 60 Load a take up roll core onto the roll winder 61 Print with or without winding 63 Winding options 63 Pri...

Страница 4: ...lity check chart 141 Calibrate the printhead 142 Calibrate the printhead carriage 143 Solve specific quality problems 144 Solve misaligned colors 144 Solve color banding 145 Solve gloss banding 146 Solve wrinkles in black 147 Solve graininess 148 Solve unsharp lines and text 149 Solve fisheye 150 Solve smudges 151 Prevent media touches 152 Chapter 7 Configure the network and security settings 153 ...

Страница 5: ...7 Stop the printer 177 Restart the printer 178 Turn the printer on after a power cut 179 Remove media from the paper path 180 Cancel the replacement of a maintenance tray 184 Clean ink pollution on the printer 185 Guidelines for cleaning uncured ink 185 Clean the media cover 186 Clean the platen 188 Clean the guide plate and replace the foams and roller assy 190 Contents 5 ...

Страница 6: ...Contents 6 ...

Страница 7: ...Chapter 1 Introduction ...

Страница 8: ...heads Maintain the printheads on page 94 Maintain the rest of the printer Maintain the printer on page 108 Network and security Network and security options Configure the network and security settings on page 153 Troubleshooting Clear jams stop the printer General troubleshooting on page 177 Clean polluted parts Clean ink pollution on the printer on page 185 Operator skill level This guide describ...

Страница 9: ...Manages the jobs such as pausing resuming and deleting jobs loading winding and cutting media etc Operates the printer and takes care of the daily use Maintains the printer such as cleaning the matrix plate maintenance station refilling ink etc System administrator Configures and manages the network Configures and manages the security settings Keeps the system up to date and secure Controls access...

Страница 10: ...About the Océ Colorado 1640 Introduction The Océ Colorado 1640 is a 64 inch roll to roll production printer that uses a unique UV gel ink technology About the Océ Colorado 1640 10 Chapter 1 Introduction ...

Страница 11: ... 14 Stickers Take note of the safety and precaution stickers in and on the machine You can find an explanation of all the stickers in the safety manual Working with UVgel ink The Océ Colorado 1640 UVgel ink needs to be handled with care Follow the instructions in this manual to work with ink safely and read all the warnings before you start the procedure When you have to clean ink protect yourself...

Страница 12: ...erning operations that may lead to death or injury to persons if not performed correctly To use the machine safely always pay attention to these warnings CAUTION Indicates a caution concerning operations that may lead to in jury to persons if not performed correctly To use the ma chine safely always pay attention to these cautions This indication can concern hazards that have a specific CAU TION s...

Страница 13: ...ing these notes is highly recommended Body protection symbols This manual uses the following body protection symbols to indicate that it is important to protect yourself before performing a specific task or action Symbol Type of symbol Indicates IMPORTANT Hand protection Wear the mentioned type of gloves when you perform this task or action IMPORTANT Eye protection Use the mentioned type of eye pr...

Страница 14: ...guide User manual On the downloads website under the prod uct name Available as a PDF file in multiple languag es Online help Embedded in the application via a weblink Available in multiple languages Safety guide On the downloads website under the prod uct name Available as a PDF file in multiple languag es MSDS Safety data sheet On the downloads website under the prod uct name Available as a PDF ...

Страница 15: ...Chapter 2 Explore the system ...

Страница 16: ...e operator panel access the roll winder collect your print or replace the knife 7 4 6 5 3 2 1 Number Component 1 Knife compartment 2 Guide plate 3 Take up media roll 4 Power switch 5 Roll winder 6 Operator panel 7 On off button The components of the printer media output side 16 Chapter 2 Explore the system ...

Страница 17: ...roll winder is located on the media output side and can be used to wind the printed media 2 1 3 4 Number Component 1 Power switch winder 2 Guide plate 3 Take up media shaft 4 Tension bar The components of the roll winder Chapter 2 Explore the system 17 ...

Страница 18: ...you can perform maintenance actions Filter configuration optional 2 1 4 Exhaust configuration 2 3 4 Number Component 1 Filter fan filter configuration 2 Chiller 3 Exhaust exhaust configuration 4 Ink bottle The components of the printer sides 18 Chapter 2 Explore the system ...

Страница 19: ...media open the top cover get access to the maintenance tray and printhead maintenance 5 6 4 3 2 1 Number Component 1 Manual maintenance door 2 Top cover 3 Media cover 4 Media drawer 5 Maintenance drawer 6 Maintenance tray The components of the printer media input side Chapter 2 Explore the system 19 ...

Страница 20: ...media drawer on the media input side to load your media rolls 1 2 3 Number Component 1 Roll loading station 2 Media roll position 1 3 Media roll position 2 1 2 3 Number Component 1 Locking mechanism 4 The components of the media drawer 20 Chapter 2 Explore the system ...

Страница 21: ...Number Component 2 Feed media shaft 3 Roll clamp The components of the media drawer Chapter 2 Explore the system 21 ...

Страница 22: ... you can access the carriages the platen area and perform several maintenance actions 1 3 2 4 5 6 Number Component 1 Filter optional 2 Knife 3 Curing carriage 4 Platen 5 Printhead carriage 6 Maintenance station The components of the printer top cover open 22 Chapter 2 Explore the system ...

Страница 23: ...Chapter 3 Handle the media ...

Страница 24: ...pare media for printing on page 48 Load a media roll in the media drawer a core on the roll winder and calibrate your media 3 Print with or without winding on page 63 Print without winding or tape media to the take up roll core to wind media with or without a tension bar 4 Cut and unload media on page 77 Cut media and unload a roll from the winder and the media drawer General workflow for using me...

Страница 25: ... profiles via the website NOTE Ask your local representative for more information on local arrangements made regarding media profiles Procedure 1 Open a web browser 2 Type in http downloads oce com 3 Select Océ Colorado 1640 in the list and click on Show downloads 4 Click on the Manuals Media profiles tab 5 Select your language 6 In the list click on Media profiles database Download the preferred ...

Страница 26: ...640 media profiles Install a downloaded media profile You have to download a Océ Colorado 1640 media profile before saved in a media library file OML for Onyx For more information see Download an Océ Colorado 1640 media profile on page 25 Step Action 1 Open the Onyx RIP queue 2 Select the Océ Colorado 1640 printer name 3 Click on Configure printer The Configure printer menu opens 4 Select the Medi...

Страница 27: ...dia pro files are installed and can be used Copy and edit an existing media profile Step Action 1 Open the Onyx RIP queue 2 Click on Media Manager The Media Manager application opens 3 Click on the Océ Colorado 1640 printer icon and click on Media library above 4 Select the media profile from the list and click on Make Copy A new window opens 4 Manage media profiles in Onyx Chapter 3 Handle the me...

Страница 28: ...dia type and click on Edit 9 A new window opens You can choose a new media category and or change the media set tings For more information see Choose a media category on page 42 Change the media set tings on page 44 NOTE When you make a copy of the media profile and you edit the media type the media category should already be correct for the media type When you still want to change the media categ...

Страница 29: ...int mode to avoid confusion 12 Click on Mode options and change the mode options For more information see Change the media settings on page 44 13 Click on Ok the window closes 14 Finish all the steps to create the media profile Create a new media profile NOTE Only experienced users or color experts can create a new media profile Step Action 1 Open the Onyx RIP queue 2 Click on Media Manager The Me...

Страница 30: ...for the new ICC workflow A new window opens 6 Fill in the new media profile name 7 Follow all the steps For more information on the general steps use the Onyx documentation 8 Change the Océ Colorado 1640 specific media category and media settings under Basic Media Profile Settings Click on Media options 4 Manage media profiles in Onyx 30 Chapter 3 Handle the media ...

Страница 31: ...e the Océ Colorado 1640 specific print mode settings under Basic Print Mode Settings Fill in the print mode name and Select a print mode on page 47 NOTE Fill in the same name as the selected print mode to avoid confusion 13 Click on Mode options and change the mode options For more information see Change the media settings on page 44 14 Click on Ok the window closes 4 Manage media profiles in Onyx...

Страница 32: ...Step Action 15 Finish all the steps to create the media profile Manage media profiles in Onyx 32 Chapter 3 Handle the media ...

Страница 33: ...dvised to use the Océ Colorado 1640 media profiles Install a downloaded media profile You have to download a Océ Colorado 1640 media profile before saved in a calpatch file for Caldera calpatch For more information see Download an Océ Colorado 1640 media profile on page 25 Step Action 1 Open Caldera 2 Click on the EasyMedia icon in the Application Bar A window opens 3 Select the printer icon and c...

Страница 34: ...click on Next 5 Click on Import 6 Click on Install patch The file selection window opens 7 Browse to your calpatch file calpatch and click on Load A window with profiles opens 4 Manage media profiles in Caldera 34 Chapter 3 Handle the media ...

Страница 35: ...ppears with the number of installed profiles click on Ok Copy and edit an existing media profile Step Action 1 Open Caldera 2 Click on the EasyMedia icon in the Application Bar A window opens 3 Select the printer icon and click on Next 4 Manage media profiles in Caldera Chapter 3 Handle the media 35 ...

Страница 36: ...the media window For more information on the general settings use the Cal dera documentation You can change the Océ Colorado 1640 specific settings Under Parameters Choose a media category on page 42 or Change the media settings on page 44 Under Vacuum Power Change the media settings on page 44 4 Manage media profiles in Caldera 36 Chapter 3 Handle the media ...

Страница 37: ...Step Action 8 Click on Ok The window closes 9 Click on Next 4 Manage media profiles in Caldera Chapter 3 Handle the media 37 ...

Страница 38: ...Parameters Change the media set tings on page 44 11 Click on Ok Create a new media profile NOTE Only experienced users or color experts can create a new media profile Step Action 1 Open Caldera 2 Click on the EasyMedia icon in the Application Bar A window opens 4 Manage media profiles in Caldera 38 Chapter 3 Handle the media ...

Страница 39: ... a media category on page 42 7 Click on Ok 8 Fill in the values in the media window For more information on the general settings use the Cal dera documentation For the Océ Colorado 1640 specific settings Under Parameters Change the media set tings on page 44 Under Vacuum Power Change the media settings on page 44 4 Manage media profiles in Caldera Chapter 3 Handle the media 39 ...

Страница 40: ...Step Action 9 Click on Ok The window closes 10 Click on Next 4 Manage media profiles in Caldera 40 Chapter 3 Handle the media ...

Страница 41: ...the Océ Colorado 1640 specific settings Under Resolution Select a print mode on page 47 Under Parameters Change the media set tings on page 44 12 Click on Ok Manage media profiles in Caldera Chapter 3 Handle the media 41 ...

Страница 42: ... to decide use the overview to choose the correct category Media category Characteristics Paper 120 200gsm Can be torn by hand Is humid sensitive will deform permanently after exposure to water Light paper 120gsm Can be torn by hand Is humid sensitive will deform permanently after exposure to water Heavy paper 200gsm Can be torn by hand Is humid sensitive will deform permanently after exposure to ...

Страница 43: ...m Smooth surface Is flexible Cannot be torn by hand Heavy banner 400gsm Smooth surface Is flexible Cannot be torn by hand Film Smooth surface Is difficult to tear by hand Thick film 200um Smooth surface Is difficult to tear by hand Canvas Made of cotton Rough surface Heavy media weight Cannot be torn by hand Textile Made of polyester Soft and flexible Low level of stiffness Cannot be torn by hand ...

Страница 44: ...it and Reliance Vacuum power Controls the suction of the media on the platen For each of the five zones available you can change the suction for example increase it in case of me dia buckling Winding ten sion Controls winding For printing without winding or for winding without ten sion bar select no tension bar For certain media types it is necessary to wind the media with a tension bar in order t...

Страница 45: ...revent any possible contact with uncured ink IMPORTANT Changing the following curing settings can result in insufficient curing of the UV ink layer Especially in combination with the Moist protection setting there is a risk the printer can get polluted When the machine is polluted make sure you clean it or call your local service representative Media settings Description Printer platen temperature...

Страница 46: ...ing when media calibration and Automatic advance correc tion do not help enough in improving the print quality Decrease smaller step to minimize light lines Increase bigger step to minimize dark lines When both light and dark lines are present you cannot correct it via this set ting Change the media settings 46 Chapter 3 Handle the media ...

Страница 47: ...applications High speed 1 114 1229 High speed printing typically used for outdoor applications Production 2 57 610 Optimal balance between speed and quality Typically used for high quality outdoor applica tions while it can also be used for indoor applications High quality 4 40 427 High quality printing typically used for standard media allow ing to use the maximum color space Specialty 8 20 222 H...

Страница 48: ...it in Put on gloves to avoid pollution of the paper by your fingerprints CAUTION Watch your fingers when you handle the media roll Loading heavy media 25 kg or more has to be done by two people or with the help of external lifting tools IMPORTANT Do not use dented or damaged media rolls to prevent damage to the printheads Only open the media drawer when the indicator light on the drawer is on Do n...

Страница 49: ...4 Take the feed media shaft out of the drawer 5 Pull 1 the handle of the locking mechanism towards you Slide 2 the media shaft into the side of the core of the new media roll 2 1 Load a media roll position 1 Chapter 3 Handle the media 49 ...

Страница 50: ...1560 1540 1520 1620 64 62 63 60 61 58 59 56 57 54 55 1400 1380 1500 1480 1460 1440 1420 1600 1580 1560 1540 1520 1620 7 Release the handle of the locking mechanism 8 Remove the tapes from the new media roll if present Place the media roll in the media drawer 9 Close the clamp firmly IMPORTANT Make sure you close the clamp completely until you hear a click otherwise the roll can come loose and can ...

Страница 51: ...10 Use both hands to turn the media roll backwards 1 until the media flap has passed the metal paper guide 1 Load a media roll position 1 Chapter 3 Handle the media 51 ...

Страница 52: ...the message that new media is detected IMPORTANT Do not open the media drawer when the indicator light is off you can damage the machine 13 On the operator panel select the correct media type and fill in the media width 14 Select if and what type of clean cut you want the printer to make when you use the media for the first time For winding with a tension bar or with a locked tension bar the clean...

Страница 53: ...t output quality it is advised to always perform a media calibration when you load a new media type or a new media width For more information see Calibrate the media on page 60 Load a media roll position 1 Chapter 3 Handle the media 53 ...

Страница 54: ...oves to avoid pollution of the paper by your fingerprints CAUTION Watch your fingers when you handle the media roll Loading heavy media 25 kg or more has to be done by two people or with the help of external lifting tools IMPORTANT Do not use dented or damaged media rolls to prevent damage to the printheads Only open the media drawer when the indicator light on the drawer is on Do not open the dra...

Страница 55: ...4 Take the feed media shaft out of the drawer 5 Pull 1 the handle of the locking mechanism towards you Slide 2 the media shaft into the side of the core of the new media roll 2 1 Load a media roll position 2 Chapter 3 Handle the media 55 ...

Страница 56: ...1560 1540 1520 1620 64 62 63 60 61 58 59 56 57 54 55 1400 1380 1500 1480 1460 1440 1420 1600 1580 1560 1540 1520 1620 7 Release the handle of the locking mechanism 8 Remove the tapes from the new media roll if present Place the media roll in the media drawer 9 Close the clamp firmly IMPORTANT Make sure you close the clamp completely until you hear a click otherwise the roll can come loose and can ...

Страница 57: ...10 Use both hands to turn the media roll backwards 1 until the media flap has passed the metal paper guide 1 Load a media roll position 2 Chapter 3 Handle the media 57 ...

Страница 58: ...the message that new media is detected IMPORTANT Do not open the media drawer when the indicator light is off you can damage the machine 13 On the operator panel select the correct media type and fill in the media width 14 Select if and what type of clean cut you want the printer to make when you use the media for the first time For winding with a tension bar or with a locked tension bar the clean...

Страница 59: ...t output quality it is advised to always perform a media calibration when you load a new media type or a new media width For more information see Calibrate the media on page 60 Load a media roll position 2 Chapter 3 Handle the media 59 ...

Страница 60: ...a type you must perform calibration for each size Procedure 1 On the operator panel tap on the Media icon on the right 2 Tap on the arrow to select the roll you want to calibrate and tap on Calibrate The printer starts the calibration Two small prints are made that can be disposed This process can take several minutes 3 When the calibration is finished a message will appear on the operator panel t...

Страница 61: ... Make sure you use the core of an empty media roll with the same width or wider as the media you are printing on Procedure 1 Locate the winder on the media output side 2 Push the green levers on both sides of the take up media shaft Remove the take up media shaft from the winder 1 2 Load a take up roll core onto the roll winder Chapter 3 Handle the media 61 ...

Страница 62: ...1080 1060 1040 1020 1000 980 960 940 920 900 880 860 840 820 800 780 760 740 720 700 680 660 640 620 600 580 560 540 520 500 480 460 440 420 400 380 360 340 320 300 280 64 62 63 60 61 58 59 56 57 54 55 52 53 50 51 48 49 46 47 44 45 42 43 40 41 38 39 36 37 34 35 32 33 30 31 28 29 26 27 24 25 22 23 20 21 18 19 16 17 14 15 12 13 11 1200 1180 1160 1140 1120 1300 1280 1260 1240 1220 1400 1380 1360 1340...

Страница 63: ...ttings on page 44 Options Media category Winding ten sion value Media characteristics Print and wind with out a tension bar on page 64 Print without winding on page 75 Polymeric cast vinyl Monomeric vinyl Film Light paper Paper no tension bar The media can be transpor ted well and is not too weak Print and wind with a tension bar on page 67 Heavy banner Light banner Textile tension bar The media i...

Страница 64: ...r you must select no tension bar under Winding tension For more information see Change the media settings on page 44 Make sure you have loaded a take up roll on the roll winder For more information see Load a take up roll core onto the roll winder on page 61 The printer is ready to print IMPORTANT Use the stop switch to stop the winder immediately Do not forget to switch it on again Procedure 1 On...

Страница 65: ... The clamp closes when the media reaches the tape position and the operator panel gives a message indicating you can tape the media 4 Move the media guides to the sides 5 Take the leading edge of the media and align it on the core Print and wind without a tension bar Chapter 3 Handle the media 65 ...

Страница 66: ...th the media 8 On the operator panel tap on Ready The printer continues printing while winding the job After you finish When you want to stop winding you have to cut the media For more information see Cut the media on page 77 Cut the media manual on page 79 Print and wind without a tension bar 66 Chapter 3 Handle the media ...

Страница 67: ...he media settings on page 44 Make sure you have placed a take up roll core on the roll winder For more information see Load a take up roll core onto the roll winder on page 61 Make sure you have tape ready The printer is ready to print IMPORTANT Use the stop switch to stop the winder immediately Do not forget to switch it on again Procedure 1 Start a print job The printer spools the media until it...

Страница 68: ...dia is flat on the platen 4 Take the leading edge of the media and align it on the core 5 Tape first the center and then the sides of the media to the core Print and wind with a tension bar 68 Chapter 3 Handle the media ...

Страница 69: ...ion bar and place it correctly on top of the media 8 On the operator panel tap on Ready The printer starts printing while winding the job Make sure the tension bar follows the media when the blouse is formed Print and wind with a tension bar Chapter 3 Handle the media 69 ...

Страница 70: ...u finish When you want to stop winding you have to cut the media For more information see Cut the media on page 77 Cut the media manual on page 79 Print and wind with a tension bar 70 Chapter 3 Handle the media ...

Страница 71: ...e the media settings on page 44 Make sure you have placed a take up roll core on the roll winder For more information see Load a take up roll core onto the roll winder on page 61 Make sure you have tape ready The printer is ready to print IMPORTANT Use the emergency stop button to stop the winder immediately Do not forget to switch it on again Procedure 1 Start a print job The printer spools the m...

Страница 72: ...ake sure the media is flat on the platen 4 Take the leading edge of the media and align it on the core 5 Tape first the center and then the sides of the media to the core Print and wind with a locked tension bar 72 Chapter 3 Handle the media ...

Страница 73: ...p on Ready and move the media guides towards the middle to align with the media The printer starts printing while winding the job Make sure the tension bar falls into the locked position NOTE Make sure you align the media guides with the media otherwise winding can go wrong Print and wind with a locked tension bar Chapter 3 Handle the media 73 ...

Страница 74: ...nish When you want to stop winding you have to cut the media For more information see Cut the media on page 77 Cut the media manual on page 79 Print and wind with a locked tension bar 74 Chapter 3 Handle the media ...

Страница 75: ...ding Printing without winding is set in the media type configuration in the RIP software For printing without winding you must select no tension bar under Winding tension For more information see Change the media settings on page 44 The printer is ready to print Procedure 1 On the operator panel tap on the Output icon 2 Make sure Wind the output is set to No 3 Start a print job The printer continu...

Страница 76: ...inish When you want to stop printing without winding you have to cut the media For more information see Cut the media on page 77 Cut the media manual on page 79 Print without winding 76 Chapter 3 Handle the media ...

Страница 77: ... see Change the media settings on page 44 Procedure 1 On the operator panel tap on the Cut icon on the top right 2 Move the media guides to the sides 3 When a tension bar is present a window telling you to remove the tension bar opens Remove the tension bar from the media path and tap on Completed The embedded knife cuts the media 4 Tape the trailing edge to the take up media roll in case of windi...

Страница 78: ...After you finish You can now remove the take up roll from the roll winder For more information see Unload a take up media roll from the roll winder on page 81 Cut the media 78 Chapter 3 Handle the media ...

Страница 79: ...edia Procedure 1 On the operator panel tap on the Cut icon on the top right The printer transports the media automatically The operator panel displays a request to make a manual cut 2 Move the media guides to the sides 3 When a tension bar is present a window telling you to remove the tension bar opens Remove the tension bar from the media path 4 Use a knife to cut the media Cut the media as close...

Страница 80: ... After you finish tap on Completed on the operator panel After you finish You can now remove the take up media roll from the roll winder For more information see Unload a take up media roll from the roll winder on page 81 Cut the media manual 80 Chapter 3 Handle the media ...

Страница 81: ...begin Make sure you have cut the media For more information see Cut the media on page 77 and Cut the media manual on page 79 CAUTION Lifting heavy media 25 kg or more has to be done by at least two people or with the help of external lifting tools Procedure 1 Locate the winder on the media output side Unload a take up media roll from the roll winder Chapter 3 Handle the media 81 ...

Страница 82: ...sturdy surface 4 Pull the handle of the locking mechanism inside the core towards you Remove the media shaft from the core of the media roll 1 2 5 You can place a new empty take up roll core for more information see Load a take up roll core onto the roll winder on page 61 Unload a take up media roll from the roll winder 82 Chapter 3 Handle the media ...

Страница 83: ...6 Push to place the media shaft back on the winder Make sure it clicks in place Unload a take up media roll from the roll winder Chapter 3 Handle the media 83 ...

Страница 84: ... Handle the media roll with care A dented media roll can damage the printer Only open the media drawer when the indicator light on the drawer is on Do not open the drawer when the light is off you can damage the machine NOTE Put on gloves to avoid pollution of the paper by your fingerprints Procedure 1 Pull firmly to open the media drawer 2 Use both hands to turn the media roll backwards 1 and rem...

Страница 85: ...ut the media shaft with the media roll and put it on the roll loading station 5 Pull 1 the handle of the locking mechanism towards you Remove 2 the media shaft from the core of the media roll Unload a media roll from the drawer Chapter 3 Handle the media 85 ...

Страница 86: ...into the drawer and firmly close the clamp Make sure you close the clamp completely until you hear a click 7 Remove the media roll from the roll loading station Store it in a safe place so that it cannot fall over or roll away 8 Close the media drawer carefully Unload a media roll from the drawer 86 Chapter 3 Handle the media ...

Страница 87: ...Chapter 4 Print a job ...

Страница 88: ...re media in the RIP on page 25 or check the website of your RIP supplier for documentation 2 Operator panel Check your job and other jobs in the queue here Pause resume and remove a job or cut the media after a certain job You can also perform special actions via the operator panel such as starting maintenance actions or configuring the printer s system and connectivity settings 3 Printing Once yo...

Страница 89: ... RIP supplier for documentation 4 Submit the job Make sure the page size printable width and physical width settings comply with the media you are using NOTE Select the correct page size including _AAC_NONE _AAC_NORMAL or _AAC_ENHANCED You can check the value that is used for the Automatic advance correction setting in the RIP 5 Collect your output at the printer If requested tape the media for wi...

Страница 90: ...use Tap the Pause icon The printer pauses the job when the image has been printed Cancel Tap the job in the header The Cancel icon appears Tap Cancel to cancel the job Re sume When the printer is paus ing the Resume icon ap pears Tap Resume to continue printing Stop When the printer is paus ing the Stop icon ap pears Tap Stop to stop printing The image that has been printed is cured The queue is s...

Страница 91: ...g You must refill ink to continue print ing You must remove media from the paper path to continue printing The system is blocked and will only continue when the indicated action has been performed by the op erator Indicators on the operator panel Indicators on the operator panel want to get your attention to make you aware of an operator action that is coming up typically used in the queue Color E...

Страница 92: ...Status on the operator panel 92 Chapter 4 Print a job ...

Страница 93: ...Chapter 5 Maintain the system ...

Страница 94: ... wipe to clean the noz zles 2 Option to print a nozzle classification chart to automatical ly optimize the nozzles Manual maintenance Start manual maintenance in case of quality issues For more information see Improve quality on page 137 Initiated by Performed by Action Operator Operator 1 The operator can clean the maintenance station includ ing the wiper and clean wall 2 The operator can clean t...

Страница 95: ...ce station includ ing the wiper and clean wall 2 The operator must clean the matrix plate 3 The operator can clean the platen 4 Vacuum the chiller 5 Option to print a nozzle classification chart to automatical ly optimize the nozzles Guidelines for printhead maintenance Chapter 5 Maintain the system 95 ...

Страница 96: ... maintenance 3 When you want to print a nozzle classification chart to optimize the nozzles 1 Make sure Automatic nozzle optimization is selected 2 Select a roll to print the nozzle classification chart on NOTE The nozzle classification chart can only be printed on smooth white opaque media Any other media will deteriorate the optimization 4 Tap on Start The printer starts the purge and wipe and t...

Страница 97: ... a nozzle classification chart to optimize the nozzles 1 Make sure Automatic nozzle optimization is selected 2 Select a roll to print the nozzle classification chart on NOTE The nozzle classification chart can only be printed on smooth white opaque media Any other media will deteriorate the optimization 4 Tap on Start 5 Perform any or all of the listed actions 1 Clean the maintenance station wiper...

Страница 98: ...ANT Wait until the Completed button turns black and the printhead carriage is in maintenance position before you open the top cover and start cleaning Start manual maintenance 98 Chapter 5 Maintain the system ...

Страница 99: ...ith the ink IMPORTANT Use the prescribed cleaning liquid Do not use any other cleaners Procedure 1 Start the maintenance action via the operator panel For more information see Start manual maintenance on page 97 2 Put on the Océ Colorado 1640 approved nitril gloves 3 Open the top cover from the media input side 4 Locate the maintenance station with the wiper and the clean wall on the right hand si...

Страница 100: ... after cleaning For more information see Replace the wiper on page 117 6 Locate the clean wall opposite the wiper 7 Lift up the black top cover to expose the clean wall CAUTION Be careful to touch the clean wall can be hot Clean the maintenance station wiper and clean wall 100 Chapter 5 Maintain the system ...

Страница 101: ...tenance station green indicated area Clean until all residue ink is gone If necessary dampen a swab with the cleaning liquid to remove any remaining ink IMPORTANT Do not clean the black top cover of the clean wall with cleaning liquid to prevent deterioration of paint When the cover or the surrounding area is polluted clean according to the cleaning guidelines For more information see Guidelines f...

Страница 102: ...al regulations 12 Close the top cover IMPORTANT Make sure all covers are closed correctly to prevent cured ink in your system 13 On the operator panel tap Completed to end the maintenance action or continue to the next action Clean the matrix plate on page 103 Clean the maintenance station wiper and clean wall 102 Chapter 5 Maintain the system ...

Страница 103: ...s After ten minutes you must put on new gloves to prevent contact with the ink IMPORTANT Use the prescribed cleaning liquid Do not use any other cleaners Procedure 1 Start the maintenance action via the operator panel For more information see Start manual maintenance on page 97 2 Put on the Océ Colorado 1640 approved nitrile gloves 3 Take a new and clean piece of matrix plate cleaning foam and put...

Страница 104: ... the compartment 8 Place the matrix plate cleaning tool against the matrix plate and position it correctly as illustrated 9 Press the cleaning tool against the matrix plate 1 Make sure all sides of the tool press against the matrix plate 2 Hold the cleaning tool in place for at least 30 seconds IMPORTANT Press until you lift the printhead carriage up very lightly When you press too hard you will d...

Страница 105: ...tion 11 Take a swab 12 Clean the matrix plate until all residue ink is gone red indicated area IMPORTANT Do not touch the nozzle plates of the printhead When you touch the nozzle plates you can damage the printhead Make sure to end the cleaning procedure within 5 minutes when you use the cleaning liquid The printer has to perform automatic maintenance after to make sure the cleaning liquid does no...

Страница 106: ... take a new swab and clean the black protection cover especially the protruding parts red indicated area IMPORTANT Do not clean the M C scanner indicated by the yellow circle as you can damage the scanner 16 Only when necessary dampen a new swab with the cleaning liquid and clean the polluted parts of the black protection cover again 17 Make sure that all residue ink is removed Clean the matrix pl...

Страница 107: ...ording to local regulations 19 Close the manual maintenance door and the media cover IMPORTANT Make sure all covers are closed correctly to prevent cured ink in your system 20 On the operator panel tap Completed to end the maintenance action Clean the matrix plate Chapter 5 Maintain the system 107 ...

Страница 108: ...nk level indication halfway the tank you can refill ink for that color When the operator panel gives an orange warning it is advised to refill ink for a specific color as the ink is running out When the operator panel gives a red warning you must refill ink for a specific color The printing process is stopped until you have refilled the ink The LED lights located next to the bottles indicate when ...

Страница 109: ... IS ACTIVE You cannot use ink that has passed the expiration date When ink is going to expire in the machine you get a warning When the LED light is blinking slowly something is wrong Do not move the green handle you can damage the machine Check the operator panel for an explanation of the issue When you cannot solve it call your local service representative Procedure 1 On the operator panel tap o...

Страница 110: ...ll pour out of the bottle The bottle is locked into place You can leave the bottle in IMPORTANT When the LED light under the handle starts blinking slowly something is wrong Do not move the green handle A message is displayed on the operator panel explaining the issue NOTE When it is possible to fill a second bottle you have to wait 15 minutes The LED light under the handle will light up again whe...

Страница 111: ... For information on the prescribed maintenance materials see List of Océ Colorado 1640 maintenance materials on page 134 CAUTION Wear the Océ Colorado 1640 prescribed nitrile gloves You can only wear the gloves for ten minutes After ten minutes you must put on new gloves to prevent contact with the ink IMPORTANT Only open the maintenance drawer when the operator panel displays a message allowing y...

Страница 112: ... Take the lid out of the drawer 8 Push the handle of the inner drawer and pull carefully to slide the maintenance tray to the front Make sure to extend the drawer completely CAUTION Open the inner drawer very carefully to not let the ink splash and spill Replace the maintenance tray 112 Chapter 5 Maintain the system ...

Страница 113: ...1 2 9 Lift the metal holder up Replace the maintenance tray Chapter 5 Maintain the system 113 ...

Страница 114: ...pose the sealed maintenance tray as chemical waste according to local regulations 13 Take a lint free cloth and clean the drawer and holder on the inside and outside until all residue ink is gone 14 Take a new and empty maintenance tray and place it in the inner drawer IMPORTANT Do not place the lid on the new maintenance tray as ink can spill that will damage the machine Replace the maintenance t...

Страница 115: ...15 Close the metal holder 16 Push to slide the inner drawer to the back and let it click to close Replace the maintenance tray Chapter 5 Maintain the system 115 ...

Страница 116: ...emical waste according to local regulations 19 Push and close the maintenance drawer 20 On the operator panel tap Replaced to confirm you replaced a full maintenance tray with an empty maintenance tray and end the action Replace the maintenance tray 116 Chapter 5 Maintain the system ...

Страница 117: ...rials see List of Océ Colorado 1640 maintenance materials on page 134 It is advised to replace the maintenance tray before you replace the wiper It prevents the wiper from falling into a maintenance tray filled with ink CAUTION Wear the Océ Colorado 1640 prescribed nitrile gloves You can only wear the gloves for ten minutes After ten minutes you must put on new gloves to prevent contact with the i...

Страница 118: ...ful to touch the wiper can be hot Let the wiper cool down for five minutes 1 2 10 Dispose the wiper as chemical waste according to local regulations 11 Clean the maintenance station and clean wall For more information see Clean the maintenance station wiper and clean wall on page 99 NOTE Perform the action from step 5 do not exit the Clean the wiper window Replace the wiper 118 Chapter 5 Maintain ...

Страница 119: ... For more information see Clean the matrix plate on page 103 NOTE Perform the action from step 3 do not exit the Clean the wiper window 14 Dispose the gloves as chemical waste according to local regulations 15 Close all covers 16 On the operator panel tap on Completed to end the maintenance action The counters will be reset Replace the wiper Chapter 5 Maintain the system 119 ...

Страница 120: ...r Torx 6 for the knife Knife NOTE For information on the prescribed maintenance materials see List of Océ Colorado 1640 maintenance materials on page 134 Procedure 1 Open the top cover from the media input side 2 Locate the knife and move it from the left to the right 3 Go to the media output side and locate the knife compartment cover on the left Replace the knife 120 Chapter 5 Maintain the syste...

Страница 121: ... 6 Locate the knife in the top right part of the compartment 7 Unscrew the two screws of the knife 1 2 NOTE Hold a piece of paper under the knife to collect any falling screws This ways you make sure you do not lose any of the screws inside the machine Replace the knife Chapter 5 Maintain the system 121 ...

Страница 122: ...op first in the rails and let it fall into position Test to make sure the knife slides well on the rails 10 Fasten the two screws hand tight 11 Place the knife compartment cover back into position 12 Fasten the screw on top of the cover 13 Close the top cover from the media input side Replace the knife 122 Chapter 5 Maintain the system ...

Страница 123: ...til you have placed new filters Before you begin Use Océ Colorado 1640 prescribed filters NOTE For information on the prescribed maintenance materials see List of Océ Colorado 1640 maintenance materials on page 134 Procedure 1 On the operator panel tap on the Tools icon on the right 2 Tap on Replace the filter 3 Tap on Replace and read the instructions 4 Move to the media input side and wait till ...

Страница 124: ...filter box to the front and take it out by the green handles Place it on a sturdy surface 8 Take both old filter boxes out of the frames Dispose the filter boxes according to your local regulations 9 Place the new filter boxes in the frames Replace the filters optional 124 Chapter 5 Maintain the system ...

Страница 125: ...the left Slide it to the back 11 Pick up the second filter box holder by the green handles Place the box in the filter compartment with the higher handle on the left 12 Close the top cover 13 On the operator panel tap on Replaced to end the maintenance action Replace the filters optional Chapter 5 Maintain the system 125 ...

Страница 126: ...es for handling chemical liquids Pouring can Screwdriver Torx 20 NOTE For information on the prescribed maintenance materials see List of Océ Colorado 1640 maintenance materials on page 134 CAUTION Wear nitrile gloves when you refill the chiller to protect your skin IMPORTANT Only refill one liter of cooling liquid when you get a warning when you use more the liquid can spill and damage the machin...

Страница 127: ... the cover under the roll winder 5 Switch the power switch to the off position 6 Pull out the two power supply plugs from the sockets 7 Go to the chiller side and locate the cover under the fan Refill the chiller Chapter 5 Maintain the system 127 ...

Страница 128: ...screws on top of the cover 9 Lift the cover a little up and towards you 1 then lift it up fully and take it out 2 1 2 10 Locate the lid on top of the chiller 11 Put on the gloves Refill the chiller 128 Chapter 5 Maintain the system ...

Страница 129: ...id Do not use any other 14 Place the pouring can on the chiller and fill the tank with the cooling liquid NOTE When the operator panel displays the level is low you can fill one bottle of one liter The level indicator inside the chiller shows the maximum level of cooling liquid Refill the chiller Chapter 5 Maintain the system 129 ...

Страница 130: ...the cover back into position 18 Fasten the left and right screws on top of the cover 19 Plug the two power supply plugs back into the sockets 20 Switch the power switch back to the on position and close the cover Refill the chiller 130 Chapter 5 Maintain the system ...

Страница 131: ...maintenance so the operator panel gives a warning when you should vacuum the chiller Before you begin Use Océ Colorado 1640 prescribed Screwdriver Torx 20 Vacuum cleaner with a brush head Procedure 1 Go to the chiller side and locate the cover under the fan 2 Unscrew the left and right screws on top of the cover Vacuum the chiller Chapter 5 Maintain the system 131 ...

Страница 132: ...he collected dust CAUTION Vacuum the surface with care make sure you do not damage the condenser surface 5 Place the cover back into position IMPORTANT Keep the area next to the chiller free Do not store any items there as it can result in insufficient cooling and damage to the machine 6 Fasten the left and right screws on top of the cover Vacuum the chiller 132 Chapter 5 Maintain the system ...

Страница 133: ...7 When you vacuumed the chiller as part of periodic maintenance on the operator panel tap on Completed to end the maintenance action Vacuum the chiller Chapter 5 Maintain the system 133 ...

Страница 134: ...yl benzoate Cleaning the matrix plate maintenance station wiper and clean wall maintenance drawer IMPORTANT This cleaning liquid is not used for any other parts in the printer Maintenance tray Replacing a full maintenance tray UVgel ink CMYK Refilling new ink Set of foams Replacing polluted guide plate foams Roller assy Replacing a polluted guide plate assy Filters Replacing saturated filters Knif...

Страница 135: ...ance material Used for Nitrile gloves for handling chemical liquids Refilling the chiller Vacuum cleaner Vacuuming the chiller List of Océ Colorado 1640 maintenance materials Chapter 5 Maintain the system 135 ...

Страница 136: ...List of Océ Colorado 1640 maintenance materials 136 Chapter 5 Maintain the system ...

Страница 137: ...Chapter 6 Improve quality ...

Страница 138: ... color Start automatic maintenance Calibration succeeded Print Quality check chart 1 Solved Print Quality check chart 1 Solved Solved Solved Solved Calibrate the printhead End 2 Print Quality check chart 1 Start manual maintenance 3 Calibrate the media 5 End Print quality artifacts in media feed direction Problem occurs Analyze the check chart and solve the problem End End Quality Problem Media pr...

Страница 139: ... 96 3 Start manual maintenance on page 97 4 Calibrate the printhead on page 142 5 Calibrate the media on page 60 6 Calibrate the printhead carriage on page 143 7 Analyze the printhead quality check chart on page 141 General workflow for solving quality problems Chapter 6 Improve quality 139 ...

Страница 140: ...ary settings to optimize the quality Procedure 1 On the operator panel tap on the Tools icon on the right 2 Tap on Printhead quality check 3 Select a roll to print the check chart on 4 Tap on Start The printer prints the check chart 5 Check the quality of the chart For more information see Analyze the printhead quality check chart on page 141 Print a quality check chart 140 Chapter 6 Improve quali...

Страница 141: ...ck chart analyze the chart to help you solve your quality problem Printhead quality check chart Each area can indicate a quality problem Use the chart to identify your problem and solve it Solve specific quality problems on page 144 Analyze the printhead quality check chart Chapter 6 Improve quality 141 ...

Страница 142: ...ge 75 You have to use a media type that can be used for printing without winding Procedure 1 On the operator panel tap on the Tools icon on the right 2 Tap on Printhead calibration 3 Select the roll you want to use for calibration 4 Tap on Start The printer performs the calibration NOTE The calibration can take quite some time around 30 minutes Wait until the printer is finished with the calibrati...

Страница 143: ... calibration when you print without winding For more information see Print without winding on page 75 You have to use a typically smooth vinyl media type for the printhead carriage calibration Procedure 1 Load the correct media type For more information see Load a media roll position 1 on page 48 2 On the operator panel tap on the Tools icon on the right 3 Tap on Printhead carriage calibration 4 S...

Страница 144: ...if the media type you loaded is also the media type you selected on the operator panel Make sure the two are correct 2 Perform media calibration Calibrate the media on page 60 3 Enable or disable the yellow markers for the media profile in the RIP Change the media settings on page 44 After you finish When the problem is not solved contact your local Service representative Solve specific quality pr...

Страница 145: ...duction In these print modes color banding has to be accepted Banding Procedure 1 Perform automatic maintenance Start automatic maintenance on page 96 2 Perform manual maintenance Start manual maintenance on page 97 3 Print in a higher pass mode Specialty Backlit or Reliance Select a print mode on page 47 4 Perform media calibration Calibrate the media on page 60 5 Perform printhead carriage calib...

Страница 146: ...fferent print mode Select a print mode on page 47 1 In case of stripes in a kind of zebra pattern usually when printing in Speciality or sometimes Backlit or Reliance try the print mode High Quality 2 In case of banding on the boundary of each swath try the print mode Speciality 2 Tune the printer platen temperature in the RIP Change the media settings on page 44 After you finish When the problem ...

Страница 147: ...op at any time in the procedure when the problem is solved Wrinkles Procedure 1 Print in a higher quality mode Select a print mode on page 47 2 In case of custom media you can reduce the amount of K ink in the ICC profiling process After you finish When the problem is not solved contact your local Service representative Solve wrinkles in black Chapter 6 Improve quality 147 ...

Страница 148: ...he problem is solved Graininess Procedure 1 Perform media calibration Calibrate the media on page 60 2 Perform printhead carriage calibration Calibrate the printhead carriage on page 143 3 Perform printhead calibration Calibrate the printhead on page 142 After you finish When the problem is not solved contact your local Service representative Solve graininess 148 Chapter 6 Improve quality ...

Страница 149: ...ocedure when the problem is solved Sharpness Procedure 1 Perform media calibration Calibrate the media on page 60 2 Perform printhead carriage calibration Calibrate the printhead carriage on page 143 After you finish When the problem is not solved contact your local Service representative Solve unsharp lines and text Chapter 6 Improve quality 149 ...

Страница 150: ... procedure when the problem is solved Fisheye Procedure 1 Print in a different print mode Select a print mode on page 47 2 Lower the printer platen temperature in the RIP Change the media settings on page 44 3 Load a different media type After you finish When the problem is not solved contact your local Service representative Solve fisheye 150 Chapter 6 Improve quality ...

Страница 151: ...ia type 2 Increase the Precure or Postcure settings in the RIP Change the media settings on page 44 CAUTION Only experienced users or color experts can change these settings When you are not sure contact your local Service representative 3 Tune the Printer platen temperature in the RIP Change the media settings on page 44 After you finish When the problem is not solved contact your local Service r...

Страница 152: ...etermines the carriage height For more information see Change the media settings on page 44 3 Make sure the media is not damaged or curled 4 Make sure the media and the printer are not stored in a humid place Check that the humidity is not too high 5 Make sure the correct winding option is selected in the RIP s media settings You can print and wind with a tension bar or a locked tension bar Print ...

Страница 153: ...Chapter 7 Configure the network and security settings ...

Страница 154: ...for password recovery SMTP port 25 by default can be changed You can access the settings editor HTTP port 80 or HTTPS port 443 by default can be changed NOTE HTTPS requires a valid certificate Procedure 1 On the operator panel tap on the System icon on the right 2 Tap on Connectivity 3 Tap on Identification and network adapter You can change the Hostname Adapter link speed and duplex mode or Prima...

Страница 155: ... can change are the Proxy settings NOTE A proxy may be required to access the internet and make use of Remote services Ask your IT administrator for the settings if he does not know them use the default values To change the Remote connection settings ask your local Service representative 9 Click on Save to save the settings Configure the network Chapter 7 Configure the network and security setting...

Страница 156: ... of the printer NOTE You can make some connectivity and security settings on the operator panel for more information see Configure the network on page 154 Access the settings editor Access the settings editor via any web browser by typing in the printer s IP address or Hostname Open the settings editor 156 Chapter 7 Configure the network and security settings ...

Страница 157: ...d is 71617000 It is highly recommended to change it during system installation or immediately after For more information see Change the System administrator password on page 159 Log in on the operator panel 1 On the operator panel tap on the System icon on the right 2 Tap on any of the tiles for example on Connectivity 3 Tap on the login icon at the top right of the window 4 Fill in the password a...

Страница 158: ...nistrator as user name and fill in the password 4 Click on Log in Or 1 Open the settings editor 2 Click on a System administrator setting you want to change 3 Select the System administrator as user name and fill in the password 4 Click on Log in Log in as a System administrator 158 Chapter 7 Configure the network and security settings ...

Страница 159: ...tor 2 Click on Configuration Users 3 Check the box in front of System administrator and click on the Edit icon above 4 In the window fill in Password and Confirm password with your new password 5 Click Ok to save the password Reset the System administrator account It is also possible to reset the System administrator account and go back to the default values Click on Configuration Security Restore...

Страница 160: ...l address you want to use to receive the password recovery link If necessary change the mail server port number default 25 Procedure 1 Open the settings editor 2 Click on Configuration Connectivity 3 Click on Edit in the Mail server header A window opens 4 Under Hostname IP address of mail server fill in the hostname or IP address of the mail server 5 Under Port you can change the port generally T...

Страница 161: ...nfiguration Users to configure the email address 13 Check the box in front of System administrator and click on the Edit icon above A window opens 14 Fill in the Email address you want to use for password recovery 15 Click on Start the test 16 Check that Result of email test shows Test successful NOTE When the result is not successful check the error to troubleshoot If you cannot solve the problem...

Страница 162: ...ame and IP address and fill it in correctly If you are not sure ask your IT administrator Transfer abor ted 1 Check if the connection with the mail server is secure or not Check the type of connection and fill it in correctly 2 The trusted certificates of the mail server are not imported in the con troller Import the certificates For more information see Import a trus ted certificate on page 166 A...

Страница 163: ...nfigure a mail server for password recovery on page 160 Procedure 1 Open the settings editor 2 Click on Visitor in the top right corner 3 Click on Log in and select the user name 4 Click on Recover password 5 Click on Ok to let the system send an email to you with the recovery link 6 Open your email and click on the link A new recovery window opens 7 Fill in the new password confirm the new passwo...

Страница 164: ...cols The Océ Colorado 1640 uses the following ports and protocols Incoming connections Used for TCP port 9100 TCP RAW printing between the RIP and the printer TCP port 80 HTTP for backchannel and settings editor TCP port 443 HTTPS for secure settings editor NOTE You can change the default value 443 Outgoing connections Used for TCP port 443 HTTPS for Remote Services including the update of Technic...

Страница 165: ...ion with the back office when Remote Service communication is enabled Identity certificates Identity certificates are required to allow a browser to establish a HTTPS connection with the controller for access to the settings editor Actions You can Import trusted certificates used by your company Ask the IT administrator For more information see Import a trusted certificate on page 166 Enable the u...

Страница 166: ... and root certificates used to access the mail sever e g in case of a secure connection via SSL TLS Intermediate and root certificates used to access any proxy for Internet access In case any of these certificates are used make sure you get them from your IT administrator Procedure 1 Open the settings editor 2 Click on Configuration Trusted certificates 3 Click on the Import icon 4 Click on Browse...

Страница 167: ...ad the valid certificate on the controller Procedure 1 Open the settings editor 2 Click on Configuration Security 3 Click on Edit in the Identity certificate header 4 Fill in the information for the certificate request 1 Fill in the fully qualified domain name of the printer under Common name 2 It is advised to fill in the alternative names e g hostname or IP address to guarantee access to the pri...

Страница 168: ...file 13 Click on Upload A new window opens 14 Click on Ok to restart the system A failed or success window appears 15 Restart the printer For more information see Restart the printer on page 178 It is advised to make a new backup which includes the complete valid certificate with the private key Result You can now use a browser and access the settings editor via HTTPS https hostname Where hostname...

Страница 169: ...the available security patches Procedure 1 Open the settings editor 2 Click on Support Software updates 3 Click on Install in the Windows updates section 4 Click on Select a file and browse to the patch file Repeat this step when you have more patch files The system uploads and installs the patches and displays the result in the Windows updates section 5 Click on Ok when the update is finished Ins...

Страница 170: ... Open the settings editor 2 Click on Support Backups 3 Click on the Confidential data icon A window opens 4 Check the box to include the confidential data in the backup and click on Ok 5 Click on the Create icon A window opens 6 Fill in the description and click on Ok 7 Check the box in front of the created file 8 Click on the Export icon A window opens 9 Click on Ok and save the file on another l...

Страница 171: ...up on page 170 Procedure 1 Open the settings editor 2 Click on Support Backups 3 In case of an external backup exported during a backup operation click on Import Browse to the external backup and confirm the import operation 4 Check the box in front of the backup file 5 Click on Restore user configuration 6 Click on Ok to restore the configuration Restore a backup Chapter 7 Configure the network a...

Страница 172: ...ated to USB it is possible to disable installation from USB Procedure 1 Open the settings editor 2 Click on Configuration Security 3 Click on the value next to Install system from USB A window opens 4 Select Enabled or Disabled according to the customer security policy and click on Ok Enable system installation from USB 172 Chapter 7 Configure the network and security settings ...

Страница 173: ...Chapter 8 Troubleshooting and support ...

Страница 174: ...n the operator panel tap on the System icon on the right 2 Tap on Regional settings 3 Change the language system of measurement date and time or the time zone NOTE You have to log in as System administrator to change some of the settings For more information see Log in as a System administrator on page 157 4 Tap on Save to save the settings General support 174 Chapter 8 Troubleshooting and support...

Страница 175: ...Move the printer You should not move the printer When you want to move the printer contact your local service representative Move the printer Chapter 8 Troubleshooting and support 175 ...

Страница 176: ...ia output side and locate the on off button under the operator panel 2 Push the button The printer is switched on or off The system is kept in standby mode so power to the system is never cut NOTE Before you turn off the printer make sure The printer is not busy There is no media on the platen The printer is in a state where maintenance is possible Turn the printer on and off 176 Chapter 8 Trouble...

Страница 177: ...s action when absolutely necessary Procedure 1 Move to the media input side 2 Open the top cover Power is cut to the engine the printer immediately stops all operations After you finish Opening the top cover can cause a paper crash and result in uncured ink You can solve the situation yourself For more information see Remove media from the paper path on page 180 General troubleshooting Chapter 8 T...

Страница 178: ...t the system to activate settings or in case of a software issue it might help to restart the system Procedure 1 On the operator panel tap the System icon on the right 2 Tap on Power management 3 Tap on Restart 4 The printer will start up automatically Restart the printer 178 Chapter 8 Troubleshooting and support ...

Страница 179: ...ne has to be on to keep the printer in optimal condition Procedure 1 Move to the media output side 2 Pull to open the cover under the roll winder 3 Switch the power switch to the off position 4 Wait 10 seconds 5 Switch the power switch to the on position Turn the printer on after a power cut Chapter 8 Troubleshooting and support 179 ...

Страница 180: ...gloves You can only wear the gloves for ten minutes After ten minutes you must put on new gloves to prevent contact with the ink IMPORTANT Watch out with uncured ink Strictly follow the steps below to make sure you do not pull media with uncured ink through the system Procedure 1 Locate the winder on the media output side of the printer If present take the tension bar out You can lift the tension ...

Страница 181: ... side and open the media cover 3 Take the knife and cut the media in the cutting guide 4 Close the media cover 5 Pull firmly to open the media drawer Remove media from the paper path Chapter 8 Troubleshooting and support 181 ...

Страница 182: ...s 9 Open the top cover 10 Carefully push the curing carriage to the left over the filters 1 11 Carefully push the printhead carriage to the left in manual maintenance position 2 IMPORTANT Touch the printhead carriage on the covered area only otherwise you can damage the printheads 1 2 3 12 Take the knife and cut the media in the cutting guide 3 Remove media from the paper path 182 Chapter 8 Troubl...

Страница 183: ...luted with ink clean it For more information see Clean the platen on page 188 17 Dispose the gloves as chemical waste 18 Close the top cover 19 On the media output side manually wind the media on the take up media roll and tape it 20 Start automatic maintenance on the operator panel For more information see Start automatic maintenance on page 96 Remove media from the paper path Chapter 8 Troublesh...

Страница 184: ...aintenance tray you can cancel the replacement Procedure 1 The operator panel displays a message you must start the maintenance tray replacement procedure Tap on OK The Tools icon turns red 2 Tap on the Tools icon 3 Go to Maintenance tray 4 Tap on Replace A new window opens 5 Tap on Cancel The replacement procedure is canceled the counters will not be reset Cancel the replacement of a maintenance ...

Страница 185: ...s for ten minutes After ten minutes you must put on new gloves to prevent contact with the ink IMPORTANT This cleaning liquid IPA is not used for cleaning the matrix plate maintenance station wiper and clean wall maintenance drawer Procedure When you clean follow the procedure Step Action 1 Make sure the printer is not printing and there is no media on the platen 2 Put on the gloves 3 Clean the pa...

Страница 186: ...TE For information on the prescribed maintenance materials see List of Océ Colorado 1640 maintenance materials on page 134 CAUTION Wear the Océ Colorado 1640 prescribed nitrile gloves You can only wear the gloves for ten minutes After ten minutes you must put on new gloves to prevent contact with the ink Procedure 1 Put on the Océ Colorado 1640 approved nitrile gloves 2 Go to the media input side ...

Страница 187: ...en the cloth with the cleaning liquid to remove any remaining ink IMPORTANT Use the prescribed cleaning liquid Do not use any other cleaners 6 Dispose the gloves cloths and pin as chemical waste according to local regulations 7 Close the media cover Clean the media cover Chapter 8 Troubleshooting and support 187 ...

Страница 188: ...e the printer is not printing 2 Put on the Océ Colorado 1640 approved nitrile gloves 3 Open the top cover from the media input side 4 If present remove the media from the paper path For more information see Remove media from the paper path on page 180 5 Take a lint free cloth and clean the complete platen area If necessary you can clean the area surrounding the maintenance station as well When the...

Страница 189: ...s with a 1mm diameter pin 8 When all residue ink is removed wait for 3 to 4 minutes to let the liquid evaporate 9 Take a new and clean cloth to wipe the complete platen 10 Dispose the gloves cloths and pin as chemical waste according to local regulations 11 Close the top cover After you finish Reload the media For more information see Load a media roll position 1 on page 48 Clean the platen Chapte...

Страница 190: ... List of Océ Colorado 1640 maintenance materials on page 134 CAUTION Wear the Océ Colorado 1640 prescribed nitrile gloves You can only wear the gloves for ten minutes After ten minutes you must put on new gloves to prevent contact with the ink Procedure 1 Make sure the printer is not printing and the guide plate is in open position 2 Remove the media before you replace the foams and roller assy Fo...

Страница 191: ...of the roller assy A pin is placed at the right end of the foam 10 Pull the pin and plug out with your fingers 11 Slide both foams towards the middle to remove them 12 Dispose the roller assy foams pins and plugs as chemical waste according to local regulations 13 Take a lint free cloth and clean any residue ink left on the guide plate If necessary dampen the cloth with the cleaning liquid to remo...

Страница 192: ... local regulations 15 Take the new foams and slide them in place 16 On the left end push in a new plug and push in a new pin 1 2 3 17 On the right end push in a new plug and push in a new pin 18 Push and click a new roller assy in place Clean the guide plate and replace the foams and roller assy 192 Chapter 8 Troubleshooting and support ...

Страница 193: ......

Страница 194: ...nada Inc www canon ca Canon Europa Inc www canon europe com Canon Latin America Inc www cla canon com Canon Australia PTY Ltd www canon com au Canon China Co Ltd www canon com cn Canon Singapore PTE Ltd www canon com sg Canon Hongkong Co Ltd www canon com hk Océ 2017 ...

Отзывы: