background image

12

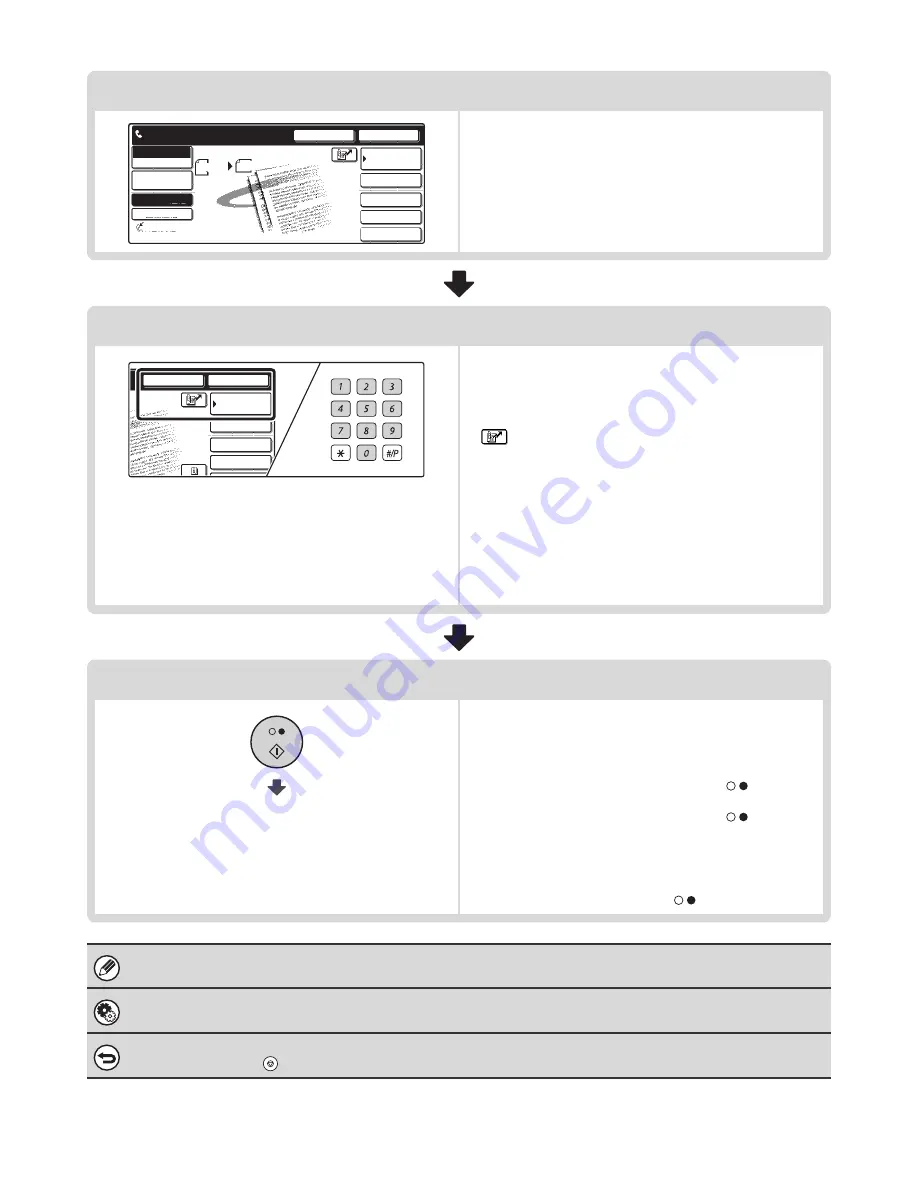
Select convenient special modes

Touch the [Special Modes] key to select special modes such 
as timer transmission and the erase function.
Touch the [File] key or [Quick File] key to select the document 
filing function.

Enter the destination fax number

• [Address Book] key: Select a destination that is stored in the 

Address Book or look up a destination 
in a global address book.

CALLING UP A STORED 
DESTINATION

 (page 37)

 key: Use a search number to specify a destination 

stored in the Address Book.

USING A SEARCH NUMBER TO CALL UP 
A DESTINATION

 (page 43)

• [Resend] key: Select a fax number from the last eight 

destinations used for transmission.

TRANSMISSION BY REDIALING 
(RESEND)

 (page 25)

• Numeric keys: Enter a fax number.

ENTERING A FAX NUMBER WITH THE 
NUMERIC KEYS

 (page 35)

Begin transmission

Transmission begins

Scan the original and send the fax.

If the original is placed on the document glass, follow these 
steps to start scanning and transmission:

When sending a fax normally (memory transmission)

(1) Press the [BLACK & WHITE START] key (

).

(2) When scanning is finished, replace the original with the next original.
(3) Press the [BLACK & WHITE START] key (

).

(4) Repeat steps (2) and (3) until all originals have been scanned.
(5) Touch the [Read-End] key.

When sending a fax in direct transmission mode

Multiple originals cannot be scanned in direct transmission mode. 
Press the [BLACK & WHITE START] key (

) and start transmission.

When transmission ends, image settings and convenient function (special mode) settings are cleared.

System Settings for Fax (Administrator): 

Default Display Setting

 (page 175)

The settings can be kept in effect a fixed period of time after scanning is completed.

To cancel scanning...

Press the [STOP] key (

).

Speaker

Resend

Scan

Send

Auto

Ready to send.

Quick File

File

Special Modes

Sub Address

Address Book

Fax

Mode Switch

Image

Settings

Direct TX

Memory TX

Auto Reception

Fax Memory:100%

 8 x11

/

 2

File

Special Modes

Sub Address

Speaker

Resend

Address Book

Содержание cm4010

Страница 1: ......

Страница 2: ...EXPOSURE 29 SPECIFYING THE ORIGINAL SCAN SIZE AND SEND SIZE Enlarge Reduce Sending 30 SPECIFYING THE SCAN SIZE OF THE ORIGINAL 31 SPECIFYING THE SEND SIZE 33 AUTOMATICALLY SCANNING BOTH SIDES OF AN OR...

Страница 3: ...HINE Polling memory 96 RESTRICTING POLLING ACCESS Polling security 96 SCANNING A DOCUMENT INTO A MEMORY BOX FOR POLLING TRANSMISSION 97 PRINTING A DOCUMENT STORED IN THE PUBLIC BOX 99 DELETING A DOCUM...

Страница 4: ...Group Key 140 Storing a Program 144 Modify Delete a One touch Key Group or Program 146 Programming an F code Memory Box Polling Memory 149 Programming an F code Memory Box Confidential 151 Programming...

Страница 5: ...0 sheet paper drawer are installed on the cm2510 To further explain certain functions and uses some explanations assume that additional peripheral devices are installed MANUALS PROVIDED WITH THE MACHI...

Страница 6: ...This manual provides detailed explanations of the procedures for using the scanner function and the Internet Fax function Document Filing Guide This manual provides detailed explanations of the proce...

Страница 7: ...from the base screen of fax mode System Settings for Fax Administrator Default Display Setting page 175 One of the following screens can be selected for the initial screen that appears when the IMAGE...

Страница 8: ...page 26 9 Resend key Touch this key to redial a fax number When entering a fax number to be dialed this key changes to the Next Address key TRANSMISSION BY REDIALING RESEND page 25 10 Address Book ke...

Страница 9: ...4 4 Special Modes key Touch this key to use a convenient special mode Use this key when the Special Modes key that appears in the base screen has been changed to a different key using Customizing disp...

Страница 10: ...the OK key The special mode settings cannot be changed from the function review screen To change a setting touch the OK key to close the Function Review screen and then touch the Special Modes key and...

Страница 11: ...s book LDAP server CALLING UP A DESTINATION FROM A GLOBAL ADDRESS BOOK page 41 When the destination is selected using a one touch key or the fax number is entered directly using the numeric keys this...

Страница 12: ...just the resolution of the image CHANGING THE RESOLUTION page 28 Original key Use this key to select the original size the original send size and two sided original scanning SPECIFYING THE ORIGINAL SC...

Страница 13: ...the document glass follow these steps to start scanning and transmission When sending a fax normally memory transmission 1 Press the BLACK WHITE START key 2 When scanning is finished replace the origi...

Страница 14: ...nsmission jobs display the job status screen 5 CHECKING THE STATUS OF FAX JOBS page 48 2 BASIC TRANSMISSION METHODS If memory becomes full while the first original page is being scanned transmission w...

Страница 15: ...ion in progress is completed ahead of any previously reserved transmissions To send a fax by direct transmission touch the Direct TX key in the base screen USING THE AUTOMATIC DOCUMENT FEEDER TO SEND...

Страница 16: ...2 A4R B5 and A5 size originals cannot be rotated for transmission System Settings for Fax Administrator Rotation Sending Setting page 180 The factory default setting is rotate before transmission If...

Страница 17: ...5 1 2 length A5 210 mm width x 148 mm length 5 1 2 width x 8 1 2 length A5R 148 mm width x 210 mm length 11 width x 31 1 2 length 297 mm width x 800 mm length When transmitting a long original page 31...

Страница 18: ...ansmission Cancel a transmission job in the job status screen CANCELING A FAX IN PROGRESS OR A RESERVED FAX page 55 System Settings for Fax Administrator Recall in Case of Line Busy page 182 This is u...

Страница 19: ...splayed together with a job control number This number can be used to locate the job in the Transaction Report or in the Image Sending Activity Report System Settings for Fax Administrator Scan Comple...

Страница 20: ...fax number with the numeric keys ENTERING A FAX NUMBER WITH THE NUMERIC KEYS page 35 4 Press the BLACK WHITE START key Transmission begins To cancel transmission While Dialing Press to cancel appears...

Страница 21: ...due to a communication error or other reason If a fax transmission is already in progress when the direct transmission operation is performed the direct transmission will wait until the previous trans...

Страница 22: ...der starting from the first page When sending a multi page fax the automatic document feeder and the document glass cannot both be used to scan the original pages 2 Enter the destination fax number 1...

Страница 23: ...ed together with a job control number This number can be used to locate the job in the Transaction Report or in the Image Sending Activity Report If no action is taken for one minute after the confirm...

Страница 24: ...l in the appropriate position for its size as shown above Do not place any objects under the original size detector Closing the automatic document feeder with an object underneath may damage the origi...

Страница 25: ...le Quick File Two Sided Scanning Resending will not take place when a direct transmission is not successful due to a communication error or other reason If a fax transmission is already in progress wh...

Страница 26: ...t glass scan each page one page at a time When scanning finishes place the next original and press the BLACK WHITE START key Repeat until all pages have been scanned and then press the Read End key A...

Страница 27: ...tion A group key cannot be used CALLING UP A FAX NUMBER FROM THE ADDRESS BOOK page 36 If the fax number of the transmitting machine is not stored in the Address Book enter the fax number with the nume...

Страница 28: ...ination that includes an F code sub address and passcode cannot be used A one touch key that has multiple destinations or has a non fax destination cannot be used System Settings for Fax Administrator...

Страница 29: ...Fax Administrator Initial Resolution Setting page 175 This is used to change the default resolution setting Resolution How to select Standard Select this setting when your original consists of normal...

Страница 30: ...posure setting can be changed each time you change pages When using the automatic document feeder the exposure setting cannot be changed once scanning has begun System Settings for Fax Administrator D...

Страница 31: ...1 2 x 8 1 2 B5 the image will be reduced before transmission Only standard original sizes can be automatically detected STANDARD SIZES page 16 When the original size is a non standard size manually s...

Страница 32: ...e transmitted The send size cannot be specified when sending a long original To specify an AB size for the scan size touch the AB Inch key to highlight the AB side and then specify the scan size 4 Tou...

Страница 33: ...Size key When the scan size is specified with numbers the send size cannot be specified Auto Exposure Standard Resolution Original Special Modes Quick File File Special Modes Sub Address Address Book...

Страница 34: ...yed out to prevent selection To specify an AB size for the send size touch the AB Inch key to highlight the AB side and then specify the send size 4 Specify the Image orientation of the original 1 Tou...

Страница 35: ...t properly when using enlargement reduction 3 Touch the OK key To specify the image orientation Touch the appropriate original orientation key so that it is highlighted Two sided scanning automaticall...

Страница 36: ...after the country code when dialing an international number Touch the Pause key A hyphen is entered when the Pause key is touched once 3 ENTERING DESTINATION FAX NUMBERS Take care to enter the correct...

Страница 37: ...ey Frequently used destinations can be displayed on the Frequent Use tab Destinations are automatically assigned to tabs when they are stored in one touch keys To have a destination appear on the Freq...

Страница 38: ...hanges in the following order search numbers page 43 ascending names descending names search numbers When the display order is changed the display order of the other index tabs also changes To select...

Страница 39: ...he destination that you wish to cancel Touch the Yes key in the confirmation screen 3 Touch the OK key You will return to the Address Book screen AAA AAA CCC CCC EEE EEE DDD DDD BBB BBB FFF FFF ABCD E...

Страница 40: ...s does not change 1 Touch the Sort Address key 2 Change the display method 1 Touch the Fax key 2 Touch the OK key To display only group one touch keys Touch the Group key AAA AAA CCC CCC EEE EEE DDD D...

Страница 41: ...This is used to create a custom index Display of a destination on the index is selected when the destination is stored Changing the Name of a Custom Index page 159 AAA AAA CCC CCC EEE EEE DDD DDD BBB...

Страница 42: ...earch key The results will appear after a brief interval For the procedure for entering text see 6 ENTERING TEXT in the User s Guide How to search Enter the initial letters of the name maximum of 64 c...

Страница 43: ...close the message A maximum of 300 search results are displayed If the desired destination was not found touch the Search Again key to add more search letters To check the information stored in a dest...

Страница 44: ...ation is stored in a one touch key If you do not know the search number print the one touch address list using Sending Address List in the system settings for fax Sending Address List page 134 When en...

Страница 45: ...d or area code are stored separately in one touch keys Example Using chain dialing to dial an international number System Settings for Fax Administrator Pause Time Setting page 178 This is used to set...

Страница 46: ...justed when faxes are received When a fax smaller than 8 1 2 x 11 A4 size is received the size of the paper used for printing will vary depending on the orientation vertical or horizontal in which the...

Страница 47: ...stapling can be selected when a finisher is installed The number of copies of received faxes that are printed and the output tray can be selected When a finisher is installed the number of copies prin...

Страница 48: ...e Cancel key The password entry screen will appear again if the mode is changed In addition after the Cancel key is touched to close the screen the key will blink in the base screen as a reminder that...

Страница 49: ...as jobs here 5 CHECKING THE STATUS OF FAX JOBS The left edge of the job status screen appears at the left edge of the touch panel screen The left edge of the job status screen can be touched to displ...

Страница 50: ...ansmission or reception jobs A description of the job and the result status are shown Broadcast transmission jobs serial polling jobs and transmission reception jobs that used the document filing func...

Страница 51: ...s reserved 5 Number of pages Shows the number of pages transmitted total number of original pages 6 Status Shows the job status Job in progress Job waiting to be executed A AAA AAA 3 Waiting 2 1 3 4 6...

Страница 52: ...ng PC Fax transmission Message Status Send OK Transmission completed In Memory Reception completed but the fax has not been printed The received fax is being held by the print hold function Printed Th...

Страница 53: ...he bottom of the job queue screen When the set retry interval elapses the job is executed If there are jobs reserved ahead of the retry job the retry job is reserved at the bottom of the job queue and...

Страница 54: ...pages Fax Waiting This shows information on the destinations that are waiting A broadcast control number 3 digits appears in front of each destination Address The name of the other destination Status...

Страница 55: ...l up the file and use it touch the Call key Failed Shows information on destinations for which communication failed A broadcast control number 3 digits appears in front of each destination Address Add...

Страница 56: ...and execute the job While Stopping appears the cancellation can be stopped and the job can be transmitted 1 Touch the key of the Stopping fax job 2 Touch the Release key The job status changes to a W...

Страница 57: ...e job will be executed when the job in progress is completed If the job in progress is a broadcast transmission job or a serial polling job the priority job will be transmitted between destinations of...

Страница 58: ...saction Report Print Select Setting page 179 This is used to set the conditions for printing transaction reports The factory default settings are printing at below Single Sending Print Out All Report...

Страница 59: ...at Error A transaction report is printed when transmission fails Do not Print Do not print a transaction report When the Print Original Image checkbox is selected part of the transmitted original is i...

Страница 60: ...peration or your machine broke the connection when polled because no data was in its F code memory polling box RX POLL NG The connection was broken because the sub address for F code polling memory wa...

Страница 61: ...Activity Report are erased when the report is printed and thus it cannot be reprinted The Image Sending Activity Report can also be printed manually For more information see List Print Administrator...

Страница 62: ...peration or your machine broke the connection when polled because no data was in its F code memory polling box RX POLL NG The connection was broken because the sub address for F code polling memory wa...

Страница 63: ...axes by broadcast transmission in group keys Group dialing allows you to call up multiple fax numbers stored in a one touch key by simply pressing the one touch key To store destinations in a group ke...

Страница 64: ...Address key when entering destinations for broadcast transmissions If the To key appears after the destination is selected with a one touch key touch this key to display the Next Address key 3 Touch t...

Страница 65: ...d then press the Read End key A beep will sound to indicate that scanning is finished To cancel scanning Press the STOP key A broadcast transmission can be used in combination with the timer transmiss...

Страница 66: ...ling resend procedure There is no need to rescan the original If the job was stored in a confidential folder or was stored as confidential file a password entry screen will appear after you touch the...

Страница 67: ...not possible to leave the document in the auto document feeder or on the document glass and have it scanned at the reserved time of transmission When the transmission is finished the transmission set...

Страница 68: ...CALLING UP A FAX NUMBER FROM THE ADDRESS BOOK page 36 If the fax number of the transmitting machine is not stored in the Address Book enter the fax number with the numeric keys ENTERING A FAX NUMBER...

Страница 69: ...ansmissions can be stored at once Only one timer polling operation can be stored at once If you wish to poll from multiple machines store a serial polling timer operation If another transmission is in...

Страница 70: ...face down on the document glass If the original can be placed in the document feeder tray place it face up 2 Touch the Special Modes key Edge erase This erases shadows that appear at the edges of the...

Страница 71: ...umeric keys ENTERING A FAX NUMBER WITH THE NUMERIC KEYS page 35 You can touch the key to display a list of the selected special mode settings or two sided scanning To return to the previous screen aft...

Страница 72: ...the Read End key A beep will sound to indicate that scanning is finished To cancel scanning Press the STOP key When the erase function is used erase takes place at the edges of the original image If y...

Страница 73: ...ment glass The send size cannot be changed 1 Place the original face down on the document glass Place the opened original on the document glass so that the first page you wish to transmit is on the ri...

Страница 74: ...s touch the OK key 5 Press the BLACK WHITE START key to scan the first two pages To cancel scanning Press the STOP key 6 If you have more pages to scan change pages and then press the BLACK WHITE STAR...

Страница 75: ...erase function Note however that Center Erase and Edge Center Erase cannot be used This function cannot be used in combination with the following functions 2in1 Card Shot Job Build Mode Mixed Size Ori...

Страница 76: ...page This function is convenient when you have a large number of original pages and wish to reduce the number of pages sent This function cannot be used in direct transmission mode or when the speaker...

Страница 77: ...iginals Landscape originals Document glass Place each original face down Originals Speaker Resend Scan Send Auto Quick File File Special Modes Sub Address Address Book Fax Mode Switch Image Settings D...

Страница 78: ...hed If you are scanning the original on the document glass scan each page one page at a time When scanning finishes place the next original and press the BLACK WHITE START key Repeat until all pages h...

Страница 79: ...used in direct transmission mode or when using the speaker 1 Place the original card face down on the document glass 2 Touch the Special Modes key 3 Touch the Card Shot key Transmission Front Back Spe...

Страница 80: ...OK key next to the Cancel key 5 Changing the original scan size and send size If you do not need to change the scan size or send size go to step 6 1 Touch the Image Settings key and then touch the Or...

Страница 81: ...press the BLACK WHITE START key to scan the back of the card 9 Touch the Read End key The ratio cannot be specified and the Rotation Sending Setting cannot be selected This function cannot be used in...

Страница 82: ...job program is stored Enter the fax numbers of the branch offices Select the 2in1 function Select erase settings Press the BLACK WHITE START key The originals are scanned and transmitted Call up the s...

Страница 83: ...Job Build mode Mixed Size Original Slow Scan mode Own Name Select Polling Memory Transaction Report File Quick File Up to 48 programs can be stored and can be used repeatedly Up to 500 destinations c...

Страница 84: ...nned A beep will sound to indicate that scanning is finished If you are scanning the original on the document glass scan each page one page at a time When scanning finishes place the next original and...

Страница 85: ...ing Page Number at Receiver page 180 in the system settings for fax administrator Page numbers appear in the format page number total pages Only the page number is printed when manual transmission or...

Страница 86: ...ouch the desired sender information key 2 Touch the OK key 4 Touch the OK key System Settings for Fax Administrator Registration of Own Name Select page 181 This is used to store sender information fo...

Страница 87: ...eder tray The following combinations of sizes of originals can be placed together in the document feeder tray 11 x 17 and 8 1 2 x 14 11 x 17 and 8 1 2 x 13 11 x 17 and 5 1 2 x 8 1 2 A3 and B4 A3 and B...

Страница 88: ...the mixed size original setting is selected rotation sending does not operate When the mixed size original setting is selected two sided scanning cannot be used except when using the cm4010 This func...

Страница 89: ...o much force they may crumple and misfeed 2 Touch the Special Modes key 3 Select slow scan mode 1 Touch the keys to switch through the screens 2 Touch the Slow Scan Mode key so that it is highlighted...

Страница 90: ...sided scanning To return to the previous screen after checking the settings touch the OK key 5 Press the BLACK WHITE START key To cancel scanning Press the STOP key To cancel slow scan mode Touch the...

Страница 91: ...ned This function cannot be used in direct transmission mode or when using the speaker 1 Insert the originals face up in the document feeder tray Place the originals face up Insert the originals all t...

Страница 92: ...cator line Repeat until all sets of originals have been scanned If no action is taken for one minute after the final original is scanned scanning automatically ends and the transmission is entered in...

Страница 93: ...polling reception function 1 Touch the Special Modes key 2 Select polling reception 1 Touch the keys to switch through the screens 2 Touch the Polling key so that it is highlighted 3 Touch the OK key...

Страница 94: ...red In this procedure one touch keys that have a sub address and passcode cannot be used 4 Press the BLACK WHITE START key Your machine will call the other machine and initiate reception of the fax Po...

Страница 95: ...UP A FAX NUMBER FROM THE ADDRESS BOOK page 36 If the fax number of the transmitting machine is not stored in the Address Book enter the fax number with the numeric keys ENTERING A FAX NUMBER WITH THE...

Страница 96: ...be used when the other machine is Super G3 or G3 compatible and has a polling function The receiving machine bears the expense phone charges of the polling reception 0312345678 Resend Speaker Quick Fi...

Страница 97: ...ogrammed sender fax number matches a fax number stored in your machine as a polling passcode number This is called Polling Security To use this function first store polling passcode numbers the sender...

Страница 98: ...the screens 2 Touch the Memory Box key 4 Touch the Data Store key 5 Touch the Public Box key 1 1 Speaker Resend Scan Send Auto Quick File File Special Modes Sub Address Address Book Fax Mode Switch Im...

Страница 99: ...RT key Scanning begins If you inserted the original pages in the document feeder tray all pages are scanned If you are scanning the original on the document glass scan each page one page at a time Whe...

Страница 100: ...lic Box key will be grayed out 5 Press the BLACK WHITE START key The stored document is printed To cancel printing Touch the Cancel key in the touch panel Speaker Resend Quick File File Special Modes...

Страница 101: ...4 To cancel the deletion Touch the No key You will return to the screen of step 4 Speaker Resend Quick File File Special Modes Sub Address Address Book Fax Mode Switch Image Settings Direct TX Memory...

Страница 102: ...he machine 1 Press the SYSTEM SETTINGS key 2 Touch the Fax Data Receive Forward key 3 Touch the Fax Data Forward key The machine cannot print Printing Forwarding Received fax The machine Forwarding de...

Страница 103: ...until it can be printed If some pages of a fax that is being forwarded were successfully printed only those pages that were not printed will be forwarded A forwarded fax becomes a fax transmission jo...

Страница 104: ...e data for transmission will be created and sent as a fax For more information on using PC Fax see the Help file for the PC Fax driver The PC Fax driver is on the CD ROM that accompanies the machine F...

Страница 105: ...ward received faxes directly to an e mail address without printing the faxes To configure inbound routing settings click Application Settings and then Inbound Routing Settings in the Web page menu Adm...

Страница 106: ...machine does not match the F code in the receiving machine reception will not take place The products of other manufacturers may use different terms for sub address and passcode If you need to contact...

Страница 107: ...ission To use the following F code communication functions F code memory boxes must be created in the other machine F code confidential transmission F code polling reception F code relay request trans...

Страница 108: ...following F code functions are used the other machine dials your machine F code confidential reception F code polling memory F code relay broadcast transmission If the destination machine does not hav...

Страница 109: ...x the print passcode must be entered The F code sub address and passcode of the memory box to be used should be verified by the sender and the recipient before the fax is sent System Settings for Fax...

Страница 110: ...the BLACK WHITE START key Scanning begins If you inserted the original pages in the document feeder tray all pages are scanned A beep will sound to indicate that scanning is finished If you are scann...

Страница 111: ...the key of the memory box containing the confidential fax appears in the keys of memory boxes that have received faxes The keys of memory boxes that have not received faxes are grayed out and cannot b...

Страница 112: ...The fax is automatically cleared from the memory box after printing If you forget the print passcode There is no way to check a forgotten passcode on the machine Take care not to forget the passcode...

Страница 113: ...automatic document feeder or on the document glass when using this function The receiving machine bears the phone charges of the transmission 1 Touch the Special Modes key 2 Select polling 1 Touch th...

Страница 114: ...o enter 5 Enter the passcode 4 Press the BLACK WHITE START key Your machine will call the other machine and initiate reception of the fax Polling multiple machines serial polling is not possible F cod...

Страница 115: ...ion System Settings for Fax F Code Memory Box This is used to create memory boxes polling memory for F code polling memory transmission A memory box name sub address and passcode are programmed in eac...

Страница 116: ...select original settings exposure resolution original size and two sided original To set special mode settings touch the Special Modes key that is displayed when the Image Settings key is touched A p...

Страница 117: ...original and press the BLACK WHITE START key Repeat until all pages have been scanned and then press the Read End key To cancel scanning To cancel scanning press the STOP key during scanning If other...

Страница 118: ...he document you wish to print is stored appears in keys that have documents stored 5 Press the BLACK WHITE START key The document in the selected memory box is printed To cancel printing Touch the Can...

Страница 119: ...documents stored 5 Touch the Yes key The document in the selected memory box is deleted and you return to the screen of step 4 To cancel the deletion Touch the No key You will return to the screen of...

Страница 120: ...nication This function can be used in combination with a broadcast transmission or timer transmission An F code relay request transmission can also be stored in a program Your machine the machine that...

Страница 121: ...inserted the original pages in the document feeder tray all pages are scanned A beep will sound to indicate that scanning is finished If you are scanning the original on the document glass scan each...

Страница 122: ...t memory box when the box is created in your machine The end receiving machines do not need to support F code communication The other machine the machine that requests a relay broadcast transmission o...

Страница 123: ...to receive a fax Connect the extension phone as shown below 9 USING AN EXTENSION PHONE Connect an extension phone that has a modular jack Use standard phone line cable to connect the phone If other th...

Страница 124: ...your extension phone 1 When you hear ringing answer the call on the extension phone 2 Signal the machine to start fax reception Press on the keypad of the extension phone 3 Replace the extension phon...

Страница 125: ...e line type setting check the main power check the date and time change your sender fax number setting CONNECTION TO THE TELEPHONE LINE Be sure to use the provided telephone line cord to connect the m...

Страница 126: ...e used and in particular if reception or timer transmission will take place at night always keep the main power switch in the On position CHANGING THE SENDER FAX NUMBER If your fax number changed chan...

Страница 127: ...ht Saving Time Setting checkbox When this function is used the time changes at the beginning and end of daylight saving time as follows Standard time Daylight saving time First Sunday in April 2 00 3...

Страница 128: ...gured Storing destinations for fax Displaying the number of pages faxed System settings that can be configured by the administrator To configure these settings login as an administrator is required Fo...

Страница 129: ...of the settings see the following pages of this chapter System settings screen factory default state To quit the system settings touch the Exit key in the top right corner of the screen User authentic...

Страница 130: ...e mail address which is stored on the LDAP server in same way as you entered the password When finished touch the OK key If you select a user whose E mail address is stored in the machine the e mail a...

Страница 131: ...chine Auth to is entered To enter your login name directly or change the login destination touch the Auth to key The following screen appears when the key is touched Select the desired key and touch t...

Страница 132: ...pletes the login procedure After login the system settings can be used For the procedure following login see When User Authentication is not Enabled page 128 To configure and store LDAP settings click...

Страница 133: ...ge 165 Depending on the machine specifications and peripheral devices installed it may not be possible to use some settings Item Factory default setting Page List Print User 134 Sending Address List 1...

Страница 134: ...ore Polling Memory Box Name Sub Address Confidential 151 Box Name Sub Address Print PIN Relay Broadcast 154 Box Name Sub Address Recipient X Modify Delete 157 Polling Memory Confidential Relay Broadca...

Страница 135: ...pears and printing begins To cancel printing Touch the Cancel key in the message screen that appears after you touch one of the keys SYSTEM SETTINGS System Settings Admin Password Default Settings Tot...

Страница 136: ...Type and then store the address 1 Press the SYSTEM SETTINGS key 2 Touch the Address Control key 3 Touch the Direct Address Program key 4 Touch the Individual key SYSTEM SETTINGS System Settings Admin...

Страница 137: ...he User s Guide 7 Enter initials 1 Touch the Initial key 2 Enter initials on the text entry screen that will appear Enter up to 10 characters For the procedure for entering text see 6 ENTERING TEXT in...

Страница 138: ...ey appears 3 Enter the sub address with the numeric keys maximum of 20 digits 4 Touch the Sub Address key appears 5 Enter the passcode with the numeric keys maximum of 20 digits A passcode is not nece...

Страница 139: ...u do not know the line conditions do not change this setting International Correspondence Mode None Mode 1 Mode 2 or Mode 3 can be selected for the International Correspondence Mode When sending a fax...

Страница 140: ...nd group keys can be stored It will not be possible to store a group if this has been prohibited using Disable Registering Destination from Operation Panel page 177 in the system settings for fax admi...

Страница 141: ...ing text see 6 ENTERING TEXT in the User s Guide The lowest number not yet used is automatically entered as the Search Number If you wish to change the search number touch the Search Number key and en...

Страница 142: ...cted instead of the ABC index display The lower keys are for selecting whether or not to include the group in the Frequent Use index It is convenient to include frequently used addresses and groups in...

Страница 143: ...cters appearing next to the Key Name key will be displayed in the group key Initially the first 18 characters of the group name entered in step 5 appear 12 Touch the Exit key To store another group To...

Страница 144: ...e group touch the displayed destination A message will appear to confirm the deletion Touch the Yes key If Disable Direct Entry page 188 has been enabled in the system settings for fax administrator i...

Страница 145: ...e Address Control key 3 Touch the Direct Address Program key 4 Touch the Program key 5 Enter a program name 1 Touch the Program Name key 2 Enter a program name on the text entry screen that will appea...

Страница 146: ...t you wish to store in the program 8 Touch the Exit key To store another program Touch the Next key and repeat the procedure from step 5 A timer setting cannot be included in a program At least one on...

Страница 147: ...delete a program touch the Program key SYSTEM SETTINGS System Settings Admin Password Default Settings Total Count Address Control Exit List Print User Fax Data Receive Forward USB Device Check Paper...

Страница 148: ...it Delete 1 2 Search Number 001 0123456789 Initial Index Fax No AAA AAA A Name User 1 E mail Fax Internet Fax 2 1 Direct Address Modify Delete Search Number 001 Group Name Initial Index Key Name Addre...

Страница 149: ...Editing and Deleting F code Memory Boxes page 157 The key is specified as a forwarding destination as explained in FORWARDING A RECEIVED FAX TO AN E MAIL ADDRESS Inbound Routing Settings page 104 If...

Страница 150: ...boxes be stored Delete unnecessary memory boxes and then store a new memory box Editing and Deleting F code Memory Boxes page 157 A passcode does not need to be stored if the other machine does not us...

Страница 151: ...not need to store a passcode go to the next step 3 Touch the OK key and cannot be used in a sub address When the Passcode key is touched appears If an incorrect entry is made Press the CLEAR key and e...

Страница 152: ...st can be stored When 100 memory boxes are stored no further memory boxes be stored Delete unnecessary memory boxes and then store a new memory box Editing and Deleting F code Memory Boxes page 157 A...

Страница 153: ...meric keys maximum of 20 digits If you do not need to store a passcode go to the next step 3 Touch the OK key and cannot be used in a sub address When the Passcode key is touched appears If an incorre...

Страница 154: ...act your dealer or nearest Oc Service Department 10 Touch the Exit key To program another memory box Touch the Next key and repeat the procedure from step 5 F Code Memory Box Confidential Enter the pr...

Страница 155: ...can be stored When 100 memory boxes are stored no further memory boxes be stored Delete unnecessary memory boxes and then store a new memory box Editing and Deleting F code Memory Boxes page 157 A pa...

Страница 156: ...keys maximum of 20 digits If you do not need to store a passcode go to the next step 3 Touch the OK key and cannot be used in a sub address When the Passcode key is touched appears If an incorrect ent...

Страница 157: ...that have been entered touch the Address Review key in the address selection screen To delete an end receiving machine touch the key of the machine that you wish to delete and then touch the Release k...

Страница 158: ...TTINGS System Settings Admin Password Default Settings Total Count Address Control Exit List Print User Fax Data Receive Forward USB Device Check Paper Tray Settings Printer Condition Settings Documen...

Страница 159: ...151 Programming an F code Memory Box Relay Broadcast page 154 To delete the box Touch the Delete key and then touch Yes key in the deletion confirmation screen To edit or delete another memory box Aft...

Страница 160: ...or the procedure for entering text see 6 ENTERING TEXT in the User s Guide The factory default names for the custom indexes are User 1 to User 6 To change another custom index repeat this procedure SY...

Страница 161: ...key of the desired receive mode 2 Select output settings When the checkbox of a setting is selected the setting can be used The settings that appear here are the settings that are configured in Fax O...

Страница 162: ...SETTINGS key 2 Touch the Admin Password key 3 Log in 1 Touch the Password key and enter the administrator password For the procedure for entering text see 6 ENTERING TEXT in the User s Guide 2 Touch t...

Страница 163: ...touch the Exit key to quit the system settings User authentication is initially disabled factory default setting System Settings Exit Logout Fax Data Receive Forward USB Device Check Default Settings...

Страница 164: ...y and go to step 3 Login by user number Touch the Admin Login key In addition to login in by touching the Admin Login key the system settings administrator can also be accessed when login is performed...

Страница 165: ...ish them from the general user system settings If Auto Clear activates logout will automatically take place To logout Press the LOGOUT key Except when entering a fax number Enter the administrator pas...

Страница 166: ...Display Language Setting American English 171 Disabling of Job Priority Operation Not used in fax mode Disable 171 Disabling of Bypass Printing Disable 172 Key Operation Setting 0 0 sec 172 X Disable...

Страница 167: ...t 175 Moir Reduction Disable 175 X Must Input Next Address Key at Broadcast Setting Disable 176 X Scan Complete Sound Setting Middle 176 X The Number of File Name Subject Body Keys Displayed Setting 6...

Страница 168: ...e Disable 177 Disable Selection from the Address Book 177 E mail Disable FTP Disable Desktop Disable Network Folder Disable Internet Fax Disable Fax Disable Disable Direct Entry 177 E mail Disable Int...

Страница 169: ...tion Print Out Notice Page Activity Report Print Select Setting 179 Auto Print at Memory Full Disable Print Daily at Designated Time Disable ECM Enable 179 Distinctive Ring Detection Off 180 X Fax Sen...

Страница 170: ...Administrator Settings List Image Sending Activity Report 186 X Image Sending Activity Report Scan X Image Sending Activity Report Internet Fax X Image Sending Activity Report Fax Anti Junk Fax Numbe...

Страница 171: ...e 3 187 Group Disable E mail Disable FTP Disable Desktop Disable Network Folder Disable Internet Fax Disable Fax Disable Disable Registration Using Network Scanner Tools 3 Disable 187 X Settings to Di...

Страница 172: ...kbox Message Time Setting The duration of time that messages appear in the display the time until a message is automatically cleared can be set to any number of seconds from 1 to 12 Specify the time w...

Страница 173: ...the OK key Disabling of Covers Inserts Mode This setting is used to prohibit the use of the covers and inserts function To enable this setting select the checkbox and touch the OK key This setting is...

Страница 174: ...to the customized key The name of the key can also be changed 5 Touch the OK key If you wish to change the name of the customized key touch the Key Name key and enter the desired name The customized k...

Страница 175: ...s used to disable two sided printing such as when the duplex module malfunctions To enable this setting select the checkbox and touch the OK key Disabling of Large Capacity Cassette When a large capac...

Страница 176: ...0X200dpi 200X400dpi 400X400dpi 600X600dpi Fax Standard Fine Super Fine Ultra Fine When using a stored image file select the Apply the Resolution Set when Stored checkbox and touch the OK key to use th...

Страница 177: ...of one touch keys that are displayed in the Address Book screen The number of keys can be set to 6 or 9 Select one of the keys and touch the OK key Disable Switching of Display Order This is used to p...

Страница 178: ...ckbox and touch the OK key Settings to Disable Transmission These settings are used to disable the following transmission operations Disable Resend on Fax Image Send Mode Disable the use of the Resend...

Страница 179: ...the checkbox and touch the OK key Pause Time Setting This setting is used to select the duration of pauses that are inserted in destination fax numbers If the Pause key is touched when dialing or stor...

Страница 180: ...ally print at a specified time once a day only Both settings can be selected When the Auto Print at Memory Full checkbox is selected the Image Sending Activity Report will automatically print when the...

Страница 181: ...g select the checkbox and touch the OK key Rotation Sending Setting When transmitting an image that is one of the following sizes this function rotates the image counterclockwise 90 degrees 8 1 2 x 11...

Страница 182: ...ender name touch the Next key and repeat the procedure from step 2 5 Touch the Exit key 1 Touch the Modify Delete key 2 Touch the desired sender name key 3 Touch the Name key 4 Edit the sender name an...

Страница 183: ...rings on which the machine automatically receives a call and begins fax reception in auto reception mode Any number from 0 to 15 can be selected Specify the number with the keys and touch the OK key T...

Страница 184: ...keys To insert a pause between digits of the number touch the Pause key If you wish to specify an F code confidential memory box in the destination machine touch the Sub Address key after entering th...

Страница 185: ...he desired staple position and paper size This setting can only be used when the Multiple Set Print and Staple checkbox is selected in the Fax Receive Settings page 160 The number of sheets that can b...

Страница 186: ...ys a message will appear and no further numbers can be stored First delete a number that is no longer needed and then store the new number 3 Press the numeric keys to store the fax number Up to 20 dig...

Страница 187: ...desired key Printing will begin Anti Junk Fax Number List This prints a list of the Anti Junk fax numbers stored using Anti Junk Fax Setting page 183 in the system settings for fax administrator Anti...

Страница 188: ...Web page and storing from a computer can each be separately prohibited Disable Registering Destination from Operation Panel Disables address control from the machine To use this setting select the de...

Страница 189: ...en the Select Cancel All key is touched all settings become When the key is touched in the checked condition all settings become Disable Direct Entry This prohibits the direct entry of the address To...

Страница 190: ......

Отзывы: