background image


10 


Network Camera User Manual


4


Network  Camera  Configuration 


In the Xcel IP Camera Configuration client, choose “Config” to go to the configuration interface.   

Note

: Wherever applicable, click the “Save” button to save the settings. 


4.1


System Configuration 

4.1.1


Basic Information 

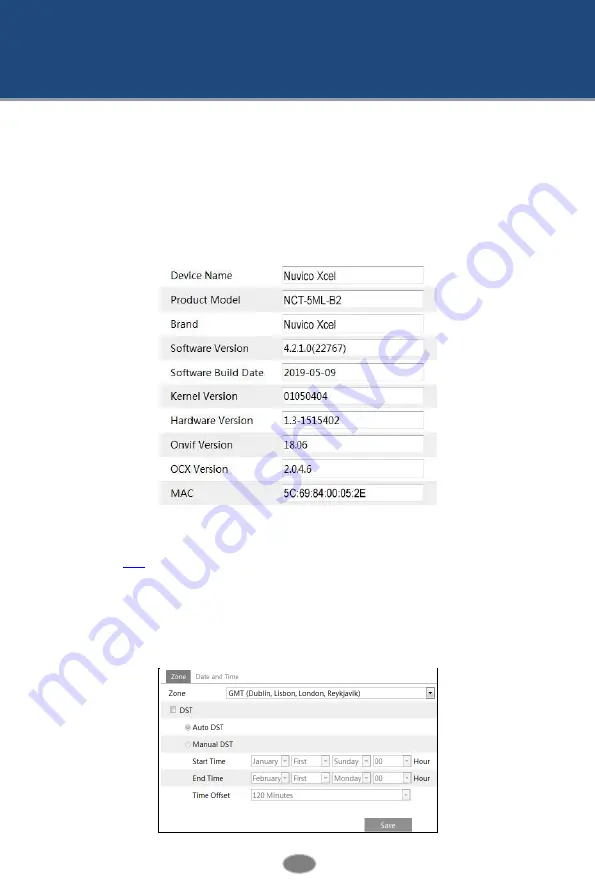
In the “Basic Information” interface, the system information of the device is listed. 


Some versions may support device ID and QR code. Having been enabled P2P (see Network 
Configuration-

P2P

), the network camera can be quickly added to mobile surveillance client, by 

scanning the QR code or entering device ID. 
 

4.1.2


Date and Time 

Go to Config

System

Date and Time. Please refer to the following interface. 


Содержание Xcel NCT-5ML Series

Страница 1: ...NCT 5ML Xcel Series IP Cameras USER MANUAL ...

Страница 2: ...to wipe dirt for hard contamination use neutral detergent Any cleanser for high grade furniture is applicable Avoid aiming the camera directly towards extremely bright objects such as sun as this may damage the image sensor Please follow the instructions to install the camera Do not reverse the camera or the reversing image will be received Do not operate it in case temperature humidity and power ...

Страница 3: ...y for any consequences resulting from illegal operations FCC Marking The products have been tested and found in compliance with the council FCC rules and regulations part 15 subpart B Operation of this product is subject the following two conditions 1 this device may not cause harmful interface and 2 this device must accept any interference received including interference that may cause undesired ...

Страница 4: ...onfiguration 11 4 2 2 Video Configuration 13 4 2 3 OSD Configuration 15 4 2 4 Video Mask 15 4 2 5 ROI Configuration 16 4 2 6 Lens Control 17 4 3 Alarm Configuration 17 4 3 1 Motion Detection 17 4 3 2 Alarm Server 19 4 4 Event Configuration 20 4 4 1 Object Removal 20 4 4 2 Exception 21 4 4 3 Line Crossing 22 4 4 4 Intrusion 24 4 5 Network Configuration 25 4 5 1 TCP IP 25 4 5 2 Port 27 4 5 3 Server ...

Страница 5: ...e User 36 4 6 3 Block and Allow Lists 36 4 6 4 Security Management 36 4 7 Maintenance Configuration 37 4 7 1 Backup and Restore 37 4 7 2 Reboot 38 4 7 3 Upgrade 38 4 7 4 Operation Log 38 5 Search 39 5 1 Image Search 39 5 2 Video Search 40 Appendix 42 Appendix 1 Q A 42 Appendix 2 Specifications 44 ...

Страница 6: ...urveillance system so that users can be easy to operate and monitor This product is widely used in banks telecommunication systems electricity power departments law systems factories storehouses uptowns etc In addition it is also an ideal choice for surveillance sites with middle or high risks Main Features 5MP 2592 x 1944 20fps ICR auto switch true day night 3D DNR digital WDR defog BLC HLC anti ...

Страница 7: ... network and the Xcel IP Utility is installed in the PC from the CD Double click the Xcel IP Utility icon on the desktop to run this software as shown below Modify the IP address The default IP address of this camera is 192 168 226 201 Click the information of the camera listed in the above table to show the network information on the right hand Modify the IP address and gateway of the camera and ...

Страница 8: ...administrator and click the Modify button to modify the setting Double click the IP address and then the system will pop up the web browser to connect the IP Camera Follow directions to download install and run the Active X control Enter the username and password in the login window to log in The default password of the administrator is 123456 The default username is admin the default password is ...

Страница 9: ... address 192 168 226 201 Subnet Mask 255 255 255 0 Gateway 192 168 226 1 HTTP 80 Data port 9008 You may use the above default settings when you log in the camera for the first time You may directly connect the camera to the computer through network cable Manually set the IP address of the PC and the network segment should be as the same as the default settings of the IP camera Open the network and...

Страница 10: ...tions to download and install the Active X control Enter the default username and password in the login window and then enter to view 2 2 WAN Access through the router or virtual server Make sure the camera is well connected via LAN and then log in the camera via LAN and go to Config Network Port menu to set the port number Port Setup Go to Config Network TCP IP menu to modify the IP address ...

Страница 11: ... the Virtual Server Router Setup Open the web browser and enter its WAN IP and http port to access Access through PPPoE dial up Network connection Access the camera through PPPoE auto dial up The setting steps are as follow Go to Config Network Port menu to set the port number Go to Config Network TCP IP PPPoE Config menu Enable PPPoE and then enter the ...

Страница 12: ...il information Open the web browser and enter the domain name and http port to access Access through static IP Network connection The setting steps are as follow Go to Config Network Port menu to set the port number Go to Config Network TCP IP menu to set the IP address Check Use the following IP address and then enter the static IP address and other parameters Open the web browser and enter its W...

Страница 13: ...tion Original size Zoom out Fit correct scale Abnormal clarity indicator Auto fill the window Scene change indicator Full screen Line crossing indicator Start stop live view Object removal indicator Enable disable audio only available for some models Intrusion indicator Snapshot Motion alarm indicator Start stop local recording AZ control only available for the model with motorized zoom lens Zoom ...

Страница 14: ...vents are enabled In full screen mode double click on the mouse to exit or press the ESC key on the keyboard Click AZ control button to show AZ control panel The descriptions of the control panel are as follows Icon Description Icon Description Zoom Zoom Focus Focus One key focus used when image is out of focus after manual adjustment ...

Страница 15: ...m Configuration 4 1 1 Basic Information In the Basic Information interface the system information of the device is listed Some versions may support device ID and QR code Having been enabled P2P see Network Configuration P2P the network camera can be quickly added to mobile surveillance client by scanning the QR code or entering device ID 4 1 2 Date and Time Go to Config System Date and Time Please...

Страница 16: ...le the bitrate display in the recorded files For models with a built in Mic there is also an option to enable or disable audio recording 4 2 Image Configuration Image Configuration includes Display Video Audio OSD Video Mask and ROI Config 4 2 1 Display Configuration Go to Image Display interface as shown below The image brightness contrast hue and saturation and so on for common day and night mod...

Страница 17: ...plane and the sharpness level of the image edge Noise Reduction Decrease the noise and make the image more thorough Increasing the value will make the noise reduction effect better but it will reduce the image resolution Defog Activating this function and setting an appropriate value as needed in foggy dusty smoggy or rainy environment to get clear images Backlight Compensation Off disables the ba...

Страница 18: ...rent video image horizontally Image Flip Turn the current video image vertically Schedule Settings of Image Parameters Click the Schedule tab as shown below Set full time schedule for common day night mode and specified time schedule for day and night Choose Timing in the drop down box of schedule as shown below Drag icons to set the time of day and night Blue means day time and white means night ...

Страница 19: ...til that scene ends the entire group of frames or pictures can be considered as a group of pictures If there is not much movement in the scene setting the value higher than the frame rate is fine potentially resulting in less bandwidth usage However if the value is set too high and there is a high frequency of movement in the video there is a risk of frame skipping Video Compression H264 and H265 ...

Страница 20: ...ge their position Then press the Save button to save the settings 4 2 4 Video Mask Go to Image Video Mask interface as shown below A maximum of 4 zones can be set up To set up video mask 1 Enable video mask 2 Click the Draw Area button and then drag the mouse to draw the video mask area 3 Click the Save button to save the settings 4 Return to the live to verify that the area have been drawn as sho...

Страница 21: ...nfig interface as shown below An area in the image can be set as a region of interest This area will then have a higher bitrate than the rest of the image resulting in better image quality for the identified area 1 Check Enable and then click the Draw Area button 2 Drag the mouse to set the ROI area Up to 3 ROI areas can be set 3 Set the level 4 Click the Save button to save the settings ...

Страница 22: ...ut of focus after a manual adjustment one key focus can be used to set the focus automatically 4 3 Alarm Configuration 4 3 1 Motion Detection To set motion detection 1 Go to Config Alarm Motion Detection to set motion detection alarm Check Enable check box to activate motion based alarms If unchecked the camera will not send out any signals to trigger motion based recording to the NVR or CMS even ...

Страница 23: ...re checked email address must be set first in the Email configuration interface the captured pictures and triggered event will be sent into those addresses Trigger FTP If Trigger FTP and Attach Picture are checked the captured pictures will be sent into FTP server address Please refer to FTP configuration chapter for more details 2 Set motion detection area and sensitivity Click the Area and Sensi...

Страница 24: ...ial day Drag the mouse to set the time on the timeline Erase Delete the schedule Drag the mouse to erase the time on the timeline Manual Input Click it for a specific day to enter specific start and end times This adds more granularities minutes Day schedule Set the alarm time for alarm a special day such as a holiday Note Holiday schedule takes priority over Weekly schedule 4 3 2 Alarm Server Go ...

Страница 25: ...t s color is similar to the background color At any time of day or night please make sure the image of the camera is clear and with adequate and even light avoiding overexposure or too much darkness on both sides 4 4 1 Object Removal Alarms will be triggered when the objects are removed from or left at the pre defined area To set object removal Go to Config Event Object Removal interface as shown ...

Страница 26: ...ments of camera and surrounding areas 1 The range of the detection object should occupy from 1 50 to 1 3 of the entire image 2 The detection time of objects in the camera shall be from 3 to 5 seconds 3 The defined area cannot be covered frequently and continuously like people and traffic flow 4 It is necessary for object removal detection that the drawn frame must be very close to the margin of th...

Страница 27: ...wn below Drag the slider to set the sensitivity value or directly enter the sensitivity value in the textbox Click Save button to save the settings The sensitivity value of Scene Change Detection The higher the value is the more sensitive the system responds to the amplitude of the scene change The sensitivity value of Video Blur Detection The higher the value is the more sensitive the system resp...

Страница 28: ...e added simultaneously Direction A B A B and A B optional This indicates the direction of the intruder who crosses over the alarm line that would trigger the alarm A B The alarm will be triggered when the intruder crosses over the alarm line from B to A or from A to B A B The alarm will be triggered when the intruder crosses over the alarm line from A to B A B The alarm will be triggered when the ...

Страница 29: ...can view objects for at least 2 seconds in the detected area for accurate detection 7 Adequate light and clear scenery are crucial for line crossing detection 4 4 4 Intrusion Intrusion Alarms will be triggered if someone or something intrudes into the pre defined areas This function can be applicable to important supervision places danger areas and prohibited areas like military administrative zon...

Страница 30: ...to focusing function should not be enabled for intrusion detection 2 Avoid the scenes with many trees or the scenes with various light changes like many flashing headlights The ambient brightness of the scenes shouldn t be too low 3 Cameras should be mounted at a height of 2 8 meters or above 4 Keep the mounting angle of the camera at about 45 5 The detected objects should not be less than 1 of th...

Страница 31: ... the user name and password from your ISP Either method of network connection can be used If PPPoE is used to connect internet the camera will get a dynamic WAN IP address This IP address will change frequently To be notified the IP change notification function can be used Click IP Change Notification Config to go to the interface as shown below Trigger Email when the IP address of the device is c...

Страница 32: ...onfiguration This function is mainly used for connecting network video management system 1 Check Enable 2 Check the IP address and port of the transfer media server in the CMS VMS Then enable the auto report in the CMS VMS when adding a new device Next enter the remaining information of the device in the CMS VMS After that the system will automatically allot a device ID Please check it in the CMS ...

Страница 33: ...y for a domain name Enter www xcelddns com in the browser web address bar to visit the website Then click the Registration button Create domain name After the domain name is successfully applied for the domain name will be listed as below ...

Страница 34: ...fy the device in a local network If the camera connected to the network interface of the switch has passed the authentication of the switch it can be accessed via the local network Protocol type and EAPOL version Please use the default settings User name and password The user name and password must be the same with the user name and password applied for and registered in the authentication server ...

Страница 35: ...de mcast Sub stream The address format is rtsp IP address rtsp port profile2 transportmode mcast Third stream The address format is rtsp IP address rtsp port profile3 transportmode mcast If auto start is enabled the multicast received data should be added into a VLC player to play the video If Allow anonymous login is checked there is no need to enter the username and password to view the video No...

Страница 36: ...a can be quickly accessed through the LAN Go to Config Network UPnP Enable UPNP and then enter UPnP name 4 5 8 Email If you need to trigger Email when an alarm happens or IP address is changed please set the Email here first Go to Config Network Email Sender Address sender e mail address User name and password sender user name and password Server Address The SMTP IP address or host name Select the...

Страница 37: ...e time multiple emails will be sent separately Click the Test button to test the connection of the account Recipient Address receiver s e mail address 4 5 9 FTP After an FTP server is set up captured pictures from events will be uploaded to the FTP server Go to Config Network FTP Server Name The name of the FTP server Server Address The IP address or domain name of the FTP Upload Path The director...

Страница 38: ...l the default certificate Then the following interface will be displayed If there is a signed certificate click Browse to select it and then click Install to install it Click Create a private certificate to enter the following creation interface Click the Create button to create a private certificate Enter the country only two letters available domain camera s IP address domain validity date passw...

Страница 39: ...ork P2P interface 4 5 12 QoS QoS Quality of Service function is used to provide different quality of services for different network applications Under the deficient bandwidth the router or switch will sort the data streams and transfer them according to their priority to solve the network delay and network congestion by using this function Go to Config Network QoS Video Audio DSCP The range is fro...

Страница 40: ...ress of the PC in Bind MAC textbox If this option is enabled only the PC with the specified MAC address can access the camera for that user 6 Click the OK button and then the newly added user will be displayed in the user list Modify user 1 Select a user to modify password and MAC address if necessary in the user configuration list box 2 The Edit user dialog box pops up by clicking the Modify butt...

Страница 41: ...urity Online User View the user who is viewing the live video An administrator user can kick out all the other users including other administrators Once the user is kicked out it will be added into the block list 4 6 3 Block and Allow Lists Go to Config Security Block and Allow Lists as shown below The setup steps are as follows Check the Enable address filtering check box Select Block Allow the f...

Страница 42: ... enabled enter http host port Anonymous 1 2 3 eg http 192 168 226 201 80 Anonymous 1 via web browser to access the camera 1 indicates main stream 2 indicates sub stream 3 indicates third stream Only video can be viewed by this means and no other operations can be done 4 7 Maintenance Configuration 4 7 1 Backup and Restore Go to Config Maintenance Backup Restore Import Export Settings Configuration...

Страница 43: ...ig Maintenance Upgrade In this interface the camera firmware can be updated 1 Click the Browse button to select the save path of the upgrade file 2 Click the Upgrade button to start upgrading the firmware 3 The device will restart automatically Caution Do not close the browser or disconnect the camera from the network during the upgrade 4 7 4 Operation Log To query and export log 1 Go to Config Ma...

Страница 44: ...to the interface as shown below Images that are saved on the SD card can be found here 1 Choose Picture Local 2 Set time Select date and choose the start and end time 3 Click to search the images 4 Double click a file name in the list to view the captured photos as shown above ...

Страница 45: ...of the image Zoom in Click this button to digitally zoom in Zoom out Click this button to digitally zoom out Slide show play Click this button to start the slide show mode Stop Click this button to stop the slide show Play speed Play speed of the slide show 5 2 Video Search Click Search to go to the interface as shown below Videos were recorded locally to the PC can be played in this interface 1 C...

Страница 46: ...n Play button After pausing the video click this button to continue playing Pause button Stop button Speed down Speed up Watermark display Enable disable audio drag the slider to adjust the volume after enabling audio Only available for the model with built in MIC ...

Страница 47: ...administrator to get the correct port number D Exclude the above reasons Restore to default setting by Xcel IP Utility Xcel IP Utility cannot search devices It may be caused by the anti virus software in your computer Please exit it and try to search device again Web browser cannot download ActiveX control A Web browser may be set up to block ActiveX Follow the steps below Open web browser and the...

Страница 48: ...etwork Camera User Manual Q No sound can be heard A Audio input device is not connected Please connect and try again B Audio function is not enabled at the corresponding channel Please enable this function ...

Страница 49: ...4MP 1 25fps 1080p 1 25fps 720p 1 25fps Sub Stream 60Hz 720p 1 15fps D1 1 30fps CIF 1 30fps 50Hz 720p 1 12fps D1 1 25fps CIF 1 25fps Third Stream 60Hz D1 CIF 480 x 240 1 30fps 50Hz D1 CIF 480 x 240 1 25fps Image Settings Saturation Brightness Chroma Contrast Wide Dynamic Sharpen NR Anti flicker etc adjustable through client or web browser ROI Support Interface Network RJ45 Fucntion Remote Monitorin...

Страница 50: ... 30fps CIF 1 30fps 50Hz 720p 1 12fps D1 1 25fps CIF 1 25fps Third Stream 60Hz D1 CIF 480 x 240 1 30fps 50Hz D1 CIF 480 x 240 1 25fps Image Settings Saturation Brightness Chroma Contrast Wide Dynamic HLC BLC Sharpen NR Anti flicker etc adjustable through client or web browser ROI Support Network RJ45 Interface Remote Monitoring Web browsing CMS remote control Fucntion Online Connection Support simu...

Страница 51: ... 15fps D1 1 30fps CIF 1 30fps 50Hz 720P 1 12fps D1 1 25fps CIF 1 25fps Third Stream 60Hz D1 CIF 480 x 240 1 30fps 50Hz D1 CIF 480 x 240 1 25fps Image Settings Saturation Brightness Chroma Contrast Wide Dynamic HLC BLC Sharpen NR Anti flicker etc adjustable through client or web browser ROI Support Network RJ45 Interface Remote Monitoring Web browsing CMS remote control Fucntion Online Connection S...

Страница 52: ... CIF 1 30fps 50Hz 720p 1 12fps D1 1 25fps CIF 1 25fps Third Stream 60Hz D1 CIF 480 x 240 1 30fps 50Hz D1 CIF 480 x 240 1 25fps Image Settings Saturation Brightness Chroma Contrast Wide Dynamic HLC BLC Sharpen NR Anti flicker etc adjustable through client or web browser ROI Support Interface Network RJ45 Audio Built in MIC x 1 Fucntion Remote Monitoring Web browsing CMS remote control Online Connec...

Страница 53: ...0fps CIF 1 30fps 50Hz 720P 1 12fps D1 1 25fps CIF 1 25fps Third Stream 60Hz D1 CIF 480 x 240 1 30fps 50Hz D1 CIF 480 x 240 1 25fps Image Settings Saturation Brightness Chroma Contrast Wide Dynamic HLC BLC Sharpen NR Anti flicker etc adjustable through client or web browser ROI Support Interface Network RJ45 Audio Built in MIC x 1 Fucntion Remote Monitoring Web browsing CMS remote control Online Co...

Отзывы: