background image

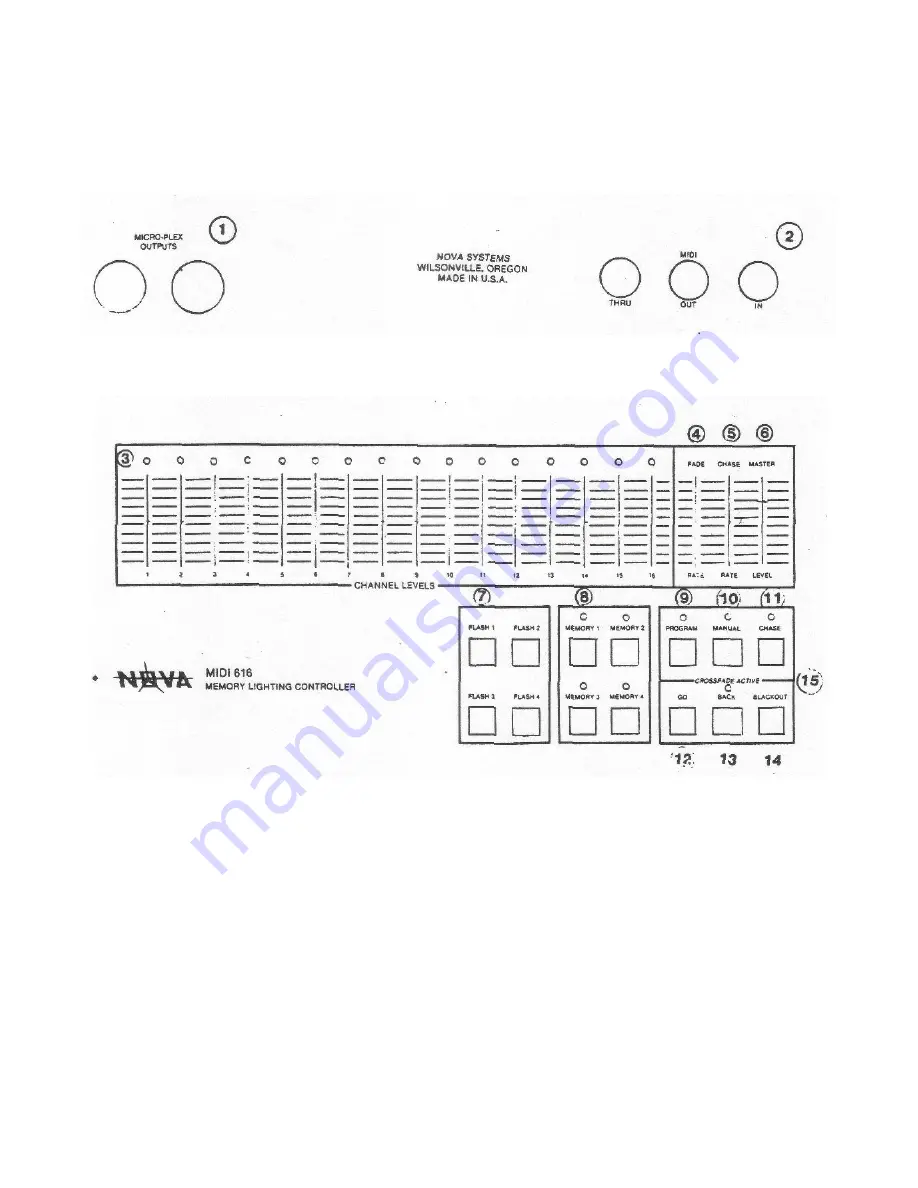
Visual Layout 


(REAR VIEW) 


(TOP VIEW) 


LEGEND 


1: Micro-Plex Outputs  

6: Raster Power Level Slide Control   

11: Chase Mode Button 

2: MIDI In-Out-Thru   

7: Flash Select Buttons 1-4    


12: Go Button 

3: Channel Level LEDS 

8: Scene Select Buttons 1-4    


13: Back Button 

4: Fide Rate Slide Control 

9: Program Button 


14: Blackout Button 

5: Chase Rate Slide Control  10: Manual Button 


15: Crossfade Active LED 

Содержание MIDI 616

Страница 1: ...6 Operation Manual All information subject to change without notice February 1997 NSI Corporation PO BOX 2210 Tualatin OR 97062 Technical Service Phone 800 864 2502 EMAIL SERVICE NSICORP COM www nsico...

Страница 2: ...ng a Scene from Memory Programming a Flash 9 Activating a Flash Manual Control 10 Selecting a Chase Mode 11 Programming a Chase Sequence 12 Activating a Chase Sequence 14 Stepping Through a Chase Sequ...

Страница 3: ...execute precisely on cue Most functions of your sequencer are supported allowing complete creative control In addition the MIDI 616 features a variety of programmable special effects The nonvolatile m...

Страница 4: ...ide Control 11 Chase Mode Button 2 MIDI In Out Thru 7 Flash Select Buttons 1 4 12 Go Button 3 Channel Level LEDS 8 Scene Select Buttons 1 4 13 Back Button 4 Fide Rate Slide Control 9 Program Button 14...

Страница 5: ...tch configuration will then be instantly sent out of the MIDI port in the form of a System Exclusive command SOFTPATCH RESET The Softpatch configuration may be reset to the factory default setting by...

Страница 6: ...hase Rate The Chase Rate controls adjusts the rate at which the lights will chase The red LED above the CHASE button will flash at the selected chase rate whenever Chase is active When the Chase Rate...

Страница 7: ...off command see MIDI data for all 16 channels A push and hold action causes an all notes off command to follow the above data GO When the GO button is tapped all lights will fade to the current chann...

Страница 8: ...ng is sent out the MIDI port followed by note on commands for the lighting levels affected ONLY A Fade Rate of 0 and the above commands are sent again 0 2 seconds later if the button is held down see...

Страница 9: ...until the scene is changed or until Manual Mode is defeated by tapping the MANUAL button again turning off the red indicator LED TECHNICAL NOTE MIDI Information Manual Mode should be avoided when reco...

Страница 10: ...um 5 Press the CHASE button to store the step in memory 6 Repeat instructions 4 5 to program any remaining steps up to 32 If an error is made you must press BLACKOUT and begin at the first step again...

Страница 11: ...6 Step By Step Procedures BLACKOUT without Chase BLACKOUT with Chase When CHASE LED is ON...

Страница 12: ...7 Step By Step Procedures Continued Presetting and Activating a Scene GO Adjust Light Level Channel Slide Controls...

Страница 13: ...8 Step By Step Procedures Continued To Store a Scene in Memory Adjust Light Level Channel Slide Controls...

Страница 14: ...tinued To Program a Flash Adjust Light Level Channel Slide Controls CHANNELS TO FLASH ARE ADJUSTED TO FULL INTENSITY Channels 2 4 6 8 10 12 14 16 CHANNELS NOT FLASHING ARE ADJUSTED TO MINIMUM OFF Chan...

Страница 15: ...10 Step By Step Procedures Continued Manual Control To Initiate...

Страница 16: ...11 Step By Step Procedures Continued Chase Programming To Select a Chase Mode...

Страница 17: ...ng cont To Program a Chase Sequence Step 1 Select a Chase Mode 1 2 or 3 as described above Step 2 CHANNELS TO CHASE ARE ADJUSTED TO FULL INTENSITY Channels 2 4 6 8 10 12 14 16 CHANNELS NOT CHASING ARE...

Страница 18: ...13 Step By Step Procedures Continued Chase Programming cont To Program a Chase Sequence cont Step 5...

Страница 19: ...14 Step By Step Procedures Continued Chase Programming cont To Activate a Chase...

Страница 20: ...15 Step By Step Procedures Continued Chase Programming cont To Step Through a Chase Sequence...

Страница 21: ...f the performance System Hookup Once the best location for the MIDI 616 has been determined you can begin connecting it to the rest of your system Through the NOVA Systems Micro Plex design you need o...

Страница 22: ...es simply tap the BACK and GO buttons alternately When you have a look that you want to save for use again while the channel level slide controls are still at their desired intensities tap the PROGRAM...

Страница 23: ...hen recording separate sequences or overdubbing you must be certain to complete each pass with a tap of the BLACKOUT button to turn off lights that were turned on by the sequencer or else they may sti...

Страница 24: ...ide controls double as configuration mode switches To access this mode perform the following steps 1 Move all slide controls to minimum 2 Hold both the GO and BACK button down while pressing the MEMOR...

Страница 25: ...20 Configuration Mode Step By Step Procedures MIDI Channel Assignment Adjust ALL Slide Controls to minimum...

Страница 26: ...21 Configuration Mode Step By Step Procedures MIDI Channel Assignment cont Select the new MIDI Channel by tapping the PROGRAM button and moving the corresponding channel slide control to maximum...

Страница 27: ...22 Configuration Mode Step By Step Procedures Console and MIDI Configuration Mode Switches Adjust ALL Slide Controls to minimum...

Страница 28: ...g LEDs lit to the full maximum position to preserve the state of the switches Slide controls with there LEDs on due to software must be moved to maximum to preserve the state of the configuration THEN...

Страница 29: ...p By Step Procedures Console and MIDI Configuration Mode Switches cont Adjust the FADE RATE control to set the Preheat Level as indicated by the Channel Level LEDs To return to normal operation and sa...

Страница 30: ...Changes LED OFF Control Change 1 is sent as FADE RATE LED ON Note on CO is sent as FADE RATE Channel 3 USE To change starting note number for scene changes LED OFF C3 is lighting Channel 1 LED ON C2...

Страница 31: ...r for relocating at the beginning of a special song Follow these steps 1 Roll back your sequencer Use separate sequence or overdub 2 Adjust all channel level slide controls off minimum 3 Remove the MI...

Страница 32: ...ng channel no Asee Config Switch 3 OvvvvVvV v Any value normally 64 CONTROL 1011nnnn n MIDI channel assignment 1 16 0 15 CHANGE Occccccc c Control No See Control Change Chart Ovvvvvvv v Control value...

Страница 33: ...to above Held down 0 2 Secs FLASH BUTTON Note on 1st Flash channel no 127 PRESSED Only Flashes programmed are sent Note on Last Flash channel no 127 FLASH BUTTON Note on 1st Flash channel no 0 RELEASE...

Страница 34: ...3 3 19 36 51 4 4 20 37 52 5 5 21 38 53 6 6 22 39 54 7 7 23 30 55 8 8 24 41 56 9 9 25 42 57 10 10 26 43 58 11 11 27 44 59 12 12 28 45 60 13 13 29 46 61 14 14 30 47 62 15 15 31 48 63 16 16 32 49 64 Som...

Страница 35: ...wn while pressing the MEMORY 3 button The MEMORY 3 LED will flash 3 The channel level LEDs now display the current condition of all 16 Configuration Mode switches 4 Move all slide controls with their...

Страница 36: ...mber of dimmers is set to 48 or more Depressing the FLASH 4 button will instruct the MIDI 616 to display dimmer channels 49 64 if the maximum number of dimmers is set to 64 The dimmer channel to be ch...

Страница 37: ...32 Programming Softpatch Step By Step Procedures Select Maximum Dimmers Enter Configuration Mode as follows Adjust ALL Slide Controls to minimum...

Страница 38: ...Slide controls with there LEDs on due to software must be moved to maximum to preserve the state of the configuration THEN Move the slide controls for channels 15 and 16 to minimum or maximum LEDs of...

Страница 39: ...edures Continued Select Maximum Dimmers cont To return to normal operation and save the new dimmer configuration Repatch Channels Enter the Softpatch Programming Mode as follows Adjust ALL Slide Contr...

Страница 40: ...he corresponding slide control ONLY to its maximum position The 16 channels level indicator LEDs will now represent the dimmers assigned to the selected control channel The four FLASH buttons will all...

Страница 41: ...buttons to move the lit LED across the control panel until the desired channel to patch or unpatch has been identified THEN Tap the PROGRAM button to toggle the channel on bright flashing LED of off d...

Страница 42: ...the FLASH and PROGRAM buttons to patch or unpatch any other dimmer channels to the selected control channel When you are satisfied with the selected control channel patching return the channel level...

Отзывы: