background image

Page 16 of 31 


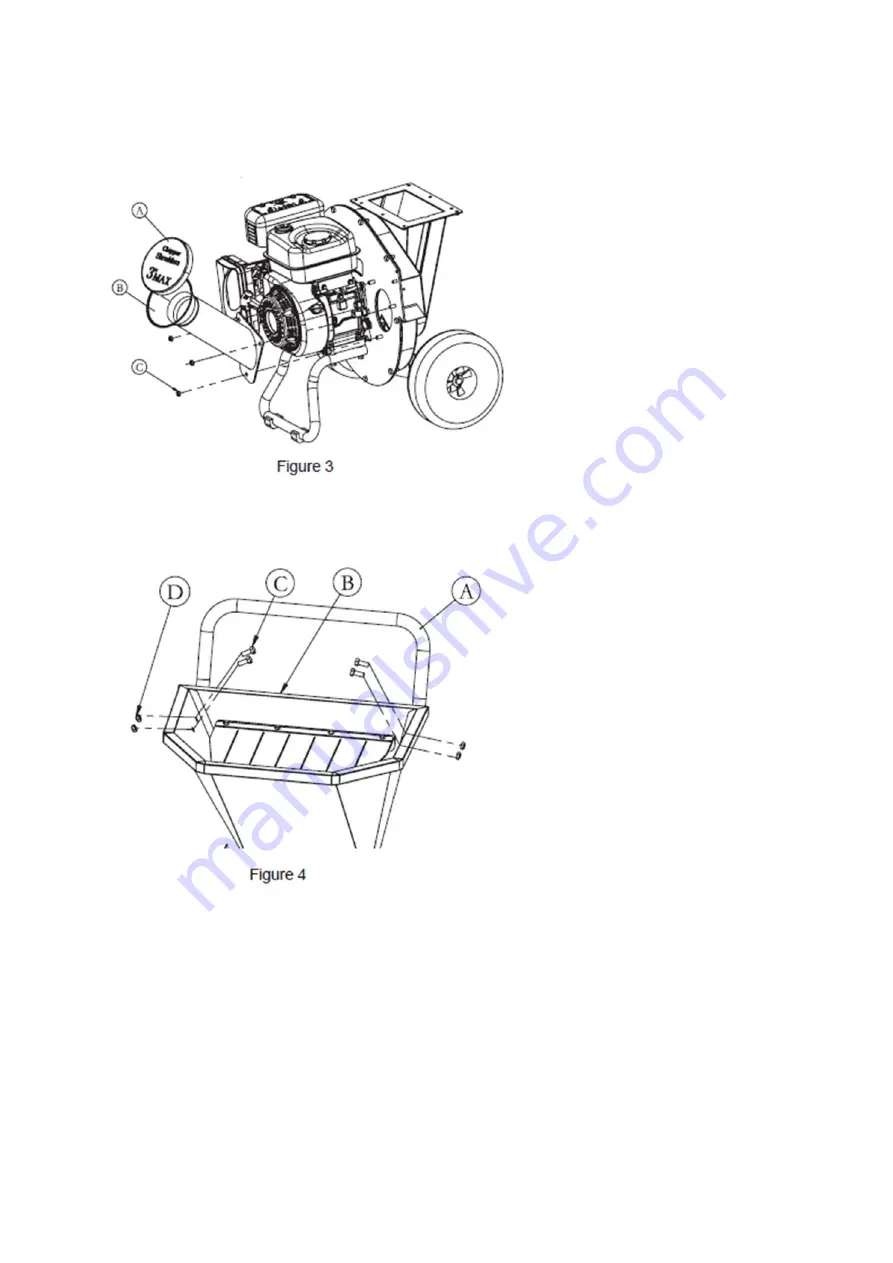
Install Chipper Cone (See Figure 3) 

1. Position the chipper cone (B) over the three M8 thread studs protruding from the engine plate. 
2. Attach the three M8 flange nuts (C) and tighten to secure the cone. 
3. The rubber cone cover (A) can be used when using the vacuum function. 


Install the Handle (See Figure 4) 

1. Position the handle (A) by aligning the handle holes with the hopper holes on the two sides. 
2. Using four flange bolts (C) and nuts (D), secure the handle on the hopper. 


Install the Hopper Guard (See Figure 6) 

1. Position the hopper guard assembly (C) by aligning the assembly holes with the holes in the hopper. 
2. Use the three M6 flange bolts (A) and nuts (D) to secure the guard assembly (C) to the hopper. 

Содержание Powerhorse 63388

Страница 1: ...Chipper Owner s Manual WARNING Read carefully and understand all ASSEMBLY AND OPERATION INSTRUCTIONS before operating Failure to follow the safety rules and other basic safety precautions may result i...

Страница 2: ...nt that you read the entire manual to become familiar with this product before you begin using it This wood chipper is designed for certain applications only Northern Tool Equipment is not responsible...

Страница 3: ...peration Warnings 7 Safety Labels 9 Main Parts of Wood chipper 11 Wood Chipper Identification 11 Site Considerations 14 Assembly Instructions 14 Before Each Use 17 Operating Instructions 18 After Each...

Страница 4: ...wer 6 5HP Displacement 212cc Starting Recoil RPM 3600 Fuel Capacity 0 7Gal Oil SAE 30W EPA3 Approval YES CARB Approval YES CAUTION HIGH ALTITUDE OPERATION Operating at an altitude of greater than 6000...

Страница 5: ...al or commercial applications must follow OSHA requirements WARNING WORK AREA SAFETY Inspect the work area before each use Keep work area clean dry free of clutter and well lit Cluttered wet or dark w...

Страница 6: ...e no tripping hazards in the feed area Carbon monoxide warning The running engine gives off carbon monoxide a poisonous gas that can kill you You CANNOT smell it see it or taste it If you start to fee...

Страница 7: ...be repaired by an authorized service representative before using Disconnect the power air supply from the product and place the switch in the locked or off position before making any adjustments chan...

Страница 8: ...burns from the motor or an amputation if an arm accidentally goes into the hopper Wear non slip closed toed shoes or boots to maintain secure footing JAMS AND CLOGGING Turn the wood chipper OFF allow...

Страница 9: ...Page 9 of 31 Safety Labels...

Страница 10: ...Page 10 of 31...

Страница 11: ...ription Quantity 1 Engine 1 15 Discharge guard 1 2 Chipper cone 1 16 Flange nut M6 17 3 Cone cap 1 17 Flange bolt M6x20 17 4 Support stand 1 18 Damper attachment 1 5 Stand pad 2 19 Damper 1 6 Flange n...

Страница 12: ...rts Breakdown Engine and Rotor Group Part No Description Quantity 1 Engine 1 2 Flange 2 3 Engine plate 1 4 Spring washer 8 4 5 Hex bolt 4 6 Key parallel pin 1 7 Bearing spacer 1 8 Rotor assembly kit 1...

Страница 13: ...ing Group Part No Description Quantity 1 Engine plate 1 2 Rotor assembly kit 1 3 Rotor house 1 4 Chipper back cover 1 5 Flange bolt M8x20 11 6 Flange nut M8 18 7 Vacuum inlet cover 1 8 Hex bolt M8x15...

Страница 14: ...Make sure the unit is located close to the area where the chips are going to be used to reduce carrying Stay clear of the discharge area Make sure all bystanders children pets or objects that you do...

Страница 15: ...sition the stand A underneath the engine base 2 Using the four M8x60 bolts C and four nuts D tighten the stand with the engine base plate Install the Wheels See Figure 2 1 Place the wheel onto the axl...

Страница 16: ...n using the vacuum function Install the Handle See Figure 4 1 Position the handle A by aligning the handle holes with the hopper holes on the two sides 2 Using four flange bolts C and nuts D secure th...

Страница 17: ...ely flammable and highly explosive under certain conditions BE SURE to install fuel cap after refueling Fill fuel tank with good quality clean unleaded regular gasoline to the level recommended by the...

Страница 18: ...The wood chipper is designed to handle tree limbs and branches up to approximately 3 inches in diameter The chipping knives also permit the processing of course organic matter like corn stalks Tree b...

Страница 19: ...wait for the engine to be running a slow RPM Then switch to STOP ENGINE as shown in the engine manual 1 Place the wood chipper on a flat firm dirt or grass surface and point the outlet in a safe direc...

Страница 20: ...he air cleaner 6 Keep engine and parts clean 7 Check engine and equipment often for loose nuts and bolts keep these items tightened Check for Loose Hardware 1 Service Interval Every 5 hours every spri...

Страница 21: ...n or storage 2 Never store the unit with fuel in an enclosed poorly ventilated structure Fuel vapors can travel to an ignition source such as a furnace water heater etc and cause an explosion Fuel vap...

Страница 22: ...l minutes before use Inspect Chipping Knives See Figure 8 Service Interval Every 25 hours or as necessary The chipping knives of this unit can be rotated or sharpened to provide a new cutting surface...

Страница 23: ...f If you prefer all of these procedures can be performed for you by your local authorized dealer Failure Possible Cause Corrective Action Engine will not start 1 No fuel 1 Add fuel 2 Choke does not in...

Страница 24: ...replace as necessary Vacuum not working 1 Hopper gate not closed 1 Slide gate to closed position 2 Cone cover not installed 2 Allow material to dry 3 Hose not attached properly 3 Clear blockage or rep...

Страница 25: ...rts to stop 2 Disconnect the spark plug wire and secure it away from the spark plug 3 Detach the rotor housing and hopper from the rotor plate See Figure 9 4 Remove the rotor by removing the hardware...

Страница 26: ...Page 26 of 31 Parts Diagram...

Страница 27: ...Page 27 of 31...

Страница 28: ...11 20 Flange bolt M8x20 4 7 Flange bolt M8x60 4 21 Retainer hopper guard 1 8 Flange 2 22 Hopper guard 11 9 Wheel 2 23 Flange hopper guard 1 10 Washer 2 24 Handle 1 11 Cotter pin 2 25 Hopper 1 12 Handw...

Страница 29: ...11 6 Flange nut M8 18 7 Vacuum inlet cover 1 8 Hex bolt M8x15 6 9 Spring washer 6 10 Washer 6 11 Wheel rack 1 Replacement Parts For replacement parts and technical questions please call Customer Serv...

Страница 30: ...ty claim contact Us at 1 800 222 5381 identify the product by make and model number and follow the claim instructions that will be provided The product and the purchase receipt must be provided to Us...

Страница 31: ...Page 31 of 31 Distributed by Northern Tool Equipment Company Inc Burnsville Minnesota 55306 www northerntool com Made in China...

Отзывы: