


The subsystem has the following headers and connectors:
Six back panel audio connectors (including one Optical S/PDIF out port)
▪
High Definition (HD) Audio front panel header that provides mic in and line out signals
for front panel audio conne ctors
▪
The audio subsystem supports the following features:
Advanced jack detection for the back panel analog audio jacks that enables the audio
codec to recognize the device that is connected to an audio port. The front panel audio
jacks are capable of re-tasking according to the user’s definition, or can be
automatically switched depending on the recognized device type.
▪
Independent multi-streaming.
▪
LAN Subsystem
The board’s Gigabit (10/100/1000 Mb/s) LAN subsystem includes:
Intel X299 Express Chipset
▪
Intel I219-V Gigabit Ethernet LAN Controller
▪
An RJ-45 LAN connector with integrated status LEDs
▪
The subsystem features:
CSMA/CD protocol engine
▪
LAN connect
between the Intel PCH and the LAN controllers
▪
PCI bus power mana gement
▪
technology suppo rt
▪
LAN wake capabilities
▪
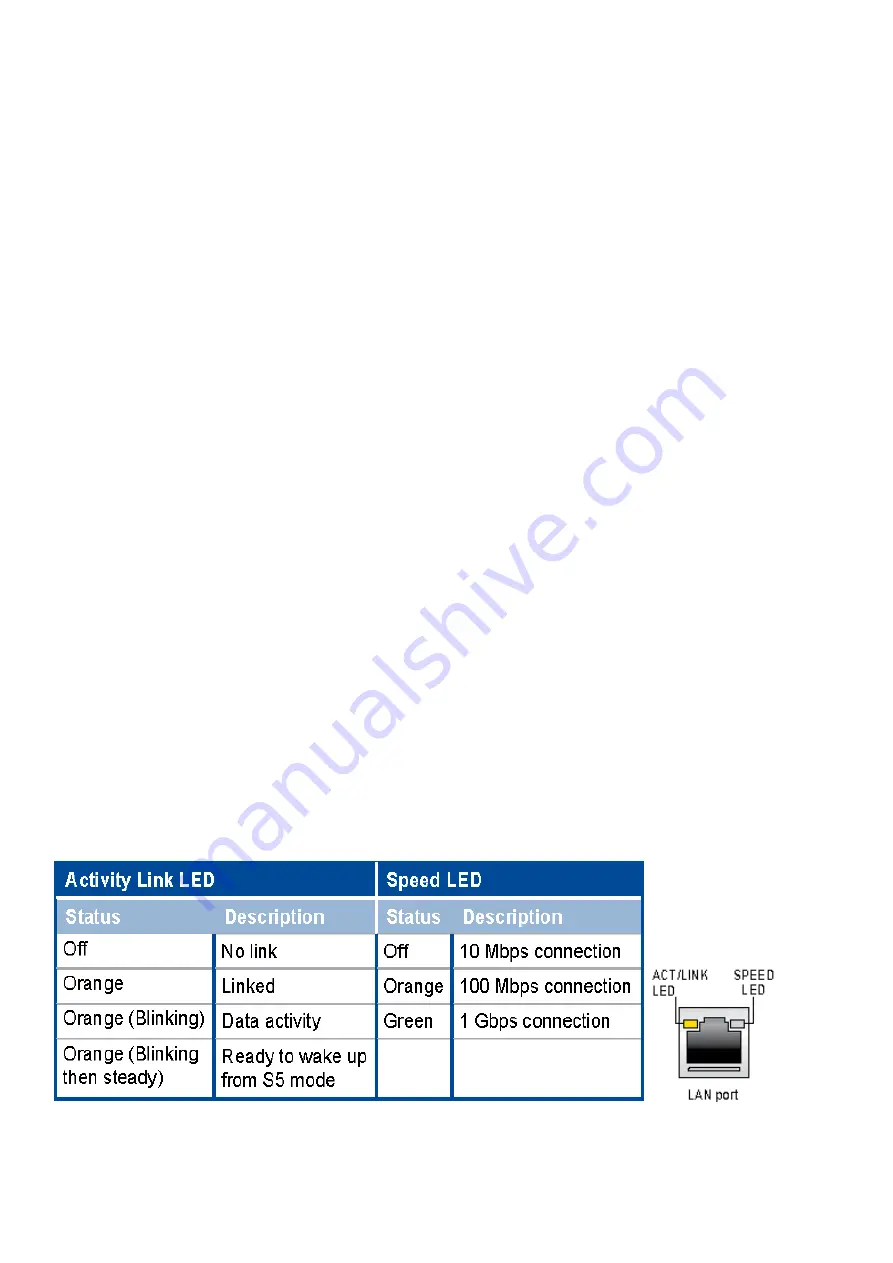
Two LEDs are built into the RJ-45 LAN connector located on the back panel. These LEDs
indicate the status of the LAN.
This table describes the LED states when the board is powered up and the LAN subsyst em is
operating.
Содержание Spirit X299-AS
Страница 1: ...Spirit X299 AS User Guide Revision 2 0 August 2018...
Страница 10: ...Removing the Case Cover Unlatch the cover and open the case from the back 1 Slide the side cover back 2...
Страница 11: ...Lift the three tabs as illustrated and pull back the front bezel 3 That opens the front of the case 4...
Страница 18: ...Specifications Summary Asus Desktop Board Prime X299 A specifications summary...
Страница 19: ......
Страница 20: ......
Страница 21: ......
Страница 22: ......
Страница 23: ......
Страница 26: ...Asus Motherboard Components...
Страница 50: ...Q Code table...
Страница 51: ......
Страница 52: ......
Страница 56: ......
Страница 59: ...3 Situate mounting ring according to diagram 4 Place special screw extenders into mounting ring...
Страница 61: ...7 Twist reservoir counterclockwise 8 Screw reservoir mounting ring assembly onto motherboard...
Страница 62: ...9 Attach cable connector from reservoir to fan assembly 10 Attach hoses from reservoir...
Страница 65: ......
Страница 76: ...Slide the optical drive out of the assembly 4...


