background image

Copyright 

©

 2020 Nortek Security & Control   

13

12

    Copyright 

©

 2020 Nortek Security & Control

Entering Menu Mode 

To change the System setup, you'll need to go to the thermostat's Menu Mode and select 

SYSTEM

Touch and hold the 

MODE

 button to enter the Menu Mode. 

SETUP

 is the first menu item displayed. 

Touch the 

 button to advance to the 

SYSTEM

 screen. From there select the correct HVAC settings 

to match the installation type.

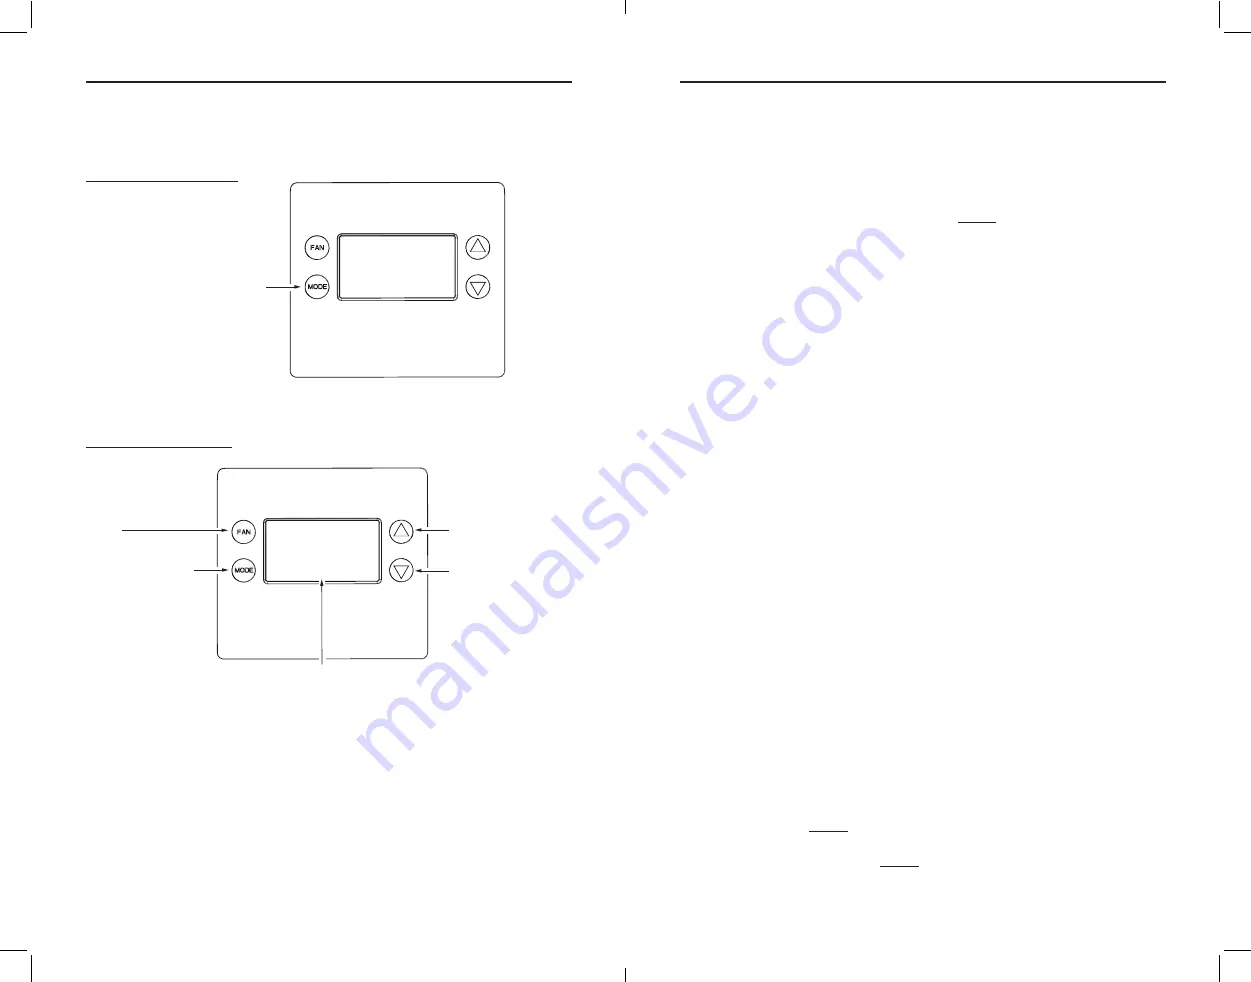
Figure 14. 

Menu Mode Setup

Menu Mode Navigation

When the thermostat Menu Mode screen is displayed, touch the 



 buttons to scroll through the 

following menu items.

Figure 15. 

Menu Navigation

The following menu items are displayed in order (pressing 

 

to cycle options).

• 

SETUP (user preference settings)

• 

SYSTEM (HVAC system setup)

• 

HUMI (humidification support if applicable)

•  Z-WAVE (install/uninstall from Z-Wave network)
• 

CLOCK (set time and day)

• 

INFO (firmware versions and Z-Wave network information)

• 

For multi-stage HVAC System Setup, please go to Advanced System Settings Menu (page 17)

Touch and hold MODE to access the menu options. To select options:

• 

Use the 



 buttons to scroll to the desired setting. 

•  Touch 

FAN (Select)

 to choose the option. The selected option will flash.

• 

Change the option with the 



 buttons. 

• 

When the desired option has been selected, touch 

FAN (Select)

 again to save it. 

•  Then touch 

MODE (Done)

 to exit.

Setup Menu 

The SETUP menu is used to set the user preferences (see 

page 23

). 

• 

Farenheight

 or 

Celsius

: F* or C

• 

Backlight Timeout

: 20* seconds

• 

Sensor Calibration

: Sensor sensitivity (-13°F to +13°F; default is 0)

• 

Status Line

 (display): Setpoint* or Clock

System Menu 

The 

SYSTEM

 menu is used to setup the thermostat for the correct HVAC system type. The following 

setup options will be displayed in the text line: 

• 

System Type

: Standard* or Heat Pump. For Standard Gas/Electric systems, select 

STANDARD

.

• 

Fan Type

 (for Standard HVAC systems only): Gas* or Electric

Changeover Type

 (available with 

Heat Pump

 setup)

The changeover (or reversing) valve is used to change from heating to cooling operation. The HVAC 

system is either a Changeover with Cooling type (O) or Changeover with Heating type (B). Most are 

changeover with cooling, which is the default setting.

• 

For Changeover with Cooling systems, select 

WITH COOL

. This is the default setting. 

• 

For Changeover with Heating systems, use the 



 buttons to change to 

WITH HEAT

•  Touch 

FAN (Select)

 to set.

•  Touch 

MODE (Done)

 to exit.

Not  sure  which  type  Changeover  system?  Check  the  existing  thermostat  connections  to  help 

determine this. If the original system had an orange wire connected to an “O” terminal, then you 

have a “changeover with cool” system. If there was a brown wire connected to a “B” terminal, then 

you have a “change over with heat” system. Set the Changeover setting accordingly. 

Note:


If heating turns ON when cooling is expected or vice versa, switch the “Changeover Type” to 

the opposite setting.

HUMI 

The SETUP menu is used to set the humidification type, if used. The following setup options will be 

displayed in the text line: 

• 

(Mode) Disable*, Humidify 

or

 Dehumidify

• 

Dry Setpoint

: 30%* to 70%

• 

Cooling Setpoint

: 0°F to 18°F

Alternatively, you can dehumidify by over-cooling when 

System Mode

 is set to Cool. Ensure HUMI is 

set to 

Disable

. Navigate to Cooling Setpoint Shift, and enter the amount of degrees (0°F to 18°F)

 to 

shift down from the cooling setpoint.

Z-WAVE 

See 

Z-WAVE Plus Installation

, next page.

CLOCK 

Set the 

Day

 and 

Time

. See 

page 15

.

INFO 

Model, Version, Z-Wave, Battery (%). See 

page 16

 for descriptions.

TOUCH 

MODE (Done)


TO EXIT BACK TO THE 
MAIN THERMOSTAT 
SCREEN

TOUCH 

FAN (Select)

 TO

ENTER THE DISPLAYED
MENU

MENU CHOICES ARE DISPLAYED IN THE 
STATUS DISPLAY LINE

TOUCH THE 

▲▼

BUTTONS TO CHANGE
TO THE DESIRED MENU
ITEM, THEN TOUCH 

FAN (Select)

Select

Done

S E T U P

Select

Done

TO SELECT THE 
MENU MODE, TOUCH
AND HOLD THE 

MODE

BUTTON UNTIL THE
SETUP SCREEN IS
DISPLAYED

S E T U P

* Default Setting

Содержание 2GIG Z-Wave Plus

Страница 1: ...N 10028238 Rev C INK BLACK PANTONE 3005 C MATERIAL 60 LB MEAD BOND SIZE 8 500 X 5 500 TOL 0 125 SCALE 1 1 FOLDING ALBUM FOLD BINDING SADDLE STITCH 72 SET 70 Fan Auto Cool F 47 User Guide 2GIG Security Automation System 2GIG Z Wave Plus Battery Powered Thermostat ...

Страница 2: ...Thermostat Operation 19 Main Thermostat Screen 19 Backlight and Button Operation 19 Display 19 Staging Indicators 19 Setting the System Mode 20 System Modes 20 Special Heat Pump Mode Emergency Heat 20 Setting the Heating or Cooling Temperature Setpoint 21 Automatic Setpoint Push 21 Frost Protection 21 Setting the Fan Mode 22 Fan Modes 22 User Customization 23 User preference settings 23 Error Disp...

Страница 3: ...HEATING AND COOLING TRANSFORMERS PLEASE REMOVE THE JUMPER CONNECTING RC AND RH TERMINALS FIRST AND THEN CONNECT HEATING R TO RH AND COOLING R TO RC PLEASE SEE PAGE 8 W2 HEAT STAGE 2 Typical Wiring for Heat Pump HVAC System THERMOSTAT CONNECTION C 24VAC COMMON HUM HUM W3 RH RC 24VAC POWER W1 HEAT STAGE 1 G FAN Y1 COMPRESSOR STAGE 1 Y2 COMPRESSOR STAGE 2 TYPICAL THERMOSTAT WIRING COLORS CAUTION VERI...

Страница 4: ...labels not included according to the terminal markings Some installations may have additional wires not shown in the example illustration below Y1 Y2 W1 W2 O B Use the thermostat terminal names marking not the wiring color to mark the wires Remove the old thermostat base CAUTION When removing thermostat don t let the wires slip into the wall and don t let the wires touch each other If the old ther...

Страница 5: ...y have one or two transformers The R wire connects differently depending on the system Single Transformer System Most HVAC systems have a single 24VAC transformer For these systems there is only one R wire that can be connected to either the thermostat s RC or RH terminal because a pre installed jumper wire connects the two terminals If installing a Standard HVAC system connect the wires from the ...

Страница 6: ...e separate heating and cooling systems with their own 24VAC transformers there is an R wire from the heating system and an R wire from the cooling system For dual transformer systems connect the C wire from the cooling system to the thermostat s C terminal DO NOT CONNECT THE C WIRE FROM THE HEATING SYSTEM IMPORTANT Remove the Jumper connecting RC and RH terminals see illustration below Figure 7 Du...

Страница 7: ...ction desired If the backlight is already on button touches work with the first touch Wait Mode The thermostat has a Minimum Off Time MOT delay after any heating or cooling cycle ends This delay prevents rapid heating cooling cycles and also provides short cycle protection for the system compressor This delay may be noticeable when you change a setpoint and it does not respond immediately due to t...

Страница 8: ...ype for Standard HVAC systems only Gas or Electric Changeover Type available with Heat Pump setup The changeover or reversing valve is used to change from heating to cooling operation The HVAC system is either a Changeover with Cooling type O or Changeover with Heating type B Most are changeover with cooling which is the default setting For Changeover with Cooling systems select WITH COOL This is ...

Страница 9: ...HID Home ID and ZNID Node ID located in the thermostat INFO screen For other specific tasks such as adding the thermostat to Scenes or Groups or deleting the thermostat from an existing network refer to the Z Wave controller instructions Removing from a Z Wave Network To remove the thermostat from the network use the following steps 1 Set your primary controller to exclude or remove mode to remove...

Страница 10: ...buttons to scroll through the menu options to the desired setting Touch FAN Select to change a setting Once it begins to flash use the buttons to select the desired setting Touch FAN Select to accept the new setting flashing will stop Select MODE Done to exit the option and return to the SETUP screen Feature Description Range Test Mode Temporary shorten Minimum Run Time Minimum Off Time to 10 seco...

Страница 11: ...ing off This will be Aux Stage off Threshold if 2nd Stage Heat Enable Aux Heat Enable in Heat Pump System 32 48 F 0 9 C Cool Stage 1 on Threshold Delta from Set point that stage 1 cooling start 34 45 F 1 7 C Cool Stage 1 off Threshold Delta from Set point that stage 1 cooling off 32 45 F 0 7 C Cool Stage 2 on Threshold Delta from Set point that stage 2 cooling start 36 46 F 2 8 C Cool Stage 2 off ...

Страница 12: ...rent setpoint of the current heating or cooling mode Adjust the setpoint temperature up or down with the buttons Note When in the Setpoint Change screen pressing the MODE button will switch the setpoint being displayed between the Heating and Cooling setpoints Default Figure 21 Accessing Setpoints Figure 22 Setpoint Change Screen Automatic Setpoint Push The cooling setpoint cannot be set below the...

Страница 13: ...play mode BACKLIGHT TIMEOUT Sets the time from last button touch that the backlight will turn OFF Range 10 30 seconds Default is 20 seconds Note Long backlight timeouts will reduce battery life SENSOR CALIBRATION Change the temperature calibration by 7 degrees Default is 0 Touch the UP or DOWN arrow buttons to change to the desired display temperature STATUS LINE Sets Status Line to Setpoints or C...

Страница 14: ...the Main Screen once either battery have been removed See Battery Installation page 10 Figure 26 Error Screen Figure 27 Battery Error Display Specifications Type Programmable thermostat for 24VAC 3H 2C non heat pump or 24VAC 3H 2C heat pump systems with humidifier de humidifier support Room Temperature Measurement Temp Scale Fahrenheit Celsius user selectable Temp Range 32 122 F 0 50 C Operating T...

Страница 15: ...ing Energy Heat Cool Setpoint Exit Energy Saving Mode by setting the Thermostat Mode to Off Heat Cool Auto through Z Wave Please note that Restore Default would set the Energy Heat Set Point to 72 F 22 C and Energy Cool Set Point to 80 F 26 5 C thus exiting Energy Saving Mode Scheduling Scheduling is only available for those with a compatible Z Wave controller gateway that supports scheduling func...

Страница 16: ...A PARTICULAR PURPOSE SHALL NOT EXCEED THE WARRANTY PERIOD PROVIDED HEREIN Some states do not allow limitations on how long an implied warranty lasts so the above limitation may not apply to you NSC SHALL NOT BE LIABLE FOR ANY INCIDENTAL OR CONSEQUENTIAL DAMAGES RESULTING FROM THE BREACH OF ANY WRITTEN OR IMPLIED WARRANTY Some states do not allow the exclusion or limitation of incidental or consequ...

Страница 17: ...Copyright 2020 Nortek Security Control 10028238 Rev C or dial ...

Отзывы: