Repair
7-4
Part 334598G03
E
2008 Nordson Corporation
Trigger Lock Replacement
See Figure 7-3.
WARNING:
Never operate the spray gun with a worn or damaged trigger
lock. Failure to observe this warning could result in an injection injury.
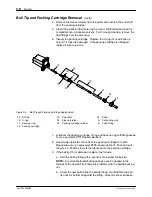
1. Drive the pin (27) out of the trigger lock (26) and handle (19) with a
small dowel pin.
2. Hold the new trigger lock in place and drive the new pin through the lock
and handle holes. The pin should be approximately flush with the
trigger lock surfaces.
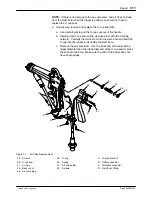
26
27
19
Figure 7-3
Trigger Lock Replacement
19. Handle
26. Trigger lock
27. Pin
Air Inlet Fitting Replacement
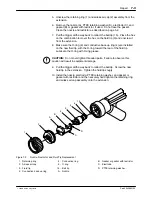
1. See Figure 7-4. Remove the screws (30, 41) to remove the back cover
(45) from the handle and ground bracket (A).
2. Remove the two screws (52) that attach the fluid hose fitting (D) to the
ground bracket. Remove the fluid hose from the ground bracket.
3. Slowly pull the back cover away from the handle so you do not
disconnect the cable connector (B) from the multiplier connector (C) or
pull on the kV actuator switch wires.
NOTE:
The cable will be secured in ribbed slots in the back of the spray
gun’s handle.
4. Unscrew the old air inlet fitting (31) from the handle base and replace it
with the new air inlet fitting. Tighten the fitting finger tight.
Содержание kinetix
Страница 6: ...Table of Contents iv Part 334598G03 E 2008 Nordson Corporation ...
Страница 12: ...Safety 1 6 Part 334598G03 E 2008 Nordson Corporation ...
Страница 24: ...Installation 3 8 Part 334598G03 E 2008 Nordson Corporation ...
Страница 34: ...Maintenance 5 6 Part 334598G03 E 2008 Nordson Corporation ...
Страница 60: ...Repair 7 20 Part 334598G03 E 2008 Nordson Corporation ...
Страница 70: ...Parts 8 10 Part 334598G03 E 2008 Nordson Corporation ...
Страница 75: ...Safety Note KINETIX TRILOGY ATEX Page 3 DOC13015B05 ...

