OPERATION
8
TrailBlazer
Series (11–01)
9.
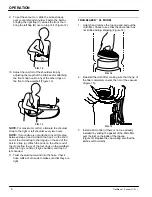
To put the vacuum on, slide the monostrap up
over your preferred shoulder. Fasten the belt by
bringing the right flap (C) across the front. then
bring the left flap (B) over on top of it. (Figure 12).
FIG. 12
10. Adjust the comfort of the shoulder strap by
adjusting the length of the strap and/or attaching
the front snap hook to any of the other rings on
the front of the waistbelt (Figure 13).
FIG. 13
NOTE: For maximum comfort, alternate the shoulder
strap to the right or left shoulder every two hours.
NOTE: If monostrap is not attached, insert this step
between steps 8 and 9. Attach the hook on the short
end of the monostrap to the ring up on the end of the
Velcro
[
strap (a). Attach the hook on the other end of
the monostrap to any of the four rings on the waistbelt.
Attach to rings on flap c if right–handed, and flap b if
left–handed.
11. Twist the aluminum wand into the hose. Check
hose cuffs at both ends to make sure that they are
tight.
TRAILBLAZER
XL MODEL
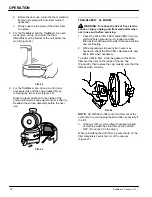
1.
Unlatch and remove the top cap and pull out the
cloth filter. Check to see that the dome filter has
not shifted during shipping (Figure 14).
FIG. 14
2.
Reinstall the cloth filter, making sure that the lip of
the filter completely covers the rim of the vacuum
(Figure 15).
FIG. 15
3.
Install a Micro filter (if there is not one already
installed) by sliding the gasket of the Micro filter
over the inlet on the inside of the top cap
(Figure 16). Replace the cap, making sure that the
latches catch correctly.


