OPERATION
6
TrailBlazer
Series (11–01)
4.
Twist the aluminum wand into the hose. Check
hose cuffs at both ends to make sure that they are
tight.
5.
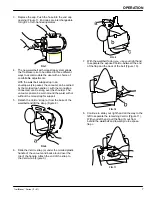
Loosen the shoulder straps and waist belt. In an
open area, lift the vacuum by one shoulder strap
and slide your free arm into the other strap
(Figure 3).
FIG. 3
6.
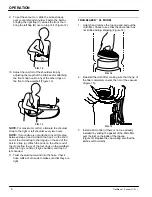
Fasten the waist belt snugly and make sure the
weight is resting comfortably on your hips
(Figure 4).
FIG. 4
NOTE: The backplate is adjustable up or down by
removing the four screws that attach to the vacuum’s
body.
7.
Check the wear on the cord by the vacuum body
and at the plug. Place the extension cord between
the waist belt’s strap and padded area to signal
you if you have run out of cord while vacuuming
(Figure 5).
WARNING: To reduce the risk of fire, electric
shock or injury, do not pull or carry the vacuum
by the cord or use the cord as a handle. Do not
close door on cord or pull the cord around sharp
edges or corners. Do not run over the cord. Keep
the cord away from heated surfaces. Do not pull
on the cord to unplug. Grasp the plug at the outlet
and pull. Work within cord length to avoid stress
and damage.
FIG. 5
8.
To attach tools to an aluminum wand, LOOSEN
the plastic nut at the end of the wand, insert the
tool, and retighten the nut. To ensure the copper
ring stays in place, NEVER remove the nut.
TRAILBLAZER
LITE MODEL
1.
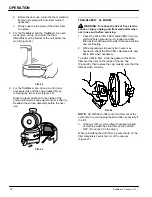
Remove the cap and pull out the cloth filter. Check
to see that the dome filter has not shifted during
shipping (Figure 6).
FIG. 6
2.
Install a Micro filter inside of the cloth filter. At the
beginning of each shift, the filters should be
checked. Empty or replace them if necessary.
NOTE: Never use a Micro filter without the cloth filter.
The cloth filter’s rubber gasket provides the seal.


