background image

7


Troubleshooting 

 
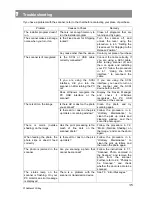
If you have a problem with the scanner, refer to the chart before contacting your place of purchase. 
 

Problem 

Causes to Check 

Remedy 

The installer program doesn’t 
run 

There is not enough memory to 
run the installer program 

Close all programs that are 
running and try again 

Is the Fixed Lever for Shipping 
locked? 

Turn the scanner off, and 
unlock the lever using the 
procedure in 4.3, “Setting the 
Fixed Lever for Shipping to the 
Release Position.” 

The scanner makes a strange 
noise when you turn it on 

Any cause other than the above

Contact your place of purchase

Is the SCSI or USB cable 
correctly connected? 

Connect the cable correctly. If 
you are using a SCSI cable, 
after turning scanner off and 
then on again and restarting 
your PC, follow the procedure 
in 4.1, “Using the SCSI 
Interface,” to reconnect the 
cable 

If you are using the SCSI 
interface, did you turn the 
scanner on after turning the PC 
on? 

If you are using the SCSI 
interface, you need to turn on 
the scanner and the SCSI 
device before the PC 

The scanner isn’t recognized 

Does Windows recognize the 
PC USB interface or the 
scanner? 

Display the Device Manager 
and check if Windows 
recognizes the PC USB 
interface or the scanner. 

Is there dirt or dust on the photo 
you scanned? 

Clean the photo and try 
scanning again 

There is dirt on the image 

Is there dirt or dust on the pick 
up rollers or scanning window? 

Follow the procedure in 6, 
“Ordinary Maintenance,” to 
clean the pick up rollers and 
cleaning window, and then 
scan the photo again 

There is moiré (net-like 
shading) on the image 

Has the print processing left a 
mesh of fine dots on the 
scanned photo?   

Follow the procedure in 7.2, 
“Moiré (Net-like Shading) on 
the Image,” and scan the photo 
again 

When feeding the photo, the 
photo slips or doesn’t feed 
correctly 

Is there dirt or dust on the pick 
up rollers? 

Follow the procedure in 6, 
“Ordinary Maintenance,” to 
clean the pick up rollers, and 
then scan the photo again 

The photo is jammed in the 
scanner 

Are you scanning a photo that 
cannot be scanned? 

Follow the instructions in 7.1, 
“Scanned Photo Jammed in 
the Scanner,” and remove the 
photo from the scanner. 
Further, refer to 2.2, “Photos to 
be Scanned,” and check 
whether the photo is able to be 
scanned 

The status lamp on the 
scanner is flashing. On your 
PC monitor, an error message 
is displayed 

There is a problem with the 
scanner or transmission device 

See 7.3, “Error Messages.” 


35 

P1SeManu220-Eng 

Содержание NS-P1S

Страница 1: ...High speed Photo Print Scanner NS P1S SU User s Guide Version 2 20 Driver Software Version 2 2x 1 P1SeManu220 Eng...

Страница 2: ...U 15 4 1 Using the SCSI Interface 15 4 2 Using the USB Interface 18 4 3 Settings the Fixed Lever for Shipping to the Release Position 18 4 4 Switching on the Photo Scanner NS P1S SU and PC 18 5 Using...

Страница 3: ...ease contact NISCA The above 4 items notwithstanding NISCA accepts no liability whatsoever for any consequences arising from the use of this product Trademark Information Windows Windows 98 Windows Me...

Страница 4: ...from the power socket and consult your NISCA dealer Never attempt to repair the product yourself as this is very dangerous Do not attempt to disassemble or modify this product This could result in unf...

Страница 5: ...t install this product in the following locations In small poorly ventilated locations such as a cupboard or bookcase On carpet or bedding Do not cover this product with fabric blankets tablecloths et...

Страница 6: ...tems that May Not Be Copied Reproduction of the following is prohibited by law 1 Paper money securities etc The reproduction of paper money certificates of indebtedness and government securities wheth...

Страница 7: ...on Windows 2000 or Windows XP you must log in as a user with administrator privileges Administrator Check that the scanner is not connected to your PC 1 Switch the PC on and launch Windows 2 If one o...

Страница 8: ...appears click Next 4 If the set up screen is not displayed Click Start in the bottom left corner of the screen and click Run Enter d setup and click OK This example assumes that the CD ROM drive is dr...

Страница 9: ...elcome to Photo Scanner NS P1S SU window appears click Next File copying begins When installation ends the dialog box shown below appears Click Finish Remove the CD ROM and exit Windows 5 6 7 9 P1SeMa...

Страница 10: ...eed scanning of up to 10 photos min The scanner features a scanning rate of 10 L size photos per minute Depending on the PC performance the scanning speed for 600 dpi scanning may vary Support for a r...

Страница 11: ...Mini 54 x 86 mm 10 Instant 86 x 108 mm 10 Single print Scanning Panorama 89 x 254 mm 1 Restrictions on photo curling When a photograph is placed at rest on a flat surface as shown in the figures below...

Страница 12: ...cable that meets the following requirements To connect the scanner to your PC or to other SCSI devices a separate SCSI cable that matches the scanner s SCSI interface is needed Provide the appropriate...

Страница 13: ...es The scanner s USB port is a Series B connector Use a USB 2 0 authorized USB cable Series A Connector on the PC Side Series B Connector on the Scanner Side 2 4 Recommended PC Hardware and Software T...

Страница 14: ...ner on and off Releasing the latch and pulling this cover outwards allows you to clean the scanning window and remove the photo if the scanner stops for any reason Eject Tray Scanned photos are fed ou...

Страница 15: ...ces are all switched off Set the SCSI ID If you are daisy chaining multiple SCSI peripheral devices care must be taken to avoid duplicating SCSI IDs Note that if SCSI IDs are duplicated data on the de...

Страница 16: ...n in the figure below Mount the ferrite core so that it is no more than 2 cm from the connector Take care also to press the ferrite core until a click is heard and check that the locking catch is firm...

Страница 17: ...ther peripheral device SCSI Cable Connect the power cord to the scanner and then plug the cord into an AC power supply If multiple SCSI devices are connected in a daisy chain configuration always conn...

Страница 18: ...d Locked Screw Loosen the screw beside the shipping lock lever set the lever to the position and then retighten the screw When shipping or moving the scanner always move the shipping lock lever to the...

Страница 19: ...Launch the TWAIN compatible application Select the TWAIN data source Select the Photo Scanner NS P1S SU Start up TWAIN Load the photos Continuous scanning Panorama photo scanning First photo scanned E...

Страница 20: ...indows Launch the driver software 1 The launching method varies depending on the TWAIN application you are using Refer to the user manual supplied with your TWAIN application When this driver software...

Страница 21: ...0D is a dye sublimation printer manufactured by Mitsubishi Electric Image processing settings Hardware Uses the image processing functions in the Photo Scanner NS P1 for scanning This option is best w...

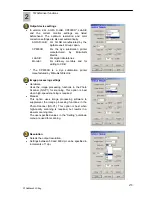
Страница 22: ...ecifies the unit used to show the Input and Output sizes Zoom Output size scales between 10 and 200 can be specified in 1 increments Preview If you change the settings and click the Preview button aga...

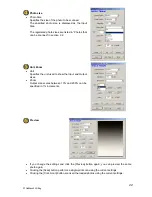
Страница 23: ...n Image Process Position Trimming This option trims the specified amount from the size specified in the Photo Size parameter Selecting a negative value widens the output image while selecting a positi...

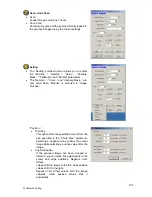
Страница 24: ...el is enabled Color Adjustment Offset Use this dialog box to set the color balance intensity and brightness If you check the grayscale check box data is output in monochrome gray Unsharp Mask Sharpens...

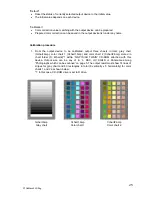
Страница 25: ...otal gray chart Gchart bmp color chart 1 Cchart1 bmp and color chart 2 Cchart2 bmp stored in chart folder D chart 1 within NS P1S SU TWAIN CD ROM attached with this device Output size can be any of E...

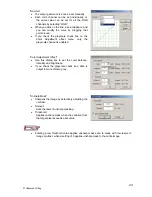
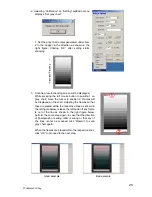
Страница 26: ...cursor to position 2 Frames will be displayed on the chart Adjusting the frames so that they are placed within the respective lines as shown in the left figure below release the left button If any fr...

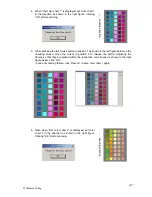
Страница 27: ...the checking screen move the cursor to position 2 to release the button Adjusting the frames so that they are placed within the respective color boxes as shown in the right figure below click OK In c...

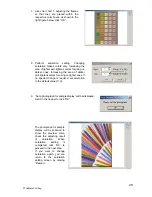
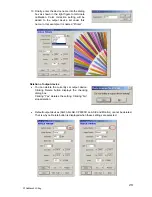
Страница 28: ...t lightens colors focusing on lighter ones If no special change is required set saturation to the default value 0 0 9 Set a photograph for sample display will be displayed Set it to the hopper to clic...

Страница 29: ...is example it is named Printer Deletion of output device You can delete the currently set output device Clicking Delete button displays the checking dialog box Clicking Yes deletes the setting Clickin...

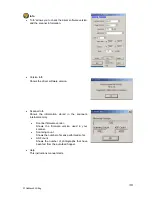
Страница 30: ...Info Shows the information stored in the scanner s internal memory Scanner firmware version Shows the firmware version used in your scanner Scanning count Shows the number of scans performed so far AD...

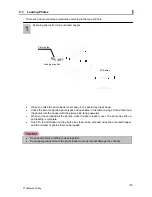
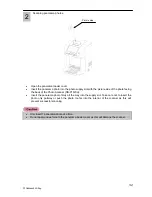
Страница 31: ...photos into the hopper with the picture side facing upwards When you have loaded all the photos close the photo loader cover The photo tray lifts up and loading is complete See P 10 for information o...

Страница 32: ...r NS P1S SU Insert the panorama photo firmly all the way into the supply slot Take care not to insert the photo only partway or push the photo too far into the interior of the scanner as this will pre...

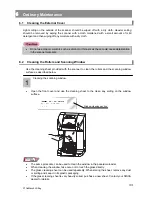
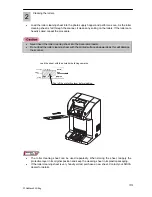
Страница 33: ...e cleaning sheet provided with the scanner to clean the rollers and the scanning window surface as described below Cleaning the scanning window 1 Open the front cover and use the cleaning sheet to the...

Страница 34: ...r Do not load the roller cleaning sheet with the printed surface downwards as this will damage the scanner Load the sheet with the printed side facing upwards Peel off the protective layer before load...

Страница 35: ...ner Display the Device Manager and check if Windows recognizes the PC USB interface or the scanner Is there dirt or dust on the photo you scanned Clean the photo and try scanning again There is dirt o...

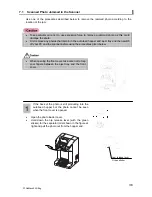
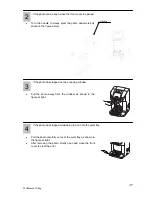
Страница 36: ...off your PC and the scanner before using the procedures given below When opening the front cover take care not to trap your fingers between the eject tray and the front cover If the back of the photo...

Страница 37: ...topped on the scanning window 3 Pull the photo away from the window as shown in the figure at right If the photo has stopped while being fed out into the eject tray 4 Pull the photo carefully out over...

Страница 38: ...s printed in documents are more susceptible to moire patterns In the same way images made up of a mesh of fine dots are also likely to suffer from moire effects when scanned While moire cannot be comp...

Страница 39: ...ibed in section 5 3 1 Photos are loaded in the hopper and manual supply slot Remove the photos from the hopper Photos were loaded into the hopper and manual supply slot when panorama scanning was sele...

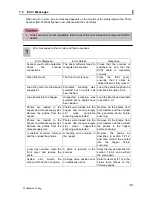
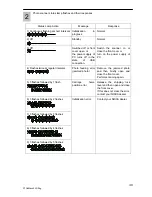
Страница 40: ...y of PC 4 Flashes twice at regular intervals Photo feeding error jammed photo Remove the jammed photo and then briefly open and close the front cover Perform scanning again 5 3 flashes followed by 1 f...

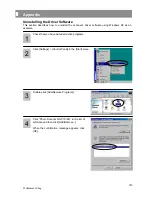
Страница 41: ...using Windows 98 as an example Check that you have exited all active programs Click Settings Control Panel in the Start menu Double click Add Remove Programs Click Photo Scanner NS P1S SU in the list...

Страница 42: ...ct the warranty for the warranty period and terms and conditions of the warranty Warranty Maintenance Contact your place of purchase or your local Nisca dealer Retention Period for Service Parts In ge...

Отзывы: