


63
M
o
re
on
P
la
y
ba
ck
Transferring Images
When the PictureProject Transfer is displayed in the computer monitor, pressing
d
(Transfer
E
) on the camera or clicking the
Transfer
button in PictureProject
will transfer images to the computer. For information on using PictureProject, see
the
Quick Start Guid
e or the
PictureProject Reference Manual
(on CD).
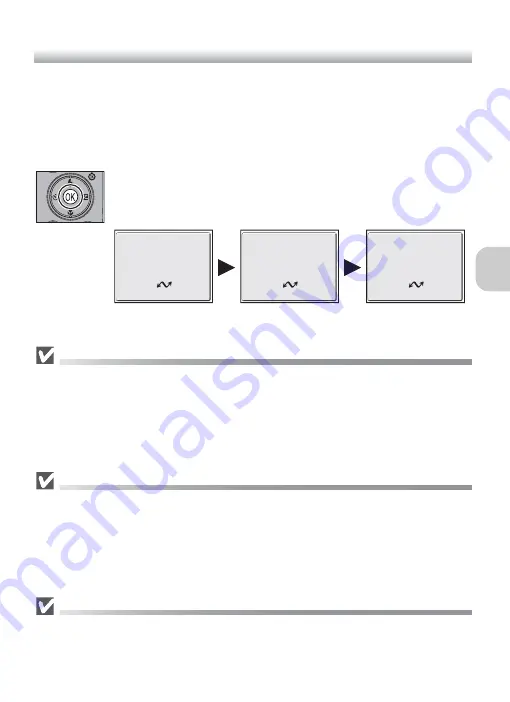
To Transfer Images Using
d
(Transfer
E
)
When the PictureProject Transfer screen is displayed in the computer
monitor, press
d
(Transfer
E
) on the camera.
Images marked with an
E
icon (
c
112, 129) will be transferred and
the following messages will be displayed in the camera monitor.
During Transfer
While transfer is in progress, do not:
• Disconnect the USB cable
• Turn the camera off
• Remove the battery or the memory card
• Disconnect the AC adapter kit
Failure to observe this precaution could interfere with normal functioning of both the camera
and the computer.
Transferring Images Stored in the Memory
• Remove the memory card from the camera before connecting the camera to the computer.
• When transferring images with
d
(Transfer
E
) on the camera, note the following.
– For Windows XP or Mac OS X (10.1.5 or later), set the
USB
option in the Set-up menu
to
PTP
.
– For Windows 2000, Windows Me or Windows 98SE,
d
(Transfer
E
) on the camera
cannot be used. Use the
Transfer
button in PictureProject, or copy the pictures in the
memory to the memory card (
c
114) and then transfer the pictures to the computer.
Using Mac OS X (10.1.5 or Later)
Before using
d
(Transfer
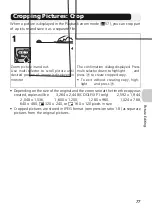
E
) on the camera to transfer images, set the
USB
option in the
Set-up menu to
PTP
. When the
USB
option is set to
Mass storage
, the images cannot be
transferred.
PREPARING TO TRANSFER
TRANSFERRING IMAGES TO
COMPUTER
TRANSFER COMPLETED
Содержание Coolpix P1
Страница 14: ...2 Before You Begin ...
Страница 21: ......
Страница 55: ......
Страница 73: ...61 ...