background image

BIKE INSTALLATION (CONTD.)

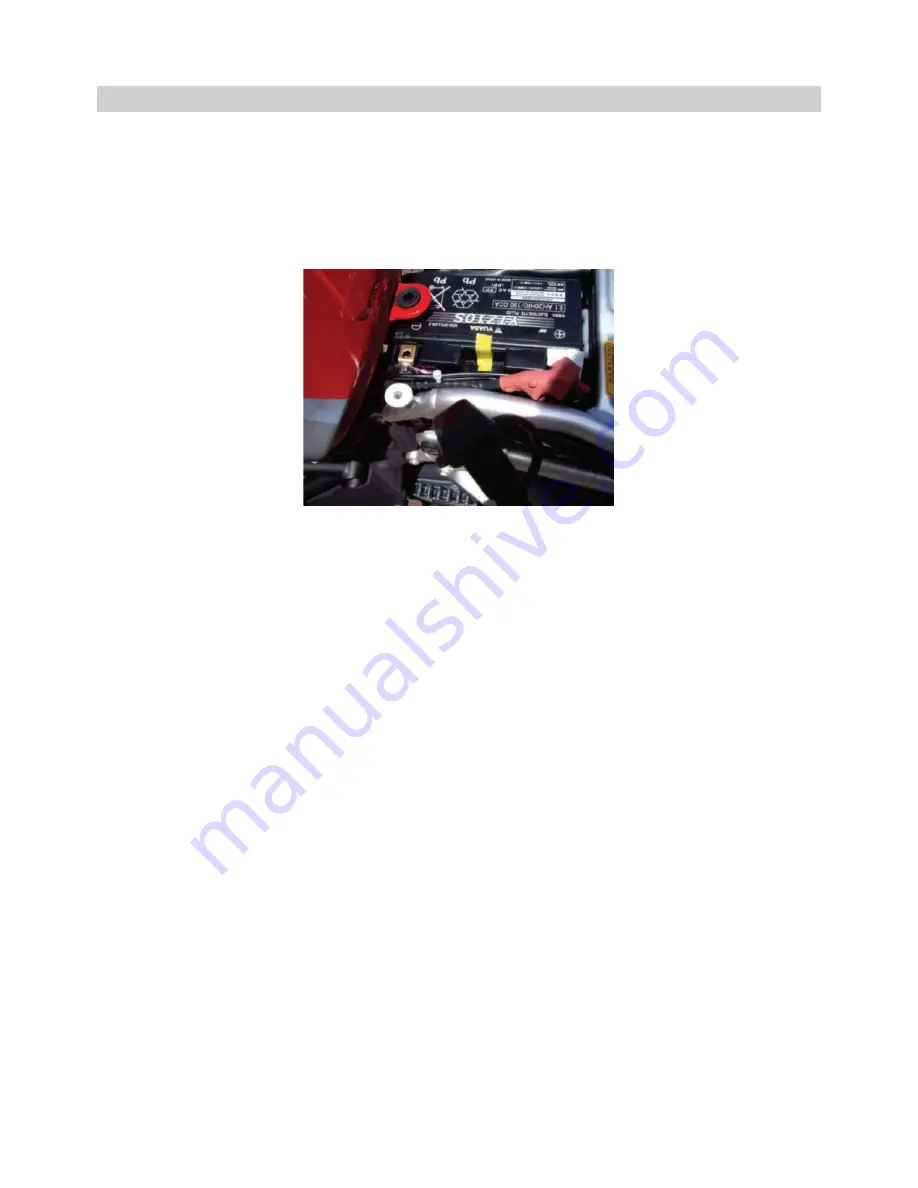
Step 2: Connecting the hard-wire cable to the battery

             2.1  Connect the positive (red) ring terminal to the positive (+) pole of the battery.

             2.2  Connect the negative (black) ring terminal to the negative (-) battery pole or to the
                    motorbike chassis to ground the hard-wire cable.

Warnings:
- Protect yourself from an electric shock:
  When connecting the hard-wire kit to the battery, use a screwdriver or spanner with an insulated 
  handle.
  Handle any cables connected to the battery by their insulated areas only.
- Danger of explosion:
  Ensure that the positive terminal connection cable does not come into contact with a fuel line 
  (e.g. petrol line). 
- Danger of chemical burns:
  Protect your eyes and skin against chemical burns caused by acid (sulphuric acid) upon contact 
  with the battery.
  Wear acid-resistant glasses, clothing and gloves
  If your eyes or skin come into contact with sulphuric acid, rinse the affected part of the body with 
  plenty of clear running water and seek immediate medical assistance!
- Failure to follow these safety precautions and instructions could result in damage to the 
  product or vehicle, which will not be covered under the manufacturers warranty.:
- Do not bypass the in-line 2A fuse.
- Fit the Hard-wire cable away from any excess heat, e.g. the engine or exhaust.
- Failure to use the supplied installation parts and/or hardware will void the product warranty.
- Failure to connect the product as instructed, may result in discharge of the vehicle battery.

Image for illustration purposes only.

Should you experience any difficulties during installation please do not hesitate

to contact our technical support team: [email protected]

14

Содержание Ride BikeCam

Страница 1: ...Instruction Manual...

Страница 2: ......

Страница 3: ...raphs Playback Allows you to view recorded video or photographs upon the cameras LCD screen Automatic Start Stop Technology The BikeCam senses power supplied to the cigarette power socket as soon as t...

Страница 4: ...PACKAGE CONTENTS PRODUCT FEATURES PARTS CONTROLS INSTALLATION VIDEO MODE PHOTO MODE PLAYBACK MODE GENERAL SETTINGS MENU FINALCAM Wi Fi APP FOR ANDROID FINALCAM Wi Fi APP FOR iOS MASS STORAGE PC CAMERA...

Страница 5: ...the deployment of any airbags in the event of an accident 2 When not in use please disconnect the power supply from both the 12Vdc outlet of your bike and the device itself If this not practical then...

Страница 6: ...t 5Vdc Hard wire cable Fuse Type 20mm 2A Output 5Vdc 14M Pixel 14 000 000 Pixel 6G 110 F2 0 1920 x 1080 30fps 1 5 480 W X 240 H pixels x RGB 4 3 MicroSD Class 6 10 upto 32GB 8 32GB Class 10 30mb s for...

Страница 7: ...directly with the battery Windows is a registered trademark of Microsoft Corporation in the U S and other countries Apple iPhone iTunes Mac and iOS are trademarks of Apple Inc registered in the U S an...

Страница 8: ...n photo mode OK Press to confirm selection when in menus Menu File Protect Menu Press to open the menu within current mode press twice to open the general settings File Protect Press whilst recording...

Страница 9: ...Cam with a variety of camera or professional RAM mounts see page 16 for details 6 Micro USB 2 0 socket Connect the supplied 5Vdc power cable or hard wire cable here Note Pull back the sleeve from the...

Страница 10: ...8 32Gb Class10 Take care to ensure that the MicroSD card is the correct way round gold contacts facing down Push the memory card until it clicks into place Use the edge of a small coin or similar obj...

Страница 11: ...d tighten finger tight only 2 Waterproof connecter for the suppled car adaptor Remove the dust cover and then follow same procedure as described above 3 12 24V cigarette plug adaptor for use with vehi...

Страница 12: ...d wire cable is fused to protect the BikeCam and power source from damage as a result of voltage current surges short circuit cable damage or product failure The fuse 2Amp 20mm is user replaceable uns...

Страница 13: ...in an area which is NOT exposed to rain directly i e under the seat under cowlings or in the headlight Switch off the ignition and ensure the motorbike is stable before work commences upon it If in a...

Страница 14: ...aused by acid sulphuric acid upon contact with the battery Wear acid resistant glasses clothing and gloves If your eyes or skin come into contact with sulphuric acid rinse the affected part of the bod...

Страница 15: ...Bar Mount The bar mount is easy and quick to install simply follow the instructions given below A Release the U Bolt clamp locate mount upon a suitably size bar and re tighten thumb screws B Gently o...

Страница 16: ...with the RAM fittings to complete the installation to ensure the best results The recommended RAM mount system comprises of three parts as shown below Notes When using RAM mount PN B 366U above please...

Страница 17: ...ng Menu Press to open the Video menu press twice to open the General Settings menu Battery LED Indicates when the BikeCam is charging Power LED Indicates when the BikeCam is powered on flashes when Bi...

Страница 18: ...crophone Indicates whether audio recording is on or off 9 Power displays power source being used external or battery 10 GPS the icon will flash whilst the BikeCam locates satellites Once a stable sign...

Страница 19: ...White Balance Adjust the white balance for different light conditions Default Setting Auto 4 Record Audio Turn On Off audio recording Default Setting On 5 Date Stamp Turn On Off the date stamp shown...

Страница 20: ...tion is present Default Setting Off 11 Speed Units Select whether to record and display speed in KMH or MPH Default Setting MPH 12 Time Lapse Turn on the Time Lapse function frames will then be record...

Страница 21: ...screen permanently as the BikeCam utilises WDR technology 4 Mode indicates the BikeCam is in Photo mode 5 Resolution displays the current resolution 6 Timer displayed on screen when self timer is sele...

Страница 22: ...has been pressed Default Setting Single 4 White Balance Adjust the white balance for different light conditions Default Setting Auto 5 ISO Adjust the ISO setting the brighter the conditions the lower...

Страница 23: ...displays power source being used external or battery 8 Playback controls use the BikeCam buttons as described below Press the OK button to play pause Press the MODE button to stop playback Use UP but...

Страница 24: ...y Playback options menu The options menu is accessed by pressing the MENU button whilst in Playback mode Use the UP and DOWN buttons to highlight option and press the OK button to enter the sub menu S...

Страница 25: ...spa ol Nederlands Norsk Suomi Svenska Dansk Default Setting English 4 Date Time Adjust the date time as required using the OK button to toggle through fields use the UP and DOWN buttons to set variabl...

Страница 26: ...tings 11 Auto Power Off Adjust the timing of the Auto Power Off function this can be used to continue recording in event of loss of power within in the vehicle Default Setting 10 Seconds The default s...

Страница 27: ...tc and playback videos directly to your smartphone or tablet The FinalCam App is available for free download from Google Play for Android smartphones Installing the App on an Android smartphone Open G...

Страница 28: ...close and the AP Mode Access Point Mode window will open as shown below This screen gives the name of the BikeCam SSID network name RIDE and also the password 12345678 Note Both the network name and...

Страница 29: ...one to the BikeCam open the Wi Fi connections menu on your phone the BikeCam will be shown in Wi Fi networks list as RIDE Tap on the RIDE and when prompted enter the password 12345678 Once successfull...

Страница 30: ...he App is opened the Please click to add camera screen will appear see image below Tap on the button select RIDE from the available networks as shown below Enter the password 12345678 and tap Add the...

Страница 31: ...mory card To playback a recording on your phone you will need to download the video file from the BikeCam to do this simply tap on the preview window The download will start immediately to your smartp...

Страница 32: ...Quality Adjust the video quality settings used by the BikeCam Format Format the inserted memory card within the BikeCam this will delete all content Advanced Settings G Sensor sensitivity Turn Off or...

Страница 33: ...Language Select language used within the FinalCam App About FinalCam version with option to check whether there is an update available 7 FinalCam home screen Tap here to return to the home screen from...

Страница 34: ...olution This function is unavailable as the BikeCam manages the resolution used for still images 3 WDR This function is unavailable as the BikeCam utilizes WDR technology permanently to optimise the i...

Страница 35: ...here to open The Camera Settings menu described earlier 10 Volume Adjust the volume level of your phone 11 Microphone This function is unavailable as the BikeCam manages the microphone on or off setti...

Страница 36: ...tory 4 Repeat Tap to toggle through the repeat options 5 Delete Tap here to delete current file 6 Volume Adjust the volume level of your phone 7 Play Pause Tap here play pause 8 Brightness Adjust the...

Страница 37: ...ay pause etc and playback videos directly to your smartphone The FinalCam App is available for free download from the App Store for Apple smartphones Installing the App on an iOS smartphone Open the A...

Страница 38: ...lose and the AP Mode window will open as shown below This screen gives the name of the BikeCam SSID network name RIDE and also the password 12345678 Note Both the network name and password can be chan...

Страница 39: ...onnections menu on your phone the BikeCam will be shown in Wi Fi networks list as RIDE Tap on the RIDE and when prompted enter the password 12345678 once successfully connected the WiFi Connected wind...

Страница 40: ...below Tap on the button the Camera is connecting and then the Add device successful screens will appear as shown below Enter the password 12345678 and tap Add the live video screen will appear Press...

Страница 41: ...on your phone you will need to download the video file from the BikeCam to do this simply tap on the preview window Download to your smartphone will start immediately Multiple files can also be downl...

Страница 42: ...the video quality settings used by the BikeCam Format Format the inserted memory card within the BikeCam this will delete all content Advanced Settings G Sensor sensitivity Turn Off or adjust the sens...

Страница 43: ...the FinalCam directory and also your Camera Roll album Language Select language used within the FinalCam App About FinalCam version with option to check whether there is an update available 7 FinalCa...

Страница 44: ...s the BikeCam manages the resolution used for still images 3 WDR This function is unavailable as the BikeCam utilizes WDR technology permanently to optimise the image quality of the recorded files 4 R...

Страница 45: ...enu described earlier 10 Volume Adjust the volume level of your phone 11 Microphone This function is unavailable as the BikeCam manages the microphone on or off settings 12 Record Tap to start stop re...

Страница 46: ...Adjust the volume level of your phone 6 Next Tap here to move to the next recording 7 Play Pause Tap here play pause 8 Previous Tap here to move to the previous recording 9 Brightness Adjust the brig...

Страница 47: ...lication upon your PC that uses a webcam e g Skype and select the BikeCam which is entitled CARDV Note Turn Off the BikeCam before disconnecting from PC Using the BikeCam with a MAC Mass Storage When...

Страница 48: ...x 1024 Windows Driving Recorder Player Insert the supplied Driving Recorder Player disk in to the CD drive navigate and display the contents upon the disk NBDVR RIDE Instruction Manual English NBDVR...

Страница 49: ...not already be installed a window will open prompting you to confirm the automatic installation from Microsoft as shown below This is normal and enables the Driving Recorder Player software to run Ple...

Страница 50: ...nt installed then the Welcome to the InstallShield window will open as shown below Press Next to continue the License Agreement window will open as shown below Check the Accept button and press Next t...

Страница 51: ...ion folder should you not want files saved to the default folder within the Program Files directory Press Next to proceed the Ready to Install the Program window will open as shown below Click Install...

Страница 52: ...s Finish to close the InstallShield Wizard window The Driving Recorder Player icon will now be available on your desktop Note For some operating systems additional different steps may be required Some...

Страница 53: ...deo clip recordings and click Open this will add the selected files to the Driving Recorder Player file list It is the same principal whether connecting the BikeCam via the USB cable see page 47 or by...

Страница 54: ...pon the BikeCam settings and availability of GPS signal during recording 4 Volume Adjust playback volume 5 Video playback control buttons Play Pause fast forward and rewind current file this function...

Страница 55: ...hen the video files are recorded when a satellite connection was present 15 Map Displays route travelled on map only available when the video was recorded when a satellite connection was present 16 Co...

Страница 56: ...iving Recorder Player NBDVR RIDE Instruction Manual English NBDVR RIDE Driving Recorder Player for Windows NBDVR RIDE Driving Recorder Player for Mac Note The instruction manual and installation files...

Страница 57: ...en the Downloads folder on your Mac The software is saved in a compressed zip folder free de compression applications are readily available for example The Unarchiver available from the Mac Appstore O...

Страница 58: ...lick select Eject Driving Recorder Player and right click once more see image below The Driving Recorder Player can also be found within the Applications List see below At this point may also want to...

Страница 59: ...s see image below Once you have located and highlighted the required folder for example VOLUME1 RIDE 10130102 then highlight the required video clip recordings and click Open this will add the selecte...

Страница 60: ...gistration Speed GPS Co ordinates Stamp Data saved to the recorded file this content will vary depending BikeCam settings and availability of GPS signal during recording 3 Volume Adjust playback volum...

Страница 61: ...co ordinates Displays current GPS co ordinates only available when the video files were recorded when satellite connection was present 13 Map Displays route travelled on map only available when the vi...

Страница 62: ...al Codecs if necessary Remove the SD card and reformat to remove non contiguous files For best recording use a branded class 10 type 30MB s SD card of 8 to 32GB recommended size Recommended video play...

Страница 63: ...nted with clear view of the sky it can take up to 10 minutes to find the three satellites required to achieve a stable signal Reception can also be affected by atmospheric conditions and the proximity...

Страница 64: ...us issue This is due to a combination of warm air inside the BikeCam and the cold air outside especially whilst riding with the wind chill Leaving the BikeCam indoors overnight with the SD card slot u...

Страница 65: ...NOTES 65...

Страница 66: ...NOTES 66...

Страница 67: ......

Страница 68: ...NBDVR RIDE IM ENG R01 www nextbase co uk...

Отзывы: