


User’s Manual
54
Record Setup
The following factors will effect the total record time of the
Premium H.264 DVR
:
•
HDD
capacity
•
Recording rate (Picture per Second)
•
Image quality settings
The greater the recording rate and the higher the quality setting, the shorter the recording
time. Most of the related factors can be set here in this submenu.
The Record Setup menu allows user to set recording quality, recording schedules, and
other recording parameters. In the Main menu, move the cursor to <Record Setup> and
press ENTER. The following menu is displayed.
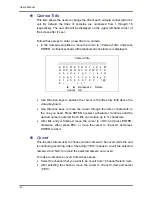
Record Setup
1. Record Mode Setup
2. Schedule Setup
3. Preset Config
4. Per Camera Config
5. ezRecord Setup
6. Data Lifetime
7. Pre-Alarm Recording
8. Circular Recording
9. Audio Recording
10. Purge Data
Best Quality
0 Days
15 Sec
ON
ON
< Record Mode Setup >
The Record Mode Setup menu is for selecting resolution and recording format. The relative
record settings, such as preset configuration, will follow the record mode setting. The menu
is displayed as the following.
Record Mode Setup
1. Record Resolution
2. Record Format
3. Max Rec PPS
720*480
H264
60
Record Resolution
Select resolution of the recorded video. If the recording is set to NTSC system,
the selections are 720*480, 720*240, and 352*240. If the recording is set to
PAL system, the selections are 720*576, 720*288, and 352*288.
Содержание Premium H.264 DVR
Страница 1: ...Ness Ultimate Premium H 264 DVR OSD Setup Manual REV1 1 Sep11 ...
Страница 49: ...User s Manual 49 This page is intentionally blank ...
Страница 50: ...User s Manual 50 This page is intentionally blank ...
Страница 51: ...User s Manual 51 This page is intentionally blank ...
Страница 52: ...User s Manual 52 This page is intentionally blank ...
Страница 53: ...User s Manual 53 This page is intentionally blank ...
Страница 89: ...User s Manual 89 Click Finish to complete the dial in connection Now the dial in connection is established ...
Страница 94: ...User s Manual 94 Click Finish to complete the process The Incoming connection is established ...
Страница 100: ...User s Manual 100 Appendix D ezRecord Diagram Sample ...
Страница 101: ...User s Manual 101 ...
Страница 102: ...User s Manual 102 ...


