


User’s Manual
17
Network Time Protocol Setup
After entering the time zone, the <
Network Time Protocol Setup
> option will
appear. Select the <
Network Time Protocol Setup
> to set the time server.
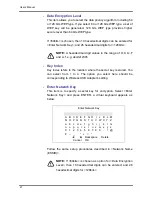
The default time server is time.nist.gov, but the user can change it to other
time servers when desired. A list of IP addresses of the time servers is listed
below.
129.6.15.28 129.6.15.29 132.163.4.101
132.163.4.102 132.163.4.103 128.138.140.44
192.43.244.18 131.107.1.10 69.25.96.13
206.246.118.250 208.184.49.9 64.125.78.85
207.200.81.113 64.236.96.53 68.216.79.113
After the time server is set, select <
Manually Time Sync
> to sync the time.
The time sync can also be updated periodically. Select <
Automatically Time
Sync
>, and choose a desired time interval to sync the time.
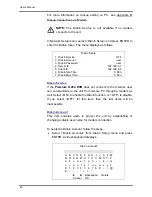
< Unit Name >
Users are allowed to assign a name, up to 11 characters, to the
Premium H.264 DVR
.
Follow the steps to edit the unit name.
•
Select <Unit Name> from System Setup menu and press ENTER. A virtual keyboard
displays.
Unit Name
A B C D E F G H I J K L M
N O P Q R S T U V W X Y Z
a b c d e f g h i
j k l m
n o p q r s t u v w x y z
0 1 2 3 4 5 6 7 8 9
.
! @
#
−
_ , ” + = *
◄
►
Backspace Delete
Cancel
OK
•
Use Direction keys to move the cursor to the wanted character.
•
Press ENTER to add the character to the entry field (up to 11 characters).
•
When done, move the cursor to <OK> and press ENTER to save the settings and exit.
Содержание Premium H.264 DVR
Страница 1: ...Ness Ultimate Premium H 264 DVR OSD Setup Manual REV1 1 Sep11 ...
Страница 49: ...User s Manual 49 This page is intentionally blank ...
Страница 50: ...User s Manual 50 This page is intentionally blank ...
Страница 51: ...User s Manual 51 This page is intentionally blank ...
Страница 52: ...User s Manual 52 This page is intentionally blank ...
Страница 53: ...User s Manual 53 This page is intentionally blank ...
Страница 89: ...User s Manual 89 Click Finish to complete the dial in connection Now the dial in connection is established ...
Страница 94: ...User s Manual 94 Click Finish to complete the process The Incoming connection is established ...
Страница 100: ...User s Manual 100 Appendix D ezRecord Diagram Sample ...
Страница 101: ...User s Manual 101 ...
Страница 102: ...User s Manual 102 ...


