


User’s Manual
23
- PPPoE
Password
The item allows users to setup the PPPoE password. Follow these
steps to setup the login password.
•
Select <PPPoE Password> from LAN Setup menu and press
ENTER. A virtual keyboard displays.
•
Use Direction keys to select from characters.
•
Press ENTER to add the selected character to the password
entry field.
•
When it’s done, move the cursor to <OK> and press ENTER to
save the setting and exit.
- PPPoE
Max
Idle
The item indicates the duration that the modem connection remains
active if there is no acknowledgement from the remote PC. You can
select the idle time from 0 to 600 minutes.
- Connect
At
Booting
The unit is allowed to automatically connect to the internet when
powered up. Select <Yes> to connect at booting, otherwise select
<No>.
- Network
Restart
Network restart is required after network settings are changed. Select
<Yes> to restart the network connection.
Wireless Network Setup
A wireless network consists of a number of computers which are equipped
with wireless networking interface card respectively. Each of these computers
can communicate directly with all of the other wireless enabled computers.
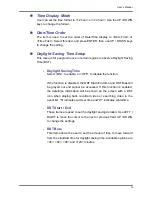
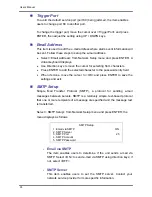
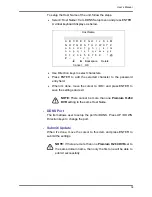
Select <Wireless Network Setup>, which is under <Network Setup> Menu,
and press ENTER, the menu displays as below.
Wireless Network Setup
1. Operating Mode
2. Choose A Wireless Network
3. Network Name (ESSID)
4. Network Authentication
5. Data Encryption
6. Data Encryption Level
7. Key Index
8. Enter Network Key
9. Network Setting
10. Connect
Infrastructure
H264DVR
Shared
Disable
64bits
1
xxxxxxxxx
No
Содержание Premium H.264 DVR
Страница 1: ...Ness Ultimate Premium H 264 DVR OSD Setup Manual REV1 1 Sep11 ...
Страница 49: ...User s Manual 49 This page is intentionally blank ...
Страница 50: ...User s Manual 50 This page is intentionally blank ...
Страница 51: ...User s Manual 51 This page is intentionally blank ...
Страница 52: ...User s Manual 52 This page is intentionally blank ...
Страница 53: ...User s Manual 53 This page is intentionally blank ...
Страница 89: ...User s Manual 89 Click Finish to complete the dial in connection Now the dial in connection is established ...
Страница 94: ...User s Manual 94 Click Finish to complete the process The Incoming connection is established ...
Страница 100: ...User s Manual 100 Appendix D ezRecord Diagram Sample ...
Страница 101: ...User s Manual 101 ...
Страница 102: ...User s Manual 102 ...


