


User’s Manual
47
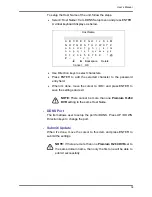
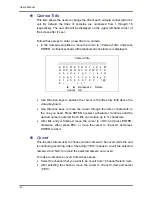
Camera Title
This item allows the users to change the title of each camera connected to the
unit. By default, the titles of cameras are numbered from 1 through 16
respectively. The new title will be displayed on the upper left-hand corner of
the screen after it’s set.
Follow these steps to enter a new title for a camera.
•
In the Camera setup Menu, move the cursor to <Camera Title> and press
ENTER. A virtual keyboard with alphanumeric characters is displayed.
Camera Title
A B C D E F G H I J K L M
N O P Q R S T U V W X Y Z
a b c d e f g h i
j k l m
n o p q r s t u v w x y z
0 1 2 3 4 5 6 7 8 9
.
! @
#
−
_ , ” + = *
◄
►
Backspace Delete
Cancel
OK
•
Use Direction keys to position the cursor in the title entry field above the
virtual keyboard.
•
Use Direction keys to move the cursor through the lists of characters to
the one you need. Press ENTER to select a character. Continue until the
desired name is entered. Each title can contain up to 11 characters.
•
After title entry is finished, move the cursor to <OK> and press ENTER;
otherwise, either press ESC, or move the cursor to <Cancel> and press
ENTER to abort.
Covert
This function allows user to choose certain camera to be covert while the unit
is continuing recording video. Choosing <YES> means to covert the selected
camera; and <NO> to remain the selected camera non-covert.
To make a camera be covert, follow these steps:
•
Select the channel that you want to be covert from <Channel Select> item.
•
After selecting the channel, move the cursor to <Covert> item and select
<YES>.
Содержание Premium H.264 DVR
Страница 1: ...Ness Ultimate Premium H 264 DVR OSD Setup Manual REV1 1 Sep11 ...
Страница 49: ...User s Manual 49 This page is intentionally blank ...
Страница 50: ...User s Manual 50 This page is intentionally blank ...
Страница 51: ...User s Manual 51 This page is intentionally blank ...
Страница 52: ...User s Manual 52 This page is intentionally blank ...
Страница 53: ...User s Manual 53 This page is intentionally blank ...
Страница 89: ...User s Manual 89 Click Finish to complete the dial in connection Now the dial in connection is established ...
Страница 94: ...User s Manual 94 Click Finish to complete the process The Incoming connection is established ...
Страница 100: ...User s Manual 100 Appendix D ezRecord Diagram Sample ...
Страница 101: ...User s Manual 101 ...
Страница 102: ...User s Manual 102 ...


