Upgrading Your Server 9-35
Installation
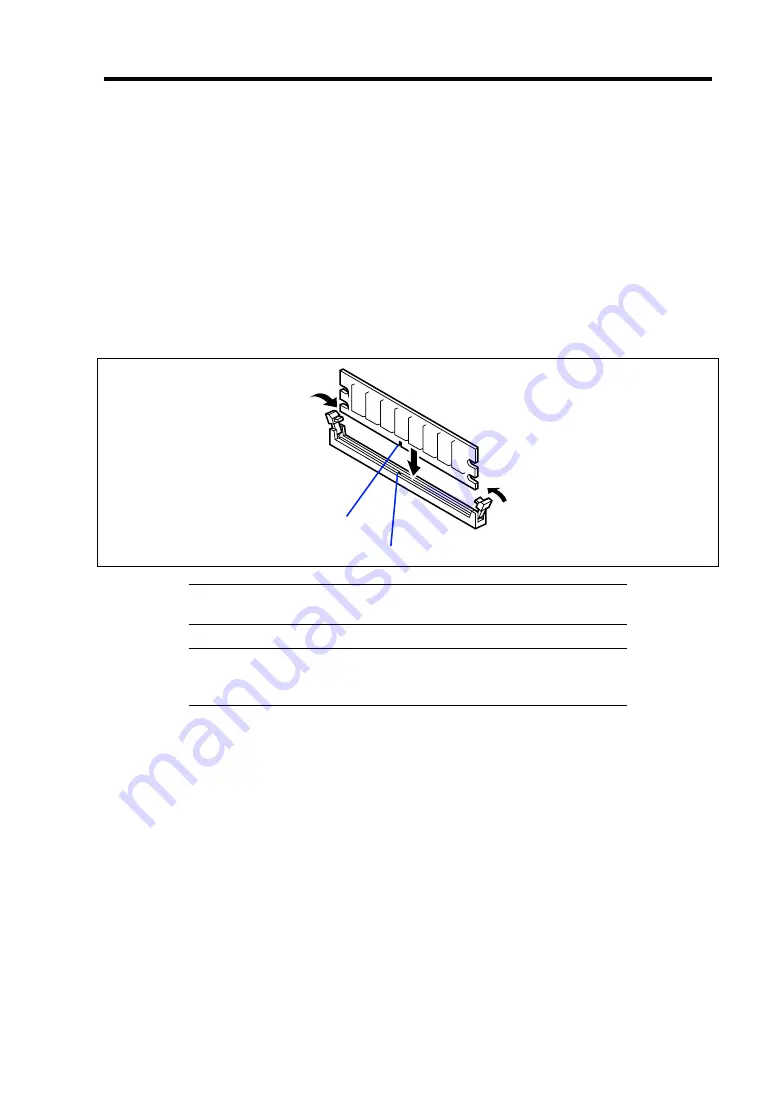
Install a DIMM in the following procedure.
1.
See the section "Preparing for Installation and Removal" described earlier to prepare.
2.
Remove the left side cover as described earlier in this chapter.
3.
Firmly hold the server with your both hands so that its left side faces upward, and bring it
down slowly and gently.
4.
Open the levers at both ends of the socket.
5.
Push the DIMM to the socket straight.
If the DIMM is inserted into the DIMM socket, the lever is automatically closed.
IMPORTANT:
To avoid damaging the lever, do not apply an excess
force to the lever.
NOTE:
Use extreme care when installing a DIMM. Applying too
much pressure can damage the socket. Keyed DIMMs insert only one
way.
6.
Close the lever securely.
7.
Install the remove components.
8.
Turn on the power of the server. Make sure that no error message appears in the POST.
If an error message appears, write down the message and contact your service
representative for the maintenance.
9.
Run BIOS SETUP utility and check to see that the installed DIMMs are correctly
recognized. See Chapter 4 for details.
10.
Run BIOS SETUP Utility to set the "Reset Configuration Data" in the "Advanced" menu
to "Yes."
This is required to update the hardware configuration information. See Chapter 4 for
details.
11.
Set the paging file size to the recommended value or larger. See Chapter 5 for details.
Key slot
Key
Содержание N8100-1447F
Страница 31: ...General Description 2 5 Rear View 1 2 3 2 4 5 6 7 8 9 10 12 11 13...
Страница 48: ...2 22 General Description This page is intentionally left blank...
Страница 157: ...Installing and Using Utilities 6 9 4 Click Parameter File Creator Parameter File Creator will appear...
Страница 216: ...9 6 Upgrading Your Server 3 Loosen the two screws 4 Hold the side cover securely to remove it...
Страница 217: ...Upgrading Your Server 9 7 5 Position the server until on its right side...
Страница 256: ...9 46 Upgrading Your Server This page is intentionally left blank...
Страница 266: ...10 10 Internal Cabling Diagrams This page is intentionally left blank...
Страница 268: ...A 2 Specifications This page is intentionally left blank...
Страница 276: ...C 2 IRQ This page is intentionally left blank...
Страница 328: ...F 2 Using a Client Computer Which Has a CD Drive This page is intentionally left blank...
Страница 332: ...G 4 Product Configuration Record Table This page is intentionally left blank...


