background image

39

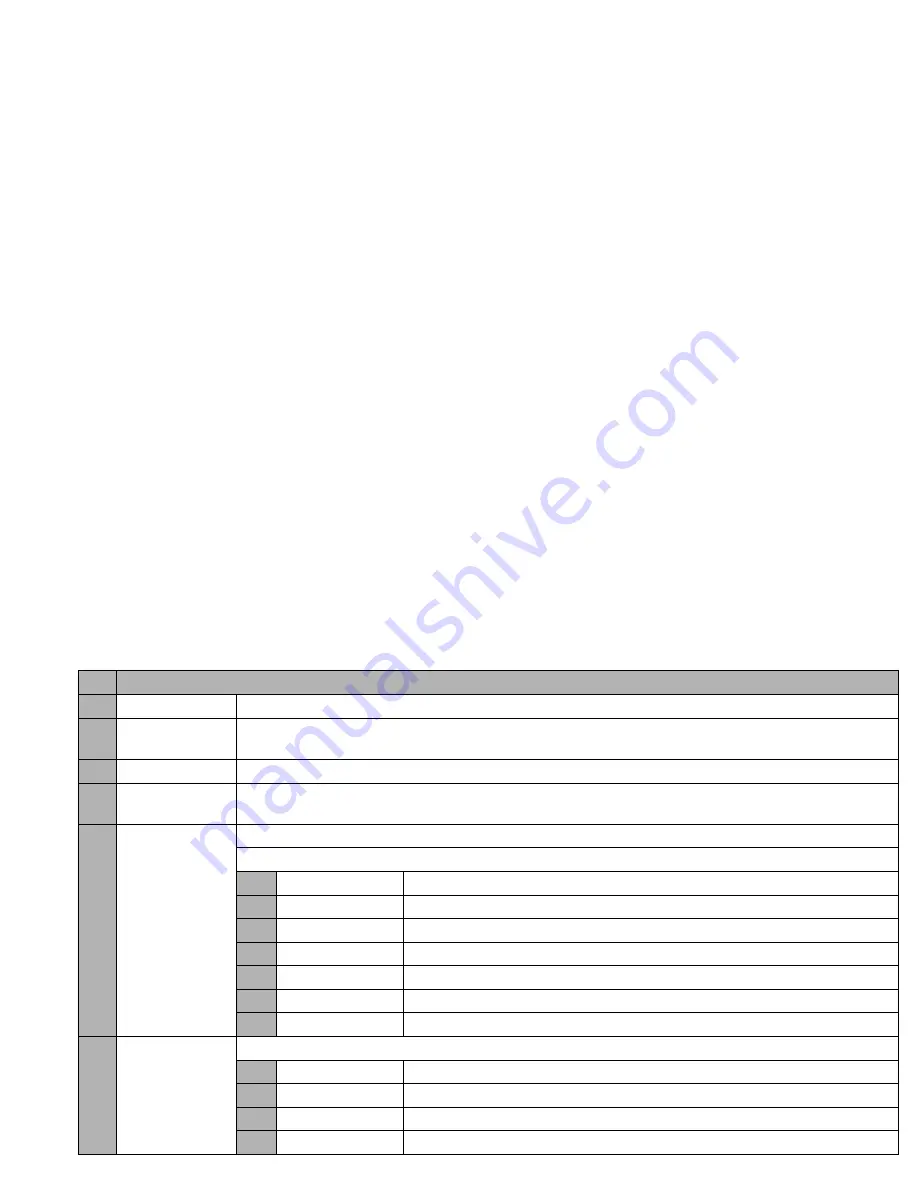
No. i-mode menu screen menus  (Sheet 1 of 3)

1

iMenu

Accesses the iMenu screen. (See “iMenu screen” on page 41.)

2

Mail

Displays the Mail screen, on which you can display received mail/MMS, saved draft messages and sent messages, 

and also create new mail/MMS (see “Mail screen” on page 42).

3

Java application

Displays the list of Java™ applications (see “Java™ (M7)” on page 66 for details).

4

SMS

Displays the Message screen, on which you can read received SMS and create new SMS (see “Message (M2)” on 

page 27).

5

Bookmarks

Displays the list of bookmarked web pages.

Bookmarks Options menu

1

Open

Displays the highlighted bookmark.

2

Copy address

Copies the highlighted bookmark address.

3

Edit title

Edits the title of the highlighted bookmark.

4

Add desktop icon

Creates a desktop icon of the URL of the selected bookmark.

5

Create message

Creates a new message with the highlighted bookmark address in the message text.

6

Delete one

Deletes the highlighted bookmark.

7

Delete all

Deletes all the bookmarks.

6

Go to webpage

Displays the URL you key in, or displays the URL in the address history.

1

Enter address

Prompts you to key in a web page address.

2

Address history

Displays the list of addresses in the access history for you to select from.

3

Go to home

Displays the homepage set in Home page of Settings (See page 41).

0

Back

Returns to the i-mode menu screen.

Содержание N401i

Страница 1: ...long time otherwise some data may be initialized Your phone contains metal which may cause you an itch a rash or eczema depending on your constitution or physical condition Take care not to put your phone in the back pocket of your trousers or skirt and then sit on it Also do not put your phone at the bottom of bag where it may subject to excessive weight or pressure Doing so may damage the LCD an...

Страница 2: ...imitation of exposure to the general public toelectromagnetic fields 0 Hz 300 GHz Official Journal of the European Communities July 12 1999 ANSI IEEE C95 1 1992 Safety levels with respect to human exposure to radio frequencyelectromagnetic fields 3kHz to 300 GHz The Institute of Electrical and Electronics Engineers Inc New York 1991 FCC Report and Order ET Docket 93 62 FCC 96 326 Federal Communica...

Страница 3: ...h the intermediate menu options The selection are made by pressing numbers on the keypad which relate to the displayed menu options 2 The instructions in this user s manual make use of the shortcuts selection except in special cases Reading the titles Some titles in this manual contain information on how to access the functions In these titles M stands for the numbers indicate the menu shortcut nu...

Страница 4: ...ppropriate for the current screen Shortcut number Press the appropriate number to jump straight to a next menu The row colour is changed when selected e g to activate deactivate a facility Help icons Displayed when you can use the key represented by these icons see page vii Next menu icon Displayed when you can press or the shortcut number to show the next menu Page scroll bar Displayed when you c...

Страница 5: ...phanumeric keys Mouthpiece IR port 2nd LCD LED light Camera Rear cover Speaker Clear CLR Back key Softkey1 SK1 Menu key Earphone 4 way navigation key Select key Charger connector cover Internal antenna Side down key Side up key Through hole for straps Earpiece jack cover for battery ...

Страница 6: ...cessing the received calls list 10 Accessing the received calls list 10 Accessing the missed calls list 10 Accessing the missed calls list 10 Accessing the dialled calls list 10 Accessing the dialled calls list 10 Highlighting a desktop icon 19 Accessing the homepage when Set homepage is set 41 Ending a call or returning to the standby screen Powering off 4 CLR Deleting character or returning to t...

Страница 7: ...on network service area and GPRS is active yellow Indicates that the GPRS is available and i mode is active Indicates that the i mode connection is carried out Indicates that the i mode lock is on 2 No icon appears when the phone is outside the GSM network service area or when the phone is in the GSM network service Appears when you are outside the service area Network name indicated in orange whe...

Страница 8: ... level red green blue Indicates the battery charging status fast slow pause Indicates that there is a new SMS in your phone Indicates that there is a new SMS on the network Indicates that the SIM memory is full Indicates that the Inbox in your phone is full green Indicates that there is a mail on the server blue Indicates that there is an MMS on the server pink Indicates that the alarm is set Indi...

Страница 9: ...klight 8 Accessory Music player Calculator Clock alarm Scheduler ToDo list Notepad Voice memo Currency Infrared 9 SIM toolkit Standby screen Main menu screen CLR or The Main menu has a set of icons for its top levels of options examples of the top level are shown right which can be selected either using a combination of the 4 way navigation key and menu selection or just the keypad shortcuts selec...

Страница 10: ...etting Started 1 Basic Calls Phone Use 5 Text Entry 14 IR Data Exchange 17 Desktop icons 19 Settings M1 21 Message M2 27 i mode M3 33 Phonebook M4 47 Camera M5 56 My data M6 61 Java M7 66 Accessory M8 68 ...

Страница 11: ...c Calls Phone Use 5 Making basic calls 5 Ending a call 5 Receiving an incoming call 5 Unsuccessful calls 6 Emergency calls 6 Last number redial 6 One touch dial 7 Multi party calls 8 Recording a call 9 Call options M43 9 Call settings M16 11 International dialling codes 13 Roaming 13 Text Entry 14 Mode change 14 T9 English text input 14 Normal text input 15 Numeric input 16 Key allocations 16 IR D...

Страница 12: ...7 Phonebook types 47 Accessing your phonebook M4 48 Phonebook list Options menu 49 Personal data Options menu 54 Scratchpad number 54 Voice mail M417 55 Camera M5 56 Sounds M62 62 Pictures M63 62 Music M64 63 File selector Options menu 64 Java M7 66 Programs M71 66 Prog backlight M72 67 Accessory M8 68 Music player M81 68 Calculator M82 69 Clock alarm M83 69 Scheduler M84 70 ToDo list M85 72 Notep...

Страница 13: ...rld wide operation 2 The digital technology of your phone helps to ensure that your conversations are kept secure 2 The SIM card contains personal data such as your electronic phonebook messages see Message M2 on page 27 and also details of the network services you have subscribed to The phone will not work except for emergency calls on some networks unless a valid SIM card is fitted Be sure to tu...

Страница 14: ... power socket Pull open the charger connector cover gently Be careful when handling the charger connector cover Do not pull strongly Connect the charger plug AC adapter into the charger connector at the bottom of the phone If your phone is turned on and charging starts the battery charging icon will be displayed LED will turn on in red while charging When charging is complete the LED will turn off...

Страница 15: ...ttery is left uncharged for some considerable time after this warning a trickle charge is used to slowly top up the battery to the safe level at which the fast charging can begin The phone can be in trickle charge for a few minutes before the fast charging starts Standby and talk times Your phone works closely with the network you are using to provide the services you need and the standby and talk...

Страница 16: ...ally turned off while downloading or deleting Java application it will take longer than usual to start up the phone the next Depressions Depressions Depressions Depressions Attaching the emblem Removing the emblem Remove the emblem by hooking your finger tips near the square depressions and lifting in the direction of the arrows You can also remove the emblem from the other side of the phone Attac...

Страница 17: ...he strength of the radio signal that links your phone to the network The maximum signal strength is shown by 4 shaded blocks and the minimum signal strength by 1 block Starting a call Key in the phone number Check the number on the display or SK1 to send the input number to start the call Before the other party answers the call you can end the call by pressing briefly pressing SK2 or closing your ...

Страница 18: ...not reject a call by closing your phone when the headset is connected If your phone receives a call and you do not answer it the screen will display the phone number or the name if stored of the caller if available This information is stored in the missed calls list Up to 20 missed calls are stored in this list 2 You can set your phone to answer a call when any key is pressed see Any key answer on...

Страница 19: ...umber 1 to 500 of your phonebook Phone and then and Displaying your own phone number M0 M416 0 or 4 1 6 Voice recall You can store up to 10 voice recall recordings which can be allocated to a personal data stored in the phonebook Phone To store the voice recall sound see page 53 To use the voice recall function use the following procedure Press and hold 2 When you use the headset you can also acti...

Страница 20: ...ferring a call When you have an active call and a held call you can transfer the call and connect the two parties then you can drop from the line while leaving those two calls active To transfer the call press 4 2 After dropping from the call with the other two parties if you have a call waiting you can proceed the call with it 4 Transfer call Enables to transfer the call and connect other parties...

Страница 21: ...l to a specific party Highlight the desired party you want to make a private call to 6 To end the private call and return to the normal multi party call 5 2 While you are on a private call other parties can continue with their conversation Ending the multi party calls To end all calls or SK2 To disconnect a specific party on a multi party call highlight the party you wish to disconnect 8 Multi par...

Страница 22: ...dent 2 To reset the display to zero set the maximum charges or edit the unit price you may be prompted to enter the PIN2 code 1 Total charge Displays the total charge SK1 to reset the display to zero 2 Maximum charge Displays the maximum charge Key in the maximum number of units allowed SK1 3 Unit price Displays the unit price Highlight the whole number integer the decimal number or the currency f...

Страница 23: ... made any mistake highlight the appropriate field SK1 to clear any mistakes If the settings are correct There will be a short delay while the network sends the divert status of your phone 3 Add to phonebook Adds the current number to the phonebook 1 to add it as a new personal data 2 to add it to an existing personal data Press the appropriate number for the storage destination Press the appropria...

Страница 24: ...To end the current call To retrieve the held call SK1 Auto redial M163 With the auto redial facility your phone will redial a number up to 10 times if the first attempt fails A tone will be heard at each redial attempt Your phone cannot connect a call if the other party is busy or if there are network problems Pressing SK2 during a redial attempt will abort it 1 6 3 1 to activate or 2 to deactivat...

Страница 25: ...s you to use your phone in many parts of the world and pay all charges through your normal service provider Your network operator usually has agreements with named networks in other countries so that automatic roaming can take place with these named networks The phone also allows you to set network preferences of your own When dialling you will need to add the international access codes if require...

Страница 26: ...h text input Your phone incorporates T9 Text Input enabling fast easy and intuitive text input For each letter to be keyed in you only need to press the alphanumeric key once The screen will display the word you may require based on the internal English dictionary of your phone With a text entry screen displayed SK1 until the entry mode is T9 English input i For example to enter Good Press 4 6 6 3...

Страница 27: ...ays the next candidate or Places the cursor 0 to 9 press and hold Inserts the number CLR Deletes any character Toggles between lower case shift upper case for one letter and caps lock permanent upper case press and hold Press and hold to activate the highlight mode see Highlight mode Options menu on page 32 for details Activates symbol mode when no word is highlighted Key Function Toggles between ...

Страница 28: ...put or Normal text ABC input toggles between lower case shift upper case for one letter and caps lock permanent upper case When a text entry screen is displayed pressing SK1 enables you to select Normal text input ABC T9 Text input T9 or Numeric input 123 2 Depending on the types of text entry screens not all types of text entry modes are available Symbol mode In the symbol mode pressing each key ...

Страница 29: ...iving phones vertically and place them as their IR ports face each other with less than 20cm of interval 2 Do not place anything between IR ports 2 The angle made of two IR ports must be within 30 2 Do not move the phones until the data exchange is complete 2 The phones may not communicate successfully if they are placed under direct sunlight or fluorescent light or close to other infrared devices...

Страница 30: ... end 2 Once the transmission completes your phone automatically judges the type of received data and stores the data accordingly 2 If your phone does not have enough space to store the received data a message will be displayed indicating lack of space In such a case delete unnecessary data and try the data exchange again 2 Received picture video sound files are stored in the Download folder of My ...

Страница 31: ...ally displayed icons by pressing and holding CLR on the standby screen 2 If you turn the phone off all the automatically displayed desktop icons are deleted Manually created desktop icons The following manually created icons are displayed on the lower row of the desktop icon area Icon name Image Description Missed call Displayed when there is a new entry in the Missed calls list Missed message Dis...

Страница 32: ... you create a desktop icon of an image file or notepad file the data will be automatically protected The default title will be the file name even if this title is changed the original file name will remain the same 2 Each manually created desktop icon has a title that you can edit Activating a desktop icon Highlight the required desktop icon 2 If you do not press any key for three minutes after hi...

Страница 33: ... On Pressing one of the Side keys stops the ringer sound and the vibrator while receiving a call with the phone closed 2 This function cannot be used if the Side keys are locked See also Mute on page 8 3 Fold answer On You can answer an incoming call by opening your phone 3 Side key Disable Side keys are locked while your phone is folded 2 You can also lock unlock the Side keys by pressing and hol...

Страница 34: ...inued 6 Set timezone Sets the timezone A is placed on the currently selected timezone Highlight the required timezone Press SK1 to save the change 2 If the highlighted timezone has Daylight Saving a check box will be displayed at the bottom of the screen Press to activate deactivate the setting 6 Language Selects the language the phone displays 2 When you have switched the language to be displayed...

Страница 35: ...or Clock alarm and Schedule alarm 0 Vibrator Turns on off the vibrator function Earphone setting Selects the sound output from Earphone Speaker or Earphone Auto answer Selects whether to answer an incoming call automatically 2 To use the Auto answer function connect the headset to your phone and set the earphone volume to 1 or higher If the earphone volume is set to 0 you must turn the vibrator ON...

Страница 36: ... display the incoming call number on 2nd LCD 4 Display direction Selects which direction to display the 2nd LCD 2 This setting does not effect the vertical clock 5 Contrast Sets the contrast level of the 2nd LCD No Power saving 1 Level setting Selects the power saving level from Level 1 minimum power save setting Level 2 moderate or Level 3 maximum 2 The main LCD backlight will turn dim and then t...

Страница 37: ...r PIN code incorrectly 3 times not necessarily in the same session will invalidate the correct PIN code In such a case you will have to contact your service provider for a PUK code to unblock your SIM card 2 Some SIM cards are set up so that PIN number entry cannot be turned off 2 When SIM PIN lock is enabled you can change the PIN code PIN2 code Your phone supports advanced feature that may requi...

Страница 38: ...ll incoming received calls or incoming received calls when roaming 1 Change settings Highlight the type of restriction and the call type and then to save changes Key in your bar calls password to verify user identification to the network SK1 to confirm and save changes to the network 2 The selected settings have red bars over their icons 2 Set password Bar calls facilities are network services and...

Страница 39: ...ures Videos and Sounds in My data see page 61 Mail facility is available from the Mail screen under the i mode facility For details on the mail service see i mode M3 on page 33 Multimedia Messaging Service MMS is a service that allows you to send messages of a slideshow of text and multimedia files When you receive an MMS message you will be notified by a message from the MMS centre You can either...

Страница 40: ...ons menu on page 29 are stored here 7 CB The received broadcast messages are saved See Cell broadcast M27 on page 33 for details Icons Descriptions Icons Descriptions Message type icons Read Unread status icons SMS message New Unread message s Incomplete SMS message Read message s Storing location icons Filtering status icons Highlighted message stored in SIM SMS messages filtered by status incomp...

Страница 41: ...tion divides an SMS with the message text exceeding the maximum number of characters allowed into multiple messages 5 Validity period Selects the period of time an SMS message is stored at the SMS centre while trying to deliver the message 2 CB settings 1 Enable 1 to receive none 2 to receive all or 3 to specify a list or Cell Broadcast Message Identifier CBMI to receive broadcast from 2 Languages...

Страница 42: ...sktop icon Creates a desktop icon of the highlighted message Inbox Sent Folder1 Folder2 only Edit Edits the highlighted message Drafts and Outbox only Resend Resends the highlighted message in the folder Outbox only The entire message or only the packets that failed to reach the recipient s can be sent No Message view Options menu 1 Reply Replies to the sender of the highlighted message 2 Reply al...

Страница 43: ...hile you are editing a message P E U Message view Options menu 1 1 Add to phonebook Adds the highlighted phone number or Email address to a phonebook 2 Dial phone number Dials the selected phone number 1 Add to bookmark Adds the highlighted URL to the bookmarks 2 Go to URL Activates the web browser to access the highlighted URL 3 2 3 Create message Creates a new message with the highlighted phone ...

Страница 44: ...ssage edit Options menu 1 Text colour Selects the colour of text and background 2 Text format Selects the font size normal large or small and font style bold italics underline or strikethrough 3 Text alignment Sets the text alignment left centred or right 4 Paste Pastes the text which has been copied onto the clipboard in the Highlight mode 2 This function can be used only when text has been selec...

Страница 45: ...ications to your phone s memory Some files with restrictions cannot be saved to your phone s memory even though they can be downloaded and played or displayed For the definitions of the icons related to i mode see LCD and displayed icons on page vii i mode operation guide You can access various i mode functions by selecting the menus on the main four i mode related screens i mode screen i mode men...

Страница 46: ...page s certificate information by displaying the page and 3 Download a file Highlight the link to the file to download When the download is complete check that the downloaded file is stored in My data see page 61 or the Applications screen of Java see page 66 Returning to the previous screen moving forward to the next screen While connecting to i mode to return to the previous screen if any or to ...

Страница 47: ...t field key in the subject Key in the message Highlight the Message field key in the message To attach a header Attach header To attach a signature Attach sign Attach a file if necessary Highlight the Attachment field select a file to attach from the My data screen To delete an already attached file highlight the attachment field Delete attachment To preview the attached file highlight the attachm...

Страница 48: ...slide Adds a new slide after the currently displayed slide 2 Insert slide Inserts a new slide just before the currently displayed slide Delete slide Deletes the currently displayed slide Text colour Selects the Text colour from the 16 different colours Background colour Selects the Background colour from the 16 different colours Set Fit mode Selects the size in which the image video is displayed 1...

Страница 49: ...isplayed Highlight the message to read The message content will be displayed Scroll the message content No Edit menu options Send Sends the mail Save Saves the mail being edited to the draft folder Attach file Attaches a file to the mail Delete attachment Deletes the attached file s Play View file Plays or displays the attached file Open phonebk Adds the destination directly from the phonebook Add...

Страница 50: ... 3 10 seconds for incoming mail MMS 2 Connection No Selects the connection number settings to use The following settings are available 1 2 Factory setting 1 2 Uses the default connection numbers 3 User setting Uses and changes the following settings 1 Access point 2 i mode server Gateway address 3 Portal server i mode server 4 Mail Mail server 2nd Mail server Confirmation site 5 User data User nam...

Страница 51: ...en Displays the highlighted bookmark 2 Copy address Copies the highlighted bookmark address 3 Edit title Edits the title of the highlighted bookmark 4 Add desktop icon Creates a desktop icon of the URL of the selected bookmark 5 Create message Creates a new message with the highlighted bookmark address in the message text 6 Delete one Deletes the highlighted bookmark 7 Delete all Deletes all the b...

Страница 52: ...e all Deletes all the saved pages excluding the protected 6 Delete all Pr Deletes all the saved pages including the protected Saved pages details Options menu 1 Save image Saves an image as a file on the current saved page 2 Edit title Edits the title of the current saved page 3 Certificate info Displays the certificate information on the current saved page 4 Page info Displays the URL on the curr...

Страница 53: ...whether to display text as is on web pages and mail SMIL text or wrap it to fit your phone s screen 4 Certificates Displays the certificate information and validates invalidates a certificate 5 Send terminal info Sets whether to send the terminal information to the Information Providers IPs If you agree to send private information e g production serial No and SIM No to the IPs via the Internet it ...

Страница 54: ...n the Draft folder Save page Saves the current page Add to phonebook Saves the phone number displayed in the current page in the phonebook 2 This option is displayed only when one or more phone numbers are displayed on the current screen Certificate info Displays the server certificate of the current page 2 This option is displayed only when the current page is a SSL page Go to webpage Displays a ...

Страница 55: ...S Reply quoted Replies to the received mail quoted Reply all Replies to all the received mails MMS Reply quoted all Replies to all the received mails quoted Forward Forwards the received mail MMS Delete Deletes the received mail MMS you are viewing Add desktop icon Creates a desktop icon that creates a new message to the sender Save address Saves the address of the sender into the phonebook Add to...

Страница 56: ... or URL to the phonebook or bookmarks 6 Create message Creates a message to the destination in the slide text 7 Play slide Plays the highlighted slide Protect On Off Protects or unprotects the received mail MMS 4 Sent mail Displays the list of sent mail MMS Sent mail list Options menu Title sort Sorts the sent mail MMS by their titles Address sort Sorts the sent mail MMS by their first destination...

Страница 57: ...MS Draft Options menu 1 Delete one Deletes the selected mail MMS 2 Delete all Deletes all mail MMS 6 Selective retrieval Displays the list of stored mail MMS on the mail server and lets you select whether to retrieve or delete each one 7 Check new mail Checks if there is any new i mode messages mail MMS for you stored at the mail server 8 Mail settings Changes the mail settings 1 Edit header Edits...

Страница 58: ...ype that can be received Highlight the file type to place a check 7 Attachment data Selects whether to receive Melody For i mode MFi files attached to a mail 8 Font size Sets the font size to display the mail MMS 9 Check settings Displays the values set to the above mail settings 0 Back Returns to the Mail screen 0 Back Returns to the i mode screen Term Definition Site program An Internet contents...

Страница 59: ...the total of the ADN FDN and SDN directories 2 When you activate the phonebook the directory which you were referring to the last time will open Personal directory ADN Bookmark A bookmark contains the URL of a web page You can save up to 50 bookmarks and use them for easier accesses Certificate information If you are displaying a Secure Sockets Layer SSL page designed to enable safe data transmiss...

Страница 60: ...ich numbers can be called from your phone With the FDN feature switched on see page 26 you can call with your phone the numbers you have stored in this phonebook and the emergency number only Although FDN is supported by your phone it must be present on your SIM card check with your service provider Service dialling numbers SDN The numbers stored in the SDN directory are pre installed by your serv...

Страница 61: ...or details on the Call options screen see Call options M43 on page 9 Phonebook list Options menu 2 When editing the data in FDN you will be prompted to enter PIN2 code 2 Depending on the condition some options may be displayed in gray and not be available 4 1 and the appropriate key for the desired directory or until the required directory is displayed Highlight the required personal data No Phone...

Страница 62: ...s the appropriate key for the desired destination SIM Phone or FDN Key in the desired location number 2 If you select the Phone you have to select whether to just copy the first phone number or copy all the registered numbers 2 If you copy a personal data with more than one phone number Email address to a directory which allows only one phone number Email address per personal data to be stored a n...

Страница 63: ...priority over those of the Group settings Group member list screen Options menu Highlight the group you wish to edit to display the list of group members Highlight the member 1 Call Calls the highlighted member 2 Create message Creates a message to the highlighted member 3 Add new Creates a new phonebook entry to join the group 4 Add to group Adds a phonebook entry to the group 5 Remove from group...

Страница 64: ...y information SK1 see Editing an existing personal data below 2 It is best to store numbers using the international number format Editing an existing personal data 4 1 and the appropriate key for the desired directory or until the required directory is displayed Highlight the required personal data 8 Location Searches for the personal data by the location number Key in the desired location number ...

Страница 65: ...Voice recall recording Highlight the Voice tag field 3 2 Up to 10 voice tags can be stored 2 You can check the number of stored voice tag and list of those tags see Displaying information about your phonebook M42 on page 49 Allocating a LED colour Highlight the LED colour field 1 Highlight the desired colour 2 This setting has priority over the Group setting and phone setting for the LED colour Al...

Страница 66: ...ions menu 1 Call Calls the highlighted phone number 2 Create message Creates a message to the highlighted phone number or Email address 3 IR send Sends the selected personal data to another device through the IR port 4 Edit Edits the selected personal data 5 Copy Copies the selected phone number s Email address es Press the appropriate key for the desired destination SIM Phone FDN Own number or Vo...

Страница 67: ... 7 Highlight the required line twice key in the voice mail number SK1 to save the change Forwarding a call to the Voice mail centre Set the voice mail centre number see Setting the Voice mail number for details Set up Call diversion see Call diversion M161 on page 11 for details When you receive a call set to be diverted the call will be diverted to the voice mail centre Retrieving a Voice mail 2 ...

Страница 68: ...an with a soft cloth before use 2 The image quality may be degraded after your phone has been left for a long period in a warm place 2 Exposing the camera to direct sunlight for a long period could discolour the camera s internal colour filter and cause discoloured images 2 Camera mode is automatically cancelled if none of the phone s keys are pressed for 3 minutes or longer Precautions when takin...

Страница 69: ... by pressing 2 You can take a picture while the phone is closed Hold the phone still To use the shutter or Side up Check the picture If successfully taken Saved as a JPEG file in Pictures 2 After taking a picture press SK1 to send the taken picture attached to a message and press SK2 to discard the picture 2 The default file name for the picture is the date month year and sequence number When you ...

Страница 70: ...f you select Wallpaper CIF or VGA the picture on the camera view finder screen will be displayed as a smaller picture than the actual size Also on the camera view finder screen the picture size before shooting differs from the size after shooting 5 Image quality Sets the image quality to Super fine Fine Normal Economy or Super economy 6 Frame Selects whether to use a frame when taking pictures and...

Страница 71: ...ves the currently displayed picture 2 Save all Saves all pictures taken in Burst mode 3 Create message Creates a new message with the file attached see page 35 4 Set as wallpaper Sets the picture as the wallpaper 5 Display as normal image Display as mirror image Selects whether to display the taken picture as a normal or mirror image on the main LCD preview screen when you select the 2nd LCD as a ...

Страница 72: ...t time you select camera function a message appears to say that you have a video that was not stored allowing you to check and store the video 2 Before recording a video you can switch to the camera function by pressing SK2 This use of SK2 however is invalid if the self timer function is activated Operations when recording a video To turn the light on or off SK1 or Side down 2 Take care not to hol...

Страница 73: ...ovies and Download Replaying the video files 1 or 6 1 Highlight a folder or Highlight a video file you wish to replay The video file will be replayed 2 When the flat view function is activated the list of folders is not displayed The list of all the stored video files is displayed 2 If you wish to move to another hierarchy folder use and No Camera Options menu after recording a video 1 Save Saves ...

Страница 74: ...splayed The list of all the stored sounds files is displayed 2 If you wish to move to another hierarchy folder use and 2 When a folder is highlighted you cannot use SK1 Operations while playing sound To stop SK2 To adjust the volume Side keys To replay the previous next file or Pictures M63 The Pictures function allows you to display images and animations which were obtained with the camera functi...

Страница 75: ...the image 90 degrees clockwise Keep pressing SK1 until the image is at the required angle to confirm Decorating the image with stamps Highlight or display the image file you wish to edit 1 6 To apply a marker stamp 1 Highlight the required stamp The marker stamp position is displayed in centre 2 If you wish to preview the highlighted stamp press SK1 To apply a text stamp 2 Key in the text The text...

Страница 76: ...lder or file Cut Cuts the selected picture into Sub QCIF 128x96 QCIF 176x144 Wallpaper 176x220 or Free Reduce Reduces the selected picture to fit within Sub QCIF 128x96 QCIF 176x144 or Wallpaper 176x220 Rotate Rotates the selected picture Stamp tool Adds a marker or text stamp on the selected picture Frame Sets a frame to the selected picture 2 Use item Videos Uses the selected file by setting as ...

Страница 77: ...ation of your phone memory View detail Displays the details of the selected folder or file 2 You can also display the details on the highlighted folder or file by pressing without displaying the Options menu Options Sorting order Sorts the files by date or alphabetically Info column Sets whether to display the column on the list screen and the information to be shown there None No column showing S...

Страница 78: ... software always make sure that you check the downloaded program is displayed in the Applications screen Do not remove the battery while the software is running as data to that point may not be saved 2 While the software is active the Java operation icon is displayed see page vii Java System menu 7 1 Highlight an application 2 Depending on the conditions some options may be displayed in gray and n...

Страница 79: ...phone to follow the normal backlight setting the current power save settings will be active see Power saving M15 on page 24 2 When the software is not running the backlight operation depends on your phone s backlight settings 4 Network connection Permits prohibits the selected software to connect to the network or displays the confirmation message every time you start the selected software 5 Auto ...

Страница 80: ... add move delete or display the properties of the selected music file or SK1 to add an MP3 music file 2 You can save up to 30 MP3 music files in the Playlist depending on the size of each file 2 The music files that are moved or deleted from Music of My data or erroneous music files are displayed in gray and cannot be played 2 Play mode Normal Plays all the music files in order from top to bottom ...

Страница 81: ...t functions The following shows the key assignment Clock alarm M83 3 Delete item Deletes the highlighted music file from the Playlist 4 Delete all Deletes all the music files from the Playlist 5 View detail Displays the properties file name title artist name and recording time of the highlighted music file Key Operation Key Operation Addition Subtraction Multiplication Division Equals to SK2 Memor...

Страница 82: ...ay to display the day s schedule list screen if any SK1 Set alarm tone Sets the melody to be played when the alarm occurs optional See Sounds M62 on page 62 Alarm repeat Selects alarm repeat for once daily or day of the week 2 You can select more than one day of the week at the same time 2 You can remove the check by highlighting and pressing again Enter alarm text Sets the message e g Wake up whi...

Страница 83: ...uler Options menu 8 4 Highlight the day to display the day s schedule list screen if any Highlight the required scheduled event No Scheduler Options menu 1 Add new Adds a new entry 2 Edit Edits the highlighted event 3 Copy Copies the highlighted event 4 Delete Deletes event s Press the appropriate keys for the event category the currently selected event all the public private events on the day all...

Страница 84: ... as completed Viewing ToDo task details 8 5 Highlight the list Highlight the required ToDo task To view the details of the previous or next ToDo task in the list or To edit the currently displayed task SK1 ToDo list setting Start date Sets the day month and year to start the ToDo task Due date Sets the date to end the ToDo task Key in the date or press the appropriate key for the date 2 If you sel...

Страница 85: ...ask s Press the appropriate keys for the ToDo task category the currently selected ToDo task all the public private ToDo tasks all the completed public private ToDo tasks or all the ToDo tasks to delete 3 Delete current Deletes the highlighted ToDo task 4 Display filter Sets the type s of ToDo tasks to be displayed by selecting the desired filter option None Incomplete or Complete 5 Sort list Disp...

Страница 86: ...cted note 8 Move all Cuts and pastes all the notes in the current folder 9 Create folder Creates a new folder under the current folder 0 Storage detail Displays the current storage information of your phone memory View detail Displays the detail of the selected file Options Sorting order Sorts the files by date or alphabetically Info column Sets whether to display the column on the list screen and...

Страница 87: ... currency 8 8 No Voice memo setting 1 Record Records a voice memo SK1 to start recording 2 You can finish recording and save the data as a file by pressing SK2 even before the recording is completed To record the conversation during a call see Recording a call on page 9 2 Play Plays a voice memo or recorded call Highlight a voice memo to start playing and SK2 to stop playing 3 Speaker setting Sele...

Страница 88: ...e during a call For details see IR Data Exchange on page 17 8 9 Your phone consumes a lot of battery power when used as a modem After using your phone as a modem be sure to deactivate the modem function from your PC or press for the CSD connection only When the modem function is deactivated the idle screen will be displayed without the Infrared icon and GPRS icon No Infrared setting 1 IR receive R...

Страница 89: ...vent display 24 Colour style 23 Contrast 24 Correcting mistakes 5 CSD 76 Currency 75 D Date 21 Date format 21 Desktop icons 19 Dialled calls list 10 Direction 24 F Fast dialling 7 FDN 48 Flicker control 58 Fold answer 21 Frame 63 Function key LED 24 G General care i GPRS 76 Greetings 23 Groups 51 GSM vii H Headset 22 Holding a call 8 Homepage 47 I icons vii i mode 33 42 Certificate information 47 ...

Страница 90: ... a message 28 Received calls list 10 Recording a call 9 Redial blacklist 10 Redial the last number 6 Rejecting an incoming call 6 Reset settings 26 Ring silencer 21 Ringer 22 Ringer volume 22 Roaming 13 S Safety precautions i Saved pages 47 Shortcuts selection ix Side key lock 21 SIM 1 SIM card 1 SIM card insertion 1 SIM card removal 2 Site program 46 SMIL 46 SMS messages 27 SMS tone 22 SMS tone v...

Отзывы: