2. BIOS Setup Utility (SETUP)
Express5800/B120f User's Guide
88
Chapter 3 Setup
2.4
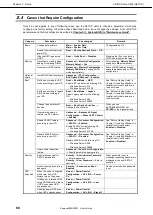
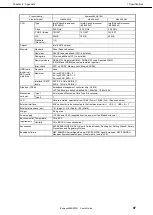
Cases that Require Configuration
Only if a case applies to any of following cases, use the SETUP utility to change a parameter which was
configured as factory setting. Other than cases described below, do not change the settings. A list of SETUP
parameters and factory settings are described in
Chapter 2 (1. System BIOS)
in "
Maintenance Guide
".
Category
Description
To be changed
Remark
Basic
Change date and time
Main
→
System Date
Main
→
System Time
Configurable on OS
Enable NumLock feature at
power ON
Boot
→
Bootup Numlock State
→
ON
Hide the NEC logo during
POST
Boot
→
Quite Boot
→
Disabled
Pressing the <Esc> key during
POST can also hide the logo.
Memory
Reconfigure memory when
adding or replacing DIMM.
Advanced
→
Memory Configuration
→
Memory Retest
→
Yes
After rebooting,
Memory Retest
changes to
No
automatically.
Use memory RAS feature
Advanced
→
Memory Configuration
→
Memory RAS Mode
→
change RAS
mode appropriately
Some of RAS features may be
unavailable depending on DIMM
configuration.
Optional
board
Install RAID Controller board
Advanced
→
PCI Configuration
→
SAS Option ROM Scan
→
Enabled
Boot
Set the boot mode to UEFI
mode according to your OS.
Boot
→
Boot Mode
→
UEFI
Select UEFI mode for the following OS.
– Windows Server 2012
– Windows Server 2012 R2
See "
Before Starting Setup
" in
Chapter 1 (Installing Windows)
in
Installation Guide
to determine
the boot mode.
Set the boot mode to Legacy
BIOS mode according to
your OS.
Boot
→
Boot Mode
→
Legacy
Select Legacy mode for the following
OS.
– Windows Server 2008
– Windows Server 2008R2
See "
Before Starting Setup
" in
Chapter 1 (Installing Windows)
in
Installation Guide
to determine
the boot mode.
Change the boot order of
devices
Boot
→
Boot Option Priorities
→
Change the boot priority
When you use
EXPRESSBUILDER, set
CD/DVD
to the highest priority.
Use remote power on
feature (via RTC alarm)
Advanced
→
Advanced Chipset
Configuration
→
Wake On RTC Alarm
→
Enabled
Enable X2APIC feature
according to your OS.
Advanced
→
Processor Configuration
→
X2APIC
→
Enabled
Enable X2APIC for the following OS.
– Windows Server 2012
– Windows Server 2012 R2
See "
Before Starting Setup
" in
Chapter 1 (Installing Windows)
in
Installation Guide
to select
Enabled
or
Disabled
.
Disable X2APIC feature
according to your OS.
Advanced
→
Processor Configuration
→
X2APIC
→
Disabled
Disable X2APIC for the following OS.
– Windows Server 2008
– Windows Server 2008R2
See "
Before Starting Setup
" in
Chapter 1 (Installing Windows)
in
Installation Guide
to select
Enabled
or
Disabled
.
Use console redirection
feature
Advanced
→
Serial Port Configuration
→
Specify parameters appropriately.
Security
Restrict access right for
SETUP parameters
Security
→
Administrator Password
→
Enter a password
Security
→
User Password
→
Enter a
password
When password is set, a
message requesting password is
displayed at the next SETUP
execution.
Restrict bootup by entering
password
Security
→
Password on Boot
→
Enabled
Can be selected when password
is set.
UPS
Powerlink
When the server is supplied
with power from UPS,
always turn on the power.
Server
→
Power Control
Configuration
→
AC-LINK
→
Power
On
If the server is turned off by
using POWER switch, leave
it OFF even when UPS
supplies power.
Server
→
Power Control
Configuration
→
AC-LINK
→
Last
State
Keep the power OFF even
when UPS supplies power.
Server
→
Power Control
Configuration
→
AC-LINK
→
Stay off


