background image

20

iCN 600 series 

|


User Manual

Route Information

The 

Route Information

 screen provides information about your current route, and let's you skip a trip destination 

point or cancel a route. The screen is only available from the 

Main Menu

 when you are navigating a route.

Show Route

Select to display your entire route on the 

Map

 screen.

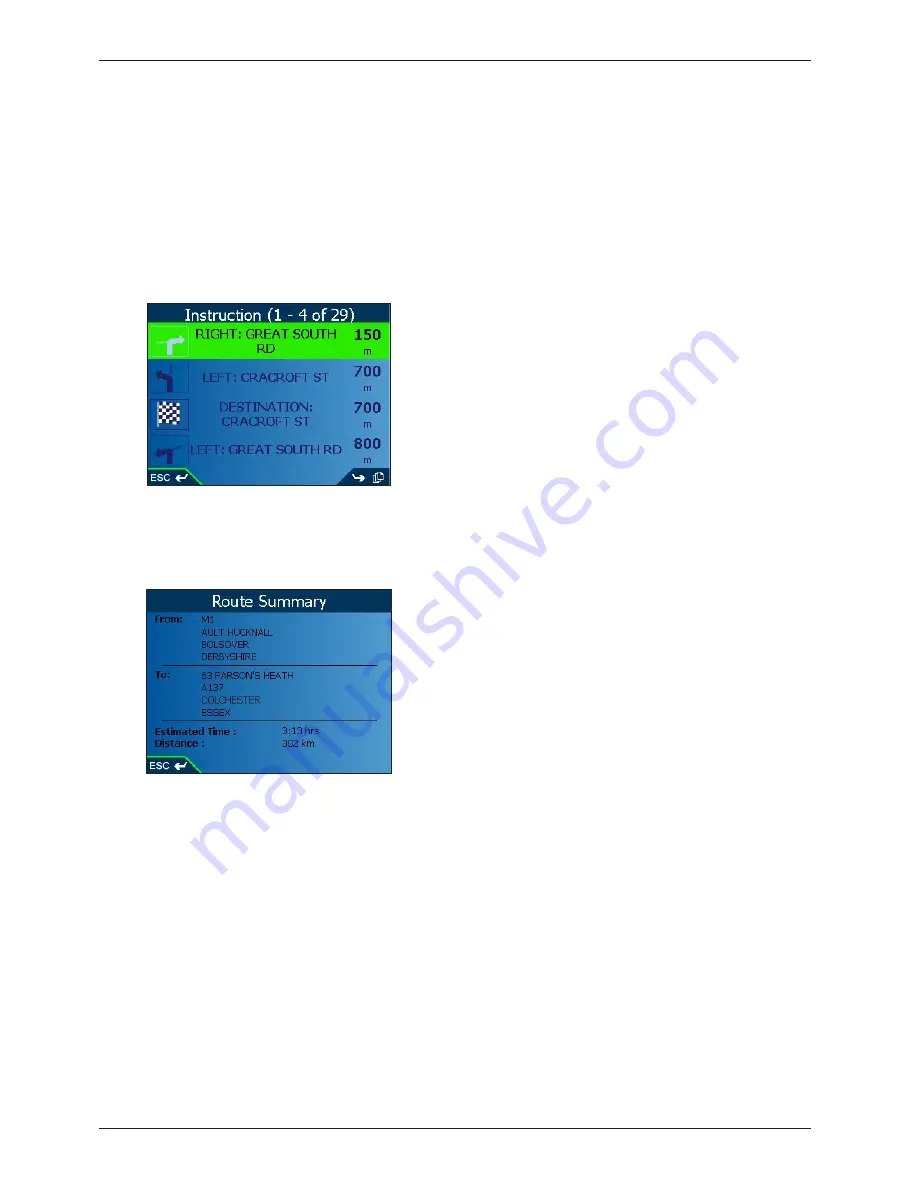
Instruction List

Select to display the 

Instruction List

 screen. The 

Instruction List

 screen is similar to the 

Next Four Turns

 screen 

except that it displays your entire route.
Use the 

Page

 button to page through the instruction list. 

Summary

Select to display the 

Route Summary

 screen containing your 

From

 and 

To

 addresses, 

Estimated Time

 to 

arrival and the 

Distance

 remaining to your destination.

If you are navigating a multiple destination trip, the information displayed will relate to your next destination point.

Skip Destination

Select to skip the next destination point of your trip. Only available when navigating a multiple destination trip.

Cancel Route

Select to cancel the route.

Содержание iCN 600 series

Страница 1: ...iCN 600series with Smart TM Version 3 0 User Manual Europe Australia New Zealand Edition...

Страница 2: ...board 10 8 GPS Status 11 9 Setting your Destination 12 10 Avoiding an Area 17 11 Viewing Your Route 18 12 Map Screen Pop up Menu 21 13 Route Demonstrator 22 14 Favorites Shortcuts 23 15 Settings 25 16...

Страница 3: ...igation systems The iCN GPS antenna receives GPS signals To receive GPS signals ensure the iCN is outdoors or in a vehicle outdoors and the GPS antenna has an unobstructed view of the sky The iCN can...

Страница 4: ...shown or press and hold to adjust the screen brightness 4 ESC Cancels an action deletes the last text character returns to the previous screen or Map Hold down to delete a line of text 5 8 way Toggle...

Страница 5: ...from GPS satellites when lifted out to the horizontal position 4 Car Antenna Socket Connection socket for GPS car antenna not included 5 Power Socket Connection socket for power cable 6 USB Socket Co...

Страница 6: ...aland you will not receive a memory card as the preactivated map of New Zealand is contained in internal memory Inserting Memory Card Note The first time you insert the memory card you will first need...

Страница 7: ...om the iCN The receiver will lift out to a horizontal position to allow it to obtain a GPS x 3 Press the Menu Power button for one second Turn iCN Off 1 Gently push the GPS receiver back towards the i...

Страница 8: ...hot you will be prompted to turn down the brightness press and hold the Zoom button If the iCN continues to get hotter the screen will go blank however voice instructions will continue Suction Mount...

Страница 9: ...against the surface and press the lever down 4 Use the base plate and screws supplied to x the iCN base into the dashboard 5 Slip the locking nut over the ball foot with the at side facing upwards 6...

Страница 10: ...n off the Tutorial on startup by using the 8 way toggle to highlight the Do not show Tutorial on startup check box press OK to con rm 6 The Main Menu screen will display 7 Use the 8 way toggle to high...

Страница 11: ...Strengths screen The strength of each satellite is displayed on a bar chart The circle on the right hand side of the screen displays green when there is a valid x 2D or 3D and red when no x is availab...

Страница 12: ...own Press OK 7 To select a Road press OK Select a road Press OK 8 Press the Page button to display the Address Details screen 9 Choose one of the following options Add to Trip Opens the Trip Planner s...

Страница 13: ...Calculates the route and displays it on the Map or 3D Map screen To a City or Town Centre 1 From the Main Menu select the Destination option 2 From the Destination screen select the City Town Centre o...

Страница 14: ...ng the 8 way toggle Press Page to view more Press OK to select from the list 9 The POI Detail screen will display Choose one of the following options Add to Trip Opens the Trip Planner screen and adds...

Страница 15: ...elect a Town press OK Select a city or town Press OK 8 To select a Road press OK Select a road Press OK 9 Press the Page button to display the Address Details screen 10 Select Add to Trip and press OK...

Страница 16: ...using the 8 way toggle Zoom using and on the Zoom Brightness button 2 Press OK to display cross hair on the Map screen To remove the cross hair press ESC 3 Use the 8 way toggle to place the intersecti...

Страница 17: ...a to the correct size and position using the 8 way toggle 6 Press OK to enable the Avoid Area Deleting an Avoid Area 1 From the Main Menu select the Map option The Map screen will display 2 Press OK a...

Страница 18: ...hair Press again to display the Pop up menu 3D Map Screen iCN 635 650 only Your route displays on a map oriented to the travelling direction with an adjustable horizon 1 From the Main Menu select the...

Страница 19: ...2 Press the Page button until the Next Four Instructions screen displays Distance to the next turn GPS strength indicator Direction of the next turn Your current location The next instruction Addition...

Страница 20: ...on List screen is similar to the Next Four Turns screen except that it displays your entire route Use the Page button to page through the instruction list Summary Select to display the Route Summary s...

Страница 21: ...Map screen 4 Press OK to select the street as your destination The Pop up menu will display 5 You can choose one of the following options Navigate To Calculates a route from your current location Set...

Страница 22: ...eswhere 1 From the Main Menu select the Map option The Map screen will display 2 Press OK and place the intersection of the cross hair over a departure point using the 8 way toggle 3 Press OK to displ...

Страница 23: ...ct the Save As box and use the 8 way toggle to save as a Favorite or Shortcut 13 Select Save and press OK to return to the Map screen Note If you save a Shortcut over a Shortcut a warning message will...

Страница 24: ...to return to the Shortcut list Using Shortcuts 1 From the Main Menu select the Favorites option The Shortcuts screen will display 2 Select from the list and press OK The Edit Shortcut screen will dis...

Страница 25: ...se Less to use urban roads often when calculating a route Move the Preference for Urban Roads slider towards Use More to use urban roads more often when calculating a route 6 Press the Page button 7 S...

Страница 26: ...een select the Maps option 3 From the Settings Maps screen select the Display option The Settings Display screen will display 4 To enable auto zoom when navigating to your destination select the Auto...

Страница 27: ...POIs in a region are grouped into Categories This function allows you to select the categories you need For example you may be interested in entertainment venues only and want to disable other POI cat...

Страница 28: ...warnings will activate 8 Press ESC repeatedly until the Map screen displays If you have made changes to the settings press OK to accept the Warning dialog box Speed Alert Settings 1 From the Main Men...

Страница 29: ...used 5 To set the time select the offset from Coordinated Universal Time UTC for your location from the Local Time Offset box using the 8 way toggle 6 Select either the 12 Hour or 24 Hour option to in...

Страница 30: ...n Type d setup6xx_3 exe where d is the letter assigned to your CD ROM drive Click OK 3 Follow the screen prompts to install Smart Desktop Select your preferred language for Smart Desktop when prompted...

Страница 31: ...ur Version of Smart It is recommended that you regularly check the Navman website for software updates to the version of Smart you are using 1 Open Smart Desktop Start Programs Navman Smart Desktop 2...

Страница 32: ...ct Key or your ICN came with a pre activated Map Product Key the map will change colour to indicate it has been selected Go to step 6 4 Follow the prompts to activate the Map Product Key Enter your Ma...

Страница 33: ...Install Basemap 1 Connect the iCN to your computer Connect the iCN to mains power supply using the adapter provided Connect the USB cable to the iCN and to your computer USB port Turn on the iCN by pr...

Страница 34: ...n on the iCN by pressing the Menu Power button The iCN USB Connection screen will display when you are connected 2 Open Smart Desktop if it is not already open Start Programs Navman Smart Desktop 3 On...

Страница 35: ...Settings Colors Adjust the settings to change the look of the map type Color Settings Description Controls map colors Displays the map border color map color map border width Adjusts the map border wi...

Страница 36: ...ill only be able to con gure the Importance and Icon File settings To enable a visual warning when the POI is in close proximity select the Visual Alert check box To enable an audible chime when the P...

Страница 37: ...enu click Backup The Backup window will display 2 Click New Backup The New Backup window will display 3 Click OK To Delete a Backup 1 From the File menu click Backup The Backup window will display 2 S...

Страница 38: ...s and to boost GPS performance in weak signal areas Memory Card Writer Connects to your computer and allows you to download maps to SD or MMC memory cards Remote Control Button functions are the same...

Страница 39: ...ed to the total amount actually paid by the Customer for the Software 7 The Licensor may terminate this Licence immediately if the Customer breaches any of its obligations under this Licence Immediate...

Страница 40: ...al Compliance Operation is subject to the following two conditions 1 this device may not cause interference and 2 this device must accept any interference including interference that may cause undesir...

Страница 41: ...e owners Published in New Zealand MN000300A LF000013A Support for New Zealand Navman NZ Ltd 13 17 Kawana Street Northcote Auckland New Zealand Phone 0800 GONAVMAN pcnsupport nz navman com www navman c...

Отзывы: