Version 18.02.2022
HW:CAM(V100)/(V47)
RL4-MBMC
P
a
g
e
7
1.5.
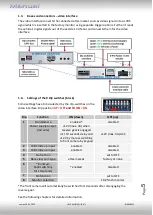
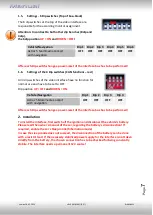
Settings - 6 Dip switches (Top of box
–
black)
The 6 dip switches at the top of the video interface are
responsible for the according monitor assignment.
Attention: In contrast to both other dip benches (8dip and
4dip),
the 6dip position
UP = ON
and
DOWN = OFF
!
Vehicle/Navigation
Dip 1 Dip 2 Dip 3 Dip 4 Dip 5 Dip 6
Actros 5 Multimedia Cockpit
with navigation
OFF
OFF
OFF
OFF
OFF
OFF
After each Dip-switch-change a power-reset of the interface-box has to be performed!
1.6.
Settings of the 4 Dip switches (CAN functions
–
red)
All 4 dip-switches of the video interface have no function for
normal use and have to be set to OFF.
Dip position
UP = OFF
and
DOWN = ON
.
Vehicle/Navigation
Dip 1
Dip 2
Dip 3
Dip 4
Actros 5 Multimedia Cockpit
with navigation
OFF
OFF
OFF
OFF
After each Dip-switch-change a power-reset of the interface-box has to be performed!
2.
Installation
To install the interface, first switch off the ignition and disconnect the vehicle’s battery.
Please read the owner`s manual of the car, regarding the battery`s disconnection! If
required, enable the car`s Sleep-mode (hibernation mode)
In case the sleep-mode does not succeed, the disconnection of the battery can be done
with a resistor lead. If the necessary stabilized power supply for the interface is not taken
directly from the battery, the chosen connection has to be checked for being constantly
stabile. The interface needs a permanent 12V source!


