National Cycle, Inc.
PO Box 158 Maywood, IL 60153-0158 USA
P: 708-343-0400 / F: 708-343-0625 / E: [email protected]
www.nationalcycle.com
©2021 National Cycle, Inc.
Page 07 of 13
10-118625-000 03/21
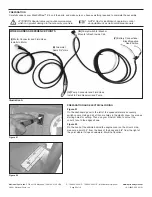
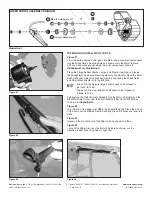
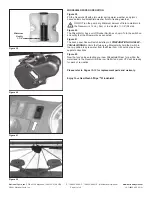
Illustration B
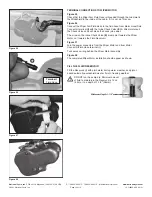
Figure 26
Figure 25
Spindle Hardware Kit
M8 Stud Hardware Kit
Nylon
Spindle Standoff
Nylon
Nut Cover
WIPER MOTOR INSTALLATION
It is recommended that you begin by removing the existing
Windshield prior to installing the Wiper Motor.
Alternately, if your vehicle has no roof, or has a roof that can be
easily detached, you can install the Wiper Motor
(A)
by standing
up in the cab and installing the motor from the inside while reach-
ing across the top rail to attach the securing hardware.
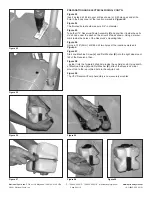
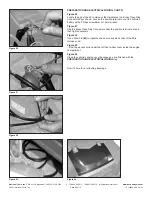
Figure 25
From the
inside
of the Windshield, push out the four Plugs in the top center
of Windshield.
(Any Conveniently Pointed Tool)
Install Grommet 1/4" I.D.
(D)
into the far right hole as shown. Install
Grommet 5/16" I.D.
(R)
from
BAG#1368
into the top center hole for the
Wrapround Clamp
(N)
.
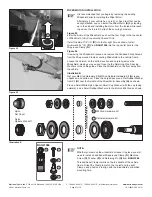
Figure 26
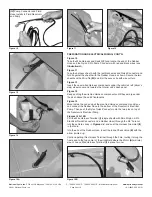
If removing the Windshield, loosen and remove the Panhead Philip Screws
from the Wraparound Clamps securing Windshield to the vehicle frame.
Loosen the Velcro® on the bottom section and carefully remove the
Windshield, making sure you don’t lose the the Retaining Pins, Spacing
Washers or the cable guides. Place the Windshield on the floor away from
the vehicle.
Illustration B
Get your M8 Stud Hardware Kit
(H)
And Spindle Hardware Kit
(G)
ready,
unpacked, and sorted out. Place the Large Spacer and Flat Rubber Washer
from Kit
(G)
over the Spindle of the Wiper Motor Assembly
(A)
as shown.
Place a Small White Nylon Spacer, Small Cup Washer (with the cup facing
outward), and a Small Rubber Washer onto the Motor’s M8 Stud as shown.
Inside of W
indshield
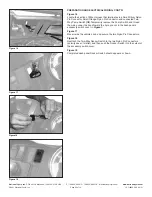
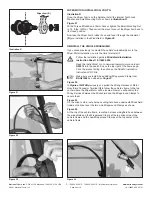
NOTE:
Whether you remove the windshield or leave it in place, you will
need to install an additional Wraparound Clamp
(N)
, Machine
Screw
(O)
, Washer
(P)
and Retaining Pin
(Q)
from
BAG#1368
.
This additional Clamp installs on the top middle of the vehicle
frame. Orient the Clamp to match the top left and top right
Clamps, and position it to align with the windshield’s pre-drilled
mounting hole.
BAG#1368


