W415-1472 / 04.21.15
41
EN
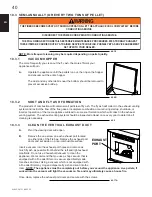
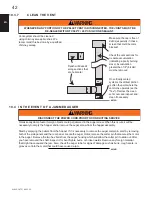
NOTE: Do not attempt this maintenance without a
replacement exhaust blower motor mounting gasket.
A.
Remove the six nuts holding the exhaust blower motor
in place.
B.
Pull the motor out being careful not to damage the
wiring, unplug the two wires that are connecting the
motor and gently set aside. (The pieces of gasket may
be discarded.
C.
Start by cleaning the exhaust tube by feeding a brush
or rag through the inside of the tube and out the
exhaust blower housing.
D.
Vacuum out the exhaust ports and the blower housing.
E.
With a bristle brush vacuum, clean the blades of the
motor.
F.
Place the new exhaust blower mounting gasket around
the screw holes being very careful not to tear it.
G.
Re-attach the wiring to the motor and place it back on to the housing, taking care that the side of the
motor does not tear the gasket and then re-attach the nuts.
40.11
EXHAUST
BLOWER
EXHAUST
HOUSING
NUTS
Check for air leaks around the door, glass, and ash pan and replace gaskets as required.
Air leaks into the fi rebox will decrease the appliance’s performance greatly, leading to excessive soot,
ineffi cient burning, and may even cause a malfunction.
Test the door seal by shutting the door on a piece of paper in various locations. If the paper can be easily slid
out, air may be leaking around the door seal. Carefully inspect the door gasket and door catch.
Inspect the door gasket to make sure it is fully attached. Appliance gasket cement can be used to re-attach if
necessary. If the door gasket is worn or fl attened, replace.
Check the door to make sure it latches correctly. The latch should engage with a slight amount of resistance,
yet not be too diffi cult.
If the glass is cracked, replace.
40.12
10.3.4
CLEAN EXHAUST HOUSING (INSERT ONLY)
10.3.5
CLEAN THE EXHAUST BLOWER
10.3.6
CHECK ALL SEALS
To clean the exhaust blower and exhaust housing, the appliance must be pulled out from the appliance cavity.
Remove the venting from the exhaust collar. If installed as a top vent, remove cover plate from the rear of the
housing. If installed as a rear vent, remove the cover plate from the top of the housing. Vacuum out the housing
back to blower outlet.
Содержание NPI45
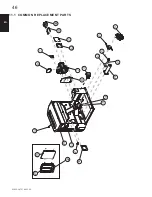
Страница 48: ...W415 1472 04 21 15 48 EN 67 20 29 58 41 38 43 44 63 57 60 6 11 3 NPI45 REPLACEMENT PARTS...
Страница 54: ...W415 1472 04 21 15 54 EN 14 0 SERVICE HISTORY 43 1...
Страница 55: ...W415 1472 04 21 15 55 EN 15 0 NOTES 44 1...
Страница 105: ...105 W415 1472 04 22 15 FR 46 29 50 34 50 52 46 51 45 47 48 49 49 13 21 30 44 43 56 6 11 2 PI CES DE RECHANGE DU NPS45...
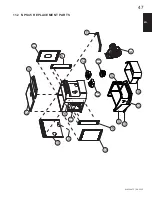
Страница 106: ...106 W415 1472 04 22 15 FR 67 20 29 58 41 38 43 44 63 57 60 6 11 3 PI CES DE RECHANGE DU NPI45...
Страница 114: ...114 W415 1472 04 22 15 FR 15 0 NOTES 44 1...
Страница 115: ...115 W415 1472 04 22 15 FR 44 1...


