W415-1472 / 04.21.15
34
EN
8.6 CONTROL
ADJUSTMENT
ON / OFF
Use this button to turn the heater on and off.
HEAT
Pressing the heat up arrow (red) will increase the heat level one setting. Pressing the heat down arrow
(white) will decrease the heat level one setting. During start-up the power light will fl ash green and
these buttons will not respond. The red lights at the top left of the control will indicate the heat setting 1
through 5.
FAN
Pressing the fan up arrow (red) will increase the fan speed one setting. Pressing the fan down arrow
(white) will decrease the fan speed one level. While adjusting the fan speed, the red lights will tempo-
rarily indicate the fan speed then fl ash back to the heat level.
AUGER FEED
Pressing and holding this button will turn the auger, speeding the feed of pellets into the burn pot. This
is convenient when using the heater for the fi rst time or when you have completely emptied the hopper
and need to restart the heater.
FEED TRIM
Both the combustion fan speed and the feed rate have been factory set but may need to be adjusted (trimmed)
on site. Due to the variables (i.e. vent size and length, pellet quality), the factory settings may not be correct for
every installation. To help keep the fl ame from extinguishing on the minimum heat level, the feed rate can be
trimmed when in normal operation (after start-up cycle). Depress and hold the auger button while you push the
heat up or down buttons. This will slightly increase the amount of fuel being fed into the burn pot. When trim-
ming the feed rate, the LED’s will display the factory setting (#3 light) with the ability to increase up two levels
(#4 and #5 light) or decrease (#2 and #1 light) the length of time between the auger feed cycle.
FAN TRIM
Similar to the feed rate, it may be necessary to trim the speed of the combustion blower. Due to specifi c instal-
lations, it may be necessary to increase or decrease the amount of air moving through the burn pot to achieve
maximum effi ciency. When in normal operation depress and hold the auger feed button. Similar to the feed trim
the LED’s indicate what setting the trim feature is set to (#3 light is the factory setting). To adjust the fl ow, push
the fan up or down buttons while depressing the auger feed button.
Содержание NPI45
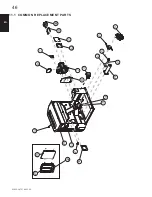
Страница 48: ...W415 1472 04 21 15 48 EN 67 20 29 58 41 38 43 44 63 57 60 6 11 3 NPI45 REPLACEMENT PARTS...
Страница 54: ...W415 1472 04 21 15 54 EN 14 0 SERVICE HISTORY 43 1...
Страница 55: ...W415 1472 04 21 15 55 EN 15 0 NOTES 44 1...
Страница 105: ...105 W415 1472 04 22 15 FR 46 29 50 34 50 52 46 51 45 47 48 49 49 13 21 30 44 43 56 6 11 2 PI CES DE RECHANGE DU NPS45...
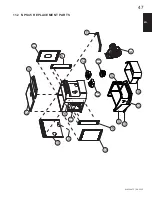
Страница 106: ...106 W415 1472 04 22 15 FR 67 20 29 58 41 38 43 44 63 57 60 6 11 3 PI CES DE RECHANGE DU NPI45...
Страница 114: ...114 W415 1472 04 22 15 FR 15 0 NOTES 44 1...
Страница 115: ...115 W415 1472 04 22 15 FR 44 1...


