


15
(4) Bell on Line Cut
(Armed) - Program to
turn the Bell Output on if the telephone line
has been cut while the panel is armed.
[23] Programmable Output Features 1
(1) Audio Verification
- Program to acti-
vate the PGM during reporting. Select spe-
cific zones for audio verification by program-
ming the required zones in
PGM Output
[08],
PGM Features 2
[24] and
PGM Fea-
tures 3
[25]. Connect the PGM to the
Veriphone
TM
trigger low input.
(2) Access Output
- Activates the PGM
output for 5 seconds using the
A3
command.
(3) Follow Keypad Sounder
- The follow-
ing keypad sounds will activate the PGM
output: Entry Sounder, Keypad Pulsing
Sounder, Keypad Output on Alarm, Chime,
Fault Find.
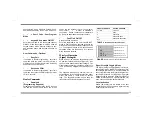
(4) Keyfob/Keyswitch Chirp
- Program to
chirp the PGM Output (1) one time when the
panel is armed or (2) two times when the
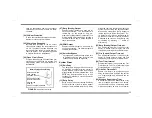
panel is disarmed. Wire as shown in Figure 7.
[24] Programmable Output
Features 2
(1) Fire
- Program to activate the PGM on
a Fire alarm.
(2) AUX
- Program to activate the PGM on
a AUX alarm.
(3) Panic
- Program to activate the PGM
on a Panic alarm.
(4) Test Timer
- Program to activate the
PGM during a Test Timer report.
[25] Programmable Output Features 3
(1) AC Fail
- Program to activate the PGM
on the loss of AC. (15 minute delay)
(2) Low Battery
- Program to activate the
PGM on a Low Battery condition.
(3) *Trouble
- Program to activate the
PGM on a Trouble condition.
(4) Armed
- Program to activate the PGM
when the panel is Armed. The PGM output
will flash when the panel has gone into
alarm.
*
Includes Bell Cut, Fire Trouble, Receiver
Fail-to-Respond, Receiver Tamper, Re-
ceiver JAM, Wireless Smoke Low Battery,
Wireless Smoke Supervisory Fail.
[26] Miscellaneous Features 2
(1) Momentary Keyswitch Arming
- Typi-
cally, connect a normally-open Keyswitch
across the zone AND its 3.3K zone-doubling
resistor.
(2) Reserved
.
(3) Inhibit Fail-to-Communicate Dis-
play -
This option prevents the keypad from
either indicating or sounding when a Fail to
Communicate has occurred.
(4) Inhibit Low Battery Display
- Program
to inhibit the Low Battery Display at the key-
pad. Low Battery Reporting is not inhibited.
The programming option is not permitted for
UL installations.
Telephone Number 1 Programming
[30] Subscriber ID Number
For 4/2 format enter a 4 digit number. If 3/1
format is required, enter a 3 digit number,
then press the
F
key to blank the last
digit.
[31] Telephone Number 1
Program the phone number to be dialed for
Telephone Number 1. Program the number
directly, just as it is entered on a TouchTone
phone. A fixed
Dial Tone Detection (E) is
included prior to the
Dialing Prefix
(Block
Number 44)
.
Programming an E is not re-
quired for
Telco 1, Telco 2 and Telco 3. If
dial tone detection is not desired select
No
Dial Tone Detection
in Communicator Fea-
tures [46-1].s Use the
F
key to blank out
remaining digits in the phone number.
[32] Receiver Format
Select the receiver format to be used to re-
port for Telephone Number 1: Program a 0
N/O
N/C
COM
BLK
RED
+AUX
Siren Driver
Steady Input
PGM
+AUX
K1
FIGURE
7
K
EYFOB
/K
EYSWITCH
C
HIRP
Содержание GEM-P800
Страница 1: ...WI850E 04 10 NAPCO 2010 GEM P800 Control Panel Communicator Installation Instructions ...
Страница 27: ...27 ...


