


9
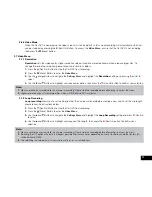
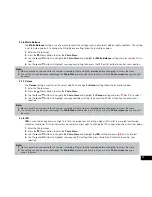
2.5.2 Set Date / Time
Setting the Time and Date
allows you to stamp your footage with the time as a reference.
1.
Press the (Rec/Ok) Button to stop the Car DVR from recording.
2.
Press the (Menu) Button to enter the
Video Menu
.
3.
Press the (Menu) Button again to enter the
Settings Menu
.
4.
Use the and Buttons to navigate the
Settings Menu
and highlight the
Date/Time
setting and press (Rec/Ok) to
select.
5.
Use the and buttons to edit the selected digit and the (Rec/Ok) button to confirm and progress to the next digit.
The final field sets the format that the date will be presented in.
6.
To save and exit the time and date, press the (Menu) button.
Note:
1.
Menus cannot be accessed while the camera is recording. Please stop the recording before attempting to access the menu.
2.
Once the time and date is set it can be stamped onto your footage using the Date Stamp setting. Please see section
Date Stamp
for more details.
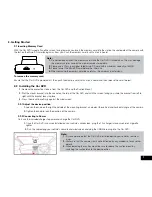
2.6 Using the Car DVR
2.6.1 Recording Video
When the Car DVR is connected to your vehicle's 12v power supply, the Car DVR will automatically power up and begin
recording when you start your vehicle. During the start up the buttons will be unresponsive and the camera will take a
moment to begin recording. The Car DVR will automatically stop recording and shutdown when your vehicle is powered off.
Note:
1.
Because of how some vehicles are wired, the recording may continue when the engine is switched off. If this happens, please
manually turn off the Car DVR or remove the car adapter from the cigarette lighter when not in use.
2.
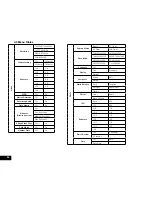
The
recording loop
length can be configured to save a video file for every 3 or 5 minutes of recording. For information on how to
adjust this setting please refer to the
Loop Recording
section of this manual.
3.
The device saves the recorded footage and photos on to the inserted Micro SD Card. If the memory card capacity is full, the oldest
file in the memory card will be overwritten.
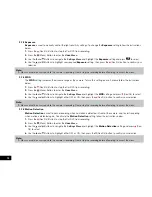
2.6.2 Locked Recording
Locked Recording
saves the current video file and protects it from being overwritten. To manually start a Locked
Recording follow the instructions below.
1.
During recording push the (Mode) button.
2.
To unlock the footage, press the (Rec/Ok) button again.
Note:
1.
If the
G Sensor (Gravity Sensing)
function is enabled and a collision is detected, the device will automatically trigger the
emergency recording and protect the current video file. Please refer to the section titled
G Sensor (Gravity Sensing)
.
2.
The emergency recording file is created as a new file, which will be protected to avoid being overwritten by normal loop
recording. If the inserted Micro SD Card fills up with Emergency Recording files the message “
SD Card Full
” will appear on the
screen, the oldest emergency file will be automatically deleted when a new emergency recording file is created.
Содержание NCP-DVR1080
Страница 1: ...USER MANUAL FULL HD DASH CAM DVR WITH 2 4 SCREEN NCP DVR1080...
Страница 2: ......
Страница 26: ...26...
Страница 28: ...www nanocamplus com au www nanocamplus co nz NanoCam Plus 2016...


