background image

34

35

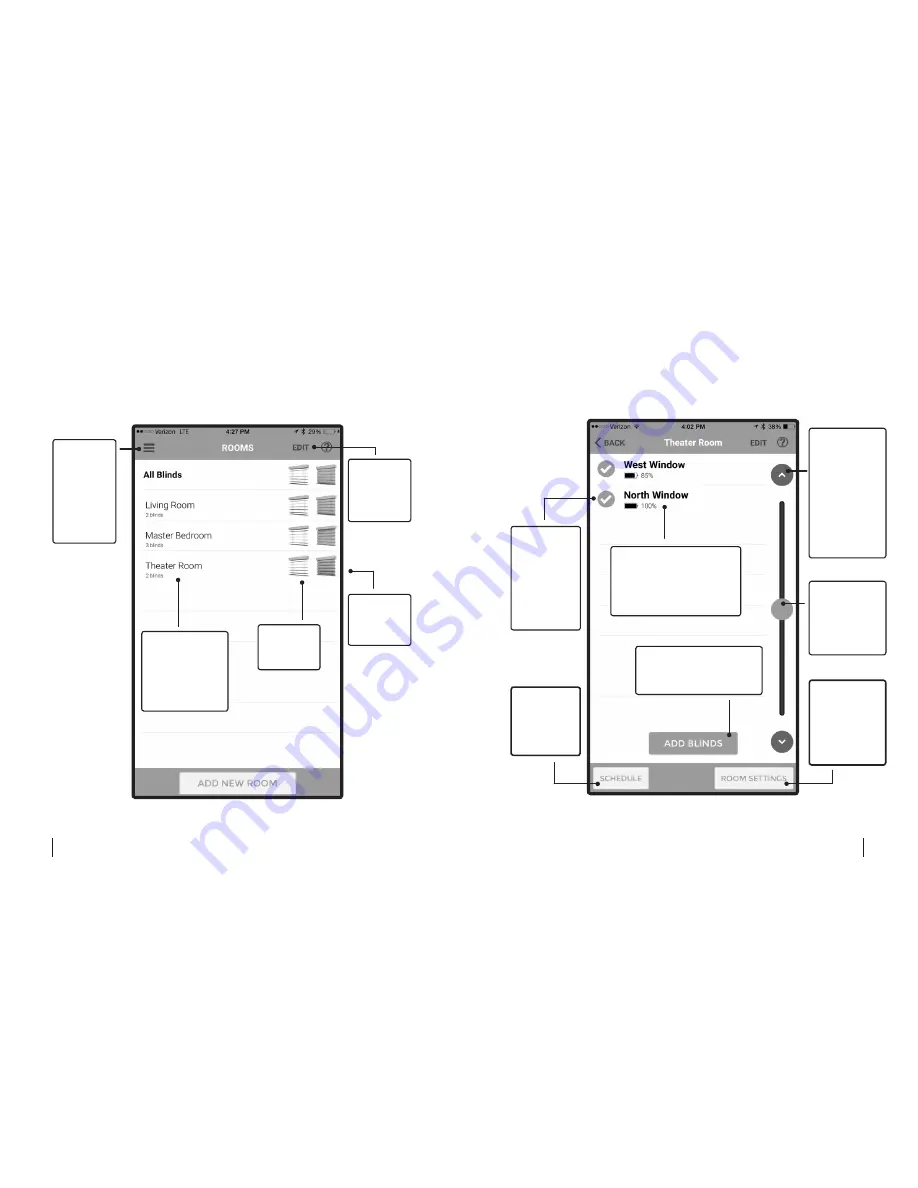
Tap 

EDIT


to edit 

or delete 

rooms.

Closes all 

blinds in 

this room.

Tap the 

MENU 

BUTTON


to access 

settings, 

help, feed-

back, and 

more.

5 Home Page

Fig. 5

Tap the room 

name to view, 

schedule, add  

to, and control 

the blinds in  

that room.

Opens all 

blinds in 

this room.

Tap the 

ARROWS


to move the 

blinds in 45° 

increments. 

Hold down 

the 

ARROWS


for more 

fine-tuned 

positioning.

Drag the 

SCROLLER


for more 

fine-tuned 

positioning.

Select the 

CHECK 

MARKS


next to the 

blinds you 

want to 

manually 

control.

Tap to 

create 

schedules 

for this 

room.

Tap to edit 

the room’s 

Smart Open 

and Smart 

Close  

positions.

6 Room Main Page

Fig. 6

Tap to add a new blind 

to the room and pair it 

with your device.

Tap on a blind’s name 

to access its advanced 

settings, including 

firmware upgrades and 

calibration.

Содержание AUTOMATION KIT

Страница 1: ...User s Manual TM mysmartblinds com installation AUTOMATION KIT...

Страница 2: ...m installation or www youtube com c mysmartblinds to access installation and trouble shooting videos Apple the Apple logo iPhone and iPod touch are trademarks of Apple Inc reg istered in the U S and o...

Страница 3: ...TABLE OF CONTENTS SAFETY INFORMATION 6 ABOUT MYSMARTBLINDS 9 BLINDS IDENTIFIER 10 PARTS IDENTIFIER 12 ROD RETENTION TYPES 13 INSTALLATION 14 USING THE APP 28 TROUBLESHOOTING 37 LIMITED WARRANTY 40...

Страница 4: ...following two conditions 1 This device may not cause harmful interference and 2 This device must accept any interference received including interference that may cause undesired operation Warning Chan...

Страница 5: ...inds 9 frequency energy and if not installed and used in accordance with the instructions may cause harmful interference to radio communications However there is no guarantee that interference will no...

Страница 6: ...10 11 BLINDS IDENTIFIER Slats Tilt rod Barrel Tilt mechanism Headrail...

Страница 7: ...ON TYPES Version A Rod pin Version B End brackets Version C Crimps PARTS IDENTIFIER Motor box A Manual switch C clip C Battery pack E Rod adapters F Cable clips G 4x Rubber tubing H Manual switch D Mo...

Страница 8: ...Fig 1 3 Fig 1 2 Fig 1 1 device on your rod according to the images on page 10 Version A Rod pin Remove the pin from the rod Fig 1 4 and slide the rod out of the headrail or if your headrail is excepti...

Страница 9: ...ls aside Fig 1 7 2 Installing MySmartBlinds Hardware 1 Remove the manual switch C clip C from the bottom of the manual switch D by pressing down on the clip s center and sliding it out Remove the adhe...

Страница 10: ...ut the hardware as much as your headrail will allow in order to avoid kinking the cables Fig 2 4 Fig 2 5 Fig 2 3 4 Lay the battery pack E inside the headrail so that the cable is on the top left side...

Страница 11: ...using this method try the following a Remove the motor box bracket B from the motor box Bend open the headrail gently and insert the bracket into the headrail Insert the motor box to the right of the...

Страница 12: ...d lowering your blinds Position the cords so that they aren t pinched beneath the motor box brack et s legs Fig 2 12a Move the cords to either the outside edge of the motor box bracket or the mid dle...

Страница 13: ...d Check for burrs or deformities along the tilt rod and if necessary remove them with sand paper or a file NOTE 15 Rehang the blinds by sliding them back into the brackets and clipping the brackets cl...

Страница 14: ...e original tilt mechanism at a later time simply use another piece of string for Step 17 Fig 2 19 Fig 2 18 KIT INSTALLATION We recommend installing all MySmartBlinds automation kits before begin ning...

Страница 15: ...ing icons within the app NOTE 2 Adding New Rooms and Blinds 1 From the home page tap ADD NEW ROOM and enter a name for your room 2 Select SET UP NEW BLINDS and follow the prompts on the screen 3 Enter...

Страница 16: ...ind from the room main page tap on the blind name If the app detects paired but uncalibrated blinds you will be prompted to calibrate the blinds NOTE Fig 2 7 To remove a blind from a room tap the name...

Страница 17: ...room s name 3 To edit the default Smart Open and Smart Close positions in a room tap the room name from the home page and then select ROOM SETTINGS Fig 3 2 Fig 4 4 Use the sliders to adjust the smart...

Страница 18: ...he blinds in 45 increments Hold down the ARROWS for more fine tuned positioning Drag the SCROLLER for more fine tuned positioning Select the CHECK MARKS next to the blinds you want to manually control...

Страница 19: ...my existing blinds If you re having trouble opening the brackets that hold your blinds you may need to use a scraper or screw driver to help gently pry the brackets open or remove any excess paint kee...

Страница 20: ...the headrail must be free of obstructions Ensure that the barrels in the headrail are all aligned Fig 3 with each other Fig 3 and that there is nothing pre venting the barrels from rotating I can t ra...

Страница 21: ...Covered The limited one year warranty on hardware covers manufacturing defects and includes parts labor and the cost of shipping the repaired or replacement product from MySmartBlinds to you The warr...

Страница 22: ...HEREIN WHETHER EXPRESS OR IMPLIED INCLUD ING BUT NOT LIMITED TO ANY WARRANTIES OF MERCHANTABILITY AND FITNESS FOR A PARTICU LAR PURPOSE Limitation of Liability THE SOLE REMEDIES AFFORDED UNDER THIS WA...

Отзывы: