background image

Setting Screen Display

50

51

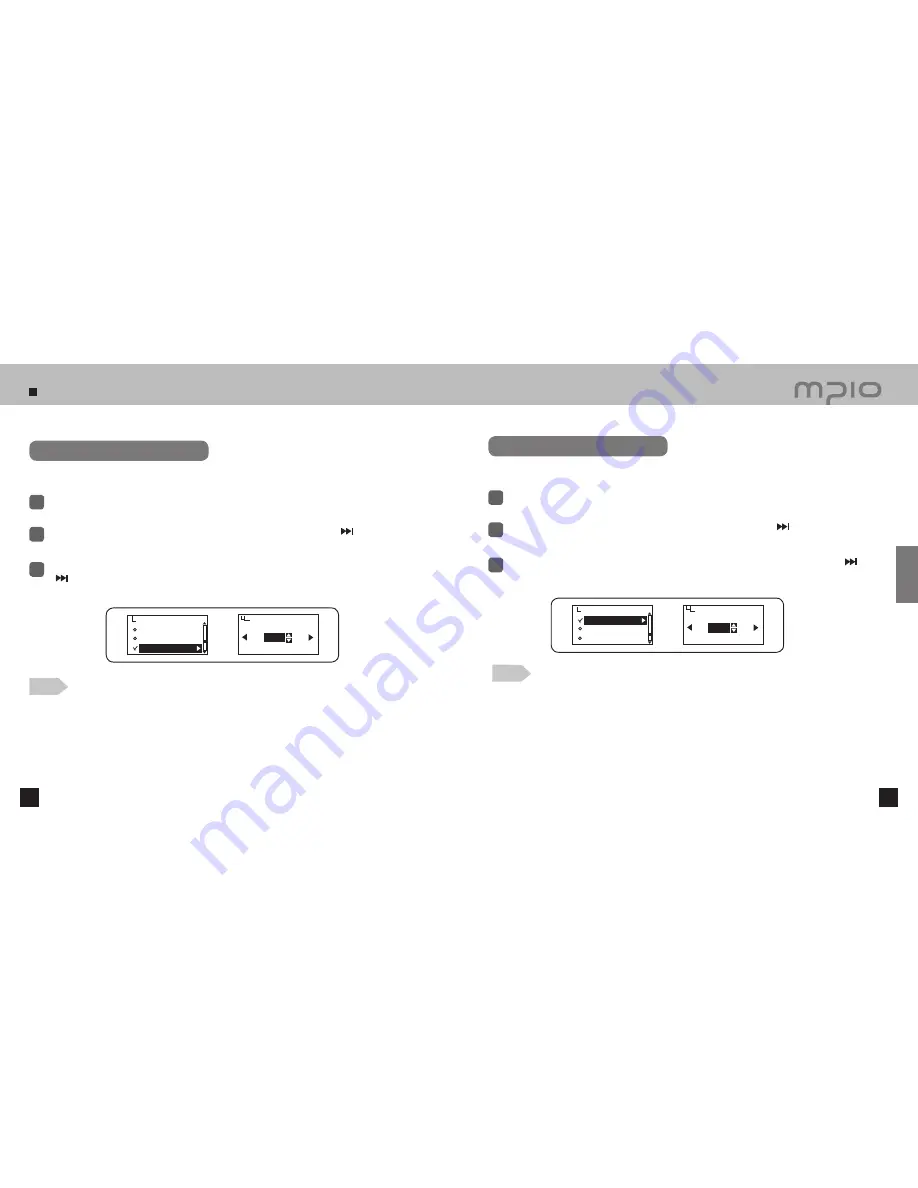
Setting Lighting Time

Select 

Display

 in menu.

1

Push the lever in 

+ / −

 directions to select 

Backlight Time 

and then, push the lever in   direction or 

press it to enter.

2

3

Push the lever in 

+ / −

 directions to select the desired lighting time. Save the setting by pushing the lever 

in   direction toward 

OK

. Pressing the lever shortly will also save the setting. After saving, the device will 

return to its previous menu.

Set the light time for the LCD screen.

Setting Contrast

Select 

Display

 in menu.

1

Push the lever in 

+ / −

 directions to select 

Contrast 

and then, push the lever in   direction or 

press it to enter.

2

3

Push the lever towards 

+ / − 

direction to select the contrast you wish. Then, push the lever towards   

direction and move to OK to save the setting value. Press the lever towards vertical direction to save the 

setting value. Then, the previous menu will appear when the setting value is saved.

You can adjust the contrast of the LCD window.

Playing Time 

Scroll Speed

Backlight Time  


Display

Backlight Time

EXIT

OK

10sec

Contrast  

Controls

Lyrics 


Display


Contrast

EXIT

OK

Level 1

Note


  The lighting time can be adjusted from 5~20 seconds.

  If the backlight is set to “ON”, the LCD is continuously on and the backlight can not be turned on 

with low battery.

Note


  You can adjust the contrast within the range of 1 to 5.

  The bigger the level value, the darker the screen.

Usage

Содержание FY 600

Страница 1: ...FY600 User s Manual...

Страница 2: ...the electronic media version and the mechanical abridgement of the contents are also prohibited Trademark Microsoft Windows Windows Explorer and Windows logo are the trademark or registered trademark...

Страница 3: ...in some regions Reduce the headset or earphone volume when listening to music or FM while you re walking There is a risk of an accident Hearing Protection Do not use headphones or earphones for a long...

Страница 4: ...eps 42 Setting Recording 43 Setting the Quality of Voice Recording 43 Setting the Quality of FM Recording 44 Customer Support Menu Structure 62 Formatting 63 Storing Default Saving 66 Upgrading Firmwa...

Страница 5: ...nd FM can be recorded Supports 7 EQ types and Live 3D Effect Supported equalizer types include Normal Pop Rock Jazz Classic Vocal and user de ned EQ mode that allows for your preferred equalizer setti...

Страница 6: ...n Pushing to Left Push the lever or push and hold it to left Pushing to Right Push the lever or push and hold it to right Functioning by pushing the lever up down left right direction and pressing it...

Страница 7: ...nsion cables is not guaranteed Note In Windows 98 98SE the program must be installed to use FY600 as a removable disk Please install the USB drivers before use In Windows ME 2000 XP FY600 may be used...

Страница 8: ...ect the programs needed to install But the following items must be installed Windows 98 Device Driver For Windows 98 98SE user s only MPIO Utility Windows Media Player Plug in 4 Click the Install butt...

Страница 9: ...reen may not appear Check the Device Manager to con rm the installation 2 Note If the system operating under Windows 98 98SE doesn t connect with FY600 automatically install the USB Driver manually by...

Страница 10: ...window will appear on the screen Then click the Finish button 4 Note In Windows 98 98SE the program must be installed to use FY600 as a removable disk Please install the USB drivers before use Go to...

Страница 11: ...n Select le you wish to playback Press button to play music For more details of how to move folders or les see Using Navigation Mode in page 25 To Stop Turning Power OFF Pressing button pauses during...

Страница 12: ...EO MY SONG WESTLIFE MY LOVE 00 00 30 Scan STEREO The screen changed from playback mode to FM radio mode The screen changed from FM radio mode to playback mode To Adjust the Volume Push the lever towar...

Страница 13: ...C002 mp3 MUSIC003 mp3 MY SONG Play Now Add to List Delete Note The les will be stored in order of VOICE001 VOICE002 etc And it will be stored in the RECORD folder as a MP3 le When storing the voice re...

Страница 14: ...w Add to List Delete WESTLIFE MY LO MUSIC002 mp3 MUSIC003 mp3 MY SONG Play Now Add to List Delete WESTLIFE MY LO MUSIC002 mp3 MUSIC003 mp3 MY SONG Play Now Add to List Delete Deleting WESTLIFE MY LO M...

Страница 15: ...saved previous frequency A function for saving the selected frequency Searching Radio FrequencyAutomatically Scan Mode Push and hold the lever toward direction automatically to search for the frequen...

Страница 16: ...ons to move between the saved frequencies channels Press the FUNC button to change the reception mode SCAN CHANNEL 3 The saved channel is selected Note If there aren t any saved frequencies channels N...

Страница 17: ...epeated Note How to Use the Menu Press and hold the lever to enter the menu Selecting Menu Push the lever in directions to move the highlight Entering Menu Push the lever in direction or press the lev...

Страница 18: ...g setting the bandwidth of each frequency 4 Push the lever toward direction to select the EQ and then press the lever down toward vertical direction or press the FUNC button to save the setting value...

Страница 19: ...Plays randomly all the music le s Directory Normal Plays the music le s once in the folder selected Directory Repeat Repeats all the music le s in folder Directory Random Plays randomly all the music...

Страница 20: ...ctions to select FM Band and then push the lever in direction or press it to enter 2 3 Push the lever in directions to select the FM Band and then push the lever in direction or pushing it to save Aft...

Страница 21: ...under the other mode Select FM Radio in menu 1 Push the lever in directions to select Auto Preset and then push the lever in direction or press it to enter 2 3 Push the lever toward direction to selec...

Страница 22: ...g the device will return to its previous menu Setting the Quality of Voice Recording Set the quality of voice recording Select Recording in menu 1 Push the lever in directions to select Voice Quality...

Страница 23: ...ay in menu 1 Push the lever in directions to select Visualization and then push the lever in direction or press it to enter 2 3 Push the lever in directions to select the visualization to use and then...

Страница 24: ...enu among 55 languages Setting Track Information Indicator Select Display in menu 1 Push the lever in directions to select File Info and then push the lever in direction or press it to enter 2 3 Push...

Страница 25: ...ting Scroll Speed Select Display in menu 1 Push the lever in directions to select Scroll Speed and then push the lever in direction or press it to enter 2 3 Push the lever in directions to select the...

Страница 26: ...direction or press it to enter 2 3 Push the lever towards direction to select the contrast you wish Then push the lever towards direction and move to OK to save the setting value Press the lever towa...

Страница 27: ...ion or press it to save After saving the device will return to its previous menu On Shows the available lyrics information of the current le Off Hides the lyrics of the current song The direction of i...

Страница 28: ...to play music automatically once the power is turned ON Setting Memorized Playback Select System in menu 1 Push the lever in directions to select Resume and then push the lever in direction or press...

Страница 29: ...he volume of the intro is to be gradually increased when the music starts Fade in setting increase the music volume steadily so that the user is not surprised by the loud music Auto Play Resume Fade I...

Страница 30: ...OFF when a certain period of time passes after the music is paused or stopped 3 Push the lever in directions to set the Auto Power Off timer Push the lever in direction toward OK to save the setting...

Страница 31: ...o enter 2 3 Push the lever in directions to select the playback speed and then press the lever in direction toward OK to save Pressing the lever shortly will also save the setting After saving the dev...

Страница 32: ...t Time Contrast Controls Lyrics System Auto Play Resume Fade In Information Sleep Auto Power Off Initial Setting Speed Control You can format FY600 from a Windows PC using MPIO Utility Click Turn the...

Страница 33: ...r s PC environment MPIO Utility cannot be run under MAC OS For information regarding MPIO Utility installation refer to Installing the software on page 13 Note Select the Removable Disc icon Click you...

Страница 34: ...lick the OK button after the Safely Remove Hardware message appears as shown 5 After clicking the OK button Setup Con g Default Setting Restoration is complete You can unplug the device from the PC 6...

Страница 35: ...the rmware upgrade le Image dat Player rom and Upgrade axf in FY600 3 Separate FY600 from the computer 4 Upgrading Firmware in Macintosh Firmware is automatically upgraded when the device is unplugged...

Страница 36: ...f you run the above command all les in the product will be removed You can check the data le only when the player is connected to the PC Letters on the LCD look broken I can hear noise and cannot set...

Страница 37: ...Memory Decoding Voice Recording Frequency Range S N ratio Output Power Frequency Band S N ratio FM Recording Menu Languages Supported Languages ID 3 Tag Languages PC Interface Supported OS Removable D...

Отзывы: