


F R O N T P A N E L O P E R A T I O N
61
2
Choose an Aux bus or group for talkback, as
demonstrated in Figure 7-7 with
Aux 1-2
, and
route it to the outputs feeding speakers (or a
headphone mixer) for the musicians.
☛
You can route talkback to as many buses and/
or groups as you wish. Route them to whatever
physical outputs are needed for your particular
setup.
3
In the
Controls
panel of the mixer, show the
Legend and the Talkback section (Figure 7-8).
4
For the channel assigned to the talkback mic,
enabled its
Talkback source
switch (Figure 7-8).
5
For the aux bus you chose for talkback in step 2,
enable its Talkback output switch (Figure 7-8). As
mentioned before, you can do so for two or more
output buses.
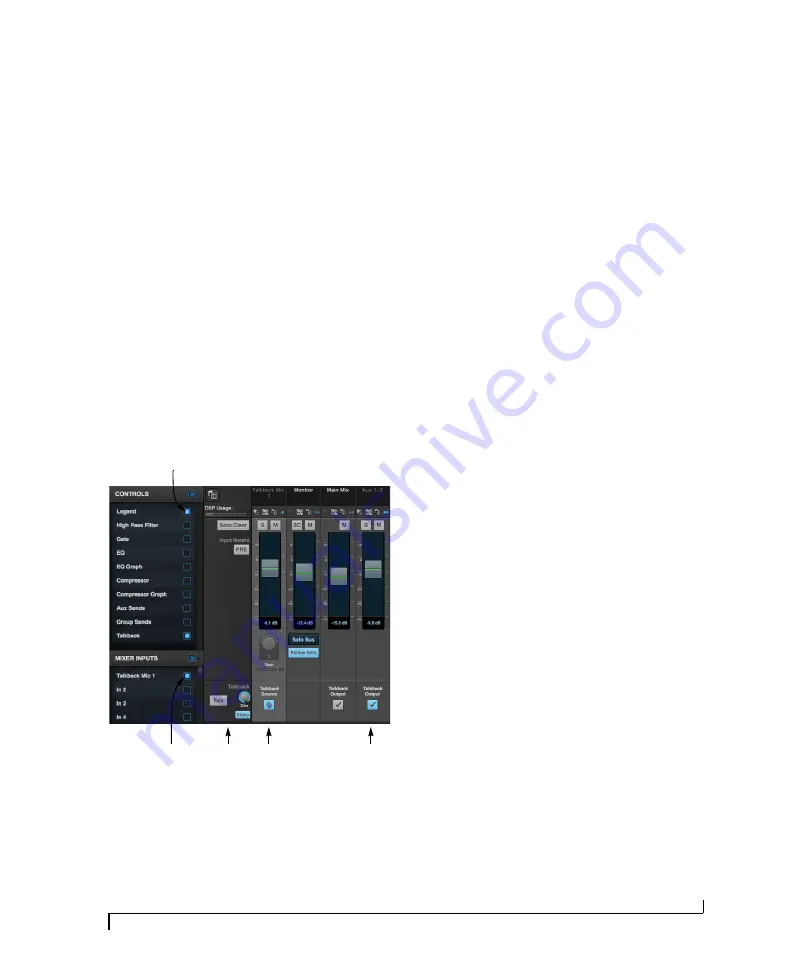
Figure 7-8: Mixer setup for the talkback mic.
Talkback settings
The talkback settings (Figure 7-8) can be accessed
by enabling the Legend in the Controls panel of
the mixer.
Talk
Press and hold the
Talk
button (Figure 7-8) to
engage the talkback mic. This is the same as
pressing the TALK button on the front panel of the
828es (item #10 on page 9).
Sticky
When
Sticky
is engaged (Figure 7-8), the Talk
button remains engaged when you click it, until
you click it again to disengage, so you don’t have to
hold it down while speaking. This setting also
affects the TALK button on the front panel of the
828es (item #10 on page 9).
Dim
If you are feeding a monitor mix to the musicians
on the same Aux bus as your talkback mic, use the
Dim
knob (Figure 7-8) to control how much the
monitor mix will be attenuated when talkback is
engaged. This gives you control over the relative
volume between the talkback mic signal and all
other audio on the mix bus. To control overall
volume of everything, use the bus fader.
NET ID
Push NET ID (item #13 on page 9) to immediately
view the 828es network information, including its
IP Address. Push BACK or METERS to return to
the meters.
HEADPHONE VOLUME
Each headphone jack has independent volume
control. The LCD provides visual feedback.
STAND-ALONE OPERATION
All settings, including mix settings and device
settings, are saved in the 828es memory. They
remain in effect even when the interface is not
connected to a computer. This allows you to use
the 828es as a stand-alone mixer. You can make
adjustments to any setting at any time from the
web app running on a device that has a network
connection to the 828es, as explained in “Setup for
web app control” on page 38.
Talkback
settings
Talkback
source
Talkback
output
Legend
Talkback
section
Содержание 828es
Страница 5: ...Part1 GettingStarted...
Страница 6: ......
Страница 8: ...8...
Страница 22: ...M O T U P R O A U D I O C O N T R O L W E B A P P 22...
Страница 28: ...P A C K I N G L I S T A N D S Y S T E M R E Q U I R E M E N T S 28...
Страница 32: ...S O F T W A R E I N S T A L L A T I O N 32...
Страница 51: ...Part2 Usingthe828es...
Страница 52: ......
Страница 62: ...F R O N T P A N E L O P E R A T I O N 62...
Страница 78: ...M I X E R E F F E C T S 78...
Страница 94: ...M O T U A U D I O T O O L S 94...
Страница 101: ...Part3 Appendices...
Страница 102: ......
Страница 108: ...A P P E N D I X B A U D I O S P E C I F I C A T I O N S 108...
Страница 109: ...APPENDIX 109 C Mixer Schematics MONO INPUT CHANNEL...
Страница 110: ...A P P E N D I X C M I X E R S C H E M A T I C S 110 STEREO INPUT CHANNEL...
Страница 111: ...A P P E N D I X C M I X E R S C H E M A T I C S 111 GROUP BUS...
Страница 112: ...A P P E N D I X C M I X E R S C H E M A T I C S 112 MONITOR BUS...
Страница 116: ...A P P E N D I X E O S C S U P P O R T 116...
Страница 120: ...I N D E X 120...


